Silverlight 2 Samples: Dragging, docking, expanding panels (Part 1)
UPDATE: Get the latest Dragging, docking, expanding panel code from Blacklight, our new CodePlex project!
NOTE: Part 2 and Part 3 now posted, with a demo of the final sample here .
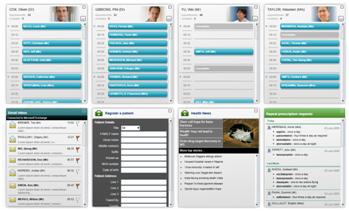
A control that we used in a number of places in the MSCUI Patient Journey Demonstrator was the dragging, docking, expanding panel control. When designing the dashboards in the application, we wanted to create an experience that was customisable, fun to use and allowed the user to focus in on the important information when they needed it.
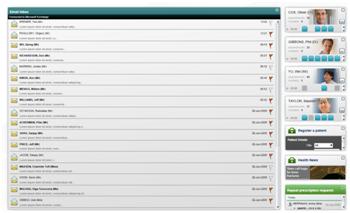
The shots below show panels in action...


The controls provide the following...
· Automatic grid layout of panels
· Picking up and moving panels around and changing their position in the grid (dragging and docking)
· ‘Maximising’ a panel causing the panel to take up much more space, whilst the others stack up on the right hand side of the application
As we used the panels in a number of places, building them for re-use was a big priority too. In this article, I will show how to build a similar customisable layout system.
There are 2 parts to the DragDockPanel system. The DragDockPanel itself (the thing you pick up and drag around) and the container for multiple DragDockPanel’s - I call it DragDockPanelHost. We will look at DragDockPanel today, and have it working just in a regular Canvas, and the host container in Part 2.
As a panel needs to contain something, it made sense for DragDockPanel to extend ContentControl. However, I also want DragDockPanel to have to easy methods to animate size and position, so I actually inherit AnimatedContentControl (a custom control that generates size and position animations and methods - see Silverlight 2 Samples: Animating controls).
As we are extending AnimatedContentControl, we also need to create a template in XAML for the control. The great thing about templates is that they allow a designer / developer to define the building blocks and visuals for a control. The only thing we need to ask of them is that they include a couple of specifically named elements, so that we can implement the functionality. For DragDockPanel, there are 3 things a designer / developer need to include in the template to get the full functionality of the panel...
· A ContentPresenter control - as we are extending ContentControl (via AnimatedContentControl) we need a ContentPresenter in the template to be the site of the panel’s content
· An element named “PART_GripBar” - this is the portion of the panel that allows the user to pick up the panel and drag it around
· A ToggleButton control (which could also be a CheckBox or RadioButton) named “PART_MaximizeToggle” - this is the button that when clicked, the panel will either maximize or collapse
When writing the code behind for the control, the developer has the choice to implement none, some or all of the above. There would obviously be missing functionally, however, if they don’t include, say, the grip bar - they would not be able to drag the panel around.
Below shows a style with an outline template (included in the attached sample) with the above parts included...
<Style TargetType="local:DragDockPanel">
<Setter Property="Template">
<Setter.Value>
<ControlTemplate TargetType="local:DragDockPanel">
<Grid>
<!-- Border with white background -->
<Border CornerRadius="3,3,3,3"
Background="#ffffffff"
BorderBrush="#ff999999"
BorderThickness="1"
Padding="2">
<Grid>
<!-- Content presenter for hosting the content -->
<ContentPresenter />
<!--
Element named PART_GripBar for
handling the dragging of the panel
-->
<Border x:Name="PART_GripBar"
Background="#7fffffff"
VerticalAlignment="Top"
Height="30" Cursor="Hand">
...
</Border>
<!-- ToggleButton for maximizing function -->
<ToggleButton x:Name="PART_MaximizeToggle"
VerticalAlignment="Top"
HorizontalAlignment="Right"
Margin="0,5,5,0" Width="20" Height="20"
Cursor="Hand"
/>
</Grid>
</Border>
</Grid>
</ControlTemplate>
</Setter.Value>
</Setter>
</Style>
You will find the above style in generic.xaml in the attached project. Placing the style in generic.xaml means that this will be the default style for DragDockPanel. Using the XAML shown below, we can now put a panel on the page, with a media element inside...
<local:DragDockPanel>
<MediaElement Source="..." />
</local:DragDockPanel>
The result...

You can see that the panel contains a video, with a grip bar and maximize button across the top of the panel. Great. Lets get it moving around the screen...
First things first, we need to get hold of the elements in the template so we can hook up the mouse events. When creating a custom control, you can override a method - public override void OnApplyTemplate() - which is called as soon as the template is applied to your control. You can then use this.GetTemplateChild("PART_ElementName") to get your elements out, and hook up events. I have mentioned before that we needed to have specially named elements in the default template in generic.xaml - this is why. Our override in DragDockPanel looks like this...
public override void OnApplyTemplate()
{
base.OnApplyTemplate();
FrameworkElement gripBar =
this.GetTemplateChild("PART_GripBar") as FrameworkElement;
if (gripBar != null)
{
gripBar.MouseLeftButtonDown +=
new MouseButtonEventHandler(gripBar_MouseLeftButtonDown);
gripBar.MouseMove +=
new MouseEventHandler(gripBar_MouseMove);
gripBar.MouseLeftButtonUp +=
new MouseButtonEventHandler(gripBar_MouseLeftButtonUp);
}
}
Here, we are pulling out the grip bar into a private member, and hooking up some events.
For the grip bar, I hook up the MouseLeftButtonDown, MouseMove, MouseLeftButtonUp. I need these to move the panel about when the grip bar is dragged.
The MouseLeftButtonDown simply checks to see if dragging is enable on this panel (another private member), we then bring the panel to the front (setting the ZIndex), capture the mouse, store the current position, flag that we are dragging, and then raise an event to say the panel has started to be dragged.
void gripBar_MouseLeftButtonDown(object sender, MouseButtonEventArgs e)
{
if (this.draggingEnabled)
{
// Bring the panel to the front
Canvas.SetZIndex(this, currentZIndex++);
// Capture the mouse
((FrameworkElement)sender).CaptureMouse();
// Store the start position
this.lastDragPosition = e.GetPosition(sender as UIElement);
// Set dragging to true
this.isDragging = true;
// Fire the drag started event
if (this.DragStarted != null)
this.DragStarted(this, new DragEventArgs(0, 0, e));
}
}
Our MouseMove firstly checks to see if we are dragging (i.e. if the mouse is down), we then use the last position variable to calculate the panels new position. We then set Canvas.Left and Canvas.Top which moves the panel within a Canvas.
Finally, we fire an event to say the panel has moved, and store the last position again.
void gripBar_MouseMove(object sender, MouseEventArgs e)
{
if (this.isDragging)
{
Point position = e.GetPosition(sender as UIElement);
// Move the panel
Canvas.SetLeft(
this,
Canvas.GetLeft(this) + position.X - this.lastDragPosition.X
);
Canvas.SetTop(
this,
Canvas.GetTop(this) + position.Y - this.lastDragPosition.Y
);
// Fire the drag moved event
if (this.DragMoved != null)
this.DragMoved(
this,
new DragEventArgs(
position.X - this.lastDragPosition.X,
position.Y - this.lastDragPosition.Y, e));
// Update the last mouse position
this.lastDragPosition = e.GetPosition(sender as UIElement);
}
}
In MouseLeftButtonUp we simple release mouse capture, set the dragging flag to false, and raise an event to say the dragging has finished.
void gripBar_MouseLeftButtonUp(object sender, MouseButtonEventArgs e)
{
if (this.draggingEnabled)
{
// Capture the mouse
((FrameworkElement)sender).ReleaseMouseCapture();
// Set dragging to true
this.isDragging = false;
Point position = e.GetPosition(sender as UIElement);
// Fire the drag finished event
if (this.DragFinished != null)
this.DragFinished(
this,
new DragEventArgs(
position.X - this.lastDragPosition.X,
position.Y - this.lastDragPosition.Y, e));
}
}
And that’s it! We can now drag our panel around a canvas, bringing it to the front with each mouse down action. On the project page, you can use the panels in a canvas like so...
<Canvas>
<local:DragDockPanel Width="400" Height="300">
<MediaElement Source="..." />
</local:DragDockPanel>
<local:DragDockPanel Width="400" Height="300">
<MediaElement Source="..." />
</local:DragDockPanel>
<local:DragDockPanel Width="400" Height="300">
<MediaElement Source="..." />
</local:DragDockPanel>
<local:DragDockPanel Width="400" Height="300" >
<MediaElement Source="..." />
</local:DragDockPanel>
<local:DragDockPanel Width="400" Height="300">
<MediaElement Source="..." />
</local:DragDockPanel>
<local:DragDockPanel Width="400" Height="300" >
<MediaElement Source="..." />
</local:DragDockPanel>
</Canvas>
The result should look like this (after you drag the panels about a bit!)

Take a look at the sample running here.
In part 2 we will look at how to arrange the panels automatically into a grid, move and shuffle the panels around, maximise / minimise panels and also how to deal with any amount of panels on the screen.
Source code is available from www.codeplex.com/blacklight.
Enjoy J
Comments
Anonymous
August 01, 2008
PingBack from http://blog.a-foton.ru/2008/08/silverlight-2-samples-dragging-docking-expanding-panels-part-1/Anonymous
August 01, 2008
Denislav Savkov with a selection helper class, Mark Monster with SL Tag Cloud, Mike Taulty on asmx webAnonymous
August 02, 2008
Can you please give details about how you implemented day dairy of the doctor , some thing similar to outlook calendarAnonymous
August 02, 2008
Thanks Martin for the code snippet for dock panel dragging. Are you using the grid or some other panel to arrange these panels in the "Patient Journey Demonstrator" main page. If yes can you give some details on dragging/dropping these dock panels to different cells. Also, in the patient demonstrator, the content inside each dock panel is completely silverlight xaml controls or any asp.net ajax controls? As all CUI controls are not ported to silverlight yet, my assumption is that your team is using controls other than silverlight controls as dock panel content. If yes, can you give us some details on how we can mix the silverlight and asp.net controls inside the dock panel. Could you please post the 2nd part of code snippet to maximize/dock the panels using the toggle button ASAP. thanks,Anonymous
August 03, 2008
Thanks! I'm looking forward to the second part where the useful features of what you've done become more evident. There were a few things I noticed. When adding content to the control, the drag bar isn't taken into account, although it would probably be best if the drag bar could become invisible(Collapsed) when you don't want dragging. Also, minimize/maximize probably isn't that useful in this example using the crud Canvas as a container. Your great Demonstrator appears to be more advanced panel oriented(Stack/Grid), where you drag/drop between panels and containers. Finally, the drag concept is evident in this example, however, the "Dock" aspect isn't. I assume that is what the next part is all about when you present the Host Container. Thanks for all the great work.Anonymous
August 03, 2008
hi all, some replies... Khanchustambham - I will be showing how to do a similar layout system in Part 2. All of the content in the panels is XAML / Silverlight content. Samcov - the drag bar isnt taken into account because thats how MY template defined it - you could make you template do whatever you please - I will try and get a Part 1.5 up about templating the drag panel. And you are right, in Part 1, we dont use the toggle button, and we dont do the grid layout, that will all come in Part 2, when we introduce the 'Dock' concept. Thanks guys, please ask any more questions!Anonymous
August 03, 2008
Hi Prejesh - thanks for your comment. I will try and look to talk about building a scheduling UI in the future.Anonymous
August 04, 2008
Hi Martin, Thanks for responding to my questions. Is there any date that we can expect to see your second part. I am very keen on knowing how you did the docking/maximizing the panels using your DragDropPanel class.Anonymous
August 06, 2008
Hey, Second part will post in the next couple of days. The second part will show how we do the grid layout and dragging between cells in the grid, then Part 3, the final part, will show the maximising and providing your own custom templates for the panel chrome. Thanks, MartinAnonymous
August 08, 2008
Hi, I'm have discovering about Silverlight yet. We have to decide soon between Flex 3 and Silverlight. Tks for you contribuition...Anonymous
August 11, 2008
Hi Martin, This is a nice solution exactly need for project. Plz atleast give me some hint after how many days u r going to post second part. Thanks, shanAnonymous
August 16, 2008
Hi Martin, As per your comment on August 7th, your second post will be here in couple of days. Its been more than a week. I hope you are tied up with other work. Could you please let us know whether we still need to wait for long to see the second post or can expect soon in one or two days. Also, i would appreciate if the second post covers both control dragging and maximizing/minimizing code snippets. thanks, -RajuAnonymous
August 17, 2008
Hi Raju, I have just come back from vacation, and hope to finish the post in the next 24 hours or so! Thanks for you patience, MartinAnonymous
August 18, 2008
Thanks Martin for your update on the post. I hope you had a fun filled vacation. Looking forward for your post. -RajuAnonymous
August 18, 2008
In Part 1 , we looked at how we construct a Dragging, docking, expanding panel, and added the ‘dragging’Anonymous
August 29, 2008
In Part 1 , we looked at how we construct a Dragging, docking, expanding panel, and added the ‘dragging’Anonymous
September 18, 2008
Hello Martin, i tryed to use this example in WPF but the drag dosen't work well, i have made almost no chages from the silverlight to wpf.. do i need to chage somethings? Thanks Rui MarinhoAnonymous
October 15, 2008
Thanks, i tried to use the sample example which is in Silverlight_2_Samples_-_DragDockPanel_Part1.zip i run successfully the project but i am not getting any output on web page. It shows only blank page...... So what will be the problem ? Thanks, KevinAnonymous
October 15, 2008
Hi Kevin, The sample attached to this post was written for Silverlight 2 Beta 2. Is it possible you are trying to run it on the RTW? You can the RTW version of the control at www.codeplex.com/blacklight. Cheers, MartinAnonymous
October 15, 2008
Thanks Martin Can you tell me exactly which version of Sliverlight i have to use. And what other tools are required? If possible provide me downloading link of Microsoft site... Thanks.Anonymous
October 15, 2008
The comment has been removedAnonymous
October 16, 2008
Thanks Martin... I used your advice and now every thing is working fine....... Thanks again.Anonymous
October 16, 2008
Hello Martin Now every thing is working fine, but when i try to open the Demonstrator from this site : http://www.mscui.net/PatientJourneyDemonstrator i am not able to see it. So can you provide me the solution for it........ ThanksAnonymous
October 16, 2008
Hi Kevin, We just updated the demonstrator yesterday afternoon to work with the RTM bits. Give it another go, and let me know if you are still having problems. Cheers, MartinAnonymous
October 19, 2008
Hey Martin... You and your team Rocks...... Thanks....Anonymous
October 19, 2008
Hi Martin I have one more question.. I have to create menu in my project.. I searched a lot for menu control in Silverlight but not getting any help.. Can you help me how to create menu like File Edit View....etc...? ThanksAnonymous
October 22, 2008
Kevin, i thank you sir!Anonymous
October 22, 2008
The comment has been removedAnonymous
October 23, 2008
Hello Martin I had solved that menu problem and thanks for your advice... Now I come with one more question. I am trying your DragDockPanel control and I am getting error in that, I think it can be bug so do look at this problem.... I am trying to display an image in that panel and when I run the code it gives error like... Error: Sys.InvalidOperationException: ImageError error #4001 in control 'Xaml1': AG_E_NETWORK_ERROR Here is my code... <Grid x:Name="grdLayoutRoot" > <controls:DragDockPanelHost> <controls:DragDockPanel Margin="3" Style="{StaticResource DragDockPanelStyle}"> <Image x:Name="myImage2" Source="Images/Water lilies.jpg" Stretch="Fill" Grid.Row="1" HorizontalAlignment="Left" Width="300" Height="200" ></Image> </controls:DragDockPanel> </controls:DragDockPanelHost> </controls:DragDockPanelHost> </Grid> Any solution.... When I put that image code directly on main control then it’s shown the image.....but in this DragDockPanel it gives error... ThanksAnonymous
October 23, 2008
This error means that there was an issue getting the image source, so I dont see how that could be affected by the drag dock panel. Whereabout is you image? Is it in the web project, or in the Silverlight project? What is the path to the image? If the image is in the Silverlight project, what are the Build actions / copy to output directory properties set to? And you say, if you take that exact image Xaml, and put it in the grid that the host sits in, then it works fine? Really strange, but if you can repro it regularly then I can take a look! Thanks, MartinAnonymous
October 23, 2008
Hi My image is in Silverlight Project (TestLight) only, the Path is TestLight/Images/Water lilies.jpg My Usercontrol is at TestLight/Samples/DragDockPanelSample.xaml And Output Path is Resource and Copy always When it put the image code in main usercontrol Page.Xaml then it works fine......... Might be this helps........ KevinAnonymous
November 03, 2008
Hey Kevin, Did you get this resolved? Sorry if I went quiet for a while there - work suddenly picked up. Thanks, MartinAnonymous
November 03, 2008
No Martin Its still not solved...good you can help.........Anonymous
November 07, 2008
The comment has been removedAnonymous
February 17, 2009
Martin, Fantastic! I've just begun learning my way through your control toolkit, as well as Silverlight as a whole, and am finding it to be invaluable. My current mission (which I seem to have accepted) is the construction of the UI framework of a Silverlight-based CRM solution. Gratefully, Benjamin HaagAnonymous
February 26, 2009
You go, Benjamin! Keep us updated on how you progress intergrating with CRM! MartinAnonymous
April 19, 2009
Hi Martin, I am trying to combine DeepZoom and a DragDropPanel but get the Category:ImageError Message:AG_E_UNKNOWN_ERROR mentioned above.. My code: <controls:DragDockPanel> <controls:DeepZoomViewer x:Name="DeepZoomViewer" SourceUri="http://www.mscui.net/patientjourneydemonstrator/clientbin/images/ecgresults/dzc_output.xml" /> </controls:DragDockPanel> Any solutions? Thanks, RuneAnonymous
April 20, 2009
Hmmm, interesting Rune. i will take a look.