Shadows in 2D
The discs of light used by my XNA 2D lighting code look decent, but shadows would really add to the realism. Shadows are a bit tricky because they are non-local: an object half-way across the screen can make the difference in whether a pixel should be light or dark. And you have to take account of every object in the scene in order to determine whether a point is in shadow. But there's a reasonable way to do 2D shadows that works well with my approach of drawing the lighting in a separate render target.
Shadow volumes are a popular technique for doing shadows in 3D. It's not too hard to see how to use a similar technique in 2D. Basically, for each object that casts a shadow, modulate that object's shape based on the light source's position and, by rendering the updated shape, mark every pixel that is in shadow (the stencil buffer is often used for this). Then when you draw the lighting for a pixel, you check the shadow information to tell whether the point should be in shadow or not. Since I'm drawing the lighting in its own render target, I can also do it in the other order: draw the light beam first, then black out the pixels that are in shadow.
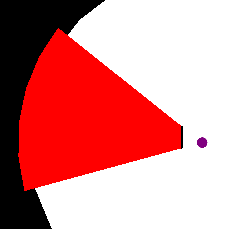
Consider a point light that casts light for a finite distance, so its area of influence is a disc (shown in white below). Now consider a line segment that intersects the disc of light, and thus obstructs some of the light. Visualize a ray extending from the light to each endpoint of the line segment, and on to the edge of the disc. We want to black out the interior of that shape (shown in red below):
There's probably a proper mathematical term for that kind of shape -- but I'm calling it a shadow wedge. The inside points are just the endpoints of the line segment -- call them p0 and p1. It's round on the outside, lining up with the light disc's perimeter, but with a slightly larger radius so there are no sparkles due to different tessellation than the light disc. I'm using 6 outer points (but of course you could use more if necessary) -- call them v0, v1, v2, v3, v4, and v5:
v0 is the extension of the ray through p0, and v5 is the extension of the ray through p1. The other "p"s are at equal divisions of the angle between v0 and v5.
Note that I'm trying to make the shadow wedge as "tight" as possible, so we don't waste pixel bandwidth. I could have made the shape a triangle with the light source as one vertex and the other two being projections through the endpoints out some great distance, and done a line test in the pixel shader to see whether to black out the pixel or not. But I'm trying to be efficient so I touch as few pixels as possible, and make it quicker to draw lots of shadow wedges.
Here's where it gets fun. Given p0, p1, the light position, and the light radius, can you generate the shadow wedge in a vertex shader? It's a slightly strange job for a vertex shader, because the shader needs to do different things for the different points. (It's a better match for a D3D10 geometry shader, but that'll have to wait for another day). Here's how I did it...
For the input vertices, instead of storing literal position info, I store the "p-ness vs. v-ness" in the x coordinate, and the "0-ness vs. 1-ness" in the y coordinate. So p0 has an x value of 1.0 (all p, no v) and a y value of 0.0 (all 0, no 1). v5 has an x value of 0.0 (no p, all v) and a y value of 1.0 (all 1, no 0). v1 through v4 have y values between 0 and 1, reflecting their increasing "1-ness."
numVertices = 8; // p0, p1, v0, v1, v2, v3, v4, v5
vertices[0] = new VertexPositionTexture(new Vector3(1, 0.0f, 0), new Vector2(0, 0));
vertices[1] = new VertexPositionTexture(new Vector3(1, 1.0f, 0), new Vector2(0, 0));
vertices[2] = new VertexPositionTexture(new Vector3(0, 0.0f, 0), new Vector2(0, 0));
vertices[3] = new VertexPositionTexture(new Vector3(0, 0.2f, 0), new Vector2(0, 0));
vertices[4] = new VertexPositionTexture(new Vector3(0, 0.4f, 0), new Vector2(0, 0));
vertices[5] = new VertexPositionTexture(new Vector3(0, 0.6f, 0), new Vector2(0, 0));
vertices[6] = new VertexPositionTexture(new Vector3(0, 0.8f, 0), new Vector2(0, 0));
vertices[7] = new VertexPositionTexture(new Vector3(0, 1.0f, 0), new Vector2(0, 0));
In the shader, I first translate to a space where the light source is at the origin. Then I find theta0 (the angle to p0) and theta1 (the angle to p1). Theta is somewhere between the two (based on the vertex's "0-ness vs. 1-ness"). So I find vLightSpace and pLightSpace, and use the vertex's "p-ness vs. v-ness" to decide which one to pick. There are a few extra bits of code to make sure we go the right direction from theta0 to theta1, and clamp p to not be bigger than the radius, but that's about it!
VS_OUTPUT MyVS(
float4 pos : POSITION )
{
VS_OUTPUT Out = (VS_OUTPUT)0;
float vVsP = pos.x; // v vs. p
float zeroVsOne = pos.y; // v0 vs. v5, or p0 vs. p1
// Use "lightspace", a coordinate system where the light source is at the origin
float2 lineP0LightSpace = lineP0 - lightPos;
float2 lineP1LightSpace = lineP1 - lightPos;
float theta0 = atan2(lineP0LightSpace.y, lineP0LightSpace.x);
float theta1 = atan2(lineP1LightSpace.y, lineP1LightSpace.x);
// Make sure our lerp takes the shortest path from theta0 to theta1
// (make sure theta0 and theta1 are <= PI apart from each other)
if( theta1 - theta0 > 3.14159 )
theta1 -= 2 * 3.14159;
if( theta0 - theta1 > 3.14159 )
theta0 -= 2 * 3.14159;
float theta = lerp(theta0, theta1, zeroVsOne);
float2 vLightSpace = float2(lightRadius * cos(theta), lightRadius * sin(theta));
// clamp p0 and p1 to the light's radius...otherwise things get weird
if( distance( lineP0LightSpace, float2(0,0) ) > lightRadius )
{
lineP0LightSpace = float2( lightRadius * cos(theta0), lightRadius * sin(theta0) );
}
if( distance( lineP1LightSpace, float2(0,0) ) > lightRadius )
{
lineP1LightSpace = float2( lightRadius * cos(theta1), lightRadius * sin(theta1) );
}
float2 pLightSpace = lerp(lineP0LightSpace, lineP1LightSpace, zeroVsOne);
// Translate back from "lightspace" to worldspace
float2 v = vLightSpace + lightPos;
float2 p = pLightSpace + lightPos;
float2 mergedPos = lerp(v, p, vVsP);
float4 mergedPos4 = float4(mergedPos.x, mergedPos.y, 0, 1);
Out.position = mul(mergedPos4, viewProj);
return Out;
}
Computing the shadow wedge in the vertex shader makes it possible to draw a whole lot of them quickly, so a light can be occluded by any shape whose silohouette is a series of line segments. I just pass in a list of my Line objects, plus the light position and radius, and the shadow wedges get drawn for each Line.
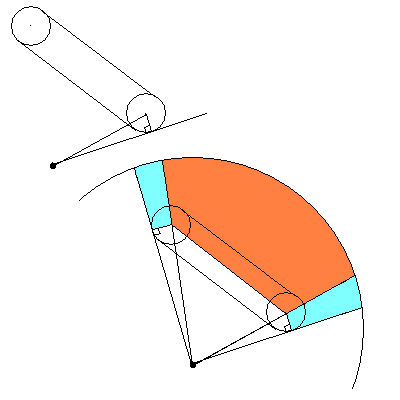
In my case, I want to have my RoundLines cast shadows, rather than idealized "thin" lines. The code above is fine if the line has a radius of 0 (or "close enough" to 0), but what if it's thick? I solved this by drawing three shadow wedges instead of one, per RoundLine. The larger, middle wedge goes between the RoundLine's "endpoints". The other points I need are the tangents to the end discs where the ray from the light source just grazes them. This requires some trigonometry.
We know the coordinates of p0 (one of the endpoints of the RoundLine), and we want to find p0-prime (the tangent point to the RoundLine). The tangent line is at a right angle to the radius line from p0 to p0-prime. We know the distance from the light to p0 (the hypotenuse), and the distance from p0 to p0-prime (the opposite side). sin(theta) = opposite/hypotenuse, so asin(opp/hyp) = theta. Once we have theta we can quickly find the length of the adjacent side, and thus p0-prime. Do the same thing for p1 to find p1-prime, and you're done! I call the little shadow wedges from p0 to p0-prime, and from p1 to p1-prime, the "sideburns" and have an option to turn them off if you're not using RoundLines. It might even work (and be faster) to simply draw a single shadow wedge from p0-prime to p1-prime.
I tried some options to have the far half of the RoundLine be dark (in shadow), and the near half be properly lit by the light source. Because the endpoints of the RoundLines overlap, this had issues, and the sideburns were causing problems too. I decided to make the walls not be affected by the shadow -- I actually draw them on the final render target after the fullbright scene is multiplied by the light scene. This is a little less "realistic" than I originally had in mind, but as I was rambling about last time, it's not really clear how the walls should be lit in 2D anyway.
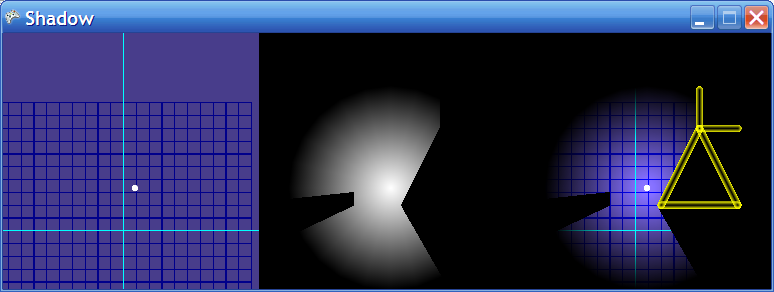
My test app shows the fullbright scene, the lighting scene, and the combined scene all side by side at once. Press "A" to go to wireframe, and "B" to go to a mode that shows the shadow regions more clearly. I'm very happy with the final result. I've got the shadows working in the BentMaze app too -- I'll show that code next time.
-Mike


