Demystifying Docker for Data Scientists – A Docker Tutorial for Your Deep Learning Projects
This post is authored by Shaheen Gauher, Data Scientist at Microsoft.
Data scientists who have been hearing a lot about Docker must be wondering whether it is, in fact, the best thing ever since sliced bread. If you too are wondering what the fuss is all about, or how to leverage Docker in your data science work (especially for deep learning projects) you're in the right place. In this post, I present a short tutorial on how Docker can give your deep learning projects a jump start. In the process you will learn the basics of how to interact with Docker containers and create custom Docker images for your AI workloads. As a data scientist, I find Docker containers to be especially helpful as my development environment for deep learning projects for the reasons outlined below.
If you have tried to install and set up a deep learning framework (e.g. CNTK, Tensorflow etc.) on your machine you will agree that it is challenging, to say the least. The proverbial stars need to align to make sure the dependencies and requirements are satisfied for all the different frameworks that you want to explore and experiment with. Getting the right anaconda distribution, the correct version of Python, setting up the paths, the correct versions of different packages, ensuring the installation does not interfere with other Python-based installations on your system is not a trivial exercise. Using a Docker image saves us this trouble as it provides a pre-configured environment ready to start work in. Even if you manage to get the framework installed and running in your machine, every time there's a new release, something could inadvertently break. Making Docker your development environment shields your project from these version changes until you are ready to upgrade your code to make it compatible with the newer version.
Using Docker also makes sharing projects with others a painless process. You don't have to worry about environments not being compatible, missing dependencies or even platform conflicts. When sharing a project via a container you are not only sharing your code but your development environment as well ensuring that your script can be reliably executed, and your work faithfully reproduced. Furthermore, since you work is already containerized, you can easily deploy it using services such as Kubernetes, Swarm etc.
The two main concepts in Docker are Images and Containers. In the Docker world, everything starts with an image. An image is essentially something you use to create a container. An image can contain, at the very basic level, just the operating-system fundamentals or it can consist of a sophisticated stack of applications. A container is where you work on your project. It is an instance of an image. They are not VMs but you can think of them as fully functional and isolated operating systems with everything you need to run your scripts already installed and yet very lightweight. These concepts will become clearer as we work through the tutorial.
The tutorial below starts by downloading the right image, starting a container with that image and interacting with the container to perform various tasks. I will show how to access the Jupyter notebook application running in the container (both the CNTK and Tensorflow image come with Jupyter installed). I will also jump inside the container to do some more complex tasks by starting a tty session. We will transfer files back and forth between the container and local machine (e.g. Python scripts, data, trained model etc.).
You must have Docker installed on your machine (aka the host machine) and have the Docker daemon running in the background. It is a straightforward installation and requires just downloading and running the installer. If you want to get started right away without any installation, I highly recommend the Data Science and Deep Learning Virtual Machines, i.e. DSVM and DLVM, on Microsoft's Azure cloud.
The Right Image
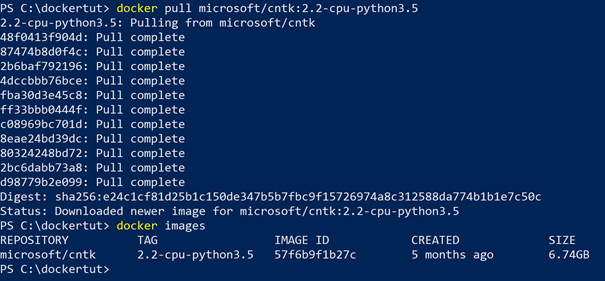
The Docker hub is a public registry where we can find publicly available and open-source images. There are generally several versions of each image as well as images for CPU and GPU. The command that will download an image to our machine is the docker pull command. For this tutorial I will download the CPU version of the CNTK image by specifying the appropriate tag. Without any tag we will get the latest image, which means the latest available GPU runtime configuration. To run the GPU versions of these Docker containers (only available on Linux), we will need to use nvidia-docker rather than docker to launch the containers (basically replace all occurrences of docker with nvidia-docker in all the commands). The command below when executed will download the CNTK 2.2 CPU runtime configuration set up for Python 3.5. After pulling the image if we execute the docker images command, the image that was just pulled should be listed in the output.
Full size image here.
Image to Containers
Next, I will use this image to start a container. The command that creates and starts a container is the docker run command. To create a new container, we must specify an image name from which to derive the container from and an optional command to run (/bin/bash here to access the bash shell).
docker run [OPTIONS] microsoft/cntk:2.2-cpu-python3.5 /bin/bash
The docker run command first creates a writeable container layer over the specified image, and then starts it using the specified command. In this sense containers can be called instances of an image. If the image is not found on the host machine, it will download it from Docker hub before executing the command. We get a new container every time docker run command is executed allowing us to have multiple instances of the same image. Normally if we run a container without options it will start and stop immediately. By executing the docker ps -a command, we can see the list of all containers on our machine (both running and stopped containers). Without the -a flag the docker ps command lists only the running containers. The containers are identified by a CONTAINER ID and a NAME. These are randomly created by the Docker daemon. To give a name to the container (makes it easier to reference) we can use the --name option with docker run command. In this tutorial I will name my container, mycntkdemo. We can choose to start a container in the default foreground mode or in the background in a "detached" mode using the -d option with docker run command. The docker run is an important command and its worthwhile to understand some of the options it accepts. I will explain a few options that I will use in this tutorial below. For a rundown of all the commands used here please refer to the slides here. The exhaustive list can be found here.
Inside the Container
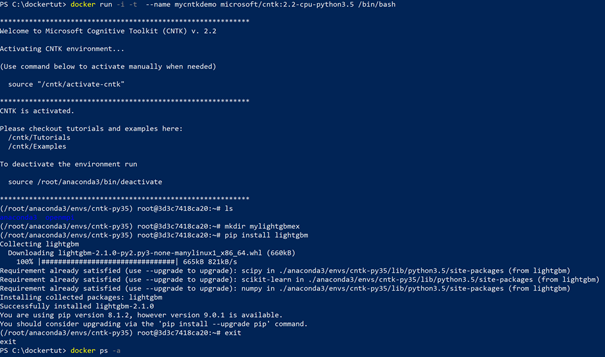
To start the deep learning project, I will jump inside the container in a bash shell and use it as my development environment. I will do the following tasks - I will create a working directory called mylightgbmex as I want to train a lightgbm model. I will pip install lightgbm inside my container as the CNTK image does not come with lightgbm. The training and test data along with my script are on my local machine. I will transfer these to my working directory in the container. We will learn how to stop and start a container to resume our work without destroying the container.
To run an interactive shell in the image, the docker run command can be executed using the following options.
docker run -i -t --name mycntkdemo microsoft/cntk:2.2-cpu-Python3.5 /bin/bash
-t, --tty=false Allocate a pseudo-TTY
-i, --interactive Keep STDIN open even if not attached
The above command starts the container in an interactive node and puts us in a bash shell as though we were working directly in our terminal. Once inside the shell, we can use any editor (the CNTK image comes with vi editor) to write our code. We can start the Python interpreter by typing Python on the command line.
Full size image here.
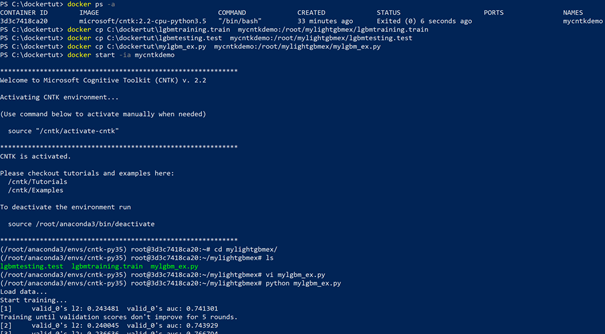
We can exit out of the container by typing exit on the command line. This will stop the container. To restart the stopped container and jump inside to the container shell we can use docker start command with the -a option.
docker start -ia mycntkdemo
This will put us back in the container shell. I had named my container mycntkdemo above, however the container ID could also be used to identify the container here. If we want to exit out of the container while still leaving the container running, we can do so by using the escape sequence Ctrl-p + Ctrl-q. The container will still be running in the background. To jump back inside the running container, we can use the docker attach command.
docker attach mycntkdemo
We could also use docker exec command as below to be put back in the container shell.
docker exec -it mycntkdemo /bin/bash
The docker exec is used to run a command in a running container, the command above was /bin/bash which would give us a bash shell and the -it flags would put us inside the container. Next I will copy the training and test data along with my Python script from my local machine to the working folder in my container mycntkdemo using the docker cp command. With the files available inside the container I will jump back inside and execute my script. Once we have the output from running our script, we could transfer it back to our local machine using the docker cp command again.
Full size image here.
Alternatively we could map the folder C:\dockertut on our machine (host machine) to the directory mylightgbmex in the Docker container when starting the container by using the -v flag with docker run command.
docker run -it --name mycntkdemo -v C:\dockertut:/root/mylightgbmex microsoft/cntk:2.2-cpu-python3.5 /bin/bash
When inside the container, we will see a directory mylightgbmex with the contents of the folder C:\dockertut in it. More documentation on sharing volume (shared filesystems) can be found here.
Custom Image
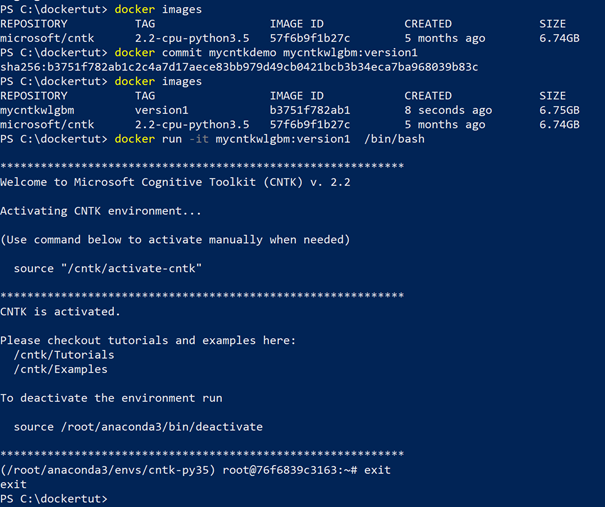
In the exercise above we installed lightgbm in our container and by doing so we added another layer to the image we started with. If we want to save these changes, we need to commit the container's file changes or settings into a new image. The way to do this is to create a new image from the container's changes by using the docker commit command.
docker commit mycntkdemo mycntkwlgbm:version1
The above command will create a new image called mycntkwlgbm and should be listed in the output of Docker images command. This new image will contain everything that the CNTK image came with plus lightgbm, all the files we transferred from our machine and the output from executing our script. We can continue using this new image by starting a container with it.
Full size image here.
Updating an image manually like above is a quick way to save the changes, however, this is not the best practice to create an image. Over time we will lose track of what went inside the image and end up with what is called the "curse of the golden image". Images should be created in a documented and maintainable way. This can be done using a dockerfile and the docker build command.
Dockerfile
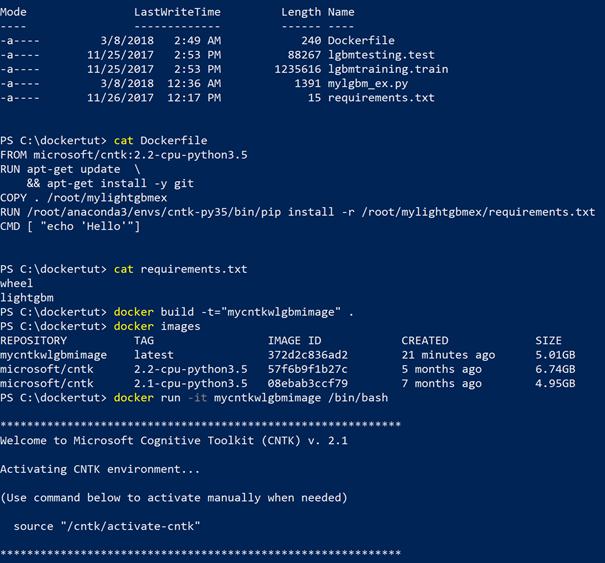
Dockerfiles are text files that define the environment inside the container. They contain a successive series of instructions and commands which need to be executed to create the environment. The docker build command automatically creates an image by reading from the dockerfile. Each layer in the image corresponds to an instruction in the dockerfile. When a dockerfile is finished executing, we end up with an image, which can then be used to start a new container. By encapsulating the environment build in a dockerfile we have a clear documentation for what is contained in the image.
In the example below, I will use a dockerfile with CNTK image as the base image to create a new image called mycntkwlgbmimage. For details on how to write a dockerfile, please refer to the documentation here. As a data scientist I frequently need git to clone repositories. The CNTK image does not come with git installed so I will install it. In my dockerfile I will also add instructions to transfer some files from my local machine to a specific location (as in the exercise above to a directory called mylightgbmex). The Python packages I want installed will be provided in requirements.txt. For Best practices on writing a docker file refer to the documentation here. Once I have everything in place, I will execute the docker build command at the end of which I should the image mycntkwlgbmimage listed in the output of docker image command.
Full size image here.
Jupyter Notebook
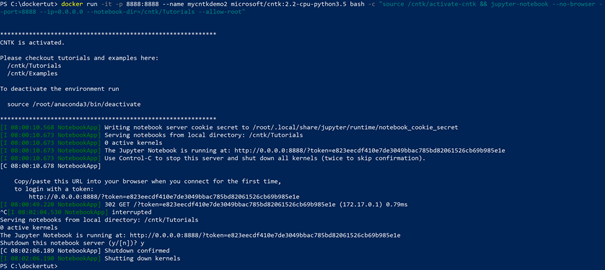
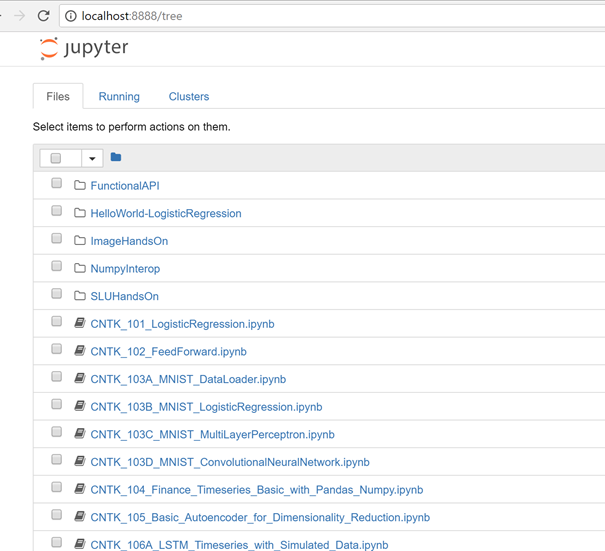
Jupyter notebook is a favorite tool of data scientists. Both CNTK and Tensorflow images come with Jupyter installed. In Docker, the containers themselves can have applications running on ports. To access these applications, we need to expose the containers internal port and bind the exposed port to a specified port on the host. In the example below, I will access the Jupyter notebook application running inside my container. Starting a container with -p flag will explicitly map the port of the Docker host to the port number on our localhost to access the application running on that port in the container (port 8888 is default for Jupyter notebook application).
docker run -it -p 8888:8888 --name mycntkdemo2 microsoft/cntk:2.2-cpu-python3.5 /bin/bash
Once in the container shell, the Jupyter notebook application can be started using the command
jupyter-notebook --no-browser --ip=0.0.0.0 --notebook-dir=/cntk/Tutorials --allow-root
Alternatively, we could do it in one step as:
docker run -it -p 8888:8888 --name mycntkdemo2 microsoft/cntk:2.2-cpu-python3.5 bash -c "source /cntk/activate-cntk && jupyter-notebook --no-browser --port=8888 --ip=0.0.0.0 --notebook-dir=/cntk/Tutorials --allow-root"
Full size image here.
Type the url with the token above https://localhost:8888/?token=************* in your favorite browser to see the notebook dashboard.
Repeat
In the examples above we used the CNTK framework. To work with other frameworks, we can simply repeat the above exercises with the appropriate image. For example, to work on a Tensorflow project, we can access the Jupyter notebook application running in the container as:
docker run -it -p 8888:8888 tensorflow/tensorflow
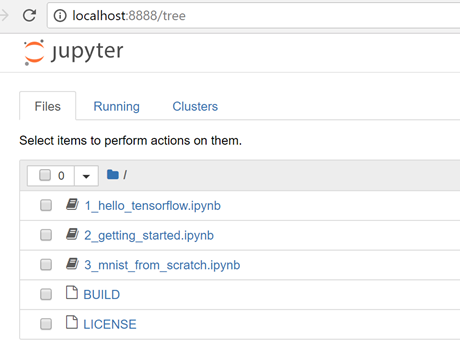
The command above will get the latest image for CPU only container and start the Jupyter notebook application.

Full size image here.
Type the url with the token above https://localhost:8888/?token=************* in your favorite browser to see the notebook dashboard.
We can also work in the container shell as
docker run -it tensorflow/tensorflow /bin/bash

Full size image here.
Takeaways
With Docker containers as the development environment for your deep learning projects, you can hit the ground running. You are spared the overhead of installing and setting up the environment for the various frameworks and can start working on your deep learning projects right away. Scripts are guaranteed to run everywhere and will run the same every time.
Shaheen
@Shaheen_Gauher | LinkedIn
Acknowledgements
- Thanks to Mary Wahl (@wahlmighty), Fidan Boylu Uz (@FidanBoyluUz), Patrick Buehler, Ivan Popivanov (@ivan_popivanov) and Naoto Usuyama (@NaotoUsuyama) for their comments and feedback and for reviewing this tutorial.