Using Portal Capabilities in Dynamics 365 (CRM)
Portal Capabilities of Microsoft Dynamics 365
The Portal Capabilities of Microsoft Dynamics 365 extend Dynamics 365 (CRM) to the web delivering a best-in-class web engagement experience for community, partner management, customer service and a breadth of other solution areas.
One of the most compelling features of the Portal Capabilities of Microsoft Dynamics 365 is the set of functionalities centered on presenting Dynamics 365 (CRM) data to a web audience using configuration only.
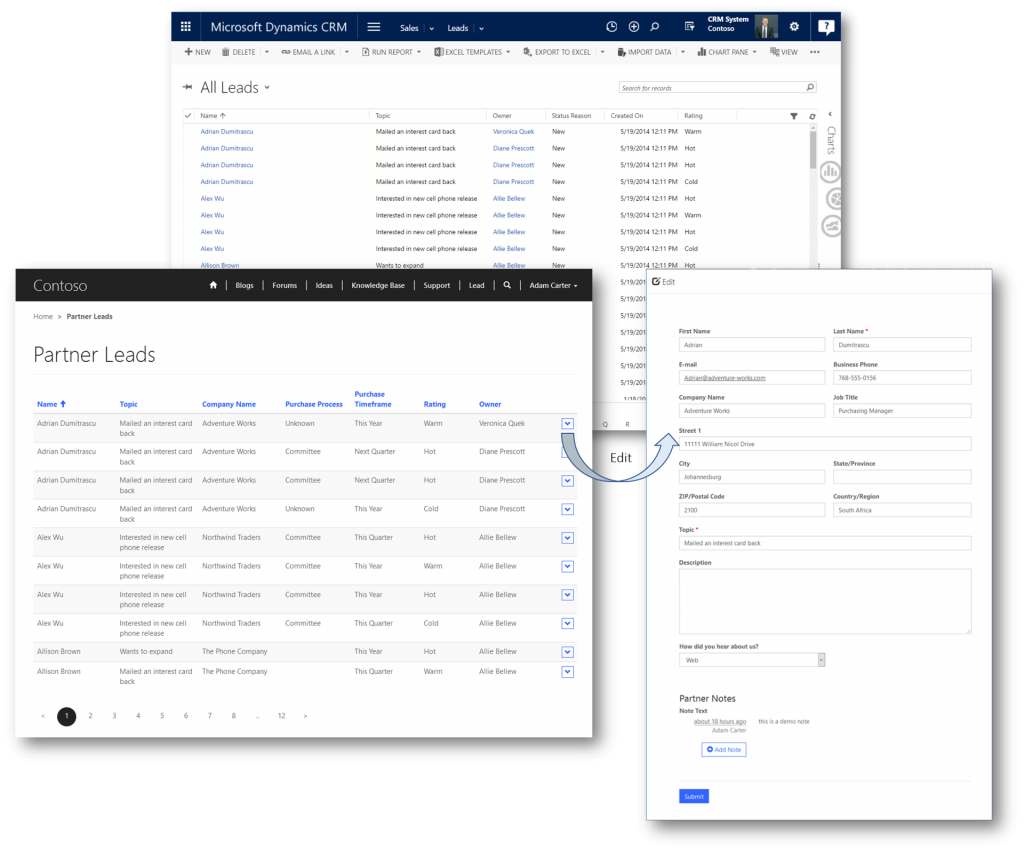
In this blog post I'll play the role as a sales company who sells through a partner channel. Together we work hard to move prospects through the sales process from leads to order. As such, my partners (and I) will benefit from the ability to share my Leads in Dynamics 365 (CRM) with my partners, for them to work with (update progress and notes). I'll make a list of Leads available to them on my portal, as well as provide a web form to update Leads. On that form I'll provide a Note field in which the partners can interact with me.
Obviously when I open parts of my Dynamics 365 (CRM) to an external audience via a portal, it is very important to secure the content on my portal.
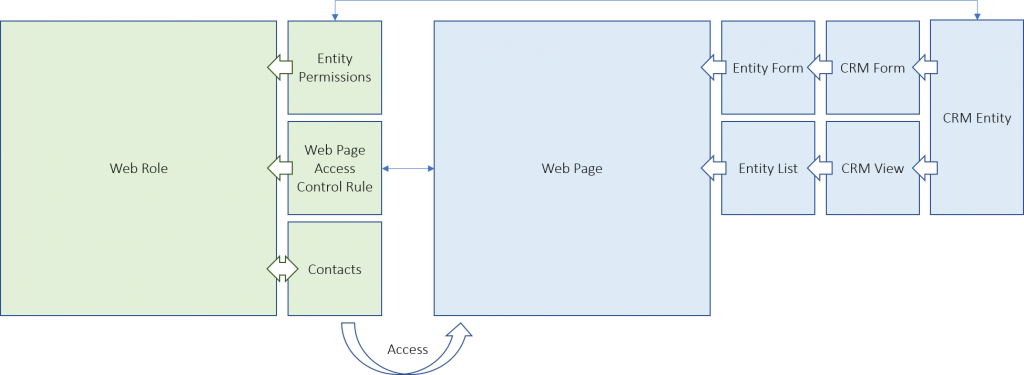
In this blog post I will leverage the below components (all configurable right from within Dynamics 365 CRM) to configure a secure collaborative environment between me and my partners - starting with the Web Role needed to control how externals accesses the list of leads on my portal.
Web Role
My partners are already in my Dynamics 365 (CRM) system as contacts. At the end of this demo (when done setting the portal up) I'll will invite them in with a specific role (a so called Web Role), ensuring that they can access and update the otherwise hidden and protected Leads on the portal.
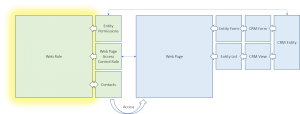
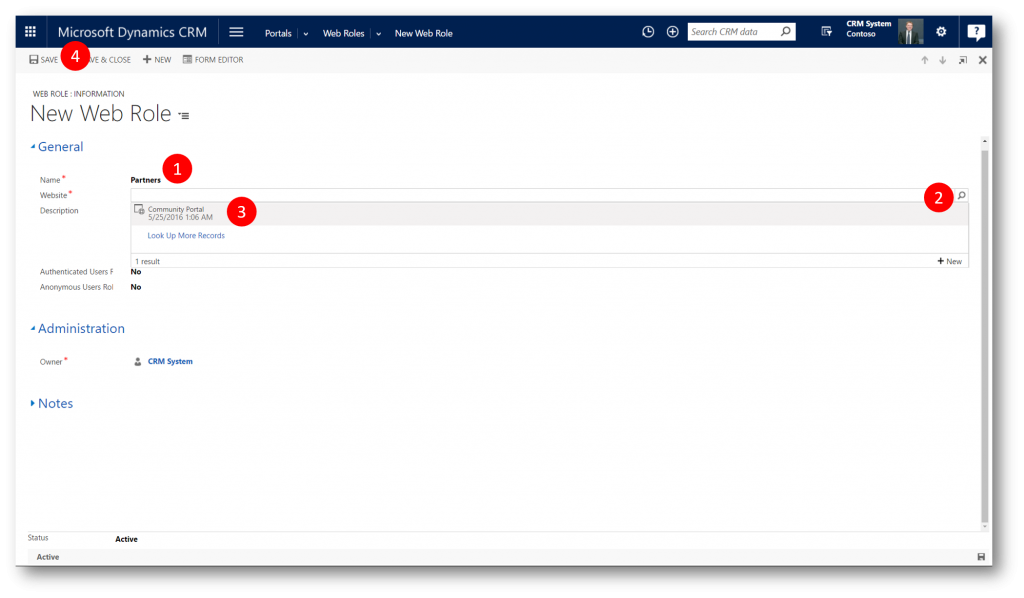
To Setup a Web Role
Navigate to Portals and click Web Roles 
Click New to display the New Web Role form

In the New Web Role form specify values for the fields provided
- Name = "Partners" (or a name of your choice) (1)
- Website = [select your portal from the drop-down] (2) (3) - in this demo "Community Portal"
Click Save (4)
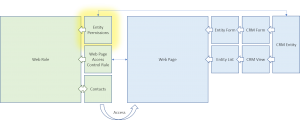
Entity Permissions
As mentioned above, my partners will be able to access a list of Leads I share with them. In the list they can edit a Lead using a form. On that form I'll provide a note field in which the partner can interact with me.
So next up in my effort to secure my content is to setup entity permissions for the Lead entity and Notes on leads for the new "Partners" web role.
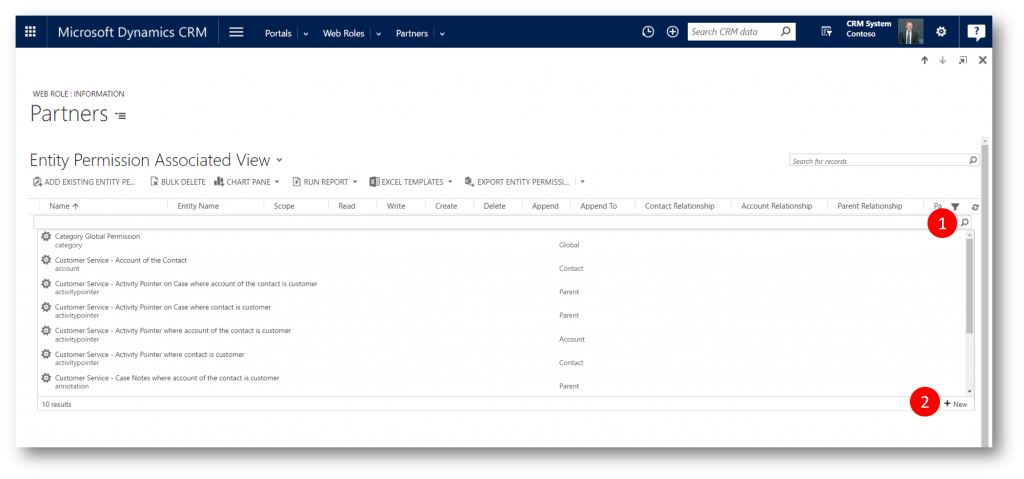
To Setup Entity Permissions
Still on the web role "Partners" form click the down arrow next to "Partners" in the navigation bar (1) and then click Entity Permissions (2) to display the Entity Permission Associated View 
Click ADD EXISTING ENTITY PERMISSION (1) on the command bar

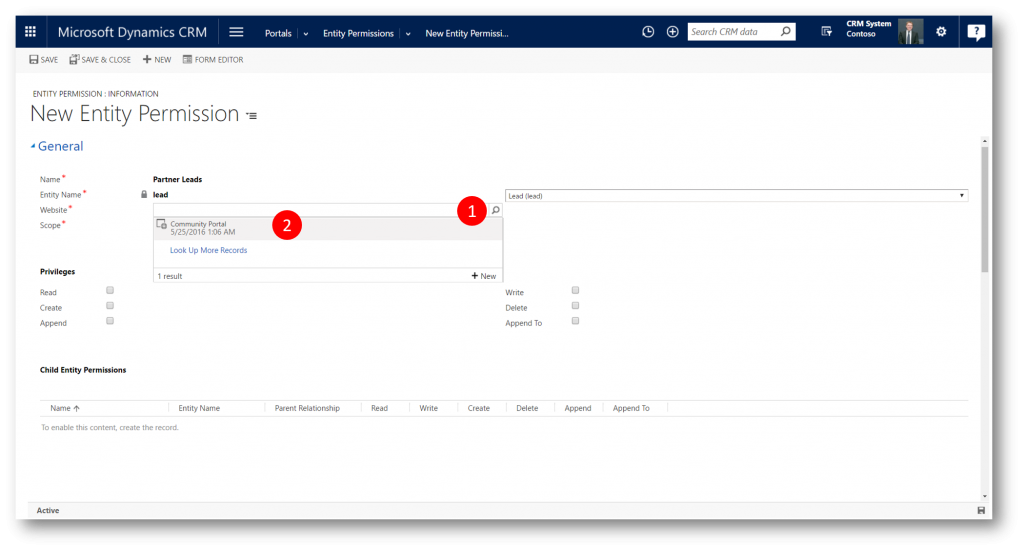
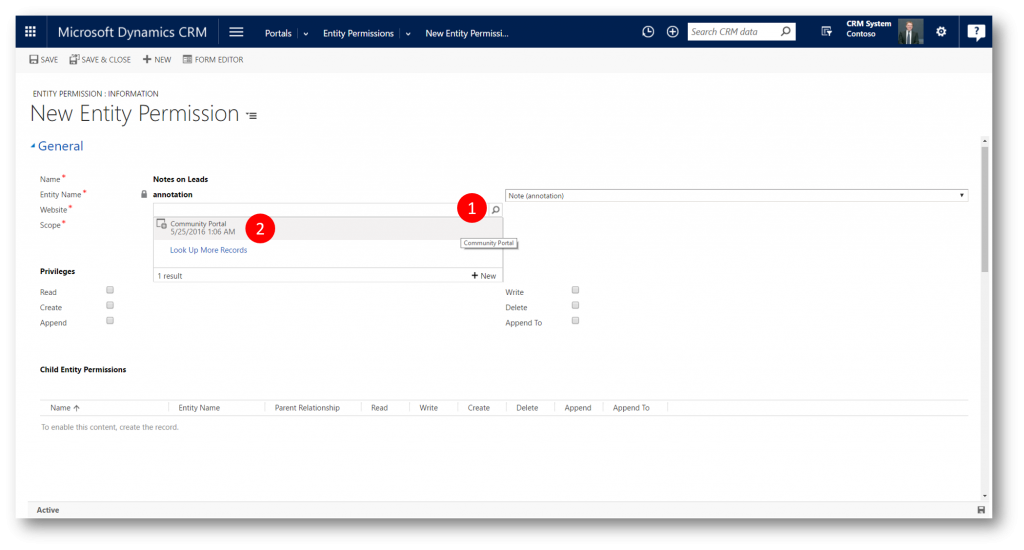
Click the magnifier icon (1) and then + New (2) to display the New Entity Permission form
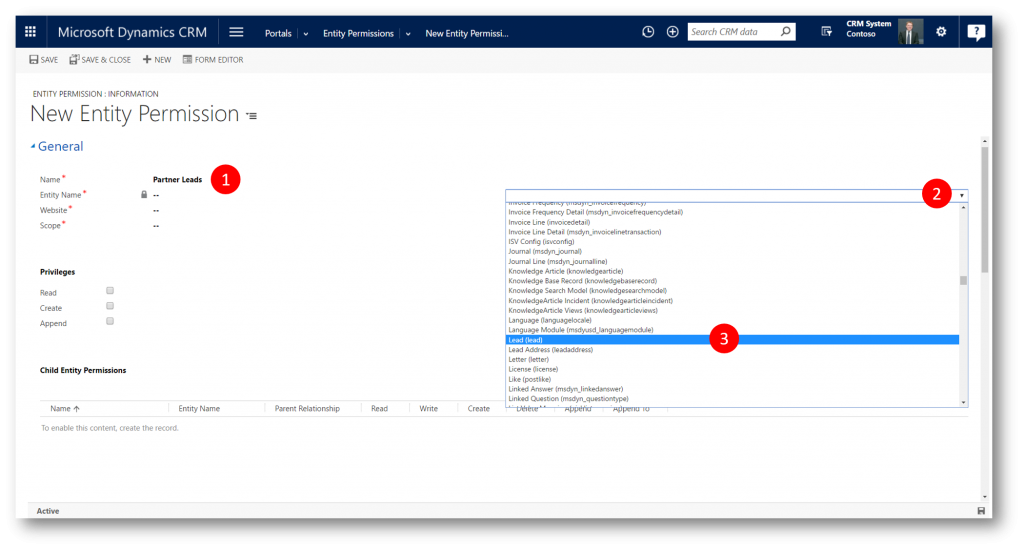
In the New Entity Permission form specify values for the fields provided
- Name = "Partner Leads" (or a name of your choice) (1)
- Select Lead from the Entity Name drop-down (2) (3)
- Website = [select your portal from the drop-down] (1) (2) - in this demo "Community Portal"
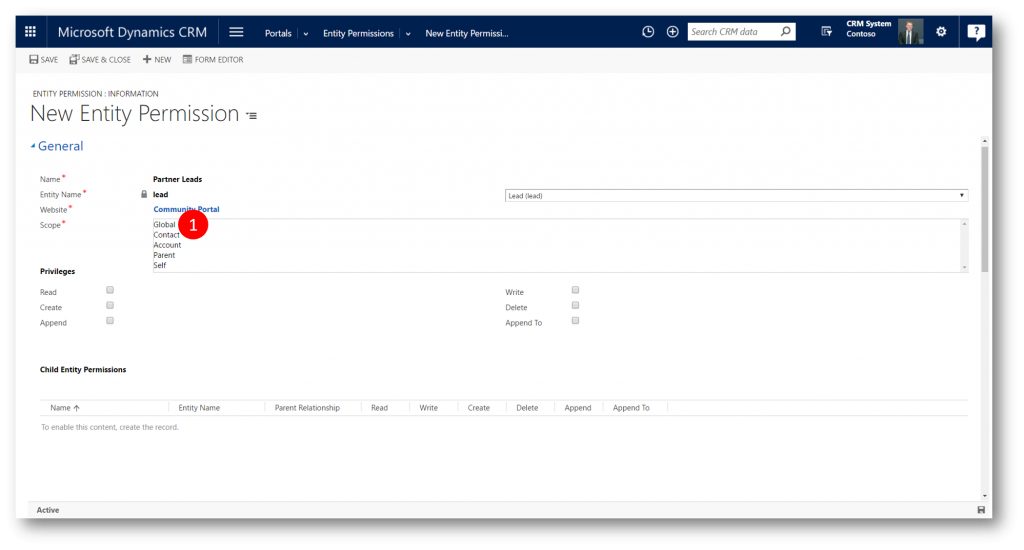
- Select Global from the Scope drop-down (1)
x
Note: In this simplified example I'll just make all leads available to all partners (Scope = Global). You can use Scope = Contact and create a 1:N relationship between Contacts and Leads to enforce filtered views in the resulting Entity List
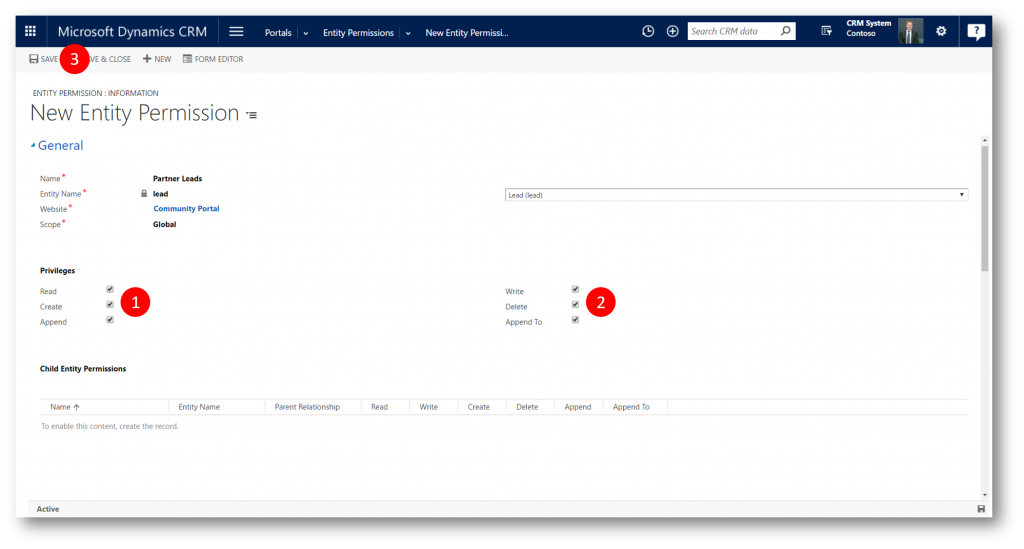
- Check all the Privileges checkboxes (Read, Write, Create, Delete, Append, and Append To) (1) (2)
- Click Save (3)
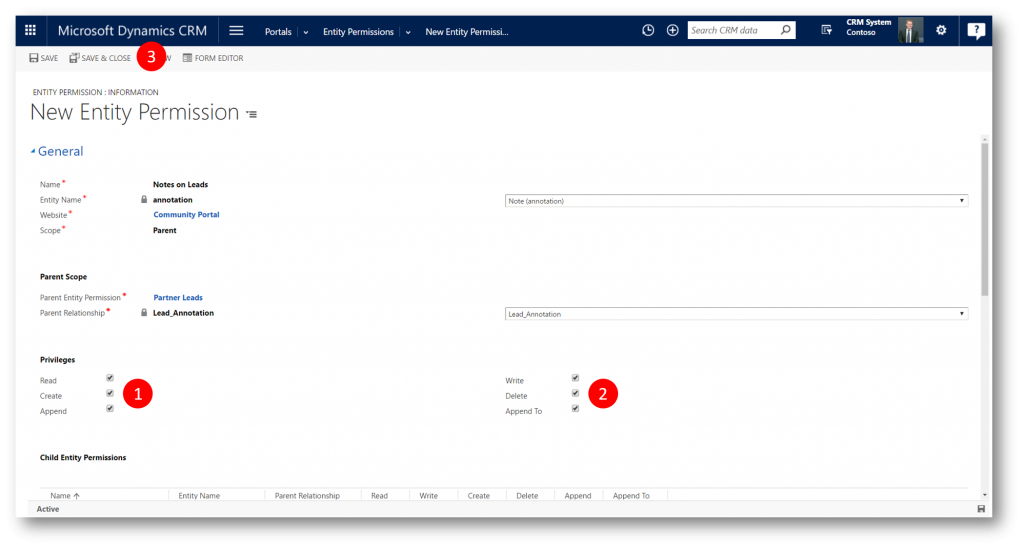
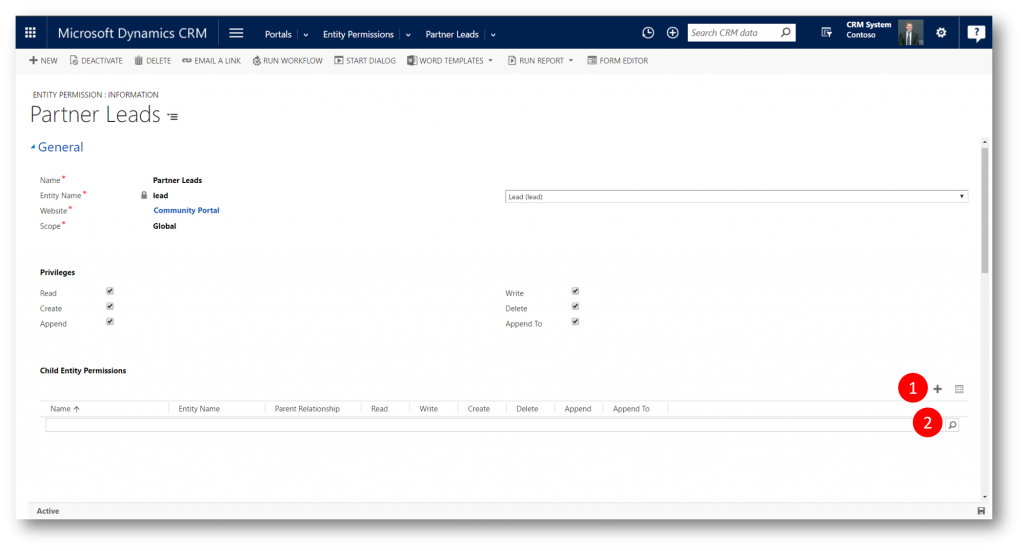
Still on the “Partner Leads” entity permission form scroll down to the “Child Entity Permissions” subgrid
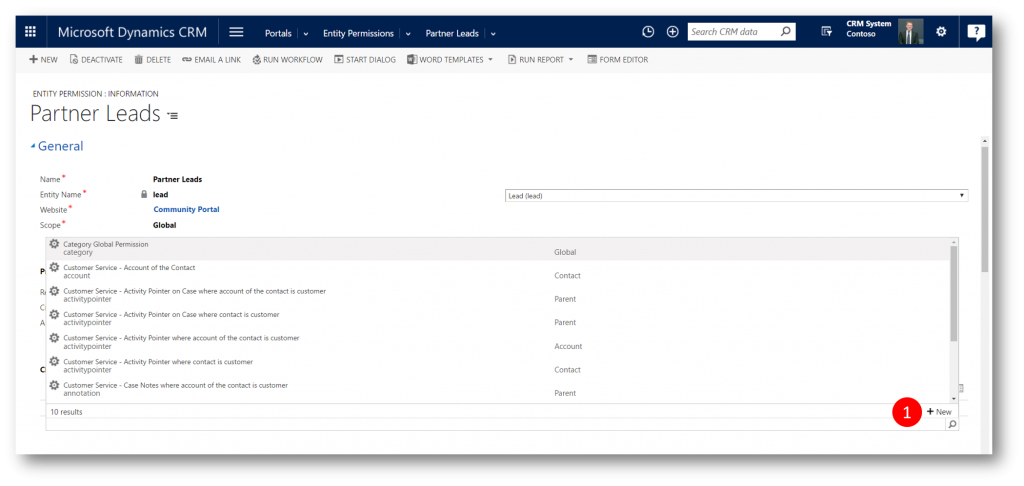
Click “ + ” > Magnifier icon > " + New" to open the New Entity Permission form
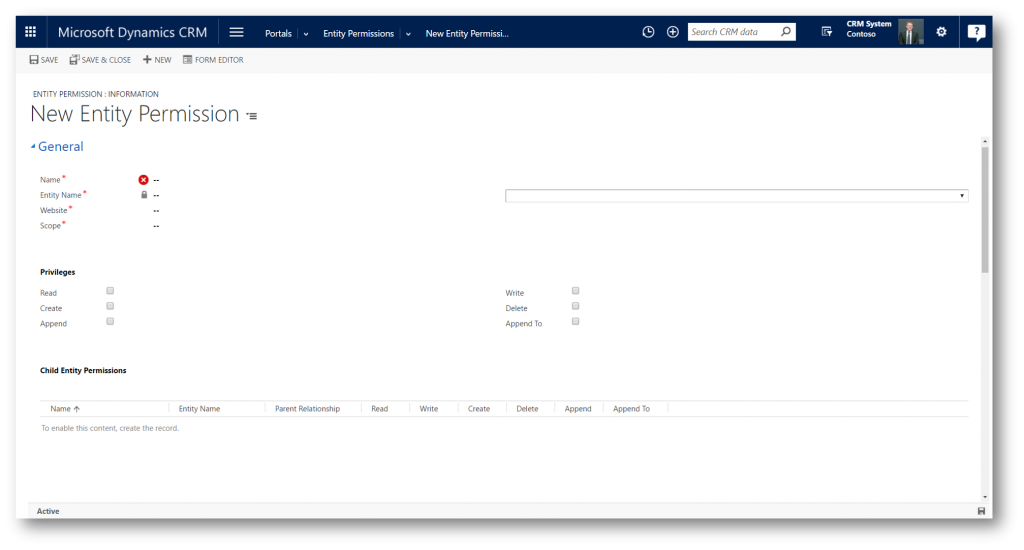
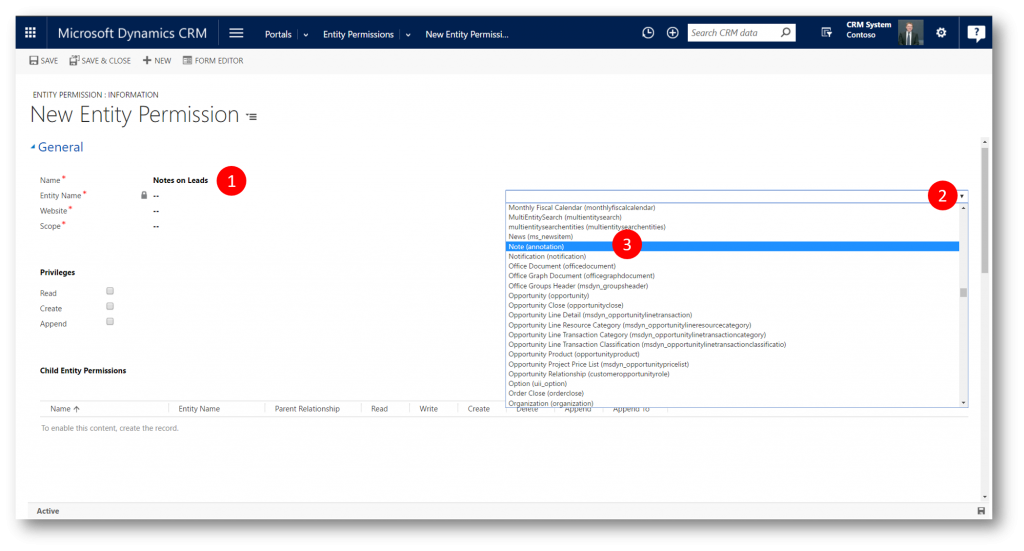
Provide the values
- Name = “Notes on Leads” (1)
- Entity Name = Note (annotation) (2) (3)
- Website = Community Portal (or your portal) (1) (2)
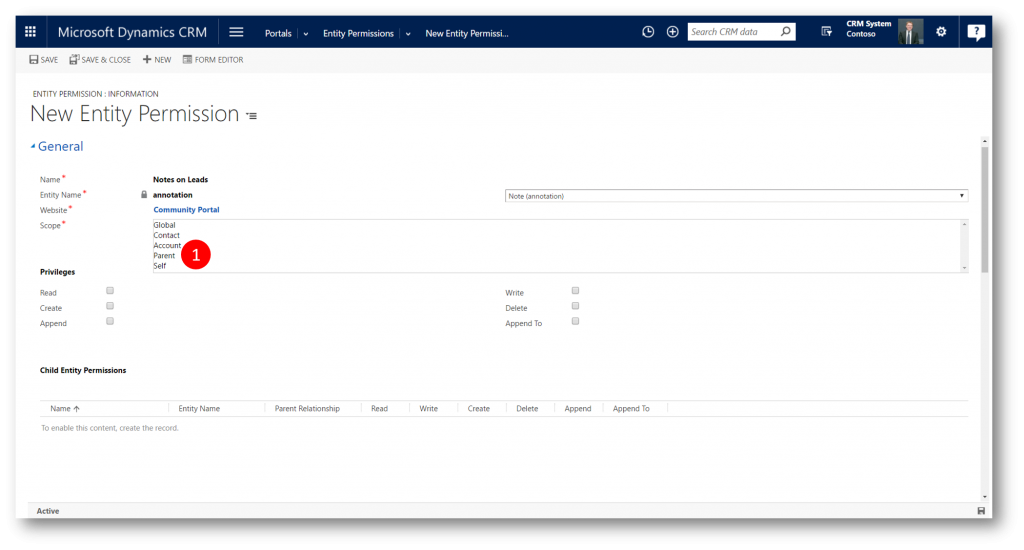
- Scope = Parent
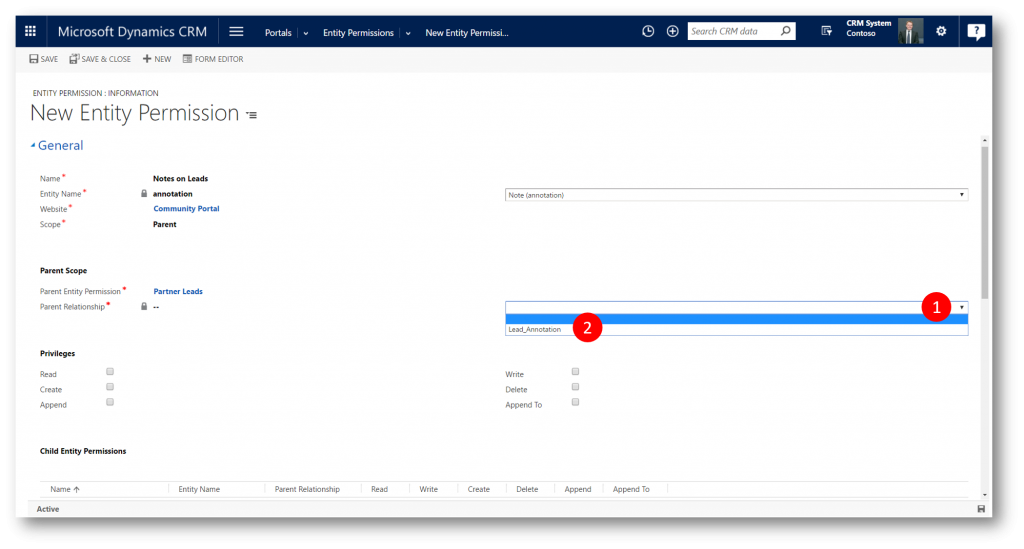
- Ensure that the Parent Entity Permission = Partner Leads
- Parent Relationship = Lead_Annotation (1) (2)
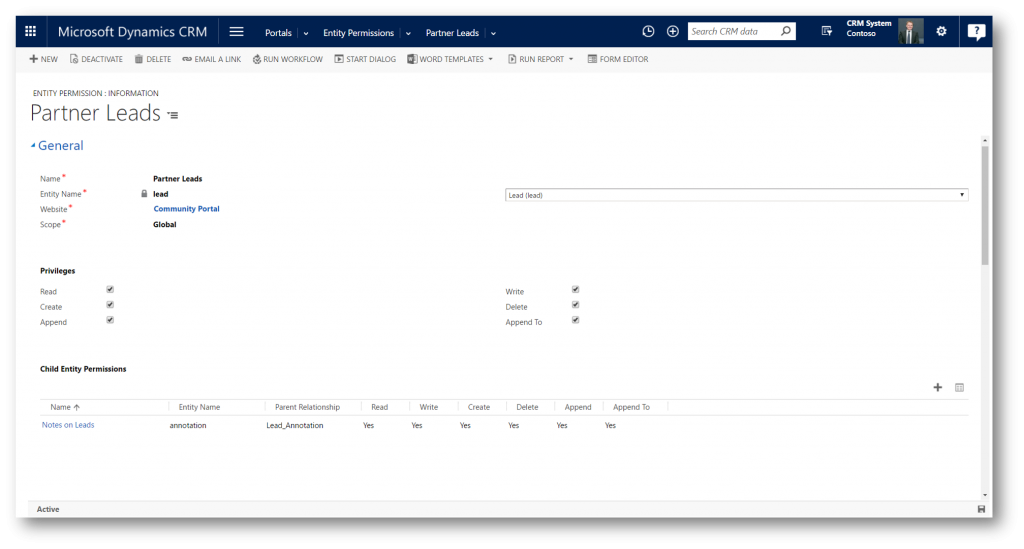
Check off all of the Privileges (1) (2)
Click Save and Close to close both Permissions
Form
Entity Forms provide a link between the typical Dynamics 365 (CRM) forms and the Portal. I will create a form my partners will be leveraging to edit leads on my portal. The form will be a modified copy of the Lead form (Web Form) in Dynamics 365 (CRM)
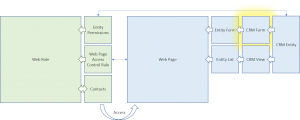
To Create a Web Ready Lead Form
In CRM navigate to the Customizations Area and click Customize the System

- Navigate the entities on the left and choose Lead
- Open the Forms sub item
- Open the Web Form

Click Save As to display the Save As dialog (to create a new form that Partners will use to edit Leads)
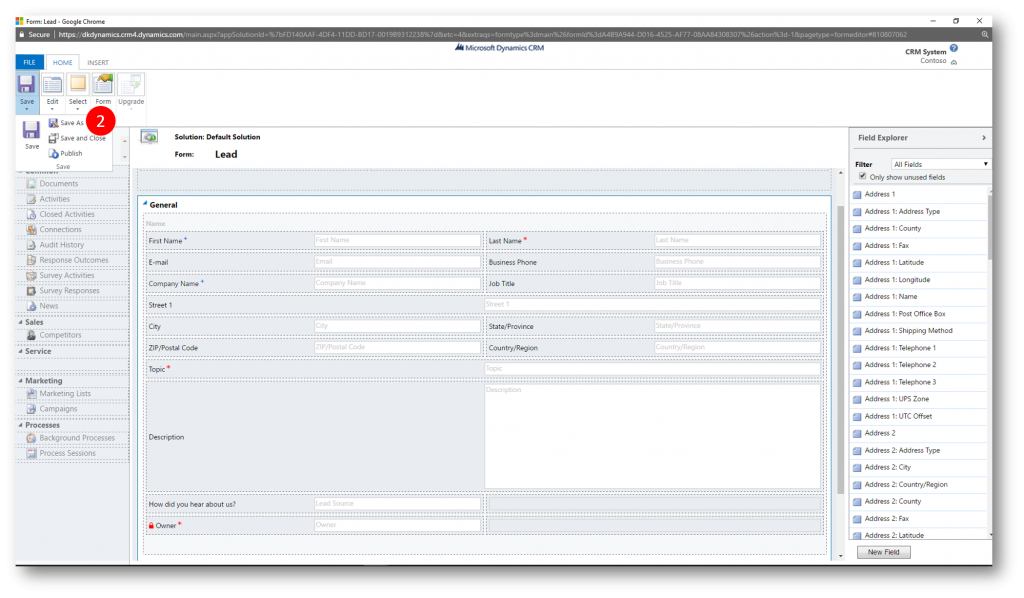
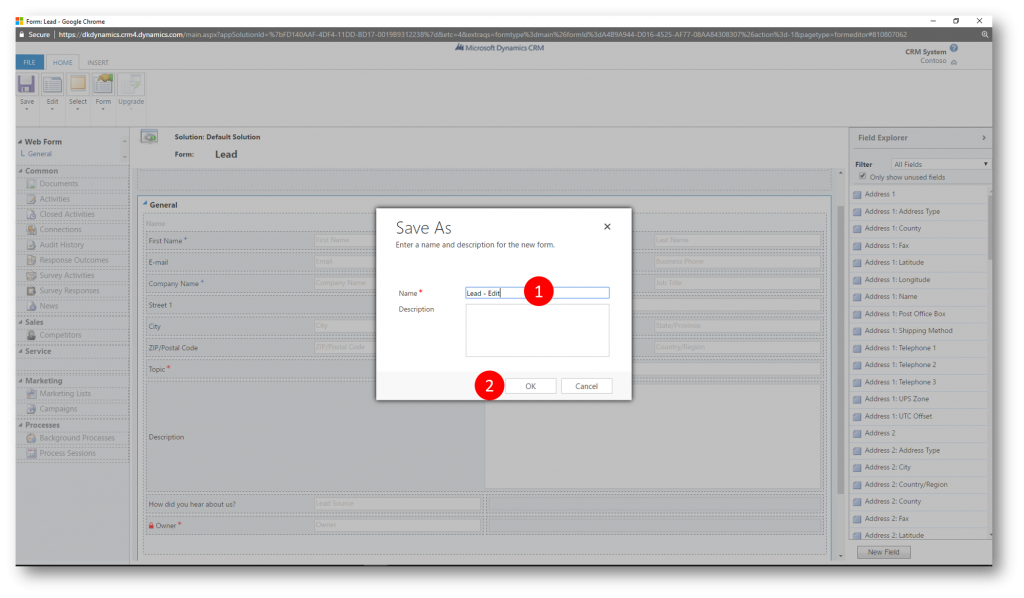
Type “Lead – Edit” in the Name textbox and click OK to save and close the Save As dialog, and return to the new form “Lead – Edit” in edit mode
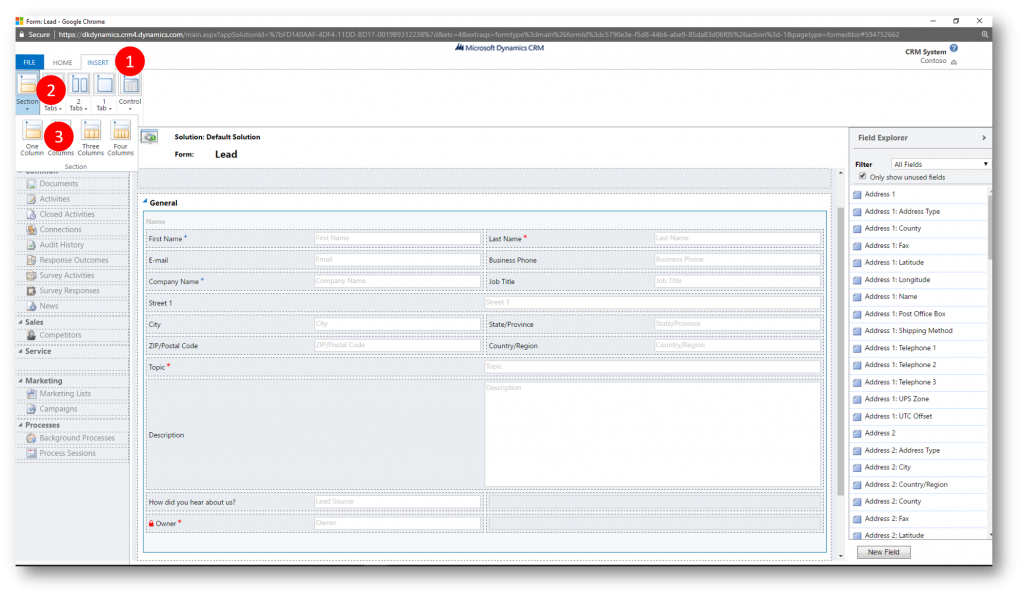
From the Insert tab in the ribbon, add a new single column section to the General Tab of your form
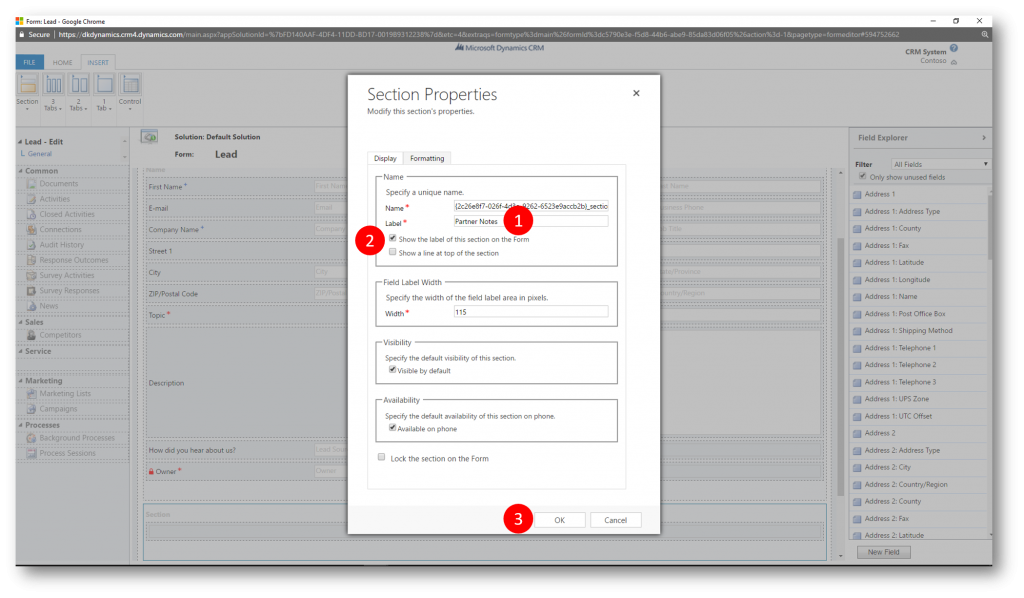
Double click the new Section to display the Section Properties dialog.
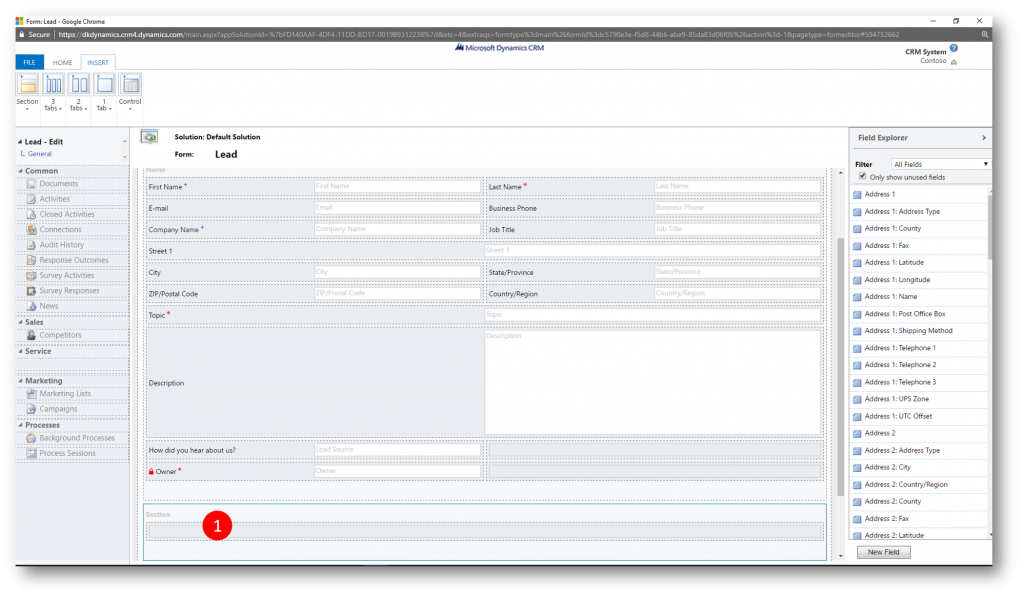
- On the Display tab type “Partner Notes“ in the Label text box
- Check the Show the label of this section on the Form field
- Click OK to close the Section Properties dialog
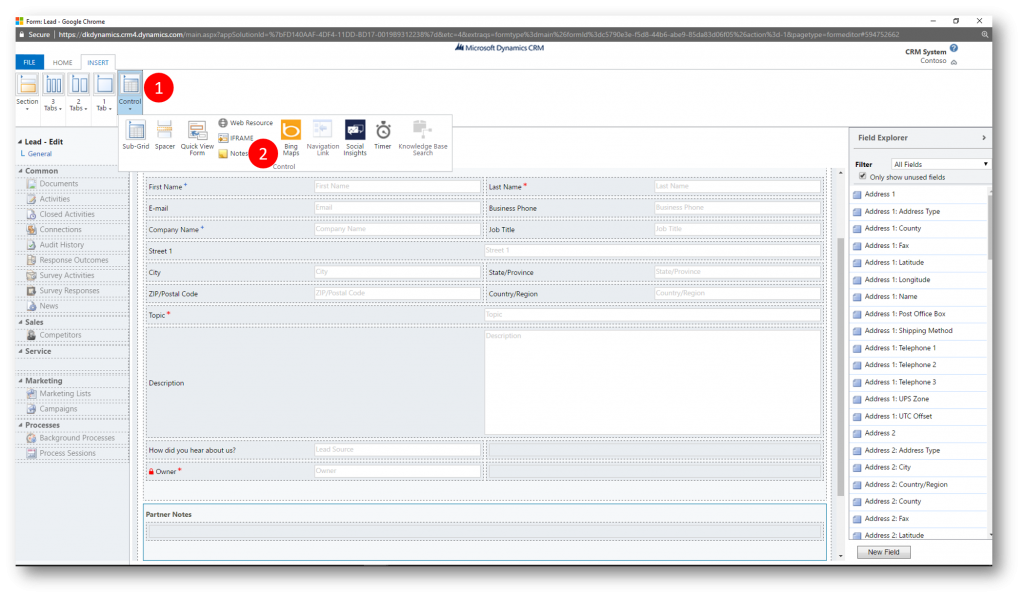
From the Insert tab add Notes to the form in the "Partner Notes" Section
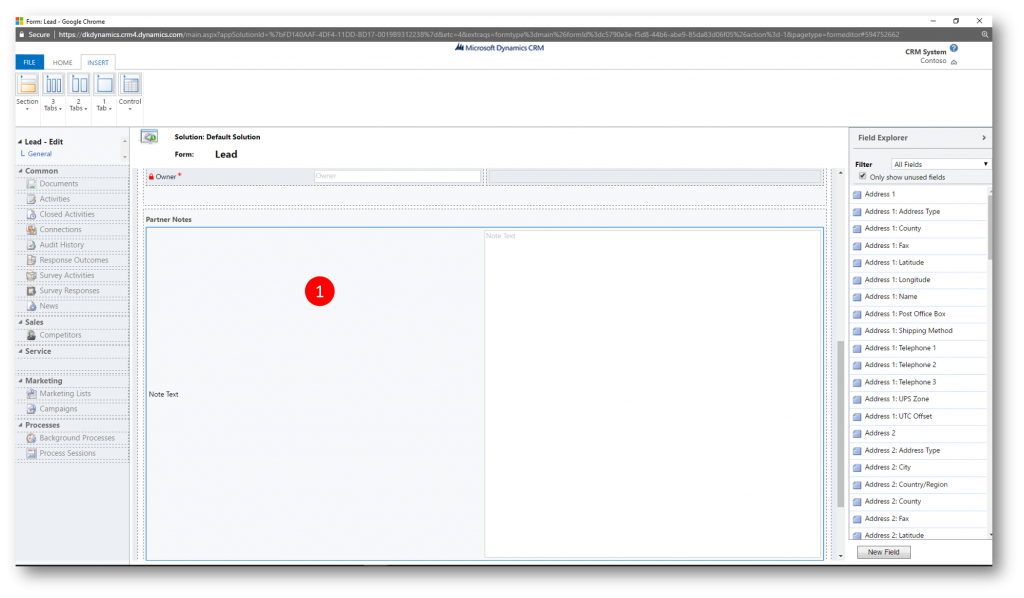
Click Save and Close to close the form

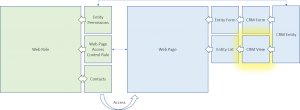
View
Entity Lists provide a link between the typical Dynamics 365 (CRM) views and the Portal. I will create a view my partners will be leveraging to see leads on my portal.
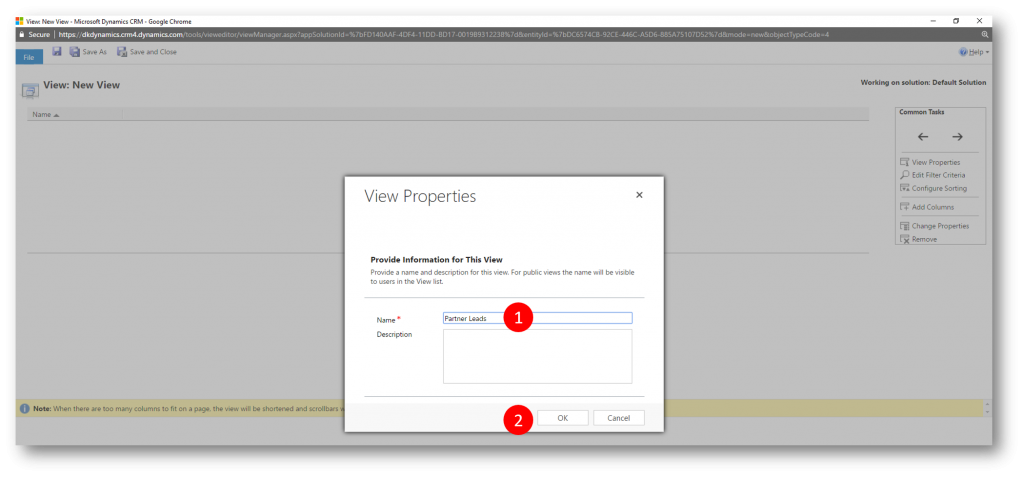
To Create a System View for Partner Leads
Still in the Customize the System window choose Lead > Views and the click New to create a new View named Partner Leads

Add relevant columns (the columns the partner will see in the list on the portal)
Set up relevant filtering, eg Active leads 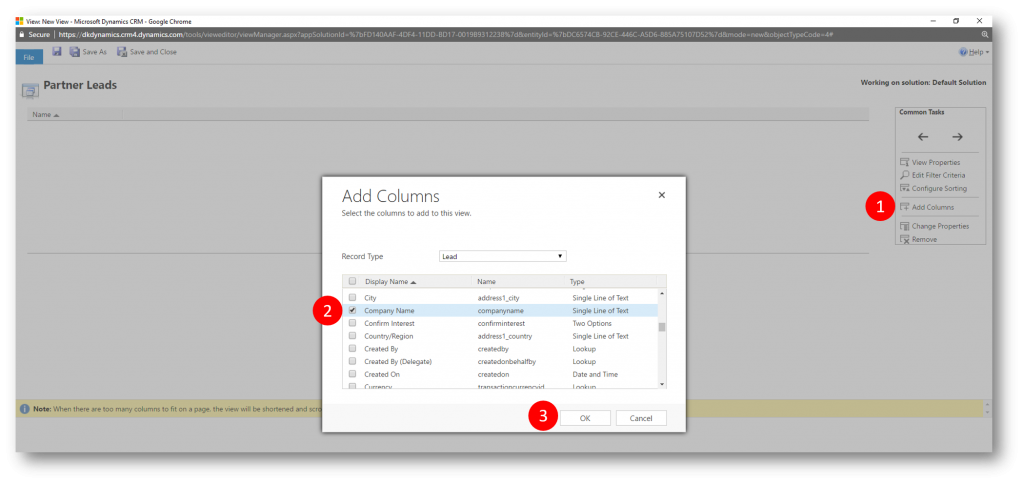
Click Save and Close to save and close the new view

Click Publish All Customizations to publish the new form and the new view
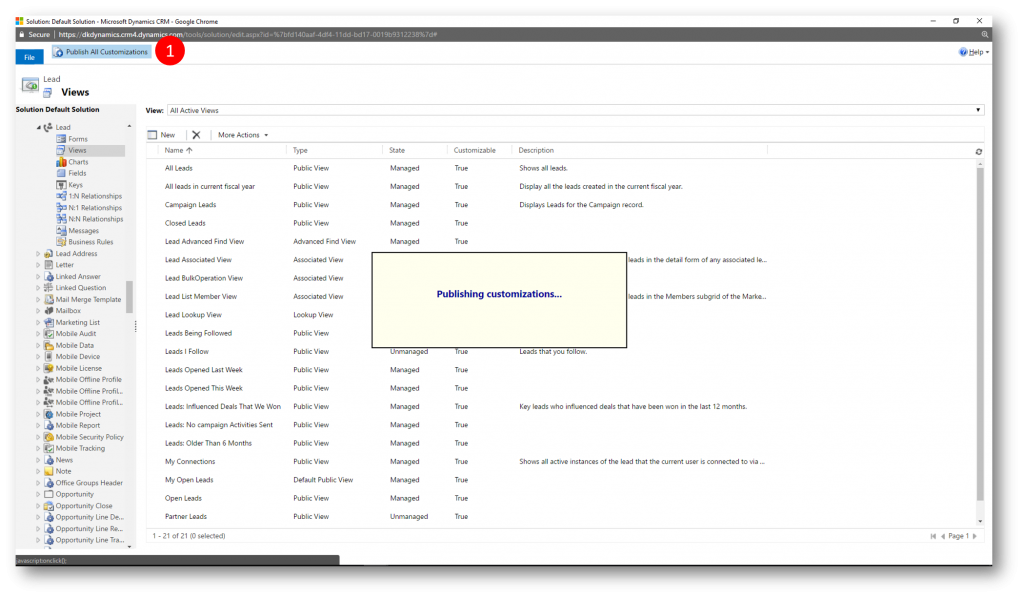
Entity Form and List
Having created the sources for my entity form and entity list using Dynamics 365 (CRM) forms and views I'm now ready to proceed with the corresponding elements on the portal
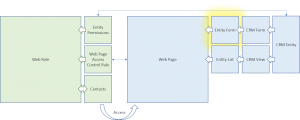
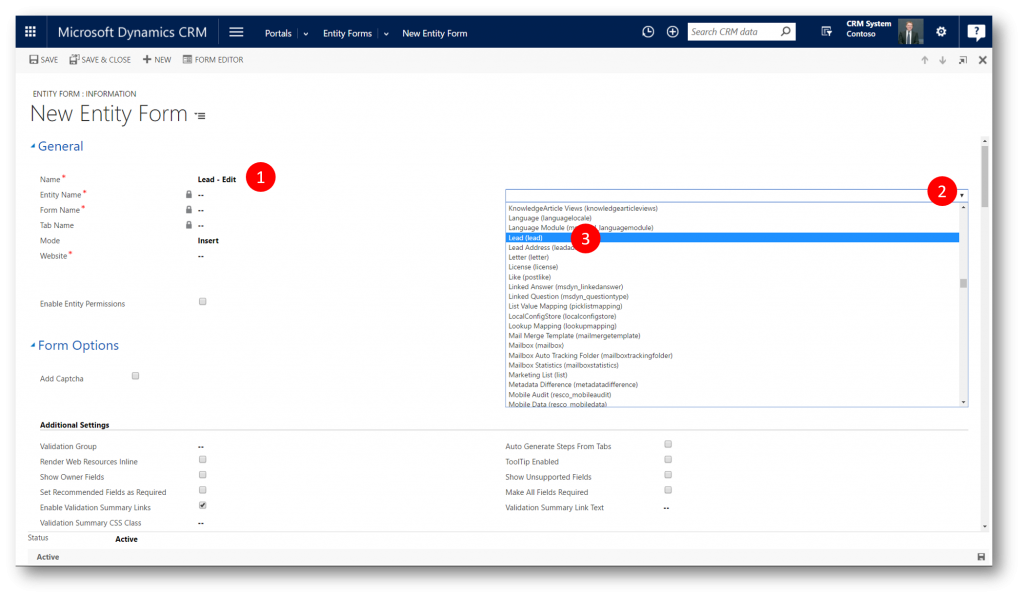
To Setup an Entity Form
Navigate to Portals > Entity Forms to open the Active Entity Forms view

Click New to open the New Entity Form dialog

Provide the values
- Name = "Lead – Edit" (1)
- Entity Name = Lead (lead) (2) (3)
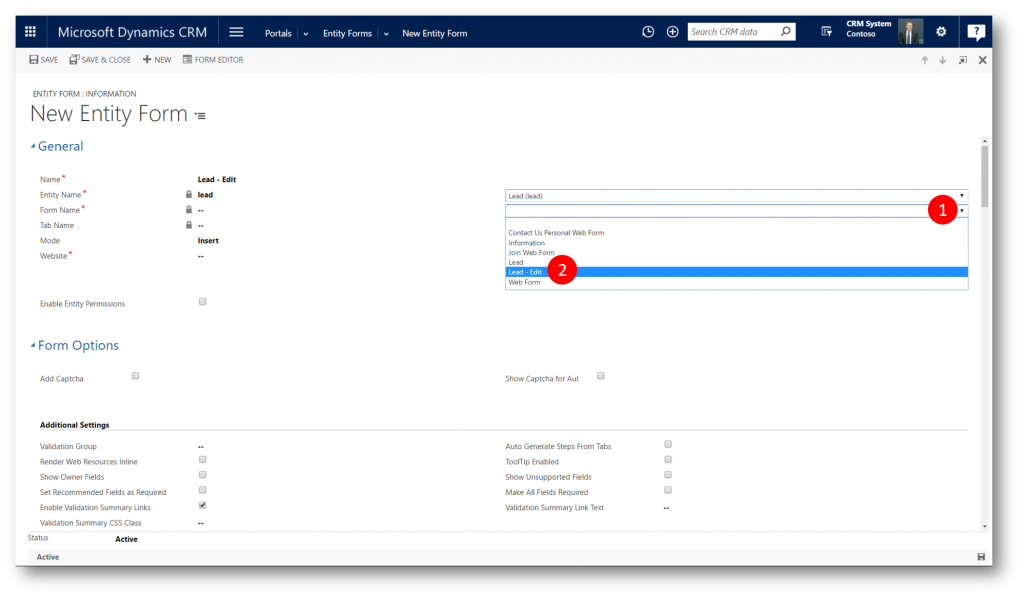
- Form Name = Lead – Edit
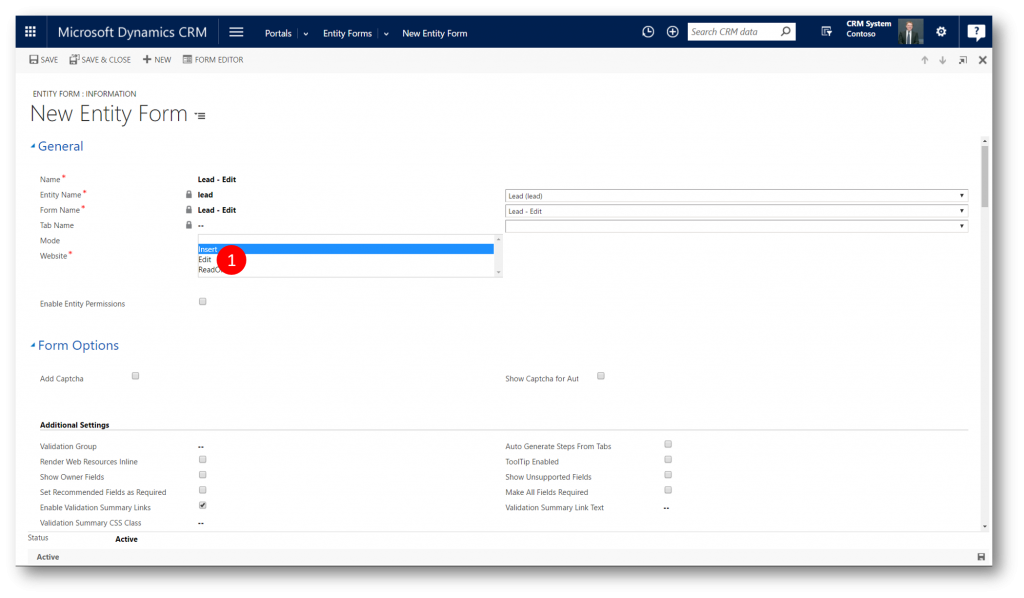
- Mode = Edit
- Record Source Type = Query String
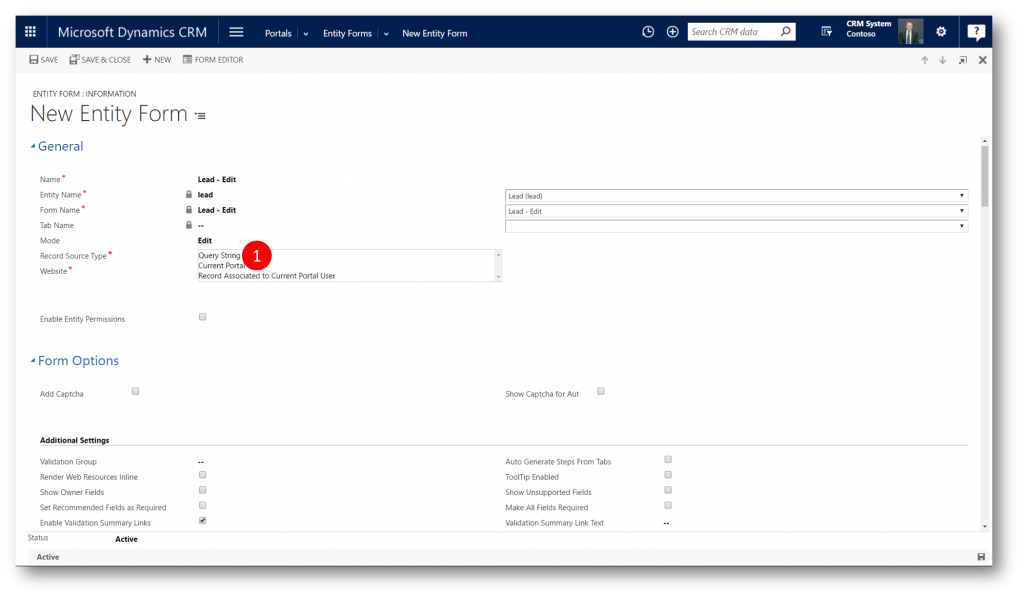
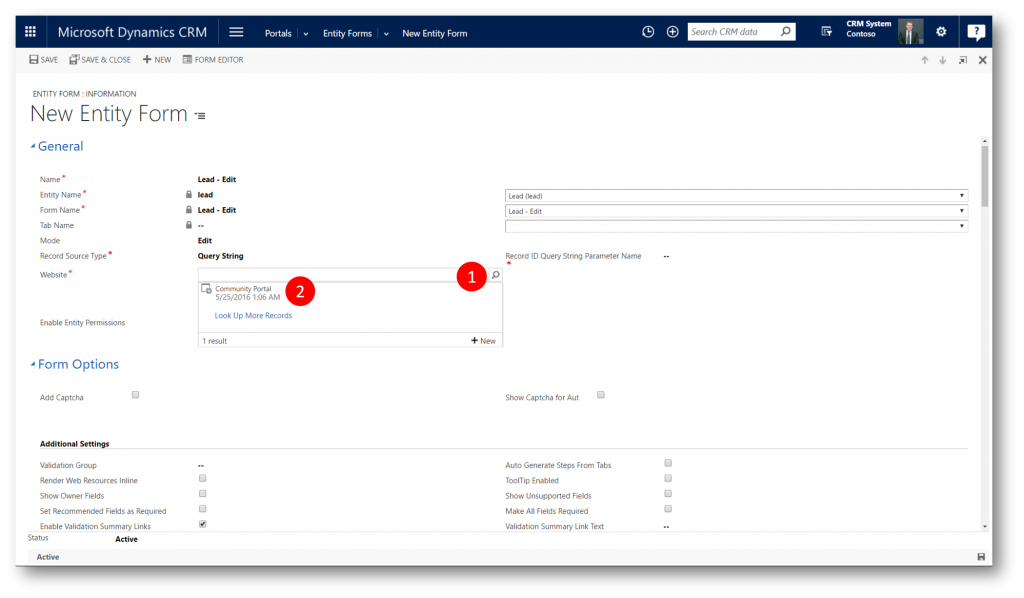
- Website = Community Portal
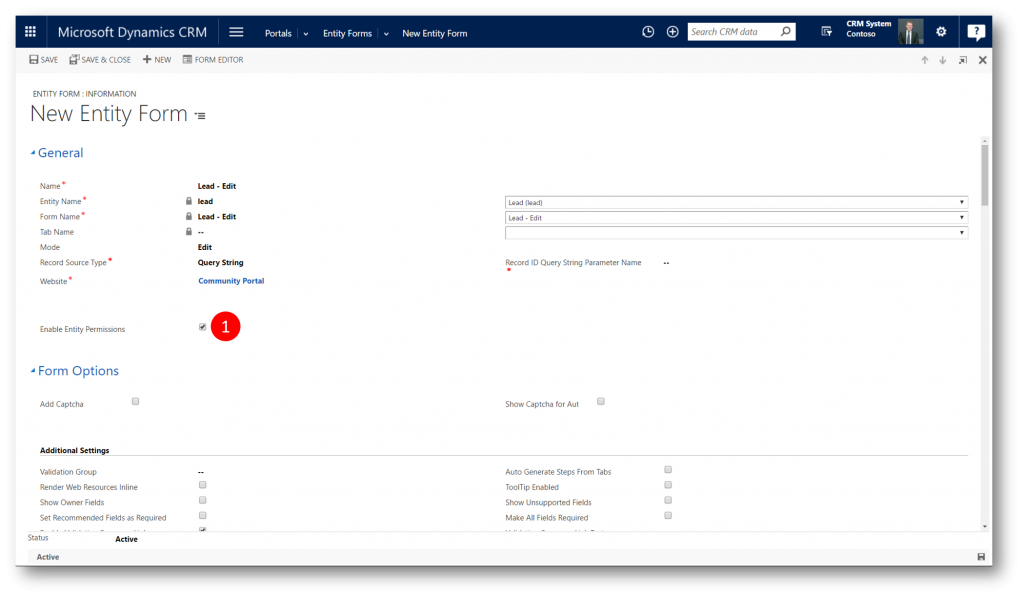
- Check the Enable Entity Permissions checkbox
Note: all of the Portal references default to “id”, so unless there is an exceptional circumstance, leaving the Record ID Query String Parameter Name as “id” is best.
Click Save 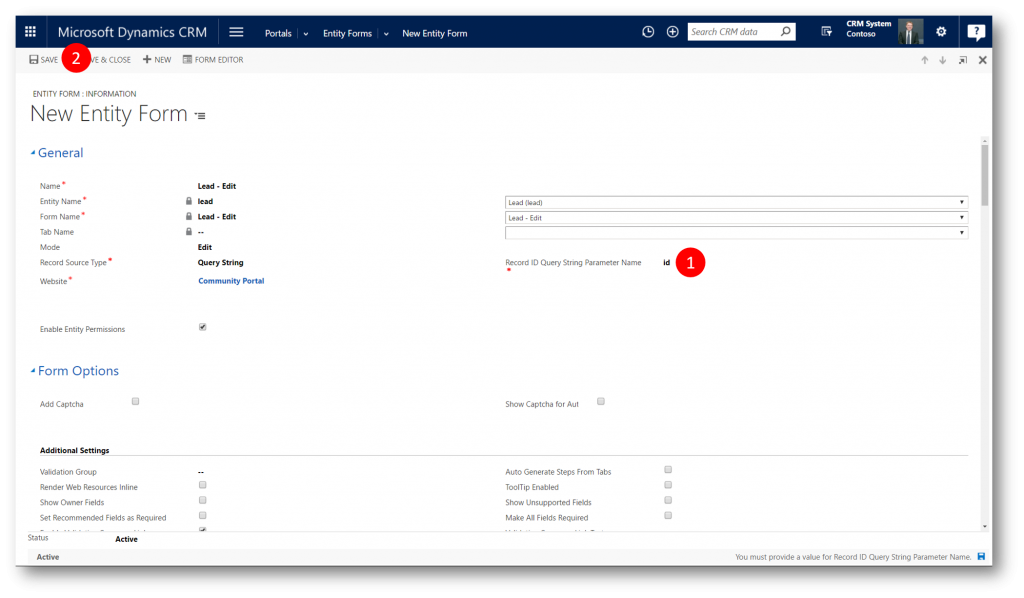
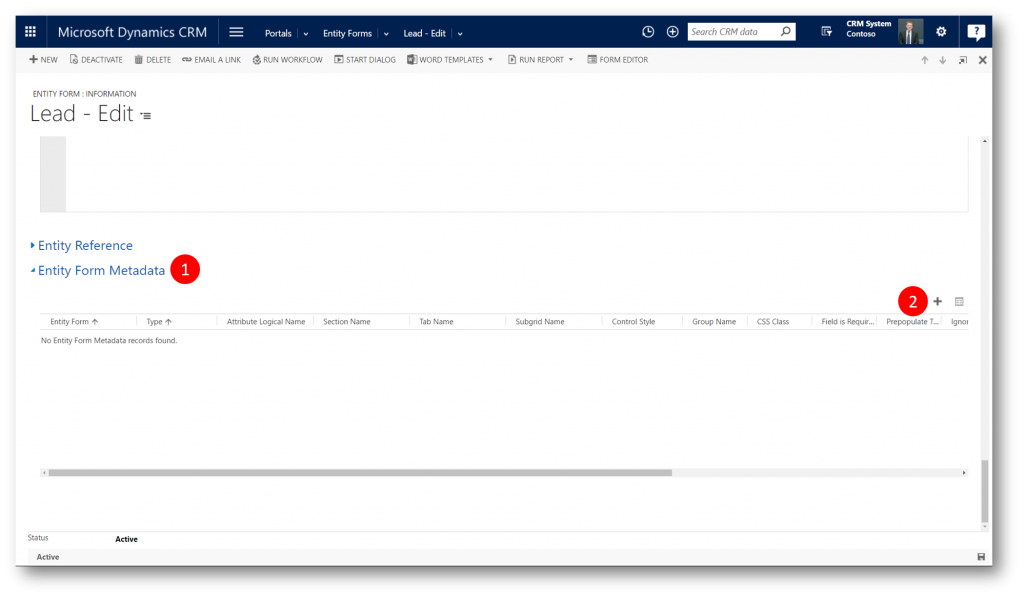
Scroll down to the Entity Form Metadata section, which (amongst other things) can be used to Enable Notes and Subgrid functionality
Click "+" to open the New Entity Form Metadata form
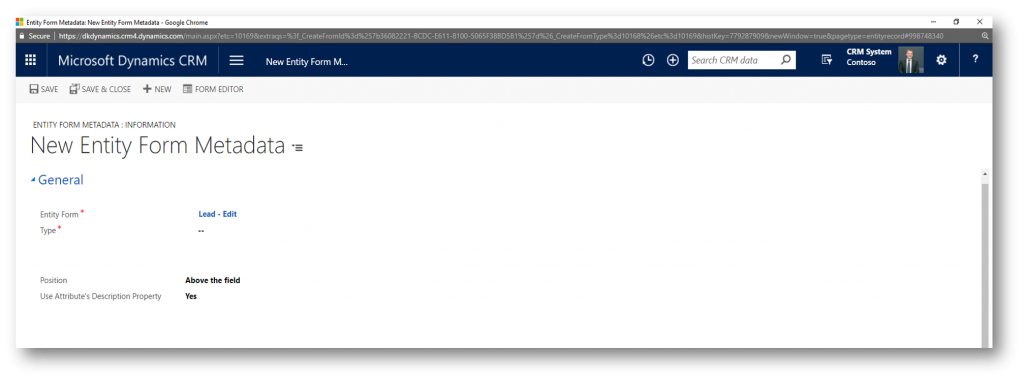
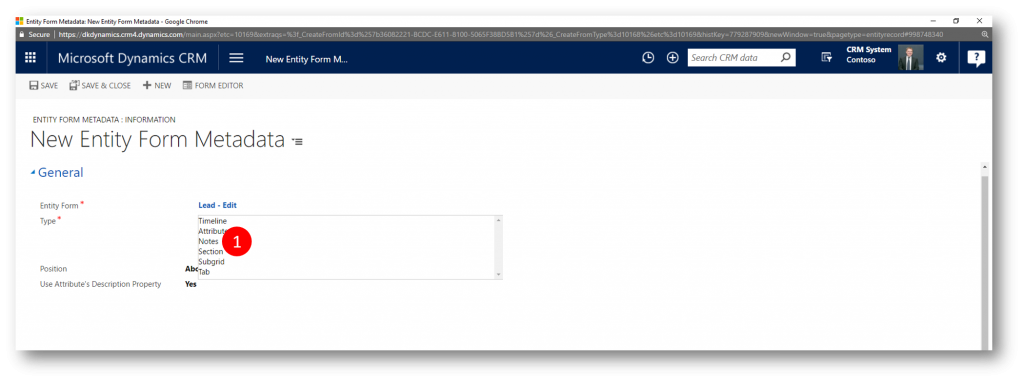
- Choose the Notes Type
- Create Enabled = True
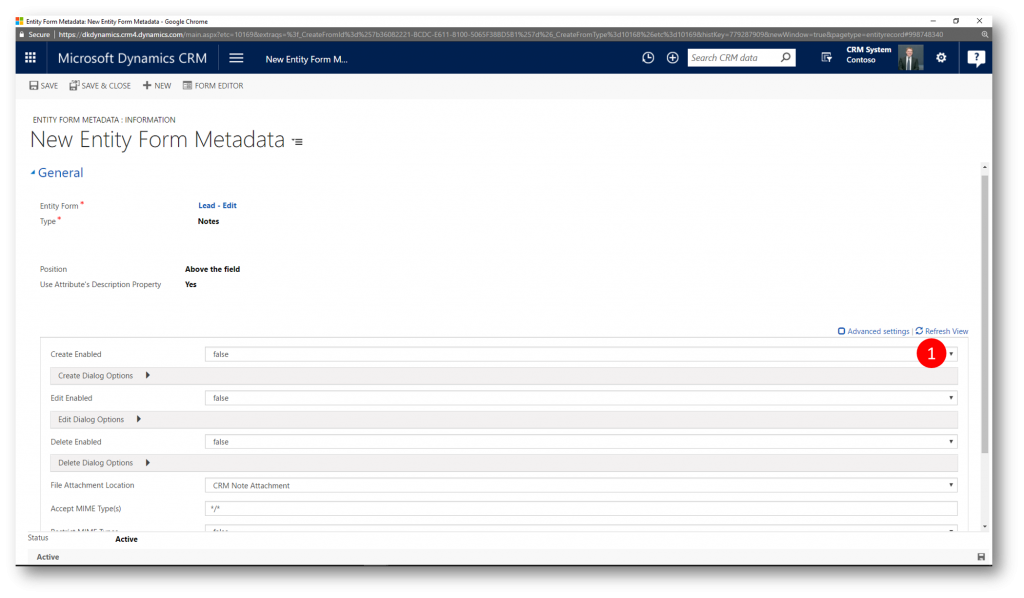
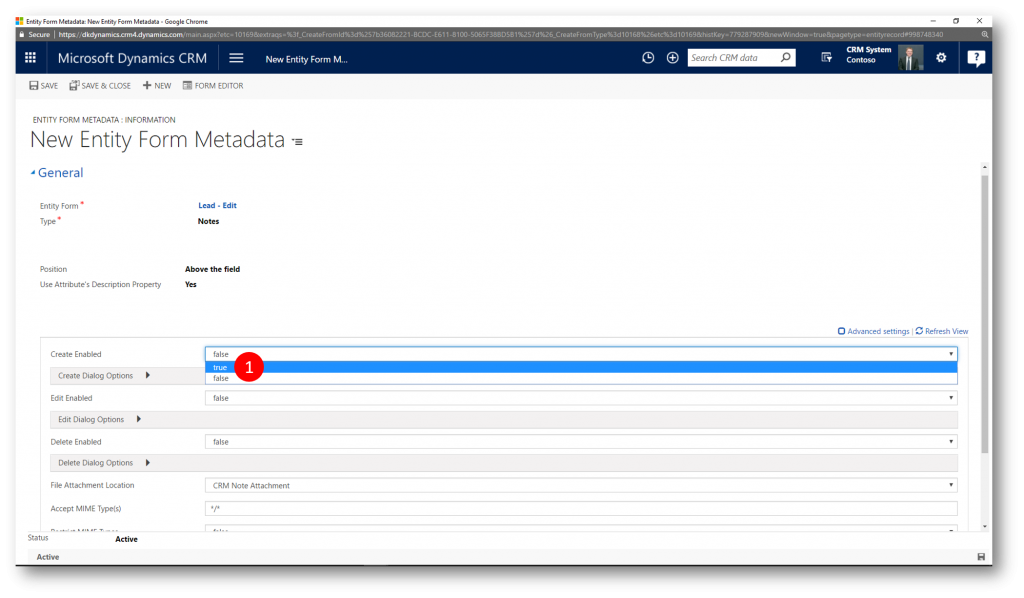
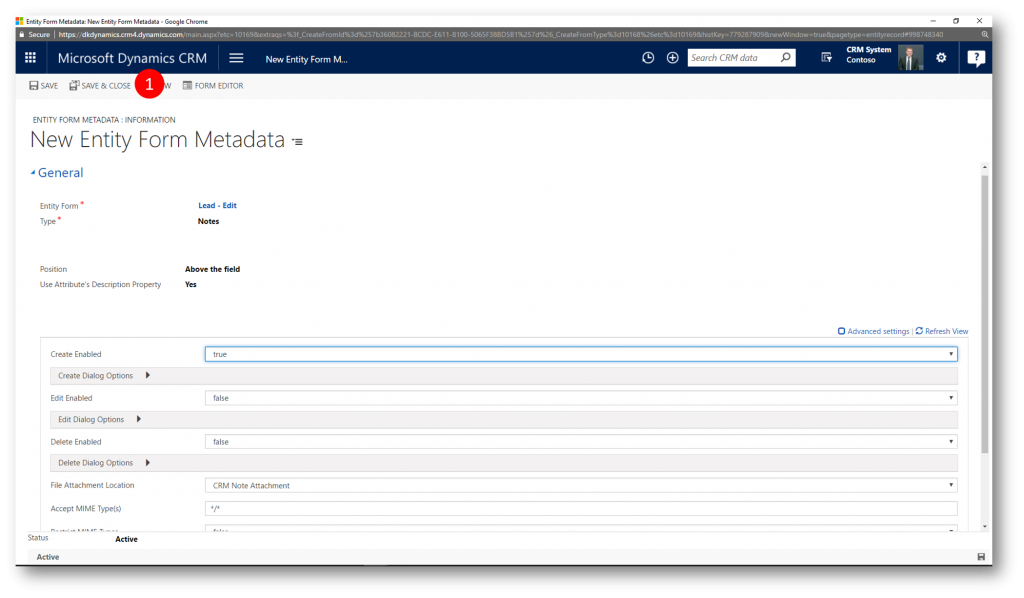
Save and Close the Entity Form Metadata and Entity Form records
Entity List
Next up is to connect the Partner Leads System view I created above to the portal with an Entity List
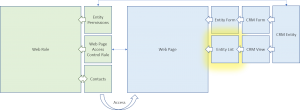
To Setup an Entity list
Navigate to Portals > Entity Lists to open the Active Entity Lists view

Click New to open the New Entity List form

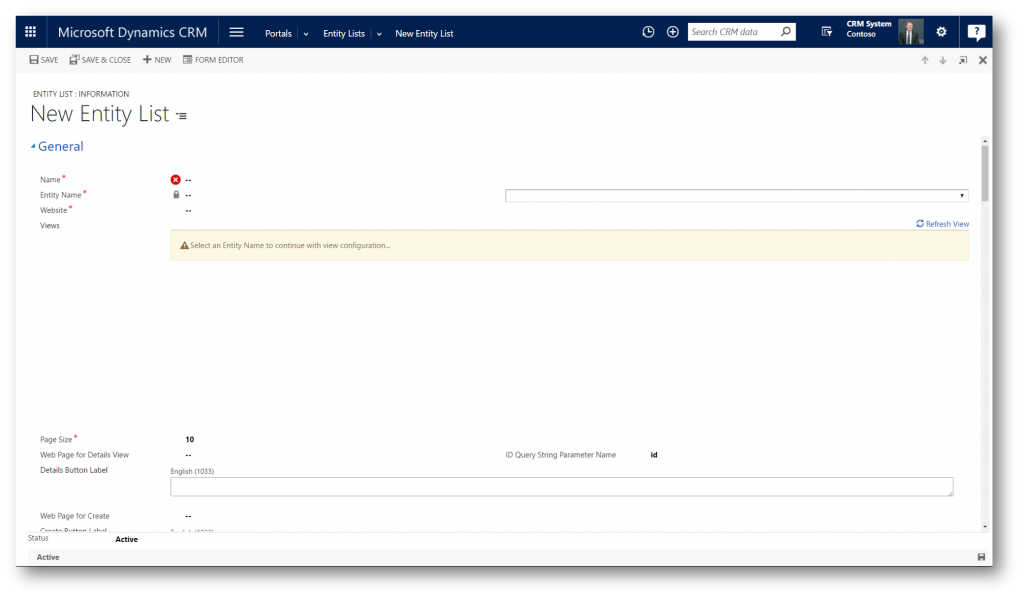
Provide the values
- Name = “Partner Leads”
- Entity Name = Lead (lead) (2) (3)
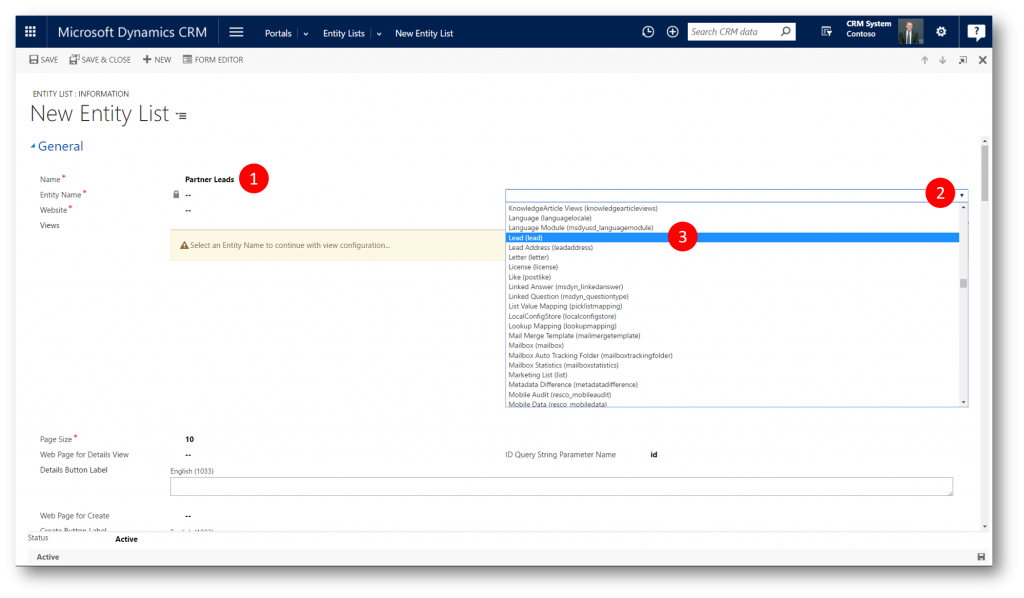
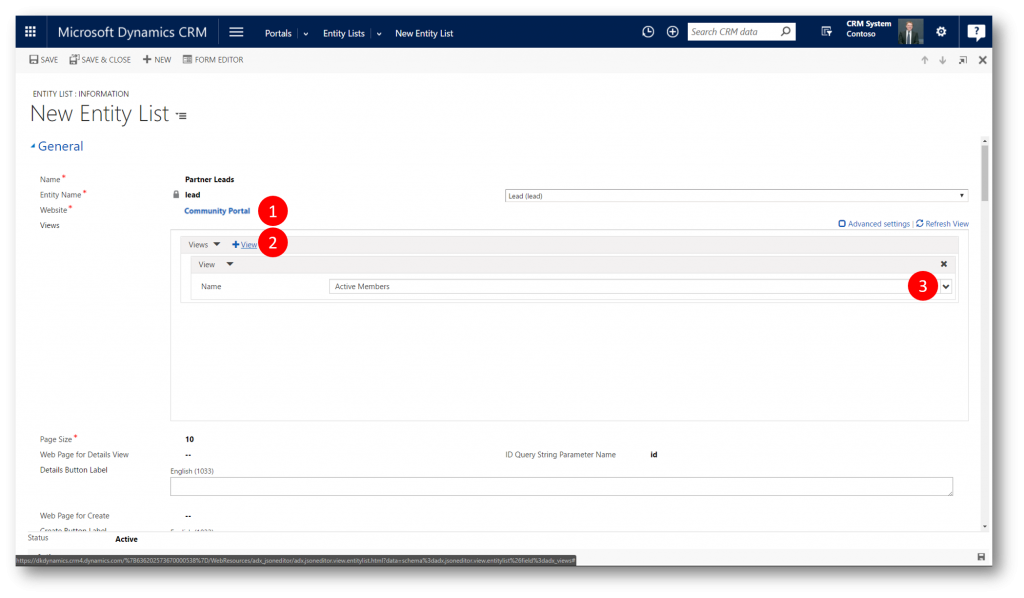
- Web Site = Community Portal
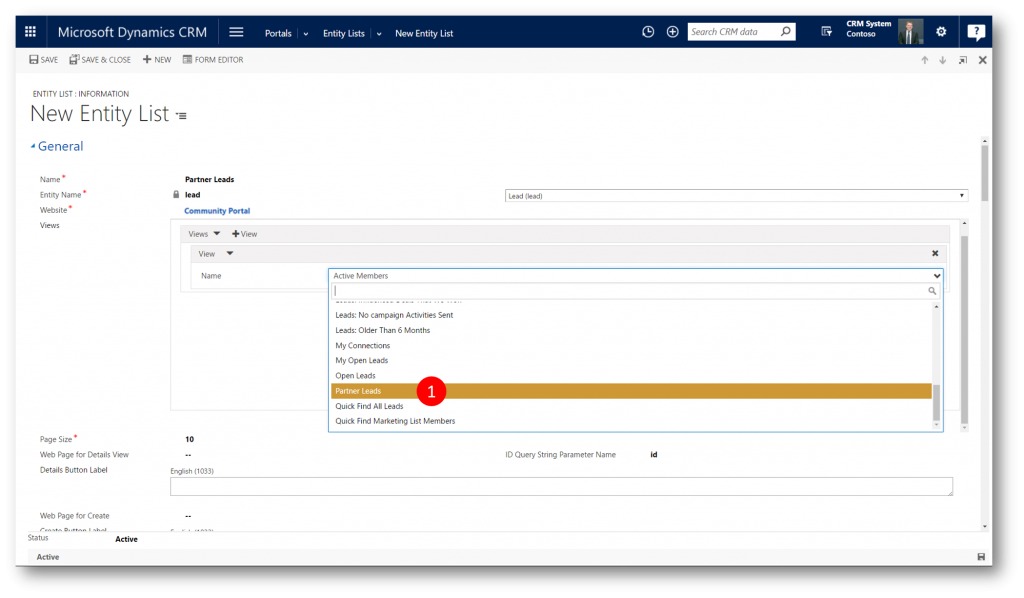
Click " + View" (2) to add a view picker, and then the down arrow (3) to pick the view "Parter Leads"
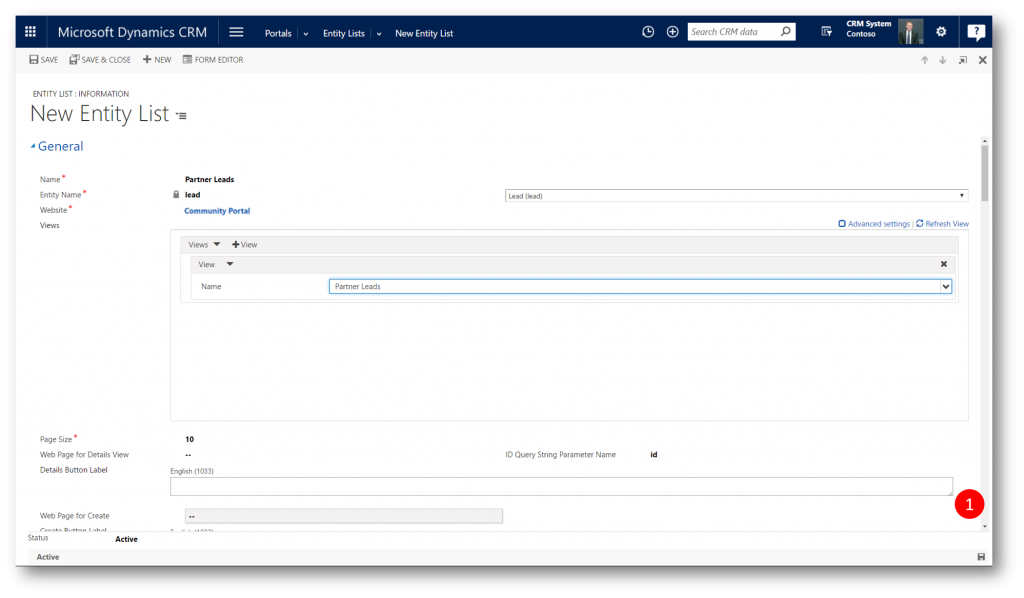
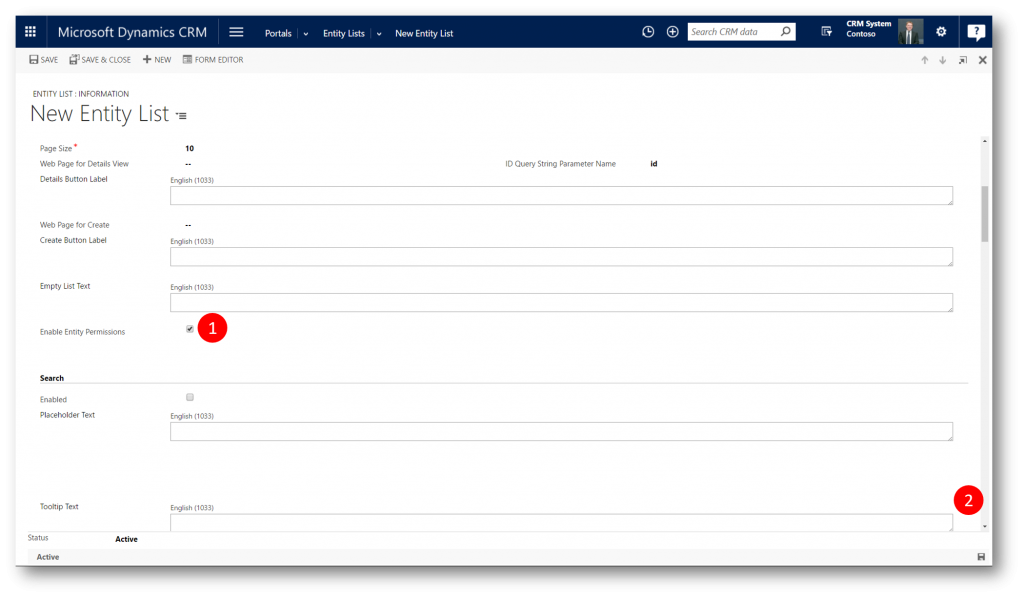
Check the Enable Entity Permissions checkbox (1)
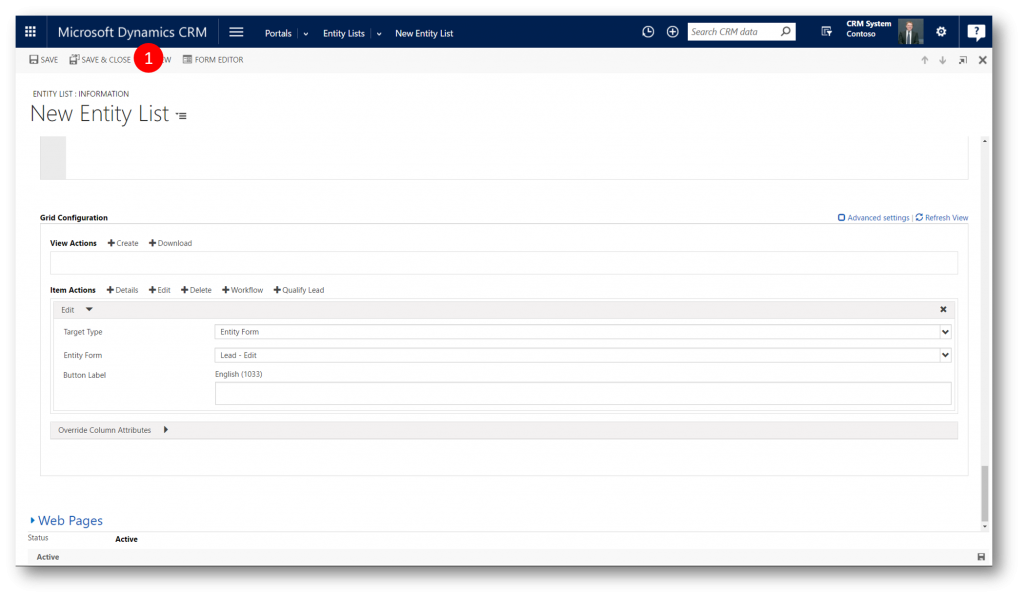
Scroll to the bottom of the New Entity List form to the Grid Configuration section
Click "+ Edit" to add an Edit action to the Grid Configuration pane (this action enables a partner to edit a Lead record in the Entity List)
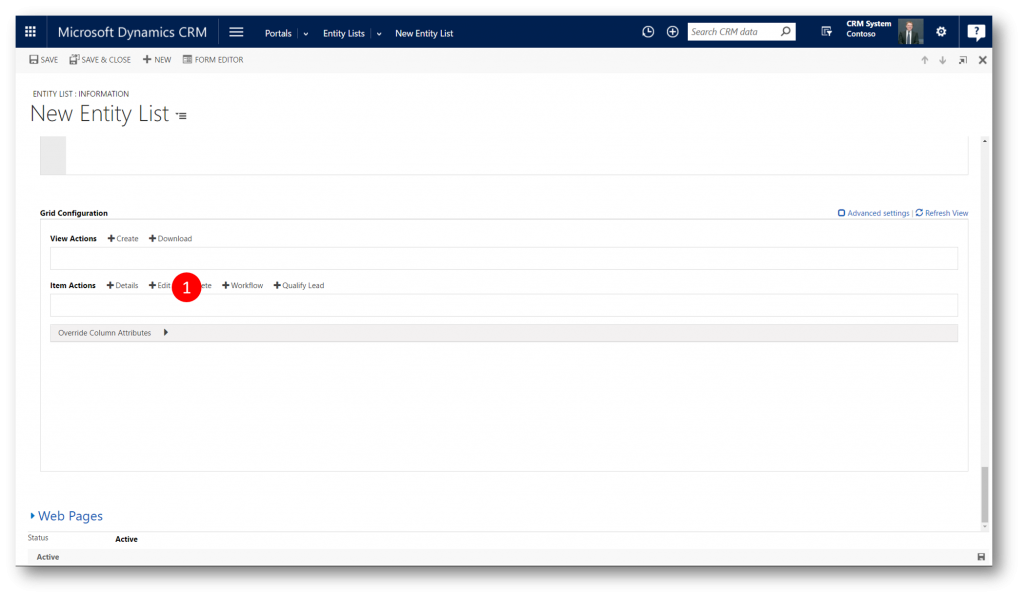
When a partner clicks Edit in the Entity List I'll display the Entity Form I created above
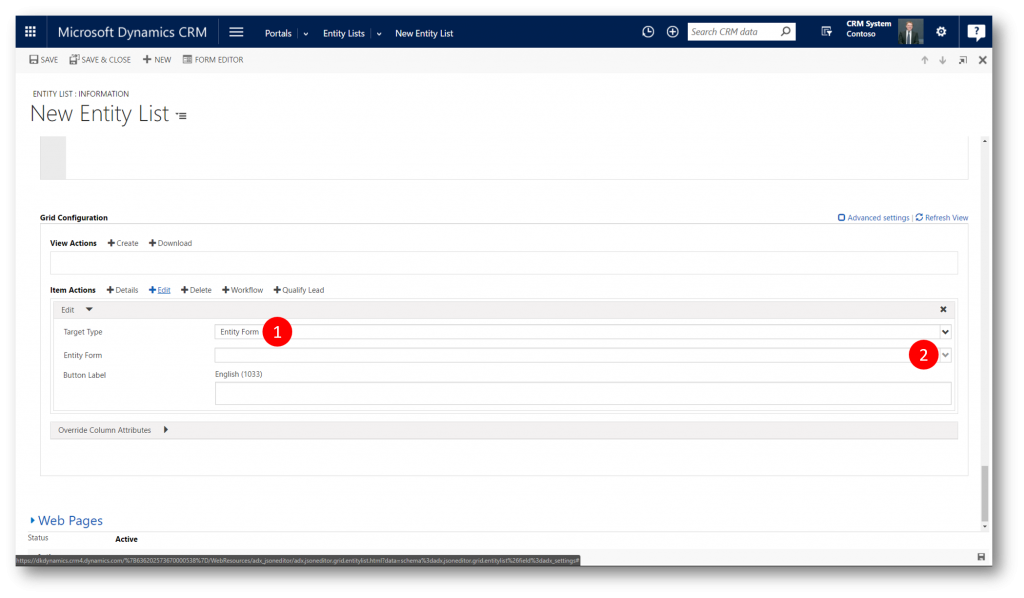
Leave the Target Type as Entity Form
Choose Lead – Edit from the Entity Form drop-down
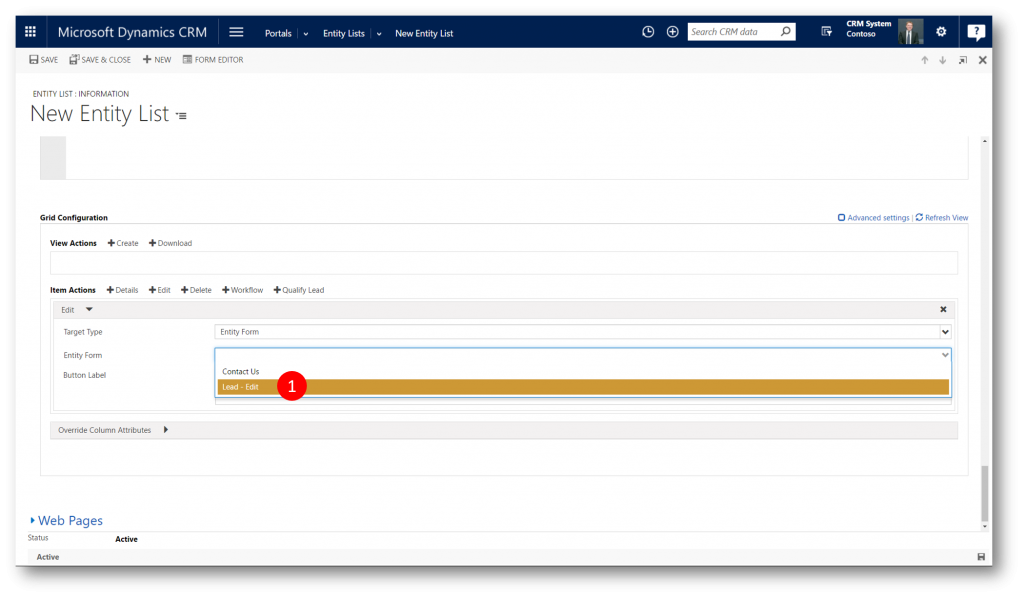
Click Save and Close to save and close the new entity list
Web Page
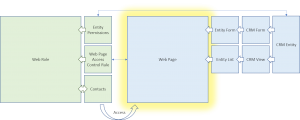
Now its time to add the Entity List to the Portal. The list will be hosted on a new web page.
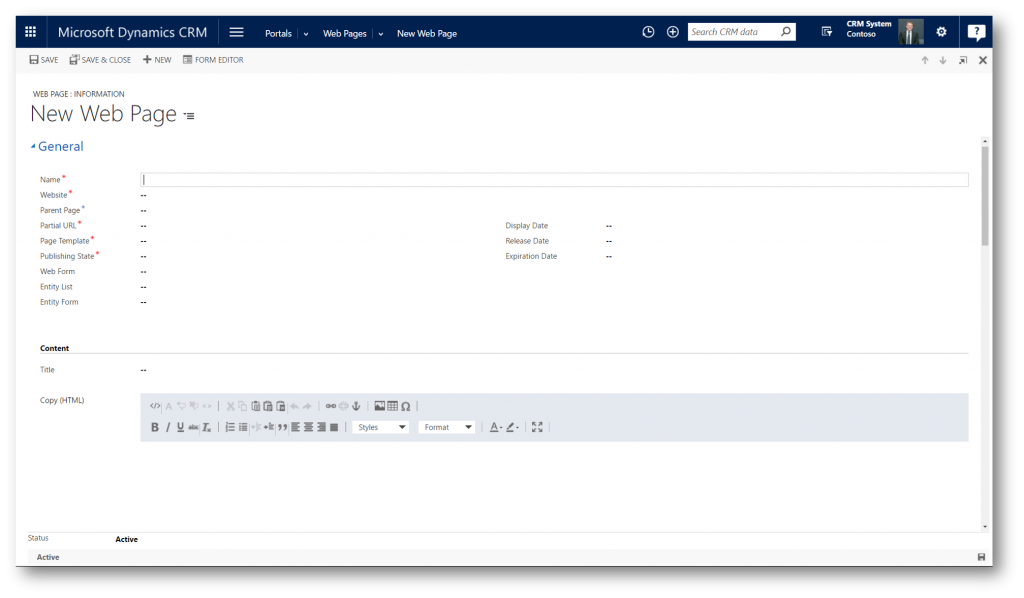
To Setup a Web Page
Navigate to Portal > Web Pages to display the Active Web Pages view. In the view click New to display the New Web Page form

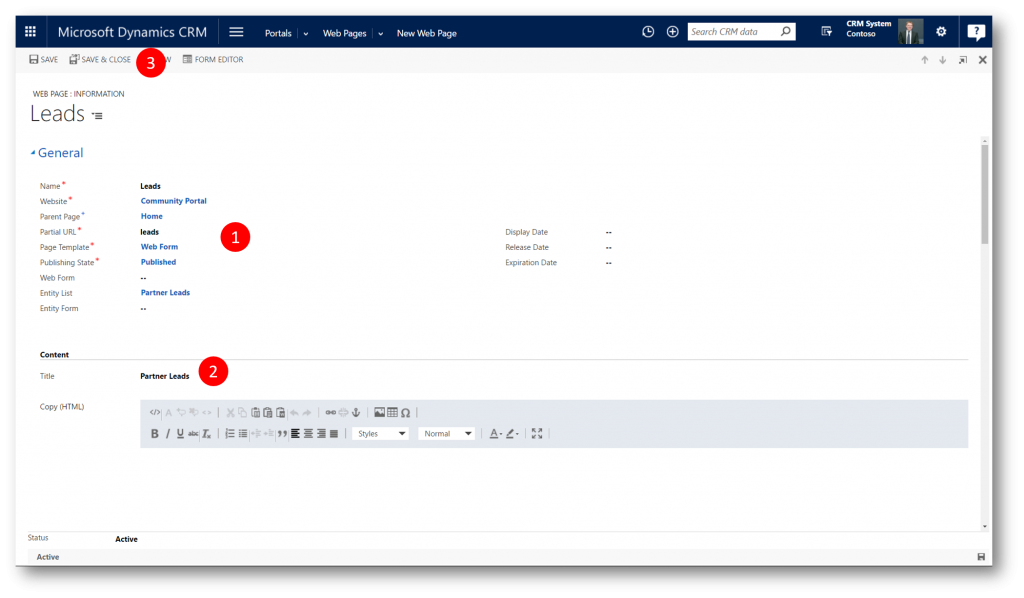
Provide the values
- Name = "Leads"
- Website = Community Portal
- Parent Page = Home
- Partial URL = "leads"
- Page Template = Web Form
- Publishing State =Published
- Entity List = Partner Leads
and click Save and Close to close the web page
Navigation
To provide my partners with easy access to the new web page I'll add an entry for the "Leads" web page to the primary navigation in the portal.
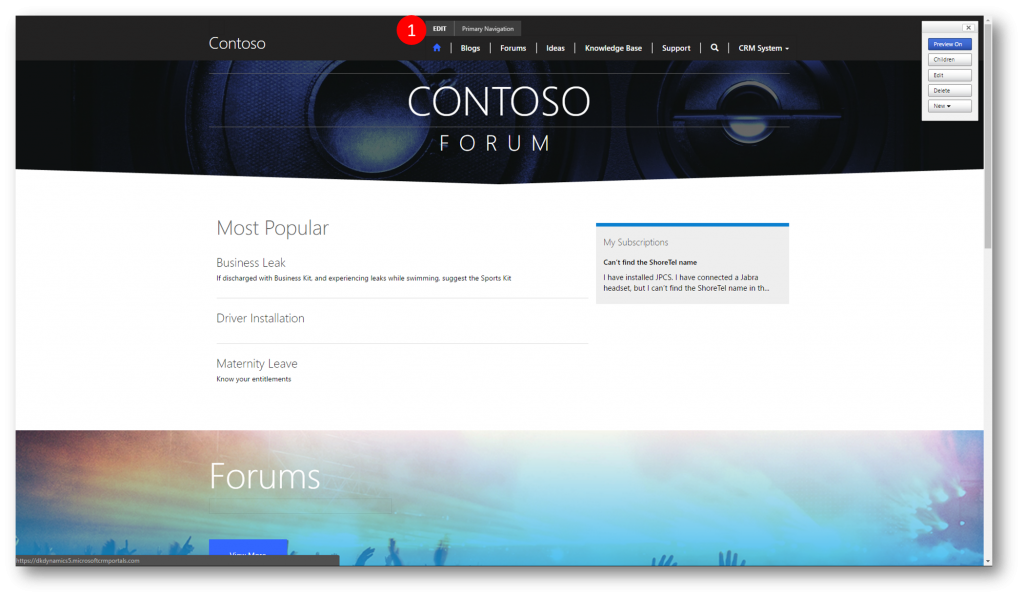
I log into to the portal as an Admin, hover the cursor over the Primary Navigation are and click EDIT (1) to open the Edit Primary Navigation dialog
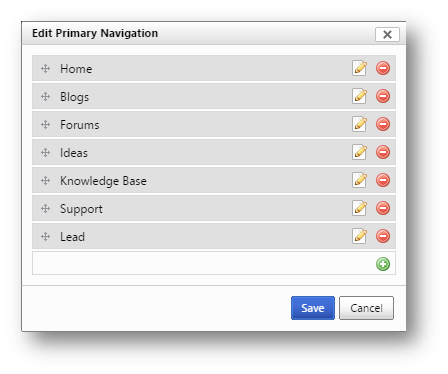
In the Edit Primary Navigation dialog click the green "+" button in the lower right to display the Add a New Link dialog
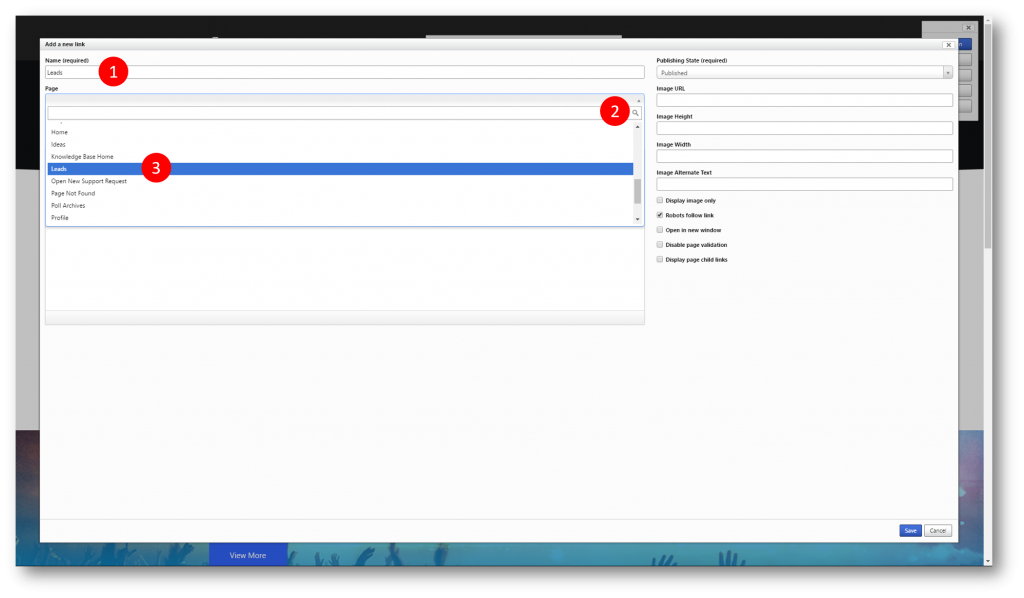
In the Add a New Link dialog provide the values
- Name = "Leads"
- Page = Leads
and click Save in the lower right to close the Add a New Link dialog and return to the to the Edit Primary Navigation dialog
Verify the new entry and click Save 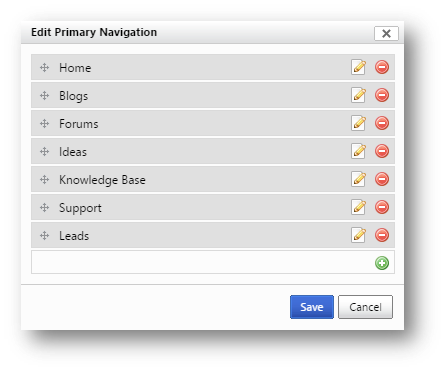
The web page is now added to the Primary Navigation

Web Page Access Control Rule
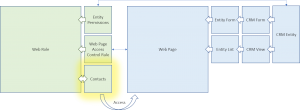
To protect the web page “Leads” and make it visible to only my partners I set a Web Page Access Control Rule on the Web Role I setup earlier.
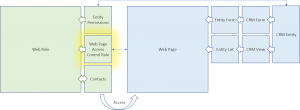
To Setup a Web Page Access Control Rule
Navigate to Portals > Web Roles to open the Active Web Roles view

In the Active Web Roles view click "Partners" to open the web role "Partners"

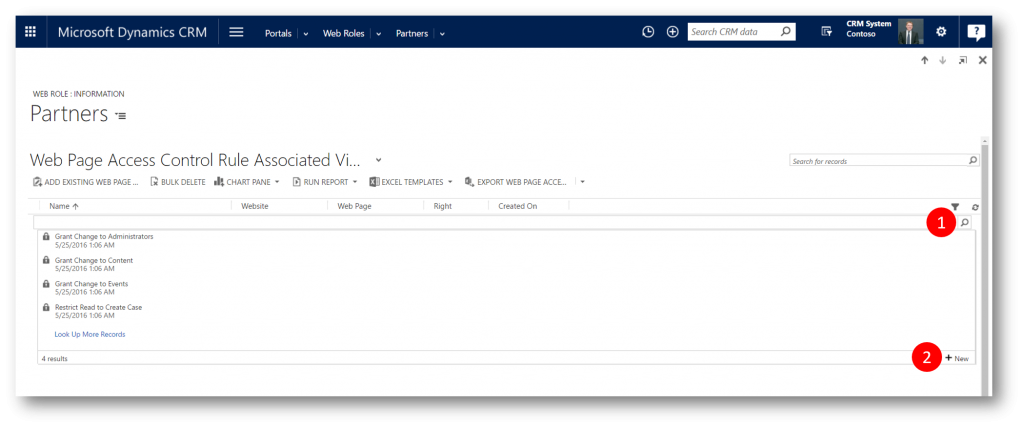
Click the down arrow next to "Partners" (1) in the navigation bar and then Web Page Access Control Rules to open the Web Page Access Control Rules Associated View 
In the Web Page Access Control Rules Associated View click the ADD EXISTING WEB PAGE CONTROL RULE command (1) to open the lookup and creation dialog

Click the magnifier icon and then the " + New" button to open the New Web Page Access Control Rule dialog
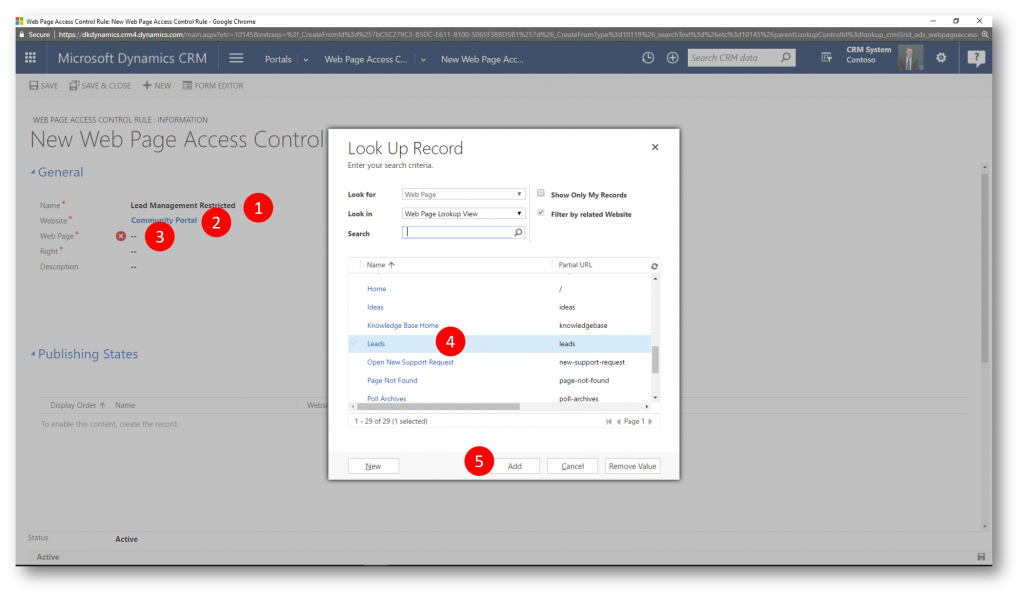
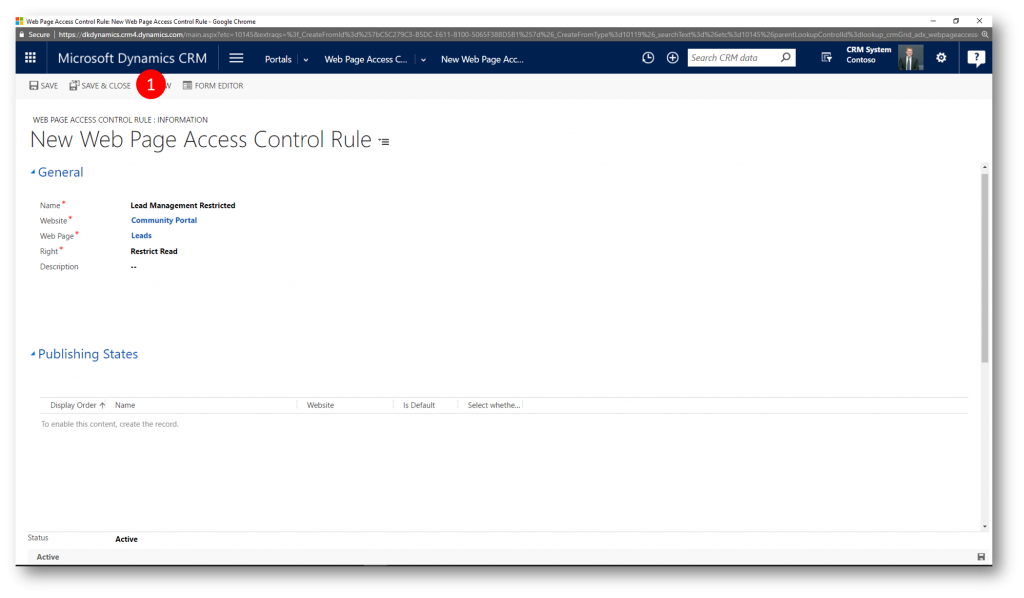
In the New Web Page Access Control Rule dialog provide the values
- Name = "Lead Management Restricted"
- Website = Community Portal
- Web Page = Leads
- Right = Restrict Read
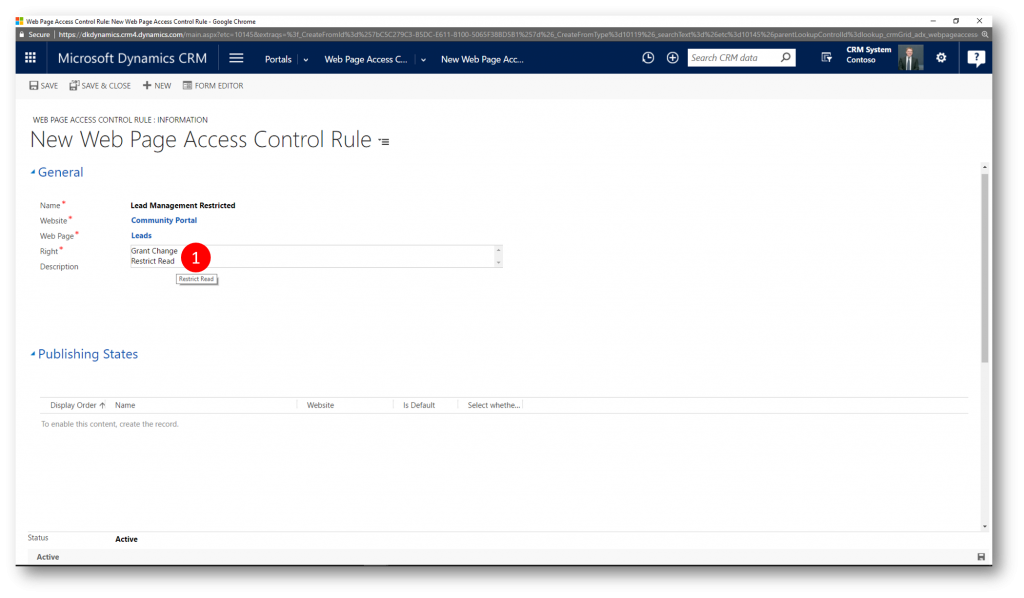
Click Save and Close to close the dialog
Contacts
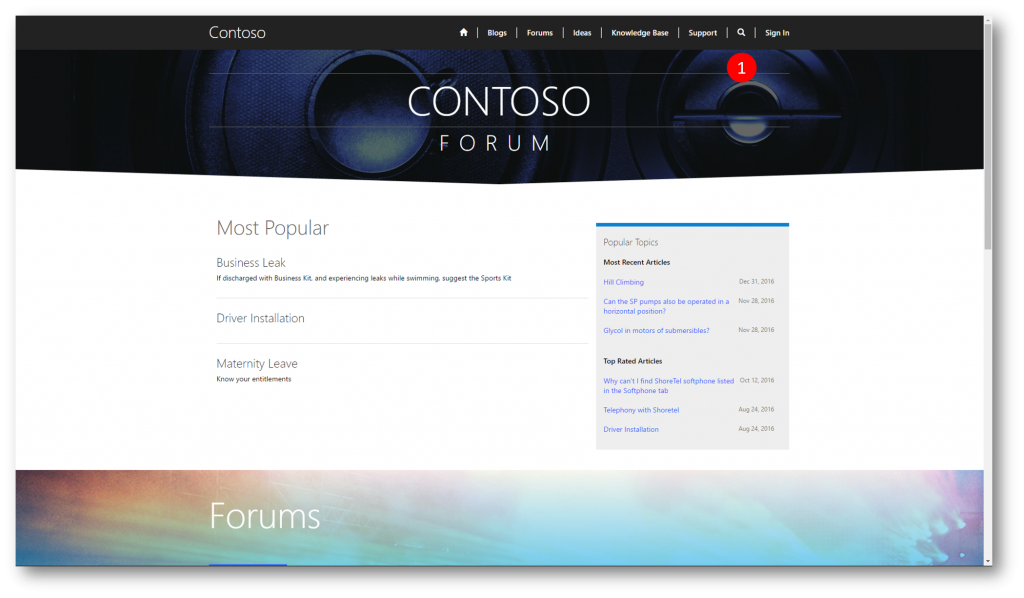
Anonymous users or contacts who aren't members of the web role "Partners" won't see the "Leads" entry in the Primary Navigation on the portal. To test the security, as well as the other capabilities I setup above, I'll invite a contact (Adam Carter) to the portal and add him to the "Partners" web role
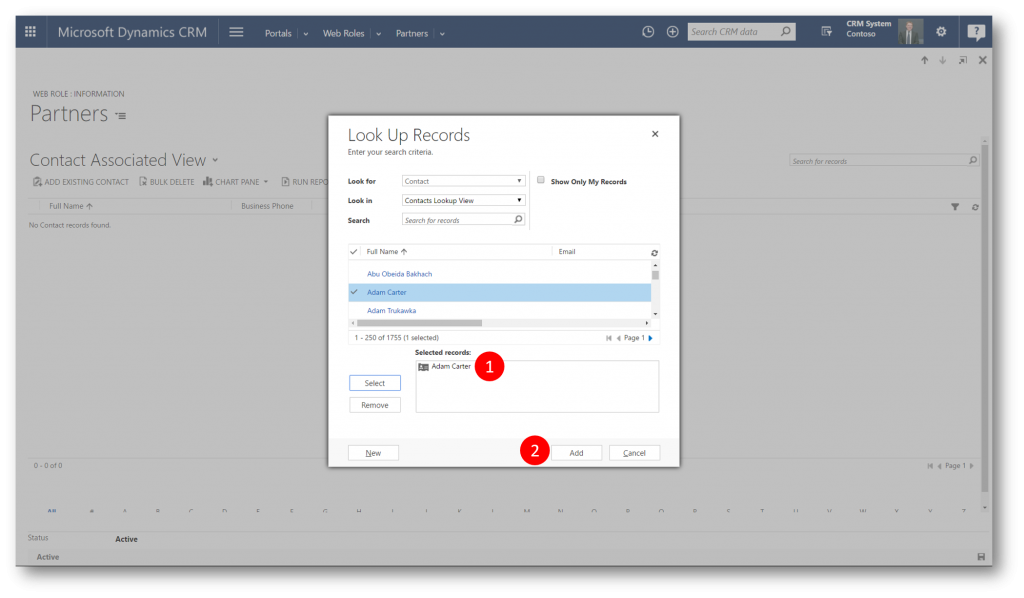
To Setup Web Role Contacts
Still on the web role "Partners" click the down arrow (1) and then Contacts (2) to open the Contact Associated View 
In the Contact Associated View click ADD EXISTING CONTACT and add Adam Carter

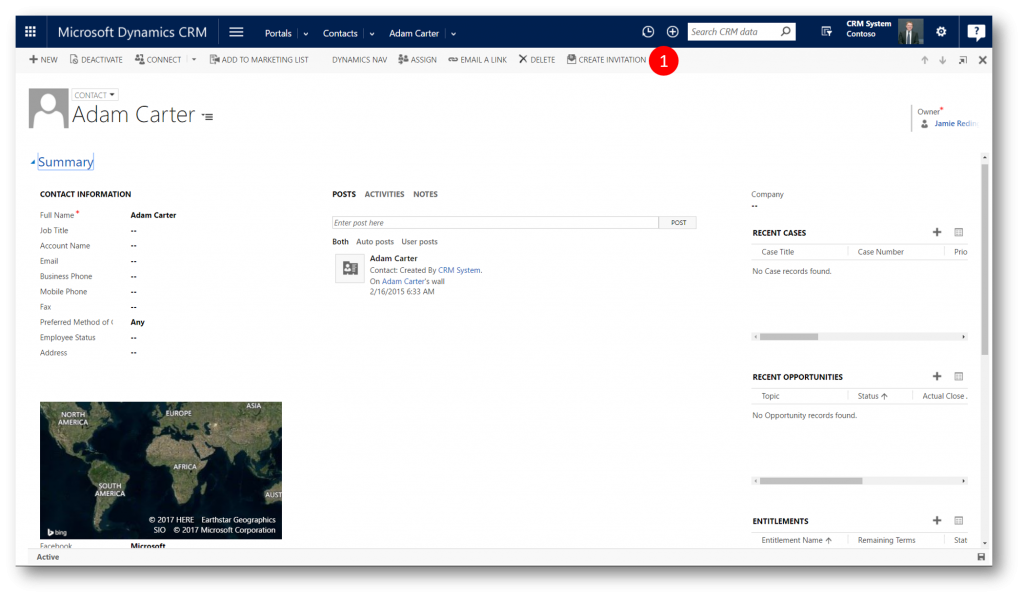
To invite Adam Carter the portal I open the contact record for Adam Carter and click the CREATE INVITATION command (1)
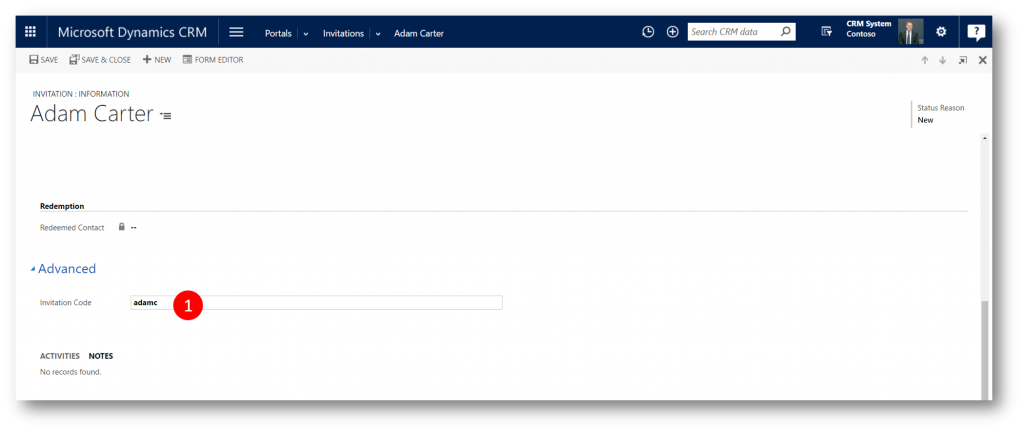
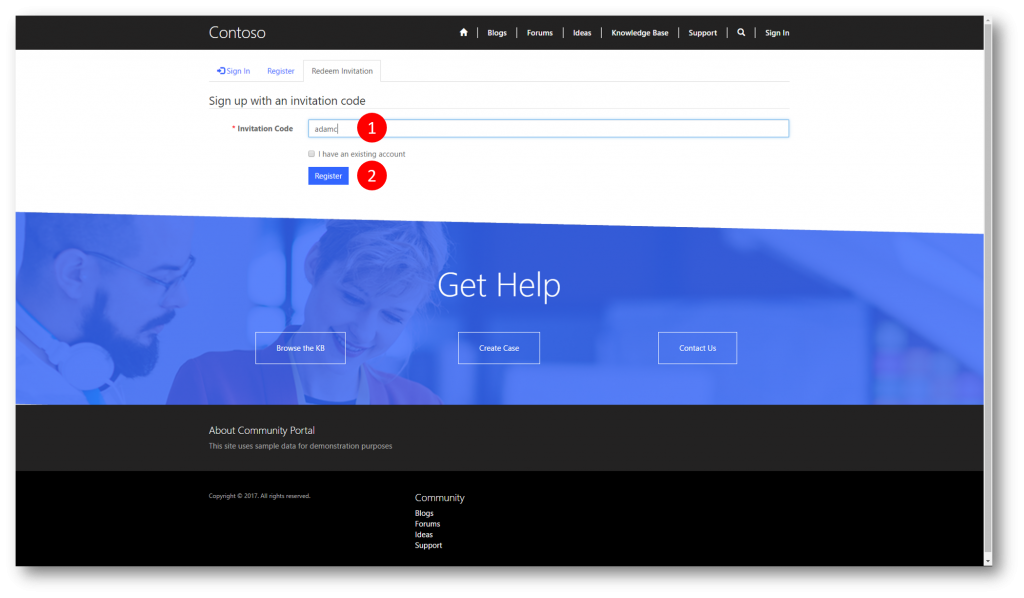
Invitation Code = "adamc"
Logging in as a partner and updating a Lead
Now assuming the role of Adam Carter, who accesses my portal for the first time in order to update a Lead
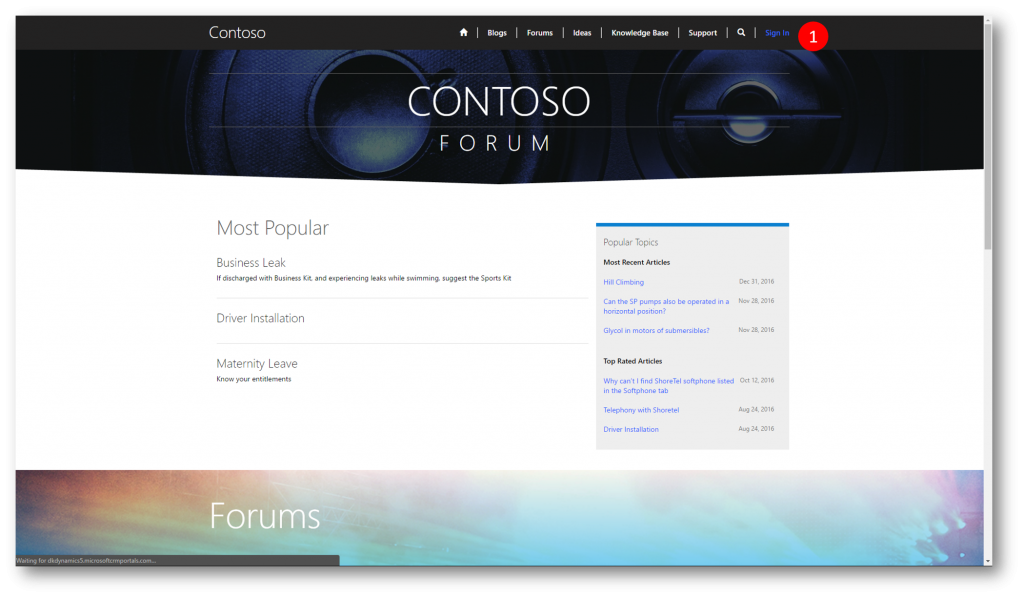
Adam clicks the Sign In command (1)
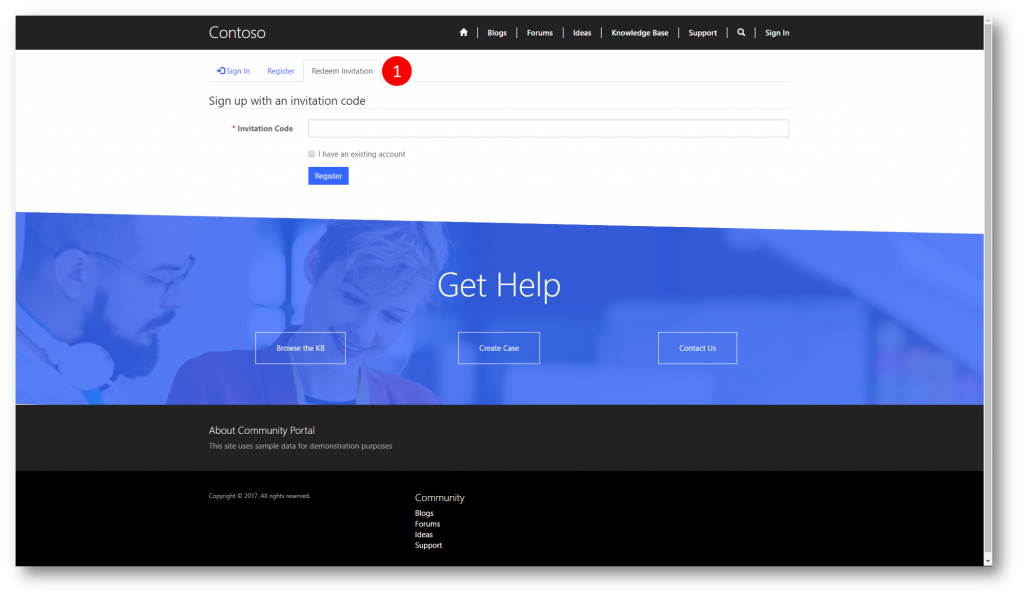
On the sign in page Adam clicks the Redeem Inviation tab and provides his invitation code
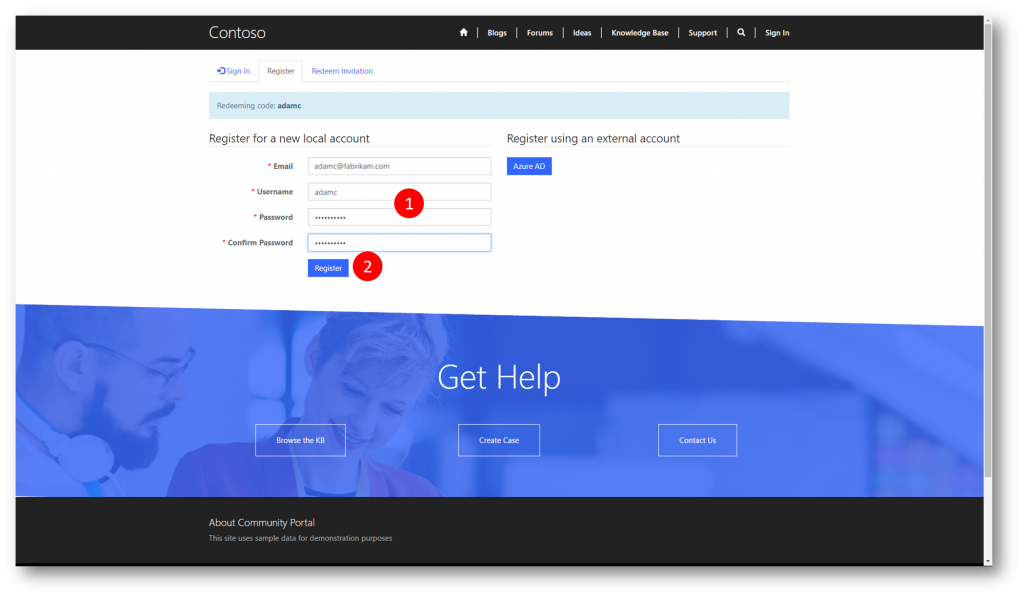
He is take to the Register tab, in which he can specify username and password
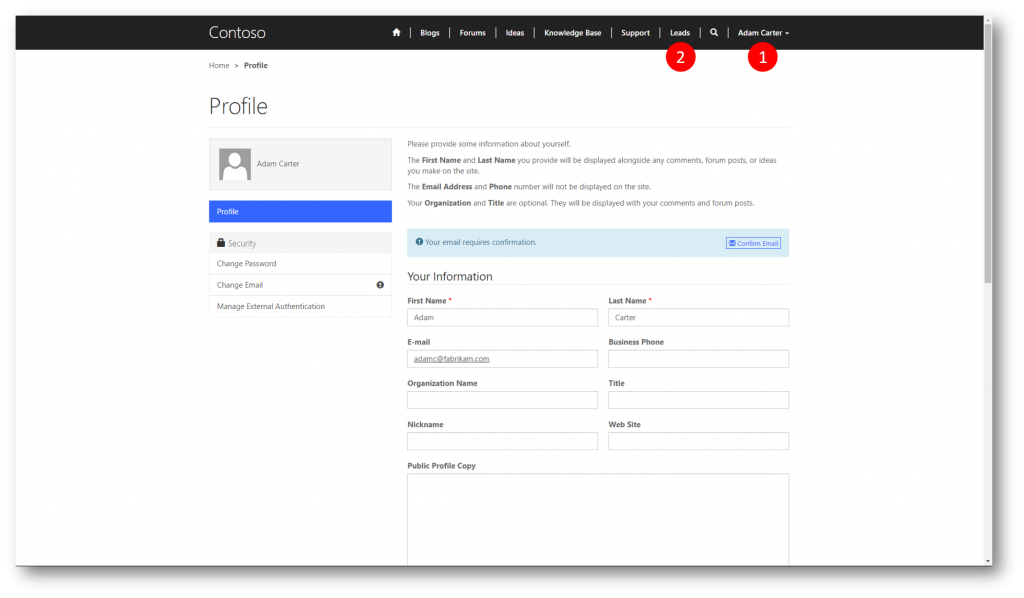
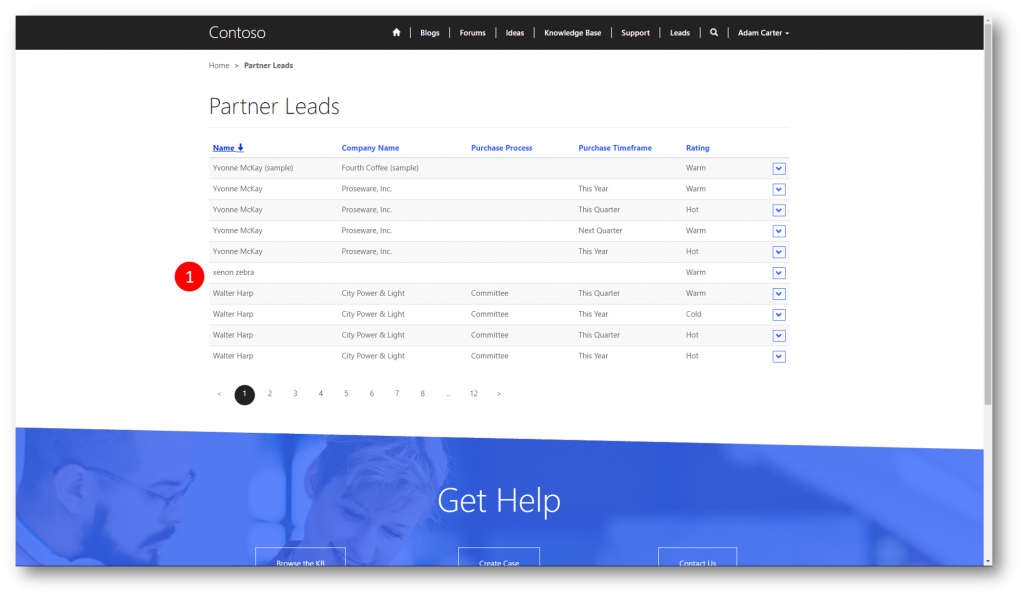
Now authenticated (1) the portal displays the "Leads" page (2) to Adam, since he is a member of the web role "Partners"
Adam clicks the "Leads" page to navigate to the list "Partner Leads"
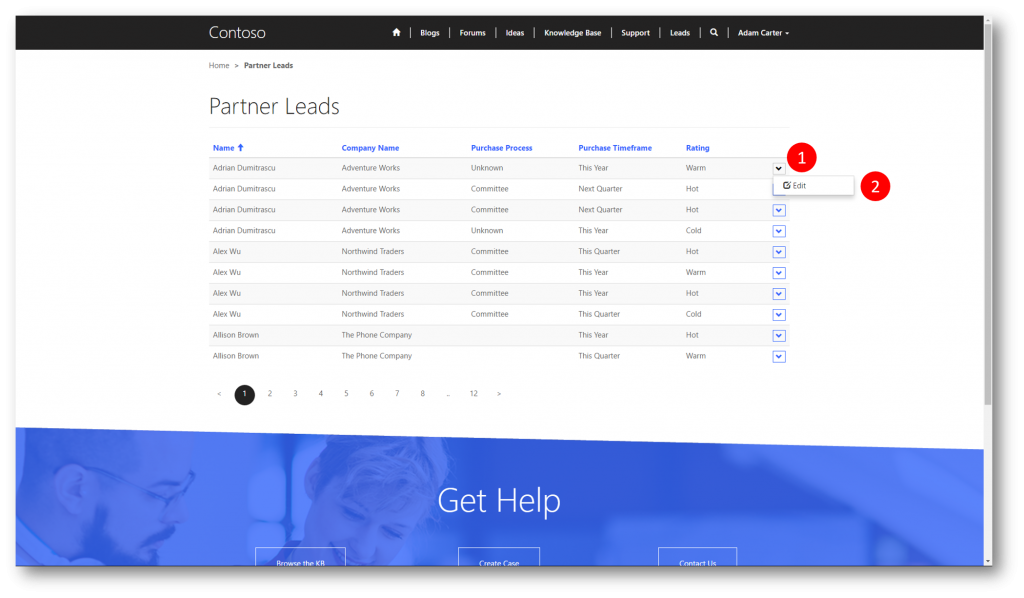
In the list "Partner Leads" Adam wants to update the lead at the top of the list. He clicks the down arrow to the far right of the row, and then clicks Edit to display the form "Edit"
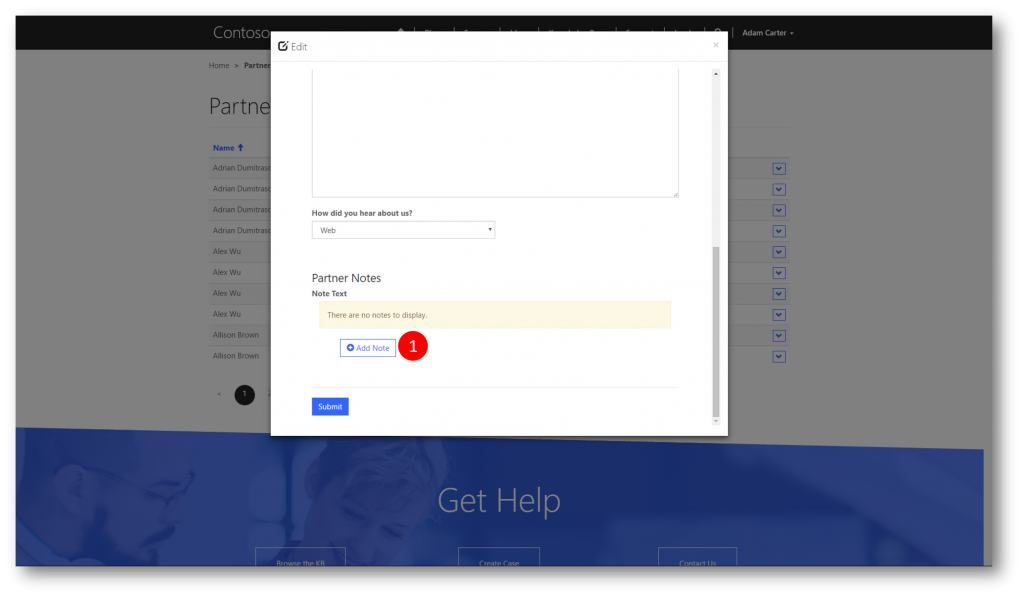
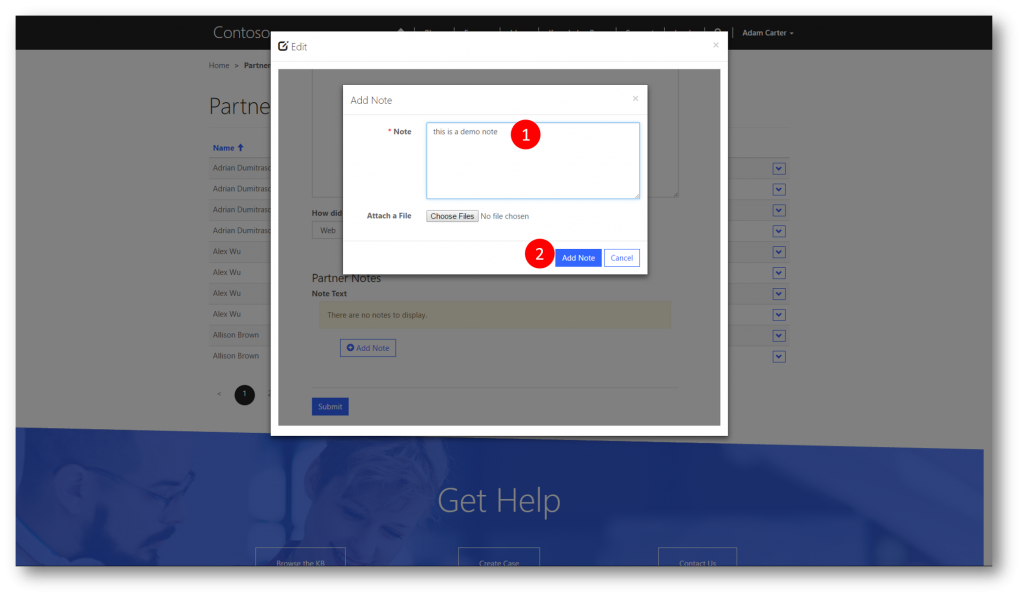
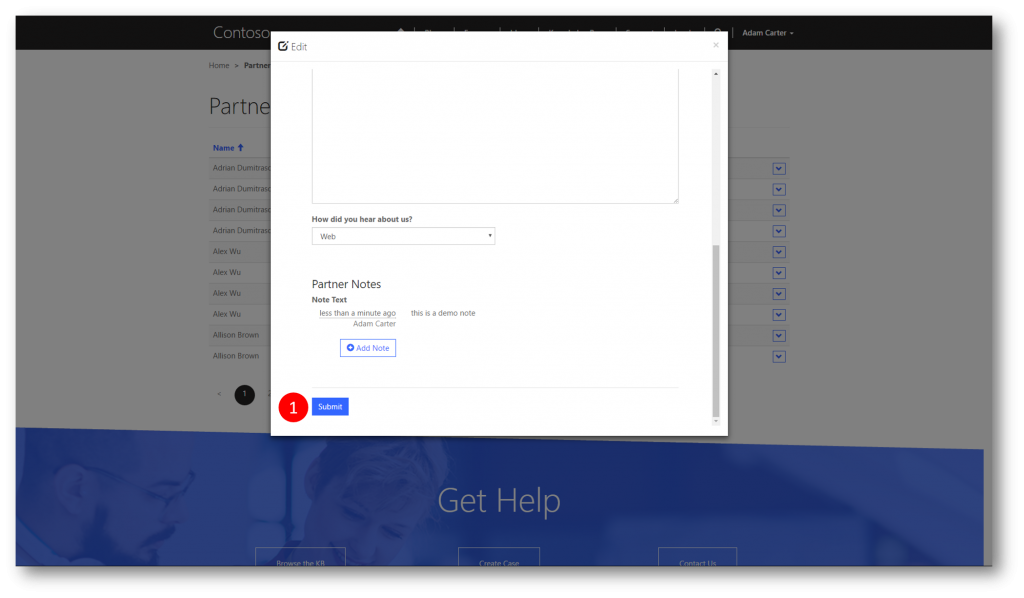
He scrolls to the bottom of the form to type and submit a note
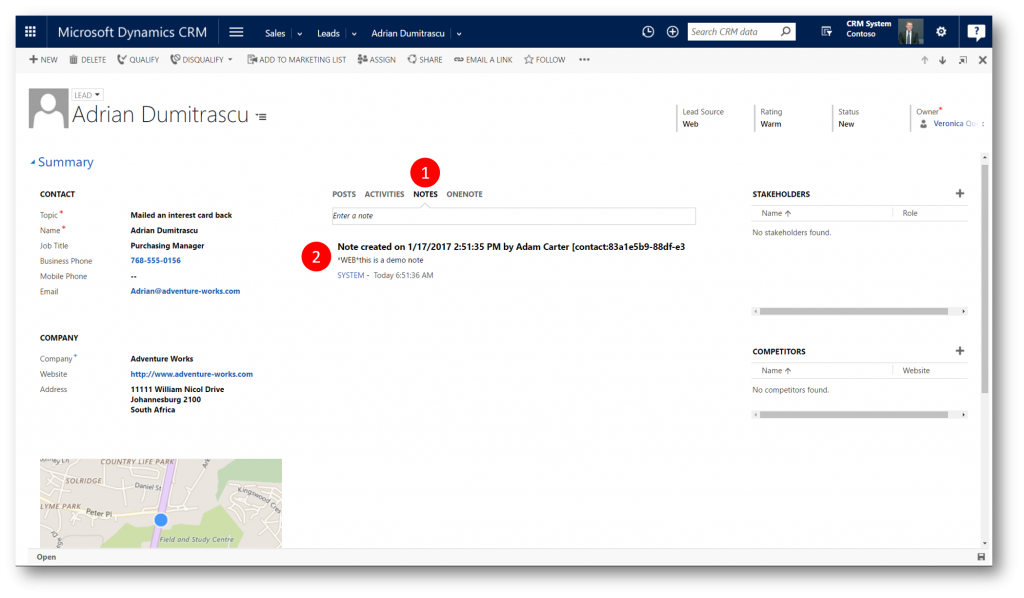
Back in Dynamics 365 (CRM) I can see the note Adam submitted for the lead on the Activity Wall of the lead
Creating Leads
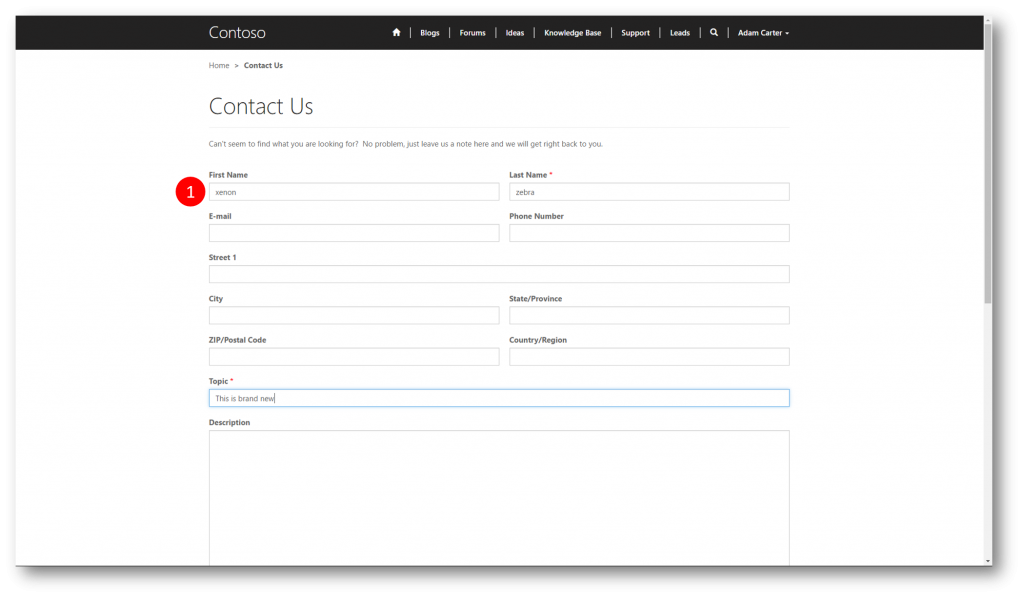
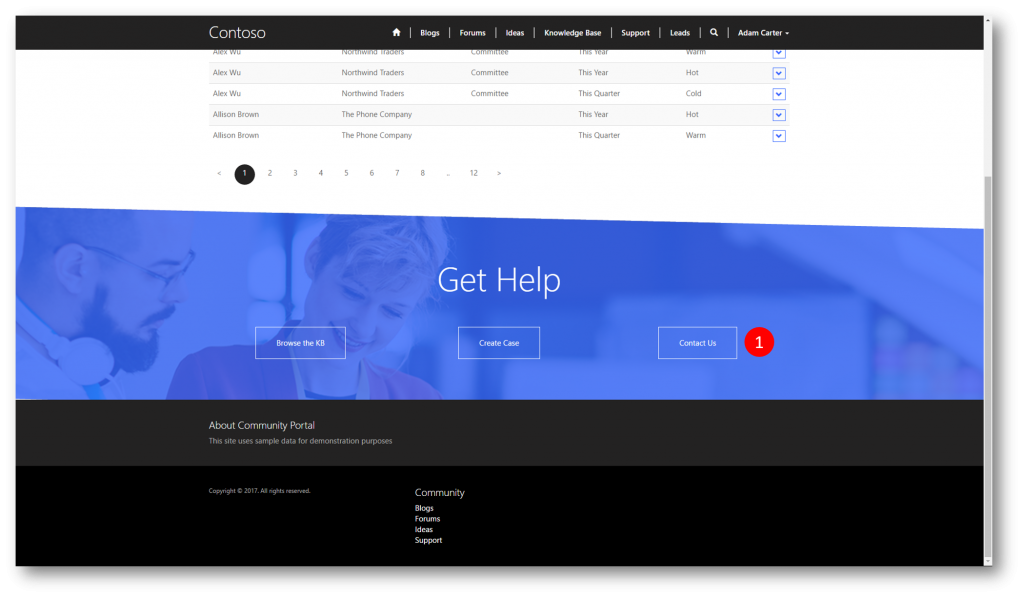
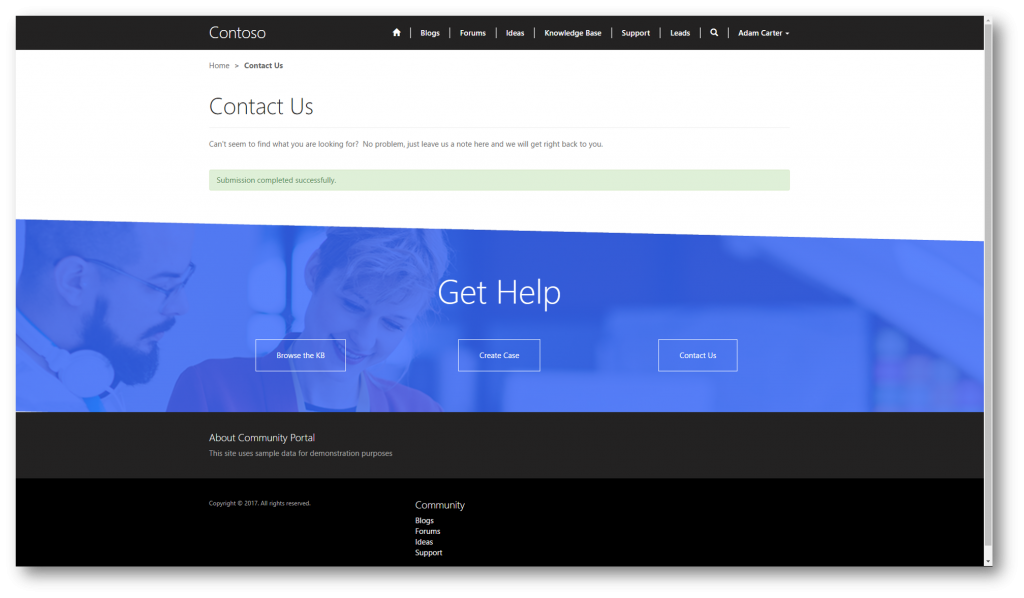
Users who accesses my portal (whether they are authenticated or anonymous) and clicks the Contact Us link at the bottom of each page will be created as Leads automatically (this capability is preconfigured, no need to set that up on a Community Portal)
In Conclusion
Configuring secure external access to your Dynamics 365 (CRM) data is easier than ever. Basically everything can be configured right from within Dynamics 365 (CRM) greatly reducing the need to learn a new UI.
See also
- Get started with a Dynamics 365 portal - link
- Administrator's Guide to portal capabilities for Microsoft Dynamics 365 - link
- Request a Portal trial - link
- July 2017 Update (new Administrative Wizard)
Comments
- Anonymous
January 26, 2017
In this example it seems that Adam (the partner employee), from Partner Company A, is able to see leads from all Partner companies. How do you prevent Mary, the partner employee at Company B, from seeing Adam's leads and prevent Adam from seeing Mary's Leads? To take it further, some partner companies might want to even prevent employees from the same partner company from seeing each others leads. Is this possible?Did I miss something? (which is always possible)- Anonymous
January 31, 2017
In this simplified example I just made all leads available to all partners (Scope = Global). You can use Scope = Contact and create a 1:N relationship between Contacts and Leads to enforce filtered views in the resulting Entity List- Anonymous
February 21, 2017
Would that mean that e.g. can you simply create a self-service site where a customer logs into the portal, and only sees his/her e.g. quotes and orders.Can that person then also create new e.g. quotes?
- Anonymous
- Anonymous
- Anonymous
February 22, 2017
I can honestly say this is the first time I've complimented an informational post. EXCELLENT JOB!!! - Anonymous
March 02, 2017
In this example, there is a step to login to portal as an admin under Navigation section to add the new lead page . How do we login to portal as admin?- Anonymous
March 03, 2017
Create a Portal Contact and add that contact to the Administrator Web Role for the Website.
- Anonymous
- Anonymous
April 19, 2017
Brilliant!We need more MS documentation to be like this. - Anonymous
August 01, 2017
Great job!This is a very informative article.I would appreciate if someone can help me here - When I click on 'Confirm Email' on Customer Self Service Portal, I don't receive any email. I didn't find any detailed information on this anywhere like the screenshots of all the workflows that are required for setting up the email.Thanks! - Anonymous
October 23, 2017
Jesper, when i opened leads page i can not see any lead records, i found empty grid
