.NET Core - How to publish a self-contained application (.exe)
The idea of this article is to detail how to create a .NET Core Console application from the command line tool (.NET CLI - DOTNET Command Line Interface) and the Visual Studio Code.
The first step is to download the .NET Core SDK. Observe that it is possible to download it to multiple platforms, as for example:
- Windows
- Linux (RHEL, Ubuntu, Linux Mint, Debian, Fedora, CentOS, Oracle Linux and openSUSE)
- Mac
- Docker
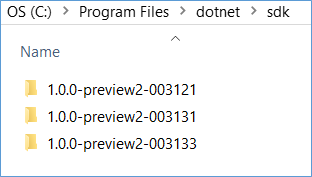
The .NET Core SDK provides a set of libraries and tools to create applications and .NET Core libraries. After installation, by default, the .NET SDK is located in C:\Program Files\dotnet\SDK. Observe that in that resource the versions of .NET Core are installed side-by-side:
 The .NET Core is based on a set of NuGet packages that allows you to optimize the applications to be dependent on only the necessary modules. This reduces the time required to test and deploy updates that are not used by the application.
Because the .NET Framework features are grouped under NuGet packages, the update time and delivery of these packages is much lower. It is not necessary to wait for a framework upgrade as a whole.
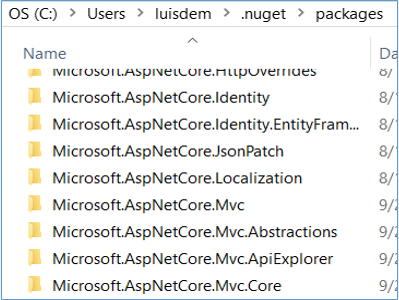
The NuGet packages installed by .NET Core SDK, are available for use in the .nuget\packages directory under the user profile:
To create a new application using the command line, open the command prompt (or PowerShell) and create a directory:
mkdir C:\temp\HelloWorldConsole
cd .\Temp\HelloWorldConsole
The .NET Core SDK provides a command-line tool (.NET Core CLI) through the executable (also called driver) dotnet. To list the commands available for the tool, type:
dotnet -h
Note that there are, by default, the following commands available:
To create a new application type Console you must use the new command. To list the types of projects that the command offers, enter the following command:
dotnet new -h
Notice that the new command provides the option to choose the language (C # or F #) through the -l parameter, and the type of project, through the -t parameter as:
The types of projects available for .NET CLI are:
- Console
- web
- lib
- xunittest
To create a new console application, type the following command:
dotnet new -t console
The following files are created:
- Program.cs
- project.json
The Program.cs file contains the application source code:
namespace ConsoleApplication
{
    public class Program
    {
        public static void Main (string [] args)
        {
            Console.WriteLine ( "Hello World!");
        }
    }
}
Note that the code is the same as the traditional C# console application. In addition, the project.json file contains all the build information, dependencies and runtimes used by the application:
{
    "Version", "1.0.0- *"
    "BuildOptions": {
        "DEBUGTYPE": "portable", // reports will be generated if debugging information
        "EmitEntryPoint": true // tells whether the module contains an entry for the MAIN method
    },
    "Dependencies": {}, // informs the project dependencies
    "Frameworks": {
        "Netcoreapp1.0": {// tells you what is the application framework
            "Dependencies": {
                "Microsoft.NETCore.App": {//super set that contains the .NET Standard Library and standard library
                    "Type": "platform", // tells the machine framework will be used
                    "Version", "1.0.1"
                }
            },
            "Imports": "dnxcore50"
        }
    }
}
The next step is to restore the dependencies, using the following command to download the Internet NuGet libraries to the default cache directory of NuGet libraries (%USERPROFILE%\nuget\packages\ or $env:UserProfile\.nuget\packages\). If there is no internet connection, the CACHE directory will be used.
dotnet restore
After restoring the libraries, the project.lock.json file is generated with the application of references:
{
    "Locked": false,
    "Version": 2
    "Targets": {
        ".NETCoreApp, Version = v1.0": {
        "Libuv / 1.9.0": {
            "Type": "package"
            "Dependencies": {
                "Microsoft.NETCore.Platforms": "1.0.1"
            },
            "RuntimeTargets": {
                "Runtimes / osx / native /_._": {
                    "AssetType": "native"
                    "Rid": "osx"
                }
            }
        },
        "Microsoft.CodeAnalysis.Analyzers / 1.1.0": {
            "Type": "package"
        },
        "Microsoft.CodeAnalysis.Common / 1.3.0": {
            "Type": "package"
            "Dependencies": {
                "Microsoft.CodeAnalysis.Analyzers" "1.1.0"
                "System.AppContext" "4.1.0"
                "System.Collections": "4.0.11"
                "System.Collections.Concurrent": "4.0.12"
                "System.Collections.Immutable" "1.2.0"
                // ... And several other references omitted here because of the amount
To compile the application use the command:
dotnet build
By default, this command will compile the application in Debug mode. To compile in RELEASE mode, use the parameter:
dotnet build -c release
The application will be compiled in the following directory, as the netcoreapp1.0 is the selected standard framework (.NET Core):
.\Bin\release\netcoreapp1.0\HelloWorldConsole.dll
To add the FULL .NET Framework (traditional part of the operating system), add the reference "net461" as:
{
    "Version", "1.0.0- *"
    "BuildOptions": {
        "DEBUGTYPE": "portable", // reports will be generated if debugging information
        "EmitEntryPoint": true // tells whether the module contains an entry for the MAIN method
    },
    "Dependencies": {}, // informs the project dependencies
    "Frameworks": {
         "Net461": {},
        "Netcoreapp1.0": {// tells you what is the application framework
            "Dependencies": {
                "Microsoft.NETCore.App": {
                    "Type": "platform", // tells the machine framework will be used
                    "Version", "1.0.1"
                }
            },
            "Imports": "dnxcore50"
        }
    }
}
Browse the C:\Temp\HelloWorldConsole\bin\release and note that the following folders exist for each .NET Framework version:
- net461
- netcoreapp1.0
To run the project, type the following command:
dotnet run
To publish the application, i.e, package the application and its dependencies in a folder, type the following command:
dotnet publish -c release
As I am using two frameworks (.NET Core and Full .NET Framework) in the project.json, it will be published two directories for the respective frameworks:
- C:\Temp\HelloWorldConsole\bin\release\netcoreapp1.0\publish
- C:\Temp\HelloWorldConsole\bin\release\net461\win7-x64\publish
Note that in the .NET Framework Full directory (Traditional - C:\Temp\HelloWorldConsole\bin\release\net461\win7-x64\publish), it generates the following executable:
HelloWorldConsole.exe
The same is not true for the .NET Core directory (C:\Temp\HelloWorldConsole\bin\release\netcoreapp1.0\publish), which is generated DLL instead of:
HelloWorldConsole.dll
In this case, to launch the application, you must use the command:
dotnet HelloWorldConsole.dll
This can be explained by the project.json file, where the type element ("type": "platform"), of the NET Core dependency (netcoreapp1.0), is configured to use the framework of the machine:
"Netcoreapp1.0": {// tells you what is the application framework
    "Dependencies": {
    "Microsoft.NETCore.App": {//superset that contains the .NET Standard Library and standard library
         "Type": "platform" , // tells the machine framework will be used
        "Version", "1.0.1"
    }
},
To be generated an executable rather than a DLL, to allow the application to be self-contained (independent of the framework installed on the machine), you must remove the element "type": "platform":
    "Netcoreapp1.0": {// tells you what is the application framework
    "Dependencies": {
        "Microsoft.NETCore.App": {//superset that contains the .NET Standard Library and standard library
        "Version", "1.0.1"
    }
},
In this case, you must add the runtimes that the application should be compiled by add the tab runtimes. Example to compile the application for Windows and Ubuntu:
{
    "Version", "1.0.0- *"
    "BuildOptions": {
        "DEBUGTYPE": "portable", // reports will be generated if debugging information
        "EmitEntryPoint": true // tells whether the module contains an entry for the MAIN method
    },
    "Dependencies": {}, // informs the project dependencies
    "Frameworks": {
        "Net461": {},
        "Netcoreapp1.0": {// tells you what is the application framework
            "Dependencies": {
                "Microsoft.NETCore.App": {//
                    "Version", "1.0.1"
                }
            },
            "Imports": "dnxcore50"
        }
    },
     "runtimes": {
     "win7-x64": {},
     "ubuntu.14.04-x64": {}
     }
}
After saving the changes, you must restore the project dependencies by running:
dotnet restore
To publish the application, run the following command:
dotnet publish -c release
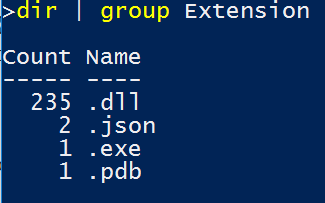
Note that now the executable has been generated, as well as all application dependencies (including framework DLLs) were added to the publish folder:
To reduce the number of dependencies, we can change the framework for the "netstandard1.6" that is a subset of netcoreapp1.0 (which includes the .NET CLR and .NET Core Core Library). The framework and the dependencies would be as follows:
{
    "version": "1.0.0-*",
    "buildOptions": {
        "debugType": "portable",
        "emitEntryPoint": true
    },
    "dependencies": {
        "NETStandard.Library": "1.6.0",
        "Microsoft.NETCore.Runtime.CoreCLR": "1.0.2",
        "Microsoft.NETCore.DotNetHostPolicy":  "1.0.1"
    },
    "frameworks": {
        "netstandard1.6": { }
    },
    "runtimes": {
        "win10-x64": {},
        "osx.10.10-x64": {}
    }
}
Note that the amount was reduced to DLLs:
As it is Hello World application, you can further reduce the amount of dependencies:
{
    "version": "1.0.0-*",
    "buildOptions": {
        "debugType": "portable",
        "emitEntryPoint": true
    },
    "dependencies": {
        "System.Console": "4.0.0",
        "Microsoft.NETCore.Runtime.CoreCLR": "1.0.2",
        "Microsoft.NETCore.DotNetHostPolicy":  "1.0.1"
    },
    "frameworks": {
    "netstandard1.6": { }
    },
    "runtimes": {
        "win10-x64": {},
        "osx.10.10-x64": {}
    }
}
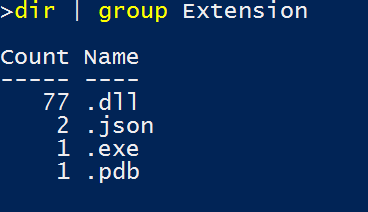
Note that the amount was reduced again to DLLs:
I hope you enjoyed.
References:
- Getting started with .NET Core on Windows / Linux / MacOS using the command line
- Writing .NET Core console apps using the CLI tools: An advanced step-by-step guide
- .NET Core Application Deploymenthttps://docs.microsoft.com/en-us/dotnet/articles/core/deploying/
Comments
- Anonymous
October 11, 2016
This is extremely helpful - Thanks!Just an FYI - your blogging tool has mangled a number of your json files with "pretty" quotes and misplaced capitalizations.- Anonymous
October 11, 2016
Thank you Christopher for your great feedback and to let me know about the issues. :)
- Anonymous
- Anonymous
October 18, 2016
Muy buen articulo, te importa si lo traduzco para el público español y lo publico en mi blog, eltrasterotecnologico.com, por supuesto poniendo un enlace al texto original.- Anonymous
October 19, 2016
Me alegro que os haya gustado.That would be great have that article published in Spanish language. In addiction, I published a new one about how to starting using GIT on VSCODE and VSTS. Feel free to use it..NET Core – Getting started with GIT and VSCode via Visual Studio Team Services https://blogs.technet.microsoft.com/pfelatam/2016/10/19/net-core-getting-started-with-git-and-vscode-via-visual-studio-team-servicesSaludos.
- Anonymous
- Anonymous
December 16, 2016
As Christopher Lewis said please check the "misplaced capitalizations"For instance this is incorrect: "Runtimes": { "Win7-x64": {}, "Ubuntu.14.04-x64": {} } it should be "runtimes": { "win7-x64": {}, "ubuntu.14.04-x64": {} } Nice article but small errors like these can send anyone troubleshooting the wrong way. I did.- Anonymous
December 16, 2016
Perfect. Thanks for your great feedback!I updated there. :)Regards,
- Anonymous
- Anonymous
January 29, 2017
How would one do this using the latest VS 2017 with the XML-based csproj format. What I've tried still doesn't seem to be creating a self-contained .exe and I cannot find a new example of this unfortunately.- Anonymous
January 30, 2017
Hi Doug!Take a look at the session Self-contained deployments (SCD) of this article: https://docs.microsoft.com/en-us/dotnet/articles/core/preview3/deploying/Let me know if it helps.Regards.- Anonymous
February 04, 2017
Yes thanks! That worked great!
- Anonymous
- Anonymous
- Anonymous
March 16, 2017
How to use web deploy publish a self-contained website to server IIS?Thanks!- Anonymous
March 16, 2017
Hi Yong,What is the .NET Core version that you are using?If you are using the version before 1.0.1, i.e., the version that has the project.json, please take a look in the following post where I show how to create a self-contained package for a console application. The concept is the same to a Web Application. After having the exe file, you can copy the package using the file option of the Web Deploy. Don't forget to change the web.config of your application to refer your executable direct, instead of dotnet.exe yourapplication.dll.NET Core – How to publish a self-contained application (.exe)https://blogs.msdn.microsoft.com/luisdem/2016/10/11/net-core-how-to-publish-a-self-contained-application-exe/- Anonymous
March 18, 2017
Thanks reply!Maybe I'm English very poor!Not use “dotnet publish -c release -r win81-x64” command to output SCD.Means,how to publish Self-contained deployments (SCD) applications to remote server IIS with Web Deploy in Visual Studio? Use Visual Studio right click solution,publish,select web deploy,publish to remote server?by default,publish to server file not have .exe!Thanks! - Anonymous
March 18, 2017
attachment:pic.twitter.com/CUk5yaiZU5
- Anonymous
- Anonymous
- Anonymous
May 08, 2017
Great help!!How do I generate models and DbSet from the existing database. I'm using Angular-Core1.1 template with VS2017.Thanks - Anonymous
July 14, 2017
Wow! just amazing article written by @Luis, Thank you so much for inspiring us from your good work, These kind of work really motivate us to work harder day by day. Thank you so much for great post.- Anonymous
July 26, 2017
Thank you for your great feedback.I really appreciate that.
- Anonymous
- Anonymous
July 16, 2018
Thanks. I was able to create a .Net Framework executable, i.e. by replacing netcoreapp2.1 with Net461 in the .cproj file. However, the newest version of visual studio code doesn't create project.json file. Does the .cproj file replace .json file? Where can I find more information about using teh .cproj and .json file? - Anonymous
February 19, 2019
Accidentally found a link to this article on the forum. It's great! Good guide. I had a problem, I could not create an executable that worked correctly. I'll try your method.- Anonymous
February 19, 2019
Thank you for your great feedback. Let me know if you have any question. - Anonymous
February 21, 2019
Also did not try this method. But I was able to make an executable using BoxedApp Packer. Thanks for your blog! Super!- Anonymous
February 21, 2019
Good to know that. Thank you for your great feedback!
- Anonymous
- Anonymous
