Introduction to WINDOWS AZURE WEB SITES aka ANTARES
With the dawn of CLOUD COMPUTING , every one is betting big time on cloud. I might be little late to arrive here, but its never too late. ![]()
MICROSOFT named its cloud infrastructure as AZURE.
Coming to the topic, Windows Azure Web Sites aka ANTARES is a PasS offering provided by Microsoft. This is currently in preview mode, hence there is still a big room for improvement.
PasS is an acronym for Platform as a Service.
SUBSCRIBING TO WINDOWS AZURE:
To start off, sign in to Windows Azure Management Portal: https://manage.windowsazure.com.
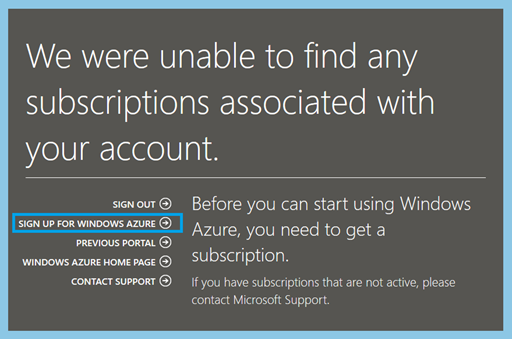
You should have a outlook.com credentials to login to this portal. If you are accessing this link for the first time you will see this:
Don’t be disheartened, click on “SIGN UP FOR WINDOWS AZURE”.
On the next page, you will get options to chose the way you would like to subscribe. For beginners and testers you could sign-up for a 3-month (or 90 day) free trial.
This is what is offered under the 90 day free trial:
The next steps will verify the account details. Once done you could successfully login to the portal using your credentials.
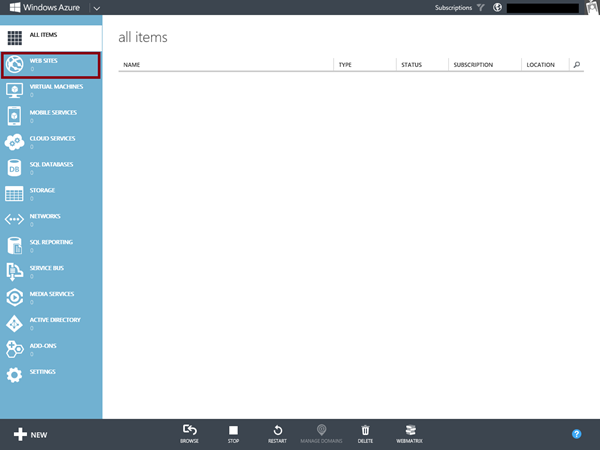
Once you are through with all these, you will be greeted with the below page. This is the Windows Azure Management Portal. I have highlighted “WEB SITES” which is referred to as WINDOWS AZURE WEB SITES (WAWS) OR ANTARES.
NOTE: Only the Web Sites section of Windows Azure is referred to as Antares or WAWS.
Windows Azure Management Portal
Creating a Web Site:
Once you have successfully subscribed, you could create a new website on WAWS either with a database or without a database. You have the option of choosing PHP as the language and MySQL as the database.
Instead of blogging the entire process, you could go through the following blog link on how to create a web site on WAWS: https://blogs.msdn.com/b/windowsazure/archive/2012/06/22/web-sites-series-create-php-and-mysql-sites-with-windows-azure-web-sites-and-webmatrix.aspx
Upon website creation the portal updates itself and reflects the changes. Notice how the count below the websites indicate the number of websites that I have.
Click on the name to configure/manage/deploy that specific site. Click on the DASHBOARD.
As you can see the UI is crisp and clear and the interface is pretty simple, straightforward and easy to use.
Deploying a Web Site on WAWS:
This is one of the interesting features that have been provided. The user could deploy his application in various ways. There are plethora of tools to select from the list:
I used Web Matrix to deploy a site and here is the URL: https://kaushal.azurewebsites.net/
That's it for today. This article is not enough to discuss all the features and options available for the users on WAWS. I will post more on this in the coming days.
Until then CIAO! ![]()
MORE INFORMATION:
Windows Azure home page: https://www.windowsazure.com/en-us/
Windows Azure Web Sites:
- https://www.windowsazure.com/en-us/home/scenarios/web-sites/
- https://www.windowsazure.com/en-us/manage/services/web-sites/
How to Manage Web Sites: https://www.windowsazure.com/en-us/manage/services/web-sites/how-to-manage-websites/
Channel9 video: https://channel9.msdn.com/Events/windowsazure/Learn-2012TechEd-EU/WebSites
YouTube:
Create and Mange Web Sites on Windows Azure
Comments
Anonymous
March 05, 2013
What are the price points and when are they making it RTM?Anonymous
June 18, 2013
very usefull Blog, Thanks for sharing it :)Anonymous
August 01, 2013
It went RTM recently. you can find the pricing on MSDN..


