Create a Custom WF Activity to Sync Version and Build Numbers
Updated for TFS 2010 RTM!
One of the common requests we hear is to provide a way of automatically updating the version information in the assemblies produced by a TFS build. Unfortunately, it’s one of those features that never gets quite high enough on our priority list to get implemented. You may have noticed that we haven’t provided a solution to this problem in TFS 2010 Beta 2, but this article is going to show you how to solve this problem yourself and will even give you the sources (see the attached ZIP file) for a working solution that you can start using today.
John Robbins at Wintellect recently blogged on how to how to sync build numbers and assembly file version numbers in sync with MSBuild 4.0 and I think he’s taken a fine approach to the problem. I’m going to show you how to solve the problem with a custom workflow activity and a customized build process template. With this solution, you’ll be able to easily configure parameters in your build definition to control how your files get versioned. Like John’s approach, it does require that you customize the build number format for your build definition so that it includes an element that can be used as a version number. Other than that, it’s a nice, clean approach with no other dependencies.
Tracing Binaries to Builds
TFS already provides a way of automatically incrementing build numbers and, while the default build numbering scheme is date-based, it’s not in a format that’s suitable for using as a version number. The default build numbering scheme uses the following format:
$(BuildDefinitionName)_$(Date:yyyyMMdd)$(Rev:.r)
This format yields build numbers like “DefinitionName_20091112.1” where the last number is an auto-incrementing number for each build of this definition that occurs in a given day. Unfortunately, this doesn’t translate well to a version number. For this exercise, I’m going to use a date-based build and version number that looks like this:
$(BuildDefinitionName)_$(Year:yyyy).$(Month).$(DayOfMonth)$(Rev:.r)
This will yield a build number like “DefinitionName_2009.11.18.1” which has a component that is suitable for use as an assembly version number.
Planning the Activity
Workflow activities can be implemented in code (using the managed language of your choice) or in XAML (using the Windows Workflow designer in Visual Studio or your favorite XML editor). There are advantages and disadvantages for each. Code Activities derive from System.Workflow.Activities.CodeActivity and implement their logic in an overridden Execute method. This method executes synchronously meaning that, while it’s running, your activity (and therefore your build) can’t be cancelled. So, you’ll want to keep the implementation of this method short and sweet avoiding things like web service calls.
XAML activities can be implemented using the Workflow Designer where you can drag and drop activities from the toolbox, set properties, define arguments, etc. visually. For this exercise, we’ll be using a both types:
- ReplaceInFile. This is a code activity whose sole purpose is to replace all occurrences of a regular expression in a text file with a specified string.
- UpdateVersionInfo. This is a XML activity that extracts the version component from the current build number, finds the files matching a specification (e.g. “AssemblyInfo.*”) within a specified directory, then uses the ReplaceInFile activity to update the version information in those files to match the build number. This activity will also use the GetBuildDetail and FindMatchingFiles activities provided with TFS Build.
Developing the Activity
I created a new C# Activity Library project to contain my code and XAML activities. I named it “ActivityPack” so that I could logically add additional activities to it over time.

Once your new project is created, the Workflow Designer will automatically open on the XAML file that’s been added. If you look at the toolbox, you’ll notice that there aren’t any TFS Build activities there. To add them, follow these steps:
- Right click on the toolbox and select Choose Items…
- The Choose Toolbox Items dialog box will open. Select the System.Activities Components tab.
- Click Browse and select Microsoft.TeamFoundation.Build.Workflow.dll from the following location:
<Program Files (x86)>\Microsoft Visual Studio 10.0\Common7\IDE\PrivateAssemblies - Verify that the activities appear in the list and that they are checked, then click OK. The TFS Build activities should now appear in the toolbox.
Before we construct the XAML activity, we’ll need to create the CodeActivity to perform the actual regular expression search and replace. Right click on your project and select Add, New Item… Then, select Workflow from the list of Installed Templates, select Code Activity from the list of item types and specify ReplaceInFile.cs as the Name.

Next, you’ll need to add a reference to the Microsoft.TeamFoundation.Build.Client assembly by browsing to it under <Program Files (x86)>\Microsoft Visual Studio 10.0\Common7\IDE\ReferenceAssemblies\v2.0 and adding it to your using clauses. Then, add the following attribute to your CodeActivity class' declaration:
 [BuildActivity(HostEnvironmentOption.Agent)]
public sealed class ReplaceInFile : CodeActivity
This attribute tells TFS that this activity is safe to load into the build controller. I’ll shed some more light on custom build activity deployment a little later. Before moving onto the XAML activity, you’ll need to build your project to get the code activity to show up in the toolbox.
The XAML activity is composed of a number of activities organized into a sequential workflow. Here’s the pseudo-code for the activity:
- Update Version Info <Sequence>
- Validate Arguments <Sequence>
- Validate SourcesDirectory <If>
- String.IsNullOrEmpty(SourcesDirectory) Or (Not Directory.Exists(SourcesDirectory)) <Condition>
- Throw ArgumentException <Then>
- Validate FileSpec <If>
- String.IsNullOrEmpty(FileSpec) <Condition>
- Throw ArgumentException <Then>
- Validate RegularExpression <If>
- String.IsNullOrEmpty(RegularExpression) <Condition>
- Throw ArgumentException <Then>
- Validate SourcesDirectory <If>
- Get the Build <GetBuildDetail>
- BuildDetail <Result>
- Extract Version Info <Assign>
- VersionInfo <To>
- New System.Text.RegularExpressions.Regex(RegularExpression).Match(BuildDetail.BuildNumber).Value <Value>
- Form Qualified Spec <Assign>
- FileSpecToMatch <To>
- Path.Combine(SourcesDirectory, "**", FileSpec) <Value>
- Find Matching Files <FindMatchingFiles>
- FileSpecToMatch <MatchPattern>
- MatchingFiles <Result>
- Handle Matching Files <If>
- MatchingFiles.Any() <Condition>
- <Then>
- Process Matching Files <Sequence>
- Log Version to Set <WriteBuildMessage>
- Enumerate Matching Files <ForEach<System.String>>
- Update Version Info in File <Sequence>
- Log Update <WriteBuildMessage>
- Update Version in File <ReplaceInFile>
- Update Version Info in File <Sequence>
- Warn No Matches Found <WriteBuildWarning>
- Process Matching Files <Sequence>
- Validate Arguments <Sequence>
A total of 10 different workflow activities are used including the ReplaceInFile code activity we created earlier and two TFS Build activities (GetBuildDetail and FindMatchingFiles). You could implement this logic entirely in a code activity, but you would be re-implementing functionality that already exists in the activities include with VS/TFS 2010. And, the XAML activity still gets compiled into MSIL when you build your the activity library project, so there’s no separate file that needs to be managed. Lastly, it makes it easier for the Workflow run-time environment to cancel the execution of your activity.
This custom activity includes a set of Arguments. In Workflow, arguments can be in, out, in/out, or properties. If you look along the bottom edge of the Workflow Designer tool window in Visual Studio you’ll see buttons for Variables, Arguments and Imports. Variables are used to define local storage for a particular scope of your workflow. Arguments are used to define the inputs and outputs of your workflow. Imports are used like “using” statements in your code so that you don’t have to type out the full namespace everywhere. The value for these is represented as a VB.NET expression so it can (and often does) include code. Here are the arguments for the UpdateVersionInfo activity:
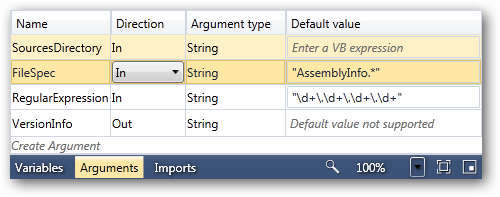
The SourcesDirectory is the directory to search for source files to update. When we integrate this activity into the build process template, we’ll be able to get this path from the build environment. The FileSpec is the file specification to find beneath the sources directory and it defaults to AssemblyInfo.* so the user won’t have to modify this in most cases. The RegularExpression is the regular expression used to extract a version number from the build number and to find within the files and replace with that version number. The VersionInfo argument is an output that stores the version number used by the activity which could be handy if you want to use it somewhere else in your build process. In the Workflow Designer, you can pass these arguments to activities you’re using by simply referring to them by name.
Testing the Activity
It’s a good idea to setup some unit tests to validate your custom activities outside the context of the build process. To get started, create a new unit test project and add a Workflow Activity to serve as your test workflow.
- Add a new C# Test Project to your solution
- Add a project reference to your Activity Library
- Add references to Microsoft.TeamFoundation.Build.Client and Microsoft.TeamFoundation.Build.Workflow
- Add a new C# Workflow Activity item to that project
Adding a Workflow Activity will create a XAML file in your test project that you can use as your test workflow. In this particular case, I’m using the GetBuildDetail activity which depends on an implementation of the IBuildDetail interface being available in the environment. For testing, I recommend create a mock BuildDetail object. In this case, I’ve created a separate C# Class Library project to contain this mock object and potentially additional ones as the need arises. It only overrides the BuildNumber property so that our custom activity can get a build number to extract version information from. Here’s what the overridden property looks like:
 public string BuildNumber
{
    get
    {
        return String.Format("{0}_{1}.{2}.{3}.{4}",
            Environment.MachineName,
            DateTime.Now.Year,
            DateTime.Now.Month,
            DateTime.Now.Day,
            Convert.ToInt16(DateTime.Now.TimeOfDay.TotalMinutes));
    }
    set
    {
        throw new NotImplementedException();
    }
}
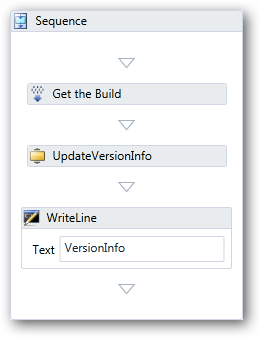 The getter provides a reasonable build number for our purposes and lets us exercise our custom activity outside the scope of the actual build process where it’s easier to debug and iterate on your design and implementation.
The actual unit tests need to instantiate our test workflow, set the arguments as appropriate for the test, add an instance of our mock BuildDetail object to the workflow’s extensions and invoke the workflow. The workflow itself is very simple with just the bare minimum necessary to exercise our custom activity. It’s a Sequence activity with a GetBuildDetail activity that will retrieve an IBuildDetail instance from the workflow run-time environment and pass it into our custom UpdateVersionInfo activity. I’ve also defined an Out Argument to receive the version string used by our custom activity so that I can write it out to the console.
The actual unit tests vary depending on what aspect of the activity’s behavior is being validated, but the general form of the tests follows this pattern:
 // another way of specifying in arguments to our workflow
var workflow = new TestWorkflow() {
    SourceDir = SourcesDirectory,
    FileSpec = String.Empty
};

// create the workflow run-time environment and add our mock
// BuildDetail object.
var workflowInvoker = new WorkflowInvoker(workflow);
workflowInvoker.Extensions.Add(new BuildDetail());

try
{
    workflowInvoker.Invoke();
}
catch (expectedException)
{
}
The main test in this example uses a typical AssemblyInfo source file for C#, VB.NET and C++ (CLR) and runs the UpdateVersionInfo activity on them to verify that the files are updated as expected.
Integrating the Activity
Build process templates reside in version control and there’s no way to queue a build in TFS using a customized build process template that only exists in your local file system. So, we’ll need a working copy of the default build process template to avoid interfering with any existing build definitions. One way of managing this is to branch the default build process template and do your customizations in the branched version. That way you can create a test build definition that uses the branched build process template without interfering with your other builds. You can also add the branched version to your solution so that you can edit it in the same context as your custom activity. In the provided example, I’ve added it to a Templates folder beneath the unit test project (and set its “Build Action” to “None”).
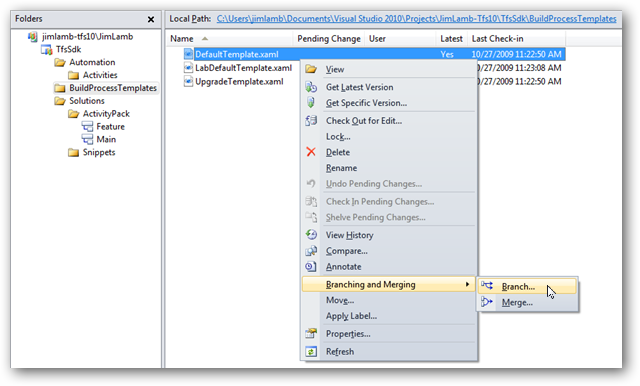
Once you’ve verified your activity, customized the build process template, and validated its behavior, you can merge it back to the BuildProcessTemplates folder (or whichever folder you’re using to store your build process templates) and your builds can immediately get the benefit of it. Note that, in this case, you’ll need to update the build number format for your build definitions before using the provided activity.
You’ll want to review the build process template you’re integrating with when deciding where to insert your custom activity. In this case, I’ve placed it at the end of the Initialize Workspace sequence so that it happens immediately after the “Get.”
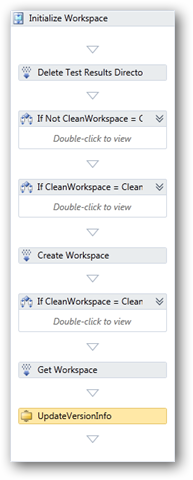
I’ve also added two In Arguments that will be visible in the build definition editor to make it easy for users to customize the behavior of the custom activity. These arguments are file spec (e.g. AssemblyInfo.*) and regular expression (e.g. "\d+\.\d+\.\d+\.\d+"). Both of these arguments have default values so they don’t have to be set but you can override them if appropriate. To expose arguments to the build definition editor, you add an argument just like you would for any XAML workflow. In the screen shot below, you can see the two arguments I’ve added.
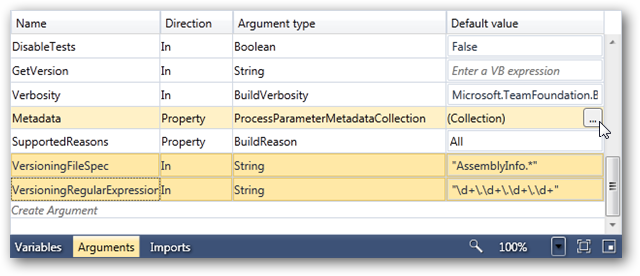
The other interesting argument is “Metadata” which is where you can specify a display name, help text and other properties for your arguments that will be used in the build definition editor. If you click on the ellipsis (…) button for the Metadata property, you’ll see the Process Parameter Metadata Editor.
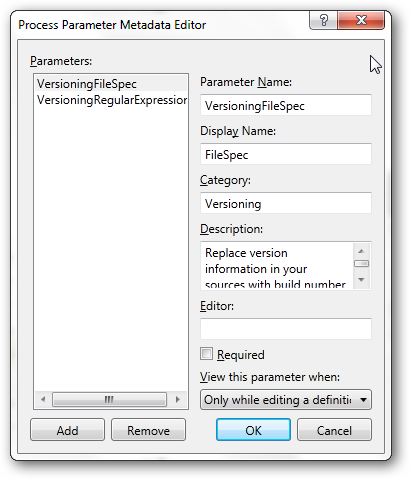
You’ll only need to specify the editor if you’re using a custom type for your argument of if you want to provide a custom user interface for setting a standard type. If you do specify an editor, you’ll need to specify its type using an assembly qualified name and the assembly hosting the editor will need to be in the GAC or in the Visual Studio probing path of each user’s machine.
Once you have customized the build process template and checked it into version control, you can create a test build definition that uses that build process template. Here’s how to create a build definition to use your custom build process template:
- Open Team Explorer
- Right click on the Builds folder and select New Build Definition
- Setup your build definition as desired
- Select the Process tab and click

- Click New to open the New Build Process Template dialog
- Click Select an Existing XAML file, then click Browse
- Browse for the build process template XAML file you checked into version control and click OK
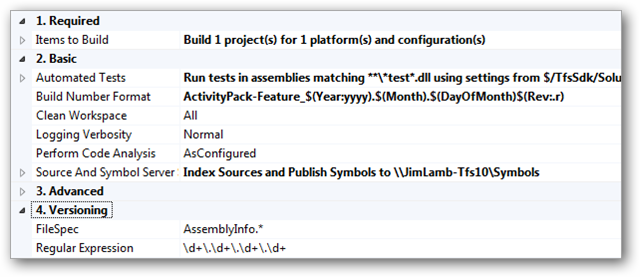
The XAML in your custom build process template will be parsed and you should see your new arguments appear in the build process parameter list as shown below:
Deploying the Activity
Before checking in the branched version of the default build process template that we’ve customized, we’ll need to deploy a build of the custom activity assembly. The first step is to choose a location in version control for your custom activity assemblies. If you have custom MSBuild tasks, you can check those into the same location (or, more likely, a sub-folder beneath that location). After you check-in a build of the assembly to this location, you can modify your build controller’s properties to load custom activities from that location using the Build Controller properties dialog (accessed from Visual Studio’s Build, Manage Build Controllers… command). Select your build controller and click Properties.
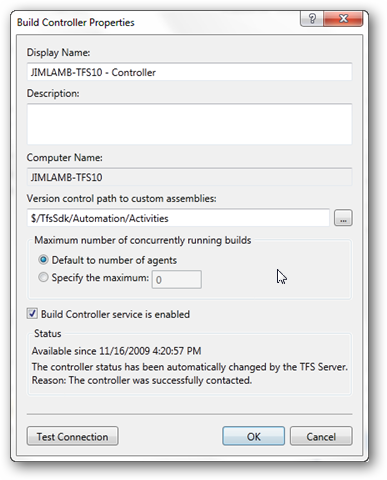
You can click the ellipsis (…) button next to the “Version control path to custom assemblies” edit box to browse for the folder in version control that contains your custom assemblies. The Build Controller monitors this location for changes and, when you check-in a new version, it will pick it up automatically, and use it in all subsequent builds that get queued on that Controller. The contents of that folder will be automatically distributed to all build agents participating in builds for that controller.
Conclusion
I hope you’ve found this article to be a useful introduction to build process customization in TFS 2010 and custom workflow activity development. I wanted to provide something that was just complex enough to really illustrate how you would do this in a production environment. You can download the complete sources for the solution here:
Download the complete solution as ActivityPack.zip (updated for TFS 2010 RC) from MSDN Code Gallery.
Note that you’ll need the MSBuild Community Tasks to load and build this solution.
Comments
Anonymous
November 20, 2009
Thanks Jim! This is very timely and a good opportunity for us to get started with Team Build 2010 customization. BobAnonymous
November 21, 2009
Nice step-by-step. What if any are the plans for the RTM release for more activities and an improved build process template? http://www.tadlockenterprises.com/2009/11/tfs-2010-teambuild-deployment-fail/Anonymous
November 22, 2009
Excellent post Jim! Very nice that you took the time and implemented a "real-world" customization. This is one activity that most team build users will want to use in their build processes. /JakobAnonymous
November 29, 2009
I'm having issues with this, no matter what I try - I end up with this error message. TFB210503: An error occurred while initializing a build for build definition ReedBuildActivities: Cannot create unknown type '{clr-namespace:BuildActivities}ReedDeploymentActivity'. I've removed all the custom functionality / references from my task (of type CodeActivity<bool>) and it still fails. I've tried restarting the build service, to work around the dll caching issue too. Also - these seems to be an issue if you include supporting DLL's into the source-control path that the build controller looks at (in my case, a third party Javascript compression DLL that supports my build activity). I'm assuming it's because these extra DLLs don't support the "CodeActivity" contract - (you get a weird error about missing endpoints, and the build controller just stops) Also - Be careful, as these new activities target the .Net 4.0 Client Profile framework - meaning you won't be able to utilize System.Web, etc, until you target the full framework (I'm not sure if working with the full framework is even possible, as I've not been able to get anything to work). Any help with these issues would be appreciated. Cheers, DaveAnonymous
December 14, 2009
Hi! I couldn't find a FileCopy workflow activity in the toolbox (beta2)... is there any way to copy files (not folders, I saw the CopyFolder activity and is not what I need) in a build definition? Thanks!Anonymous
January 18, 2010
Dave, any extra assemblies should get loaded when your activity assembly is loaded. It sounds your activity isn't getting loaded. Do you have the Build Controller's custom assembly path set correctly? Have you checked the fusion logs to see why the load is failing?Anonymous
January 19, 2010
BTW - I'm running into a similar issue that Andres has reported with my build controller not finding the custom assembly even though it's configured to the correct version control path. Here's the error from the build report: TFB210503: An error occurred while initializing a build for build definition TeamBuildTestingTest for QueueNewBuild Activity: Cannot create unknown type '{clr-namespace:CommunityTeamFoundation.Build.Workflow.Activities}QueueNewBuild'.Anonymous
February 01, 2010
We've been experiencing the same problems as Dave (not finding custom assembly) and found a comment on http://social.msdn.microsoft.com/Forums/en-AU/tfsprerelease/thread/0ad14bc5-8c5c-4dc2-8bce-e4e60b4194d5 which refers to this blog and includes the following step: Add the namespace xmlns:<ns>="clr-namespace:<ActivityNamespace>;assembly=<AssemblyName>" to your build process' root element I edited the xaml file for the build definition to add the assembly=<AssemblyName> to the xmlns entry and I don't get the message any more - however I didn't see anything in Jim's blog to indicate that I needed to do this - have I missed somethingAnonymous
February 15, 2010
Jim, thanks for the great post. I have been working through the issues, but I am stumped on this one: The argument validator fails because the sourcesDirectory is not set. Where is that supposed to be set? Is it manual or automatic? Thanks for any help.Anonymous
February 22, 2010
Hi Jim, I try to do the same than you, but I have a problem. I want to edit my workflow definition (checkout it from TFS et open it with Visual Studio Editor) / I have my activity build in my toolbox but I can't drag n drop it to the workflow (i have a black circle). I Can drag n drop TFS / MSBuild activities but not mine. I think i need to reference it somewhere: How do you reference your custom Acitivty in the XAML Build definition / where do you deploy it (locally)? Regards, Florent.Anonymous
February 23, 2010
The comment has been removedAnonymous
February 24, 2010
@David Jensen: there’s a “SourcesDirectory” variable that gets set by the Agent Scope Activity in the default build process template. I bind the SourcesDirectory parameter on my UpdateVersionInfo activity to that variable. It should be configured that way in the sources I provided in the .zip file. Let me know if you still have issues.Anonymous
February 24, 2010
@Florent: You’ll notice that, in the sample I provided, I had branched a copy of the default build process template into a folder in the ActivityPack.Tests unit test project. That gives the workflow designer the project context it needs to load the activities you’re building. It also lets you modify your template without affecting any production builds that may be running on TFS. Alternatively, you can right click on the Toolbox and select the Choose Items… command, select the System.Activities tab, then click Browse… to select your custom activity assembly. Generally, however, I’ve found this to be less reliable than working with a copy of the XAML file in a project (with Build Action set to None and Copy to Output Directory set to Do not copy).Anonymous
March 09, 2010
The comment has been removedAnonymous
May 01, 2010
Hi Jim, Thanks for the beautiful article. A couple of days back, we upgraded from TFS 2010 RC to TFS 2010. We are using TFS build templates for our automated builds. And we added some custom activities to the default build process template. I am just curious to know if there are any changes in default build template from TFS 2010 RC version and TFS 2010 latest release? Will my RC version's Build template (which has a couple of custom activities in it) work as-is with the latest version of the TFS 2010? Any source where I can find out the list of differences between RC version and latest version of TFS 2010, if any? Thanks, Manish Gupta cse.manish@gmail.comAnonymous
May 03, 2010
The comment has been removedAnonymous
May 05, 2010
I have a similar issue as Florent has. I can't drag and drop the activity. However, I can't understand your answers. Can you eleborate more? Thanks!Anonymous
May 10, 2010
The comment has been removed