Building DSL Enhancing PowerToys - Good Practices
If you are building DSL's and you haven't heard yet, we released the Editor PowerToy last month. The current release is only a small step towards the vision we have for the PowerToy that will deliver a very powerful capability to provide additional customized views in a tool-window (for your DSL diagram) that enhance the runtime usability of your DSL.
"All well and good" you might say, but this might not be that interesting to you anyway, since you have no use for the PowerToy presently.
Nonetheless, in this post I wanted to describe the design, techniques and patterns we used to create the PowerToy itself (which are going to be further developed in future releases of this PowerToy). Hoping that this discussion will help you and others in extending and adding further capabilities to DSL's (perhaps using automation), and we can develop a set of best practices for doing these kind of things.
I am certain this PowerToy won't be the last of its ilk, and hopefully some of you will find the discussion interesting enough that you might feel compelled to go ahead and innovate and package your own DSL enhancements, and build new PowerToys yourself.
I guess in one respect, what I am going to describe here is 'a means or a pattern for creating pluggable add-ins for DSL solutions.'
What we wanted to achieve
The current release of the DSL Editor PowerToy simply adds a new tool-window to the 'DSL Package' project of the chosen DSL solution. This tool-window hosts a simple control that responds to user selections. Next releases of the PowerToy will build upon this theme in various ways but the implementation patterns of the mechanics of the PowerToy itself will change little in how we basically achieved that. In this respect, this PowerToy provides a certain capability to enhance a DSL.
Our broad basic requirements for this tool were:
- Make use of it as simple and clean as possible with the minimal amount of user interaction, and maximum amount of automation.
- Make it trivial to remove/reinstall its capability should the developer decide not wish to go with it (try-it-out mode).
- Provide an easy means to customize the capability so that a DSL developer can modify/enhance the moving parts of it with ease.
This last one is a major requirement, since we fully expect that in most cases many DSL developers will want to rip-and-replace certain parts of the capability for their own purposes - we want to facilitate that.
In order to satisfy these broad requirements we needed to come up with a basic pattern of how to provide additional capability to the DSL with as little impact on the existing DSL as possible, that is both highly customizable and integrated into the current developer-build process (Transform Templates->Compile->Run).
Basic Requirements
So to summarize, these are the basic things we wanted to achieve in the development of the PowerToy:
- Add the new capability to the DSL project(s) using a simple automated, contextual, wizard based, configuration approach.
- Minimise and simplify the amount of configuration information gathered from DSL developer.
- Integrate components with existing generated DSL classes (making no assumptions about naming, namespacing etc. of DSL components).
- Modularise the new capability into easy to understand 'add-in' architecture and physical structure.
- Promote, and accommodate common scenarios for customization of the capability.
- Integrate with standard development process for building DSL's. (i.e. no special build/configuration requirements)
- Remove/re-install the capability entirely (as best we can), preserving any customizations to it.
How we achieved that
Creating an RI
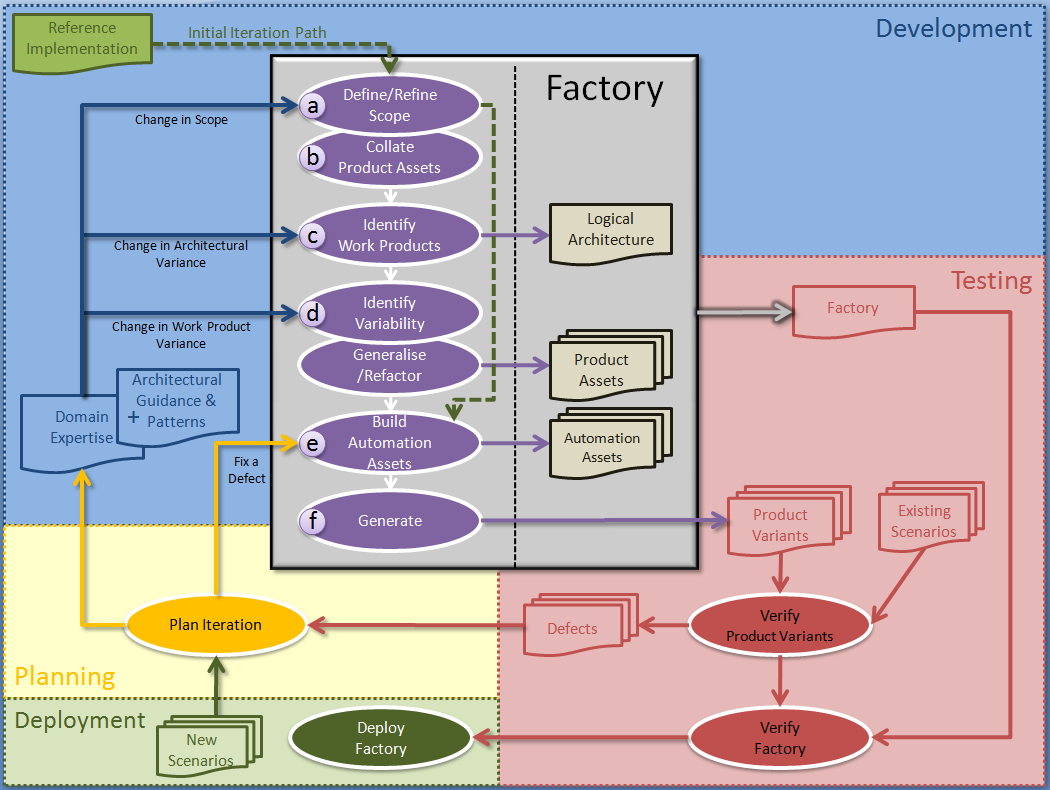
The very first thing we did before building the PowerToy itself was to create a prototype of the capability we wanted to build. Then we generalised and refactored that capability in a gradual and iterative process separating the common components and identifying the variability if the components that would have to be specific to the DSL. Fortunately for us (well, actually by design before we started), we had already prototyped this capability in a previous DSL solution, so we simply isolated this capability from that solution into a mini-solution for refinement. (Basically we built a reference implementation (RI) of it). Harvesting existing assets in existing solutions is by far the best means to explore the domain of the thing you want to automate.
Commonality/Variability
Without going into the gory details of the whole process of building guidance automation assets here, it's suffice to say that the outcome of that process was that we refactored out some common classes into some common assemblies, and teased out the specific (non-general) code that we needed to add to the DSL solution. (The common assemblies would be installed to the developers machine at install time of the PowerToy itself, and referenced by the specific code).
As part of the process, we quickly identified the variable parts of the components we needed to add, and all that was left to do was find a way to add the specific code and references the common libraries to the DSL solution, in such a way as to meet the other requirements stated above.
It was pretty clear from the RI, at the start, what actually needed to be physically done to add our tool-window editor capability to the existing DSL solution. In other words, what source and files we needed to add to the solution. Most of the components of this PowerToy's capability could be simply appended to the components already generated in the DSL solution.
Thanks to partial classes, and the DSL toolkit's provisioning of them, in most cases we could add our capability by just adding partial class source files to the DSL solution. However, in at least one area requires us to write code snippets into existing configuration files already present in the DSL solution. This presented challenges of its own, particularly to meet 'clean removal' requirements.
Templatizing Artefacts
Our RI identified the required source files, and code snippets that needed to be generated and added to integrate with the DSL solution. The next step was to templatize the RI source code and identify which parts of the source code (particularly identifiers) needed to be generated by the DSL solution itself. We wanted to make no assumptions about the naming of the DSL classes we were integrating with, and we didn't want to explicitly read configuration files (like the *.dsl file, or use reflection) to determine their names and namespaces either. We also wanted all our code to be part of the same namespace as the all other DSL code.
The DSL toolkit makes extensive use of the Text Templating Engine to generate its DSL classes in source files by transforming the domain model designed by the DSL developer. In fact if you look carefully, the *.dsl file is actually included in all the *.tt files that is read as input when you use the 'Transform Templates' command whilst developing your DSL, and this is processed by the text template at transformation time.
<#@ Dsl processor="DslDirectiveProcessor" requires="fileName='..\..\Dsl\DslDefinition.dsl'" #>
<#@ template inherits="Microsoft.VisualStudio.TextTemplating.VSHost.ModelingTextTransformation" #>
<#@ output extension=".cs" #>
Since one of our requirements is to leverage this transformation mechanism (i.e. not define a separate compile/build process for our PowerToy's capability) we needed to use the same mechanism to generate our specific code for the capability. It was pretty clear at this stage that we will be adding text template files (*.tt) to the DSL solution to generate our code.
To create these *.tt files, we simply work backwards from our RI code and replacing any DSL component identifiers with directives in the Text Templates. These text template files, will then include the *.dsl file as an input (as above), added to the DSL solution, and will participate in the normal text transforming process.
You can see an example of one of these text templates from this PowerToy.
Modifying Existing Artefacts
As mentioned earlier, most of the RI code can be added to the DSL solution by simply adding partial class source files, however we also needed to add code snippets to existing files in the DSL solution. This may also be a quite common means to integrate a capability into a DSL.
The *.ctc file is one example of this, where, in order to add VS menus and commands to the IDE, we need to write entries into the Command Table file at specific locations in the text. Other types of files may not be as structured and formatted as *.ctc, but in this case we could leverage that structure to append specific text one line at a time at specific locations in file. This of course had significant advantages when we needed to remove the appended text, if the developer wanted to remove/reinstall the tool-window editor.
[This remaining part of this section is kind of a sideline, but nonetheless might be interesting if you find yourself having to modify similar files.]
The CTC command table format is rather esoteric, but nonetheless it is predictable and assuming that the DSL developer maintains the standard format and layout in tact, additional commands can be easily added. The actual configuration for the commands is rather complex and can be variable (definitely customizable by the DSL developer), and to aid modularisation of this configuration the CTC file supports #define's, which allow us to #define the actual menu commands separately in another file, and only requires us to write in macros that will be expanded at CTC compilation time.
Firstly, we needed to add a #include statement at the start of the *.ctc file, which points to another *.h file that contains the #defines for the actual macros. This included *.h file is the one added by the PowerToy at a known location in the DSL solution, and contains the actual menu commands. Firstly, we add our #include statement after the other #include statements we expect in the *.ctc file by default. All that remains to do is to write in the various macros (i.e. 'DSLEDITORPOWERTOY_CMDPLACEMENT' and 'DSLEDITORPOWERTOY_BUTTONS') into the *.ctc file at the appropriate locations. We can do this by appending the macro text before the end of the relevant command table sections (such as: 'CMDPLACEMENT_END' and 'BUTTONS_END'). The resulting *.ctc file would look something like this:
#include "stdidcmd.h"
#include "vsshlids.h"
#include "msobtnid.h"
#include "virtkeys.h"
#include "DSLToolsCmdID.h"
#include "..\GeneratedCode\GeneratedCmd.h"
#include "..\GeneratedCode\DslEditors\CustomCmd.h"CMDS_SECTION guidPkg
MENUS_BEGIN
GENERATED_MENUS
MENUS_ENDNEWGROUPS_BEGIN
GENERATED_GROUPS
NEWGROUPS_ENDBUTTONS_BEGIN
GENERATED_BUTTONS
DSLEDITORPOWERTOY_BUTTONS
BUTTONS_ENDBITMAPS_BEGIN
BITMAPS_ENDCMDS_END
CMDPLACEMENT_SECTION
GENERATED_CMDPLACEMENT
DSLEDITORPOWERTOY_CMDPLACEMENT
CMDPLACEMENT_END
The advantage of this approach with this kind of structured text file is that when it comes time to remove the capability, we only have to identify the lines on which the #include and macros exist, and simply delete those lines. (Again assuming the DSL developer maintains the clean format of this file).
Installing Artefacts
Now that we have our code templatized in text templates, and we know which code snippets need to be added to which existing files, the next challenge is to figure out where to add the text templates, and what else needs to be done to integrate the tool-window editor into the DSL solution.
At this point, from our RI, we have established that we need to do the following to integrate our tool-window editor:
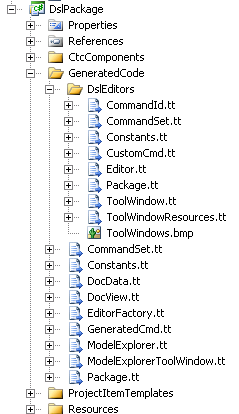
- Add a number of text templates to the DSL solution (which generate partial class source files, resource files, header files etc.)
- Add static supporting files to the DSL solution (i.e. *.bmp files)
- Modify existing files in DSL solution (i.e. *.ctc files)
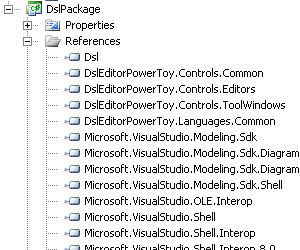
- Add assembly references to supporting common assemblies.
Modularisation
As with any add-in type functionality it is important to modularise your additional functionality. To facilitate add-in type add/remove functionality and clean separation of PowerToy artefacts from the rest of the DSL solution, it is necessary to group all PowerToy created source artefacts in the same folder.
DSL solutions, by default, separate their generated code from the source artefacts that the DSL developer works with at design time (i.e. the Domain Model designer *.dsl). They do this by placing all text template files within a folder called 'GeneratedCode' (by default). The DSL developer is not expected to modify these generation files, instead work with the Domain Model Designer (*.dsl) file to make any customizations to the DSL. It is the domain model design that acts as input to the generation files.
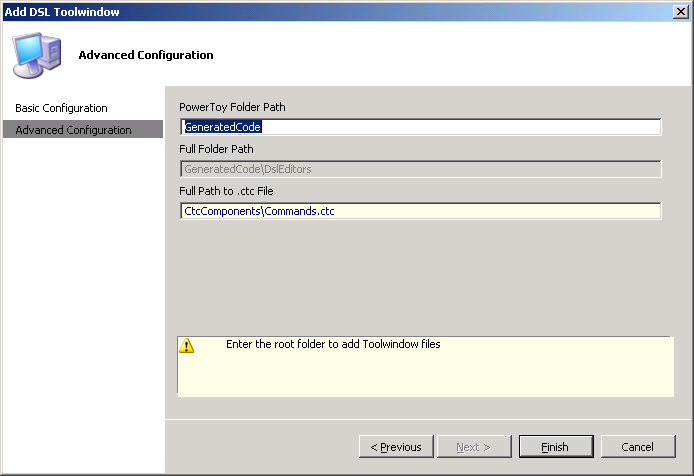
One of the objectives and requirements of the PowerToy is to provide a simple means to configure its capability and require little to no maintenance of the generated code from the DSL developer. For this reason, the PowerToy employs a similar strategy to the DSL toolkit for adding all source artefacts to a single folder. By default, this folder is located under the 'GeneratedCode' folder in the DSL solution.
In the first release of the PowerToy, the only difference between the semantics of the use of the PowerToy subfolder and the 'GeneratedCode' folder from the DSL solution is that there are source artefacts (such as *.resx files) that the DSL developer can customize the workings if the PowerToy's capability. This folder is also the intended location for additional source files from customization of the capability.
[In future releases of the PowerToy, there will be other designer artefacts with which the developer works with to make a cleaner separation between generated code files and design time artefacts.]
Supporting Install/Uninstall
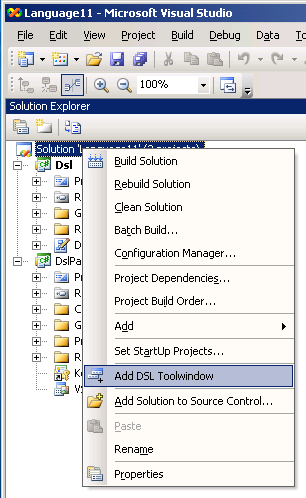 One of the primary requirements of any add-in type mechanism is that it can be added or removed from the solution at will - it's pluggable. The objective should be - to have minimal impact on the existing DSL solution if a DSL developer added the capability and then removed it sometime later. In order to achieve this, for every installation type action listed above, we need to be able to reverse it in the 'removal' mode (and reset it in the 'reinstall' mode).
The basic philosophy here is that the PowerToy would undo any modifications it made to the DSL solution, whilst preserving any potential customizations the developer had made to its capability (within reason of course).
The tricky part is that, DSL solutions are innately flexible in their structure and naming, and there are little to no limitations on how a DSL developer can modify the projects of a DSL solution to suit their needs. The moving parts of DSL solutions make almost no assumptions about how the projects are named, and physical structure etc. It is feasible, for example, that a DSL developer could decide to combine all artefacts from both DSL projects into one project and completely restructure it, renaming its folders and files etc. This might be at the extreme end of the customization spectrum, but it is quite likely that every DSL developer will have their own strategies for customizing their DSL solution and how to structure customizations in their DSL projects. Certainly, for any customization that requires additional code artefacts, a developer may choose to restructure or enhance the structure of the projects. Also, its is feasible, especially in the software factory context, to have more than one DSL in a single VS solution.
This makes it reasonably challenging to perform uninstall type operations since the PowerToy can make very few assumptions about how the DSL developer could move files around and rename them to suit their needs prior to install, or between install and uninstall of the PowerToy's capability.
Grouping and modularisation of the installed artefacts (i.e at least placing all files in same folder) alleviates some of these issues, but does not eradicate them, or deal with all possibilities. Since there is no built in infrastructure in DSL solutions to aid us here, the PowerToy can only go so far to deal with this solution flexibility. (Perhaps a DSL PowerToy framework would be useful for this!).
Looking at the list of actions defined above, we simply need to be able to:
- Remove/replace the files (and subfolder) we added.
- Delete/replace the modifications to any modified files.
- Remove/replace the assembly references.
However, most of those actions require us to reliably know (a) where the added files reside now, (b) where the modified files reside now. (assembly references are only located on project, so they are always predictable to modify). Furthermore, there are in fact, by default, 2 projects in a DSL solution, and some actions only apply to one or other of the DSL projects. (that also assumes the DSL developer didn't split or merge parts of these projects).
To resolve these issues with the minimum amount of assumptions being made (and without building a complex infrastructure around it all), the PowerToy employs the following strategy, to accommodate non default configurations.
- On install:
- Prompt user for appropriate DSL solution project
- Create a subfolder in a user defined location on the DSL project
- Add all files to this subfolder
- Modify existing files, prompting user for location of specific file in DSL project
- Add assembly references to the DSL project
- On reinstall:
- Same as on install, overwriting any existing files/modifications
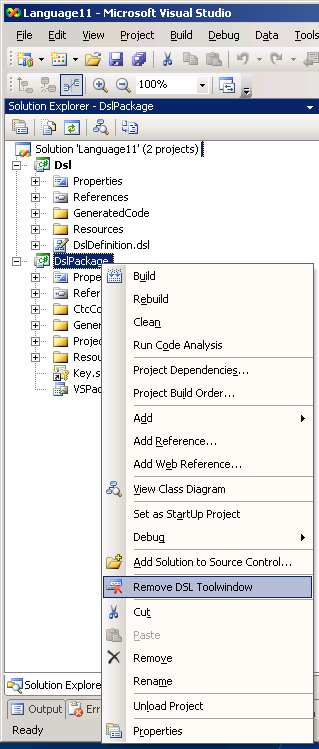
- On uninstall:
- Prompt user for added subfolder, in DSL project
- Delete all added files, leaving any additional files
- Delete subfolder only if empty of files
- Delete modifications to modified files, prompting user for location of modified file in DSL project
- Remove added assembly references from DSL project
The last remaining issue is how to determine which is the right DSL project (of the 2 default ones) to operate on. In this release of the PowerToy, we are only interested in the 'DslPackage' project (which contains the VSPackage class), and we have no modifications at this stage for the 'Dsl' designer project. In subsequent releases of the PowerToy we may need to perform different actions on different DSL projects.
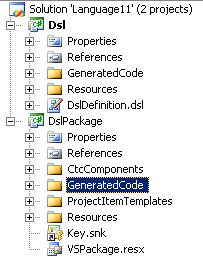
One could argue several techniques of determining the package project, you could reflect over the assembly of the project and determine if it contains a package class, but even this requires that the project has been built successfully at the time of deploying the PowerToy. Also, this does not deal with cases of multiple DSL's in a VS solution either.
Clearly, the only reliable means available to us in reliably selecting the right project that contains the package class, for the DSL of choice, is to ask the PowerToy user to select it from the list of projects in the VS solution. Once, we know this project, we can also ask the user to define the subfolder in which contain PowerToy files, and prompt them to locate the specific files to be modified by the PowerToy. Of course, we can assume certain defaults for these values to aid usability, based on what comes out of the box from the DSL toolkit, but we need to provide for the potential flexibility.
Now, when the PowerToy user comes to remove the PowerToy, it would be helpful to remember any settings we used on the install to act as the default values on the uninstall, particularly folder paths and specific modified files. We can also validate these folders and files exist currently.
It also comes in handy to mark the modified projects with specific PowerToy metadata, so we know which projects were modified by the PowerToy. Marking the projects and saving installation metadata is done by saving values to the projects global property bag on install.
As it turns out, this metadata 'marking' helps us drive further actions of the PowerToy and indicates the right context for the Add/Remove/Re-install actions.
Applying Guidance Automation
At this stage, we have resolved most of the challenges of installing and uninstalling the PowerToy capabilities. The final part to this PowerToy development is applying guidance automation and making that automation context aware so the user has the right actions available at the right times for the right purposes. We could of course get the DSL developer to perform the necessary actions to install the PowerToy's capability, but automation makes that trivial and reliable.
The primary areas to apply automation for such PowerToys are typically:
- Installing the capability
- Configuring the capability
- Re-configuring the capability
- Uninstalling the capability
In this simple release of the PowerToy the configuration of the capability was done during installation of the capability. The capability can be re-installed, at which time it will be re-configured. Later release of this PowerToy might vary with respect to when configuration/re-configuration takes place, since the configuration of later releases is expected to be vastly more complex.
However, each of these actions is a good candidate for full or partial automation.
Adding Recipes
Recipes are ideally suited to applying automation to the areas identified above. A recipe is a simple strategy for gathering information and executing a sequence of actions that provide the automation part. Recipes can be made context aware by only being active under certain conditions when the state and context is correct. This state and context can be derived from any source within the development environment, but typically it is based upon the users current actions. In this case, when the user is designing a DSL solution.
 For this PowerToy, from the previous section we can make the recipes available at anytime during DSL solution development. The recipes can then prompt the DSL developer for the various settings they require to execute.
As mentioned before in the previous section we used metadata on the DSL projects where we installed our capability, and we also used metadata to save values used in the installation, to be used as default values at uninstallation time. This metadata provides us the context we need to determine where and when the various recipes are valid, and what recipes could be invoked at any particular time. The recipes themselves also manage the adding/removing of the metadata itself.
The installation recipe and uninstallation recipe for this PowerToy release are programmed with the sequence of actions already discussed in previous sections. You can see the parameters (arguments) that are collected from the user, the wizard that is used to gather the data from the user, and the sequence of actions that are performed.
Generating Text Templates
The last point that is noteworthy in this discussion is to do with the installation of the text templates that generate the code for the PowerToys capability.
Part of the configuration gathered by the recipes on installation (and configuration) needs to be written into the actual content of the text templates the PowerToy adds to the DSL solution. This is to customize the templates to the current DSL solution. Currently, this would include things like captions for resource files, and other parameters gathered from the user and recipe.

Careful formatting of the text templates is required to support this 2-stage rendering, but this is an elegant pattern for customizing text templates for application to a specific DSL solution for generating source for a PowerToy capability.
You can see an example of one of these 2-stage rendered text templates from this release of this PowerToy
Facilitating Customization
So far we have seen how to build a PowerToy that installs a configured capability, but what about customization of that capability?
Since we are installing text templates that get transformed into source code during the compile time of the DSL, we are limited in how to customize this capability? Surely, that would involve editing source code in the text templates themselves wouldn't it? - Well, yes, yes it would. However in most cases, all you want to do is customize the code by providing your own methods for a class, to enhance an existing method or change the class's behaviour. The typical way you would want to do this is using partial classes, but that can't be done here since you can't rip and replace methods using the partial class machanism. You might then be able to use inheritance and subclassing (in some cases), but it's not your subclassed type that is going to be consumed by the existing executing code. To make that work, you would need to make changes to the existing text template code to explicitly use your subclassed type. None of this is elegant, and hampers seperation of the code the the capability and the code for customizing or configuring that capability.
The DSL Toolkit developers figured out a neat way around all this called the 'double-derived pattern' that gets around most all these issues very, very elegantly. Basically, what this amounts to is: instead of just defining a class and its' methods in a text template, you instead create an abstract base class containing all the properties/methods (which are now virtual) and you create a concrete derived class of the base class in the text template.
Now, as the DSL developer customizing the capability, you can create a partial class definition of the concrete class and modify its behaviour. It will be the concrete derived class that gets consumed by existing executing code, and this should require no changes to any text templates.
Together, text templates utilizing the double-derived pattern provide a strong foundation for facilitating customization of a PowerToy capability, and seperation of the PowerToy capability code from the DSL specific customization code of that capability.
Summary
In this post we discussed in detail the issues with creating a PowerToy for DSL solutions. In particular, we have described some of the general patterns and strategies that could be used to create DSL PowerToys. In this respect, these PowerToys to being modular plug-ins for DSL's, that support add/remove like capabilities and use automated guidance to provide easy operation.
To summarise we discussed the following patterns and strategies:
- Building Reusable Assets - the process for developing guidance automation assets from existing solutions. (RI->CV analysis->Asset creation) Described in more detail here.
- Creating contextual source artefacts - using text templates, and leveraging the incumbent DSL build process.
- Adding modular capabilities - separating and modularising capabilities, packaging them for easy maintenance, configuration, and removal.
- Applying Guidance Automation - automating the installation, configuration and uninstallation of the capability.
- Facilitating Customization - designing text templates that employ the double-derived pattern for intentional customization.
I believe that these patterns and strategies are re-usable in the development of other PowerToys, which may lead to a future common framework, practices and guidance around DSL PowerToy development.
Resources
The DSL Editor PowerToy, used as an example for this article, is an open source community project hosted on CodePlex, you are free to download the releases of this PowerToy to examine the details of how it was built, and participate in the evolution of this PowerToy.
Comments
Anonymous
April 13, 2007
A friend from my previous life, Jezz Santos, has been very active in the area of Software Factories....Anonymous
May 21, 2007
In my most recent post , I mentioned that the DSL Editor powertoy shows how you can exploit the openness
