Getting Started With ASP.NET Web Stack Source on CodePlex
Note: Updated instructions to target Visual Studio 2012. While you can still use Visual Studio 2010 there are big advantages to using VS 2012.
Note: Please also check out the documentation on Codeplex for how to build.
As you probably know by now, ASP.NET MVC, Web Pages, Web API is now all open source (if you haven’t heard then please read ScottGu’s blog). What this means is that the source for all our runtime components is now available on CodePlex for you to review and use as well as suggest changes to in the form of issues or pull requests. You can also track recent code submits and check that the code looks good.
This blog will give you some hints and tricks for getting started working with the source code. Note you still have the official installers which contain the usual MSI with NuGet packages. In fact, if you don’t intend to work directly with the source, I would go with the installer because it provides tooling support for Visual Studio (project templates, etc.) which are not available in the CodePlex repository.
If you want to live on the edge (as in without support) then you can also use the nightly NuGet packages.
Before getting started, you should take a quick look at the ways in which you can contribute. It contains a lot of good information about how you can contribute, what the process is for contributing, and how contributions are evaluated. The more you familiarize yourself with the process, the less chance of getting disappointed later.
Prerequisites
Before getting the source you should setup your dev machine with the right tools to compile the source (obviously you shouldn’t be running anything critical on the dev machine). The prerequisites listed are not the only way of setting up your developer environment but the purpose here is to reduce the steps and improve the chance of getting off to a good start.
Visual Studio
You can use either a Visual Studio 2012 full edition or Visual Studio Express 2012 for Web edition to open and compile the project solution.
Git
Git is the version control system used to manage the source. If you are not already a Git expert then you should check out the Git site for how to get started. Git is great to work with but if you are used to more traditional versioning control systems then it will take a little time to get “re-programmed”. Here are the steps for the Git tools that I use and recommend you install:
- Git for Windows (use one of the binary downloads). Using the default setup options should be fine – for reasons that will become clear later I don’t recommend using a Windows Command Prompt for issuing Git commands.
- TortoiseGit (use one of the binary downloads) which integrates Git with Windows Explorer allowing you to see the state of your local repository clone in an graphical manner.
- PowerShell Git extensions. Even if you are not a PowerShell user I recommend this for executing Git commands from the command line as it gives you critical clues as to what branch you are on and what state you are in. You can always use a regular shell for everything other than Git commands if you can’t find your way around PowerShell. The installation here is slightly more complicated but if you follow the readme then you should be fine.
CodePlex
Make sure you have a CodePlex account – you need it to participate in discussion forums, enter work items, and create projects. Once you have an account, I would encourage you to browse around the CodePlex project – there’s a lot of good information. Also you can sign up for notifications or subscribe to RSS feeds for discussions, source code changes, and updates to issues.
Cloning the Repository
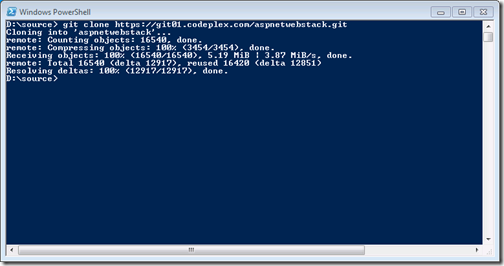
Ok, now that you have all the prerequisites it is time to get the source. We use PowerShell and then clone the repository like this:
The result of the command should look like this:
To sync to the latest changes use the commands
- git checkout master
- git pull --rebase origin
That will pull down all changes to the CodePlex repository and get your master branch up to date.
Skipping Strong Name Verification
By default the projects are delay signed which means that they are not fully signed. Unless we explicitly turn off strong name verification for the compiled assemblies, building will cause a set of strong name verification failures. To only disable strong name verification for the WebStackRuntime assemblies, download the SkipStrongNames zip file and unzip it. Then run the command
- .\SkipStrongNames.exe /e
The result should look like this:
You can later run .\SkipStrongNames.exe /d to re-enable strong name verification if/when you want to do so.
Compiling from Command Line
To compile and run unit tests as well as StyleCop and FxCop directly from the command line, simply run this from the aspnetwebstack folder:
- .\build.cmd
This is the authoritative way to build ASP.NET Web Stack. If the build is successful you should see BUILD SUCCESSFUL when it has completed.
Compiling from Visual Studio
In Visual Studio Express you can build the source but not run the unit tests. In full Visual Studio you can both compile and run unit tests – just install xUnit.net runner for Visual Studio 2012.
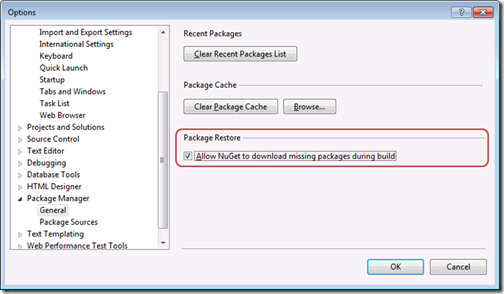
In either case, just open the solution Runtime.sln and compile as normal. If you haven’t compiled from command line before then you need to enable NuGet Package Restore by opening the Tools/Options/Package Manager menu and make sure Package Restore is enabled:
That’s it – you are now free to move around the cabin!
You may also want to check out the blog Contributing to ASP.NET Web Stack Source on CodePlex which explains how to setup and work with a fork.
Henrik
Comments
Anonymous
August 22, 2012
Hi Henrik, Nice post, thanks! When I try to skip the Strong Name Verification I got the following warning: WARNING: Every assembly is already covered by a global exclusion rule. There is nothing for this utility to do.Anonymous
August 22, 2012
I also got lots of unit test errors on master branch. I am not sure if this is normal.Anonymous
August 23, 2012
The comment has been removedAnonymous
June 16, 2014
The comment has been removedAnonymous
June 16, 2014
Seems in current version , run build.cmd with any argument can easily skip strong name verification...Anonymous
November 10, 2014
Now that this is opensource ( and I assume free or for a donation ) is it support by Microsoft? Is this software only for web development or is it for windows applications as well?


