Treemap released in Silverlight Toolkit
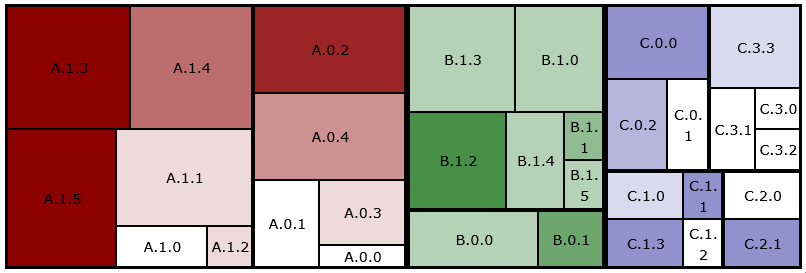
As Silverlight 3 has just released, a new version of the Silverlight Toolkit is now available. Microsoft’s Global Product Development - Europe team is delighted to have contributed the Silverlight Treemap to this release. The Treemap allows hierarchical data to be visualised as a set of nested rectangles, where the size of each rectangle is related to a selected value within the node. The Treemap also allows other visual properties, such as background colour, opacity and font size to be related to values within the node. The image below shows a Treemap containing 3 sub-trees; one red, one green and one blue. This example, which is part of the Silverlight Toolkit samples (SL2, SL3), allows us to explore the capabilities of the Treemap.

The rectangles representing the data are defined using a TreeMapItemDefinition (see the XAML below). In this example, the item definition contains a TextBlock inside a Border. The item definition specifies which of the node’s values determines the size of the rectangle (via ValueBinding) and which property contains the child nodes (via ItemsSource).
<datavis:TreeMapItemDefinition ItemsSource="{Binding Children}"
ValueBinding="{Binding Value}">
<DataTemplate>
<Border ... ToolTipService.ToolTip="{Binding ToolTip}">
<TextBlock Text="{Binding Name}" ... />
</Border>
</DataTemplate>
</datavis:TreeMapItemDefinition>
The Treemap contains a list of Interpolators, which can control the background colour (using a SolidColorBrushInterpolator) or properties such as font size (using a DoubleInterpolator). The interpolator’s TargetName and TargetProperty specify which control and what property is modified by the interpolator and the DataRangeBinding specifies which of the node’s values is used to determine the interpolation point.
<datavis:TreeMap.Interpolators>
<datavis:SolidColorBrushInterpolator TargetName="Segment1Border"
TargetProperty="Background"
DataRangeBinding="{Binding Value2}"
From="White" To="DarkRed" />
...
</datavis:TreeMap.Interpolators>
So how do we get different colours on the different sub-trees? Well, we use a number of different item definitions, each with its own interpolator. An ItemDefinitionSelector is used to select the item definition (and associated interpolator) to be used for each node. A custom item definition selector, implemented in SegmentItemDefinitionSelector.cs, selects the red, the green or the blue item definition depending on the node’s sub-tree number (which I have called its “segment”). Note how the border in each item definition has a unique name and each interpolator’s TargetName corresponds to one of the item definitions.
<datavis:TreeMap ... >
<datavis:TreeMap.Interpolators>
...
<datavis:SolidColorBrushInterpolator
TargetName="Segment1Border"
TargetProperty="Background"
DataRangeBinding="{Binding Value2}"
From="White" To="DarkRed" />
<datavis:SolidColorBrushInterpolator
TargetName="Segment2Border"
TargetProperty="Background"
DataRangeBinding="{Binding Value2}"
From="White" To="DarkGreen" />
...
</datavis:TreeMap.Interpolators>
<datavis:TreeMap.ItemDefinitionSelector>
<local:SegmentItemDefinitionSelector>
...
<datavis:TreeMapItemDefinition ItemsSource="{Binding Children}"
ValueBinding="{Binding Value}">
<DataTemplate>
<Border x:Name="Segment1Border" ... >
<TextBlock Text="{Binding Name}" ... />
</Border>
</DataTemplate>
</datavis:TreeMapItemDefinition>
<datavis:TreeMapItemDefinition ItemsSource="{Binding Children}"
ValueBinding="{Binding Value}">
<DataTemplate>
<Border x:Name="Segment2Border" ... >
<TextBlock Text="{Binding Name}" ... />
</Border>
</DataTemplate>
</datavis:TreeMapItemDefinition>
...
</local:SegmentItemDefinitionSelector>
</datavis:TreeMap.ItemDefinitionSelector>
</datavis:TreeMap>
Our team is very excited to have had the opportunity to finally release our Treemap. Hopefully this blog has given enough of an intro to encourage you to download the toolkit and give it a try. Please let us know what you think. A special thank you to David Anson and the Silverlight Toolkit team for their help in making this release a reality.
Gareth Bradshaw is a Program Manager on Microsoft’s Global Product Development – Europe team in Dublin, Ireland. He holds a BA(Mod.) in computer science and a PhD in computer graphics from Trinity College Dublin.
Comments
- Anonymous
July 15, 2009
Hi!! I've data of type the TreeStructure - Root - SubItems - SubItems .... so on.. So, its a multilevel hirarchy. I tried to set in xaml as - <datavis:TreeMap x:Name="ByTagDetailed" ItemsSource="{Binding}"> <datavis:TreeMap.ItemDefinition> <datavis:TreeMapItemDefinition ValueBinding="{Binding Weightage}"> <DataTemplate> <Grid> <Border BorderBrush="Black" BorderThickness="1" Background="#ff7fc3ff" Margin="0 0 1 1"> <Grid Background="{StaticResource GradientOverlay}"> <datavis:TreeMap ItemsSource="{Binding SubItems}"> <datavis:TreeMap.ItemDefinition> <datavis:TreeMapItemDefinition ValueBinding="{Binding Weightage}"> <DataTemplate> <Border BorderBrush="Black" BorderThickness="1" Background="#ff7fc3ff" Margin="0 0 1 1"> <Grid Background="{StaticResource GradientOverlay}"> <controls:Viewbox Margin="3 0 3 0"> <TextBlock Text="{Binding Field}"/> </controls:Viewbox> </Grid> </Border> </DataTemplate> </datavis:TreeMapItemDefinition> </datavis:TreeMap.ItemDefinition> </datavis:TreeMap> </Grid> </Border> </Grid> </DataTemplate> </datavis:TreeMapItemDefinition> </datavis:TreeMap.ItemDefinition> </datavis:TreeMap>
In C#(xaml.cs) - TreeData = e.Result as TreeMapNode; var blogPostsByTag = TreeData.SubItems; ByTagDetailed.DataContext = TreeData.SubItems[0].SubItems;
Def of TreeMapNode - public class TreeMapNode : IComparer<TreeMapNode> { public string Field = string.Empty; public string ID; public List<TreeMapNode> SubItems = new List<TreeMapNode>(); public double Weightage { get { return _weightage; } set { _weightage = value; SizeTmp = value; } } }
Plz, reply on this id - pragati.dukale@revalanalytics.com
- Anonymous
July 16, 2009
Hi Pragati, Thanks for submitting the XAML and the code, although you did forget to ask the actual question :) I’m assuming you’re running this code and nothing shows up in your treemap. If you’re simply trying to display your hierarchy of TreeMapNodes as a TreeMap, the answer is simple, you don’t need to nest TreeMaps one inside another. The ItemsSource property of TreeMapItemDefinition takes care of walking the tree and creating nested items for you. Here’s a simplified version of the code: <datavis:TreeMap x:Name="ByTagDetailed" ItemsSource="{Binding}">
<datavis:TreeMap.ItemDefinition>
<datavis:TreeMapItemDefinition ValueBinding="{Binding Weightage}"
ItemsSource="{Binding SubItems}"
ChildItemPadding="5,20,5,5">
<DataTemplate>
<Border BorderBrush="Black" BorderThickness="1">
<TextBlock Text="{Binding Field}"/>
</Border>
</DataTemplate>
</datavis:TreeMapItemDefinition>
</datavis:TreeMap.ItemDefinition>
</datavis:TreeMap>
If instead you really are trying to nest treemaps one inside another, then please make sure that the Weightage value is properly set for every node. This value (which you set in ValueBinding) is used to calculate the relative sizes of the nodes on the screen. So if Weightage is zero for a node then the node (and all its children) will have a zero width/height. In your case the root item probably has a zero Weightage so you don’t see anything. In the common scenario however (my example above) you don’t need to calculate anything, it’s done automatically for you if you’re using TreeMapItemDefinition.ItemsSource. Then the TreeMap knows that the children of a node are in the SubItems property and will walk the tree recursively, summing up Weightage values from children to parents. Of course the leaf nodes will still need to have non-zero values. Hope this helps, please let us know if you have other questions. Cristian