Monitoring and Management services in IIS Transform Manager 1.0 Beta
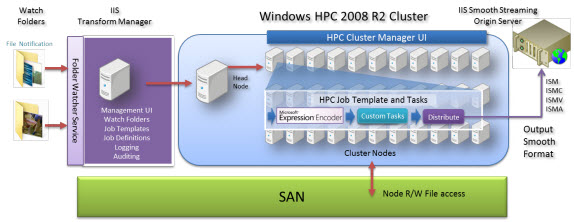
IIS Transform Manager 1.0 – Beta refresh is available for download. IIS Transform Manager (IIS TM) is a new component of the next version of the IIS Media Services platform and provides a simple integrated video encoding/encrypting and batch conversion and transformation of video files. IIS Transform Manager integrates directly with Expression Encoder 4 to allow you to use "watch folders" to queue up multiple encode jobs on your server and deliver them directly to IIS Media Services 4.0 Web folders as IIS Smooth Streaming presentations. Transform Manager offers also an SDK that permits developers to write custom Task plug-ins that can be used with Transform Manager to support custom actions, third-party encoders, or your own custom workflows. IIS TM can permit to you an easly scalability for your transformations workflow because you could leverage Windows server HPC (High Performance Computing) and scale out your encoding\trans-mux tasks on a grid of servers in easy way. In the next picture you can see the typical architecture that you can implement using IIS TM:
As I have written in others articles in Italy we have some important customers that use today IIS TM Beta in some relevant video service like RAI Replay TV and Video Mediaset web site.
You can learn more about IIS TM starting from the page dedicated to this new service on IIS Media Sevices Web site.
With this new Beta coming some new interesting features in IIS TM like the new Notifications service and the Monitoring and Management API.
Notifications service can permit to you to send notifications as a POST web requests with job status changes to a remote web application or service. This enables web developers to build a custom Transform Manager job-monitoring system. You can learn more about notifications in IIS TM in this tutorial on IIS Media Web site.
The new Monitoring and Management API can permit to manage Jobs using custom code. You can directly use the same API that the Management Console application uses, in order to create custom code to manage and monitoring Jobs Status and IIS TM configuration. You can send any command to IIS TM from your code and execute operation like stopping or resubmiting a Job. These API are available as WCF endpoints. You have to use a process that runs in the context of a user with administrative privilege to use these endpoints.
Before to start to use IIS TM and this features make sure that you have downloaded the latest IIS TM Beta build (build 1151.5) from the Microsoft download center in order to have the right build where this API works with the right behavior.
The interfaces of this API are described in the IIS TM SDK and these offering a large numbers of methods useful to manage and monitoring Jobs and IIS TM configurations.
You can consume these WCF Endpoints in a very simple way using Visual Studio 2010. For example you can build in a very simple way a WPF app that is able to consume these API.
In order to do this you can open Visual Studio using “run as Administrator” in order to have the right permissions to consume management and monitoring API:
From Visual Studio you have to create a new WPF project:
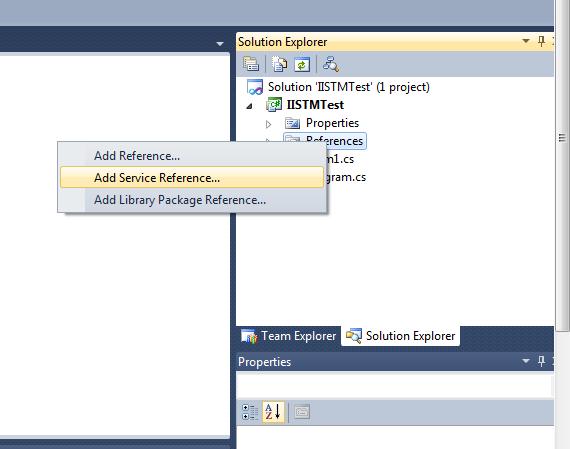
In the Solution Explorer you can add a Service reference to the management and monitoring API on the PC where you running the IIS TM and Visual Studio:
The addresses of the WCF endpoints are:
net.tcp://localhost:59999/TransformManager/Management/Monitoring
net.tcp://localhost:59999/TransformManager/Management/Management
and the metadata URL where is available the WSDL is:
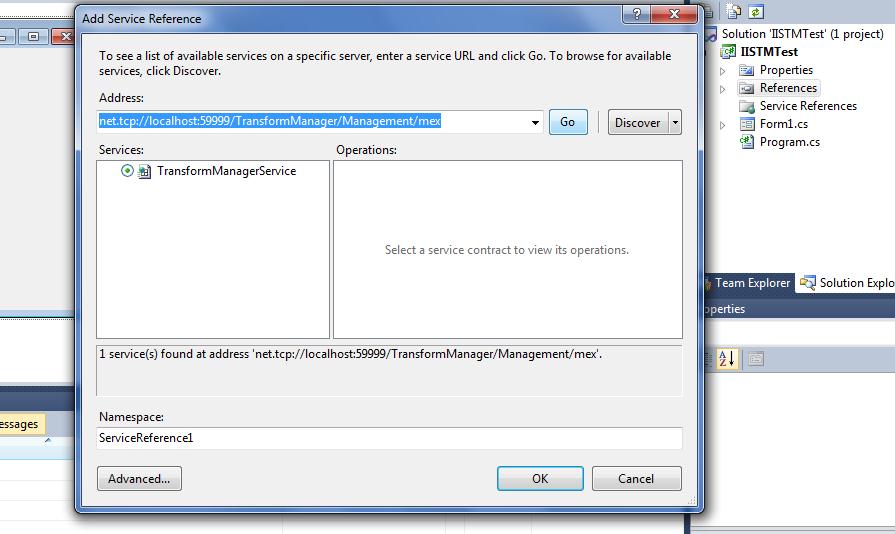
net.tcp://localhost:59999/TransformManager/Management/mex
You can use the metadata URL and insert it in the service reference wizard that creates for you the WCF proxy code to access to the services endpoints:
After the creation of the WCF proxy, you can add a reference to the WCF proxy namespace to your WPF window code, in my case ia called the namespace of the project IISTMTest and the namespace of the proxy ServiceReference1:
using IISTMTest.ServiceReference1;
and you can use the proxy classes ManagementServiceClient and MonitoringServiceClient in order to consume the IIS TM services.
For Example , you can add a Button and a ListBox with a DataTemplate to the WPF Window in order to show some details from the Jobs:
<Window x:Class="IISTMTest.MainWindow"
xmlns="https://schemas.microsoft.com/winfx/2006/xaml/presentation"
xmlns:x="https://schemas.microsoft.com/winfx/2006/xaml"
Title="MainWindow" Height="350" Width="525">
<Grid>
<Button Content="Button" Height="23" HorizontalAlignment="Left" Margin="22,12,0,0" Name="button1" VerticalAlignment="Top" Width="75" Click="button1_Click" />
<ListBox Height="100" HorizontalAlignment="Left" Margin="12,73,0,0" Name="listBox1" VerticalAlignment="Top" Width="479" >
<ListBox.ItemTemplate>
<DataTemplate>
<Grid>
<Grid.ColumnDefinitions>
<ColumnDefinition Width="Auto"/>
<ColumnDefinition Width="Auto"/>
<ColumnDefinition Width="Auto"/>
</Grid.ColumnDefinitions>
<TextBlock Margin="10,0,0,0" Grid.Column="0" Text="{Binding JobSchedulerId}"/>
<TextBlock Margin="10,0,0,0" Grid.Column="1" Text="{Binding JobSchedulerName}"/>
<TextBlock Margin="10,0,0,0" Grid.Column="2" Text="{Binding EndTime}"/>
</Grid>
</DataTemplate>
</ListBox.ItemTemplate>
</ListBox>
</Grid>
</Window>
and in the click event of the button you can write this code:
private void button1_Click(object sender, RoutedEventArgs e)
{
MonitoringServiceClient svc = new MonitoringServiceClient();
int num=svc.GetJobCountByStatus(JobStatus.Finished);
JobDetails[] jobs =svc.GetJobDetails(JobStatus.Finished,JobDetailsField.JobSchedulerId, true, 0, num);
listBox1.ItemsSource = jobs;
}
And in this way you could list all the finished Jobs and show some properties about these in the ListBox.
In the IIS TM SDK you can find all the methods available from IManagementService and IMonitoringService that you can call using the WCF Proxy classes created from the WSDL of the IIS TM service using the Visual Studio service reference wizard.
Because the methods from the services require that the process that call the services run in the context of a user with administrative elevated privilege, in order to run the exe compiled, you have also to add a .manifest file with the configuration that required the administrative privilege for the .exe. For this reason you have to add a new item to the project and insert an app.manifest file:
In the manifest file you have to configure the requestedExecutionLevel in order to require administrative privilege:
<?xml version="1.0" encoding="utf-8"?>
<asmv1:assembly manifestVersion="1.0" xmlns="urn:schemas-microsoft-com:asm.v1" xmlns:asmv1="urn:schemas-microsoft-com:asm.v1" xmlns:asmv2="urn:schemas-microsoft-com:asm.v2" xmlns:xsi="https://www.w3.org/2001/XMLSchema-instance">
<assemblyIdentity version="1.0.0.0" name="MyApplication.app"/>
<trustInfo xmlns="urn:schemas-microsoft-com:asm.v2">
<security>
<requestedPrivileges xmlns="urn:schemas-microsoft-com:asm.v3">
<!-- UAC Manifest Options
If you want to change the Windows User Account Control level replace the
requestedExecutionLevel node with one of the following.
<requestedExecutionLevel level="asInvoker" uiAccess="false" />
<requestedExecutionLevel level="requireAdministrator" uiAccess="false" />
<requestedExecutionLevel level="highestAvailable" uiAccess="false" />
Specifying requestedExecutionLevel node will disable file and registry virtualization.
If you want to utilize File and Registry Virtualization for backward
compatibility then delete the requestedExecutionLevel node.
-->
<requestedExecutionLevel level="requireAdministrator" uiAccess="false" />
</requestedPrivileges>
</security>
</trustInfo>
</asmv1:assembly>
After this you can run directly the .exe file.
Enjoy this new API from IIS TM and start to build great applications for managing videos workflow !!


