Developing Business Central Extensions (part 3) - Build Pipeline
If you haven't read part 1 and part 2, you should do so before continuing here. Part 1 contains the prerequisites and part 2 is about cloning the project and get your sandbox environment up running.
Create a build agent
In order to setup continuous integration, we need a machine which can perform the actual build asks for us, the build agent.
A build agent consists of a Windows Server 2016 with some software installed: Docker, NavContainerHelper and the Azure DevOps Agent. You will also need to configure the build agent to access your organization.
I have created an ARM template, with which you can create a build agent.
The Url to this template is https://aka.ms/getbuildagent
or you can create a Windows Server 2016 and install the components manually:
- Docker EE (https://docs.docker.com/install/windows/docker-ee/)
- NuGet Package Provider 2.8.5.201 or higher (https://www.nuget.org)
- NavContainerHelper (https://www.powershellgallery.com/packages/navcontainerhelper)
- Azure DevOps Agent 2.141.1 installed and configured (/en-us/azure/devops/pipelines/agents/v2-windows?view=vsts)
The script, which performs these steps for the ARM template can also be downloaded and used. You will find it here: https://github.com/Microsoft/nav-arm-templates/blob/master/initbuildagent.ps1
In both cases you will need a Personal Access Token for your Azure DevOps Organization in order to setup a build agent.
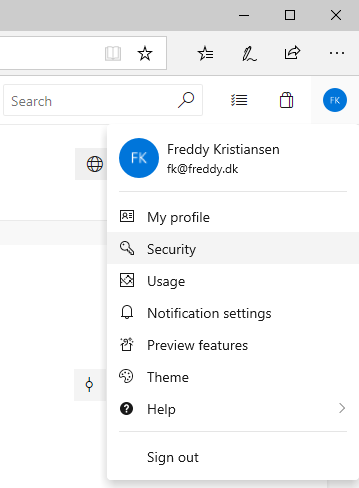
Open your Azure DevOps organization (eg. https://dev.azure.com/\<organization>/) and click your avatar and select Security
In the Personal Access Tokens list, you can revoke tokens, regenerate them or edit scope, expiration date and more.
Select New Token, give the token a name, an expiration date, click show all scopes to reveal Agent Pools and select Read & manage.
Click Create and you will see the token one time and one time only. You will need to copy the token.
Note: You can use the same token for multiple agents.
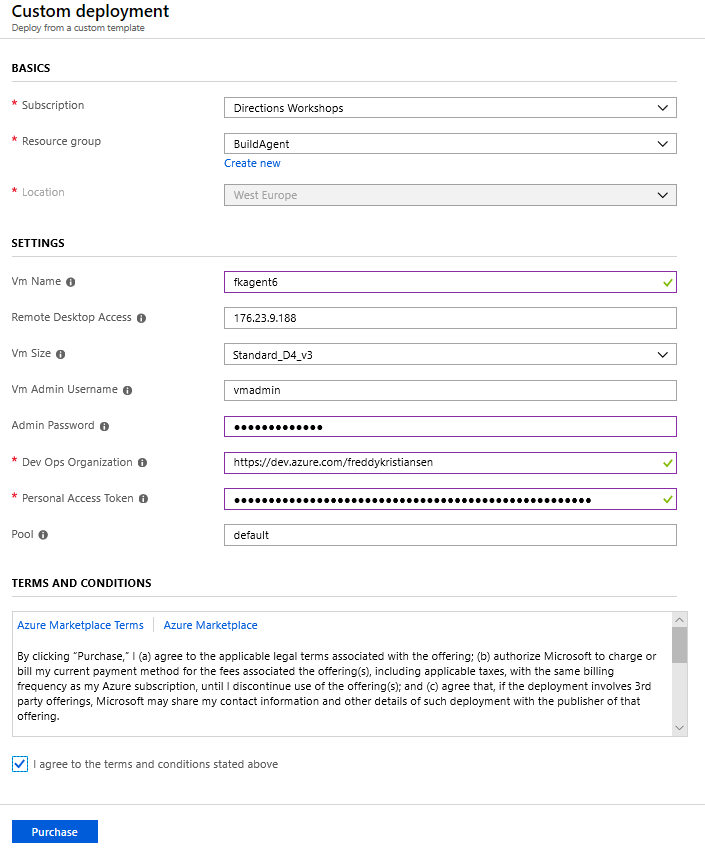
For the automated build agent setup, open https://aka.ms/getbuildagent and specify size, location, your organization and the Personal Access Token.
After 15-20 minutes, you should see your new agent popping up (https://dev.azure.com/\<organization>/_settings/agentpools), ready to serve you:
Access your secrets in the build system
In part 1, we created an Azure KeyVault, with a number of secrets (password, license file etc.). We need these secrets in the build and fortunately, Azure DevOps has a nice way of getting to those.
In Azure DevOps, under your Project, select Pipelines -> Library.
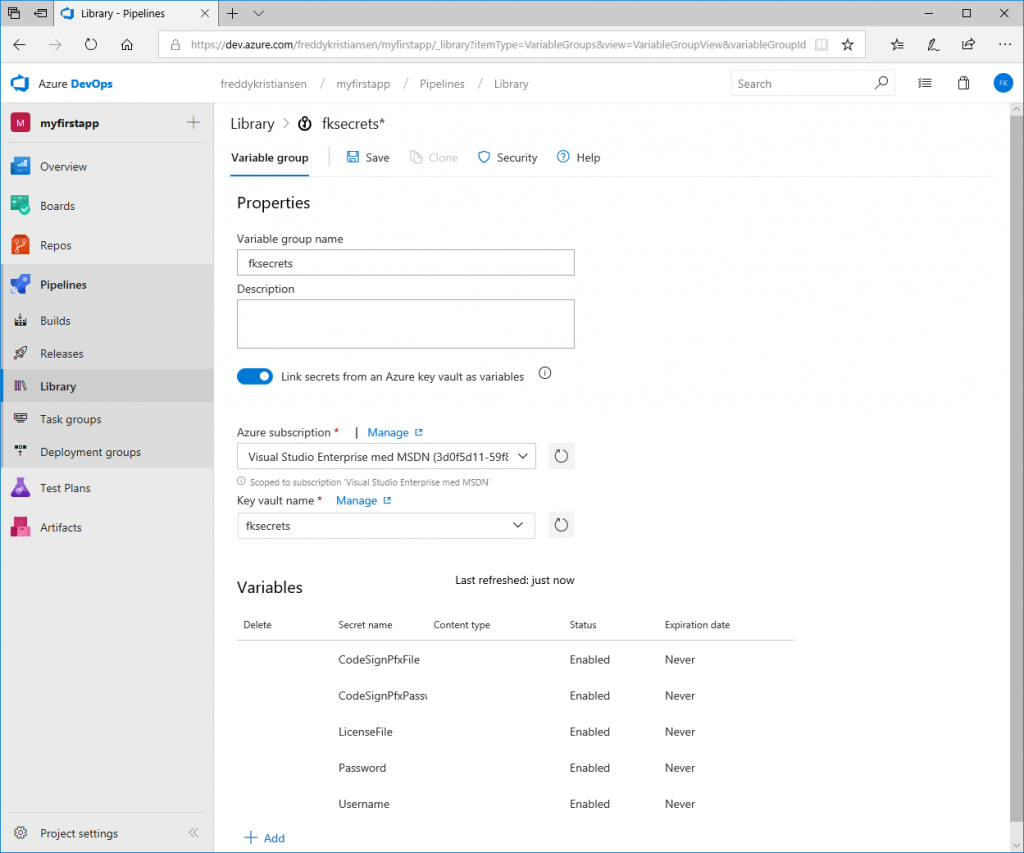
Click + Variable group to create a variable group. Name the variable group and select Link secrets from Azure key vault as variables.
Specify the subscription (you will need to authenticate), select the key vault and add the variables
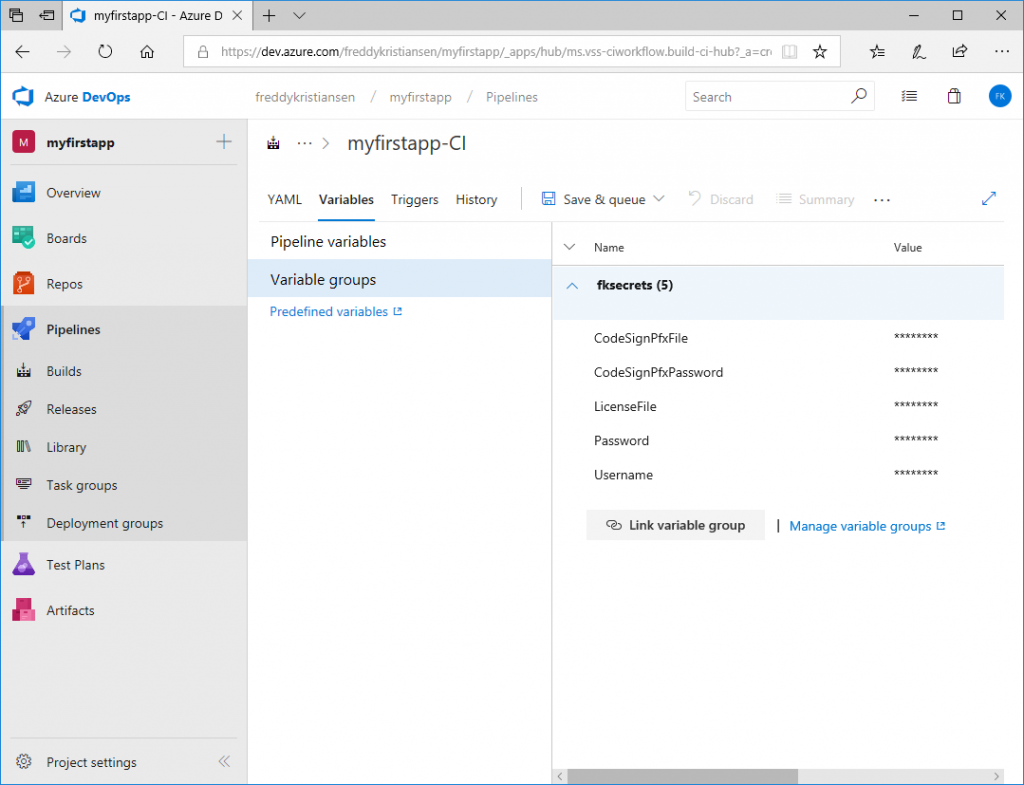
These variables will now be available for the build tasks if you link the variable group to the pipeline.
Create a build pipeline
In Azure DevOps, under your Project, select Pipelines -> Builds. You will likely see that you have no build pipelines: 
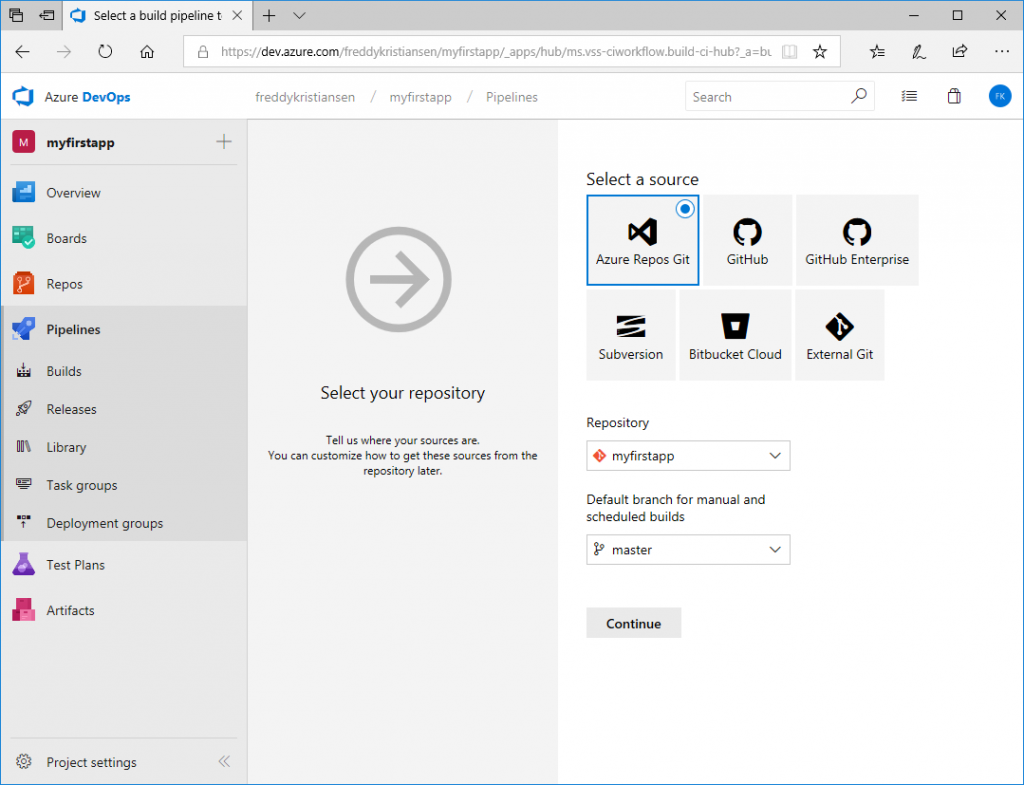
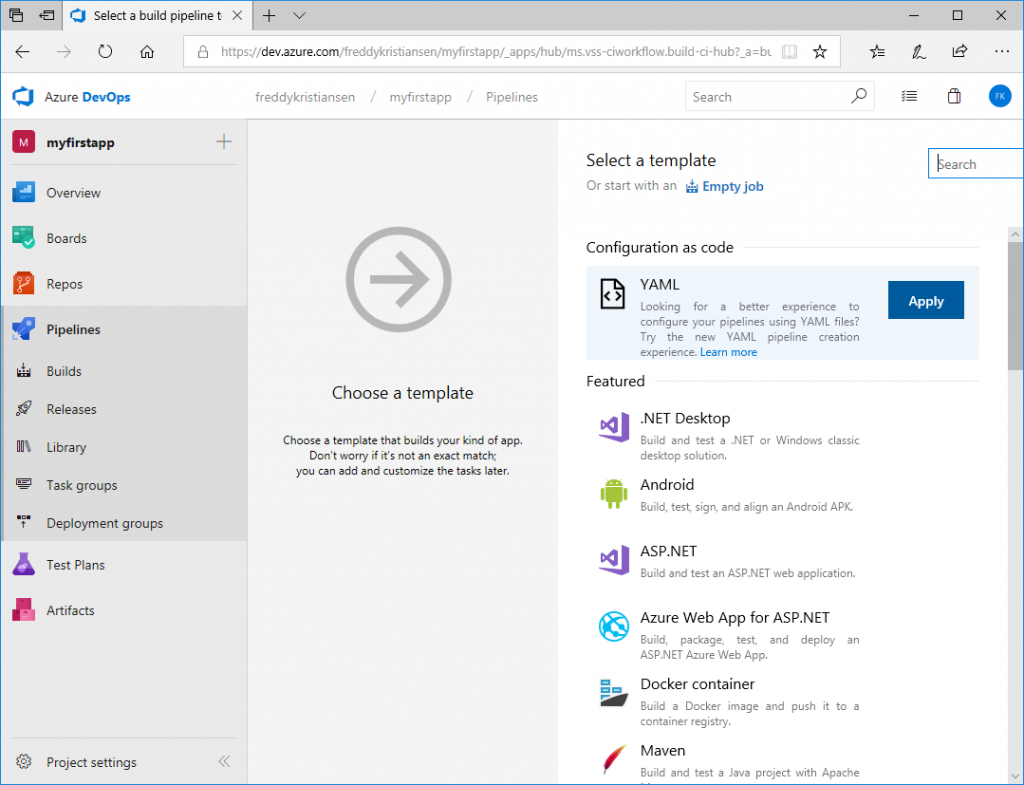
Click New pipeline and click Use the visual designer. Select your repository:
Continue and select the YAML template under Configuration as code.
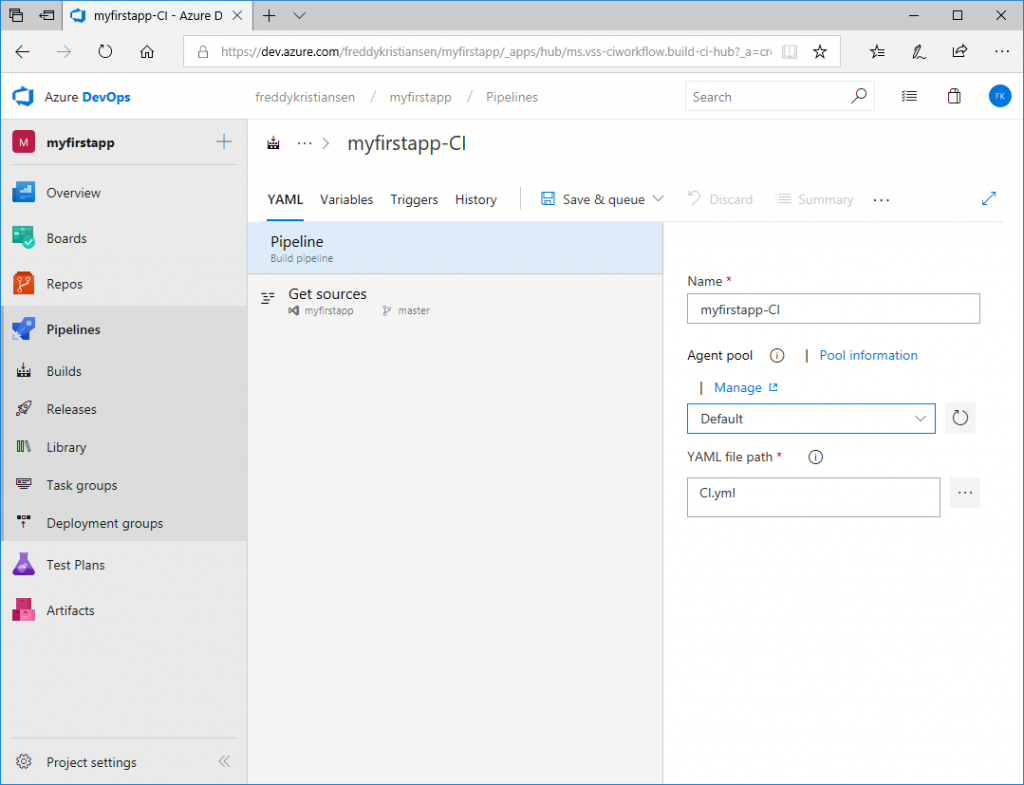
Select the Default Agent pool and select the CI.yml file (included in the repository)
Select Variables, Variable Groups, Link variable group and Link your variable group you created above to the pipeline.
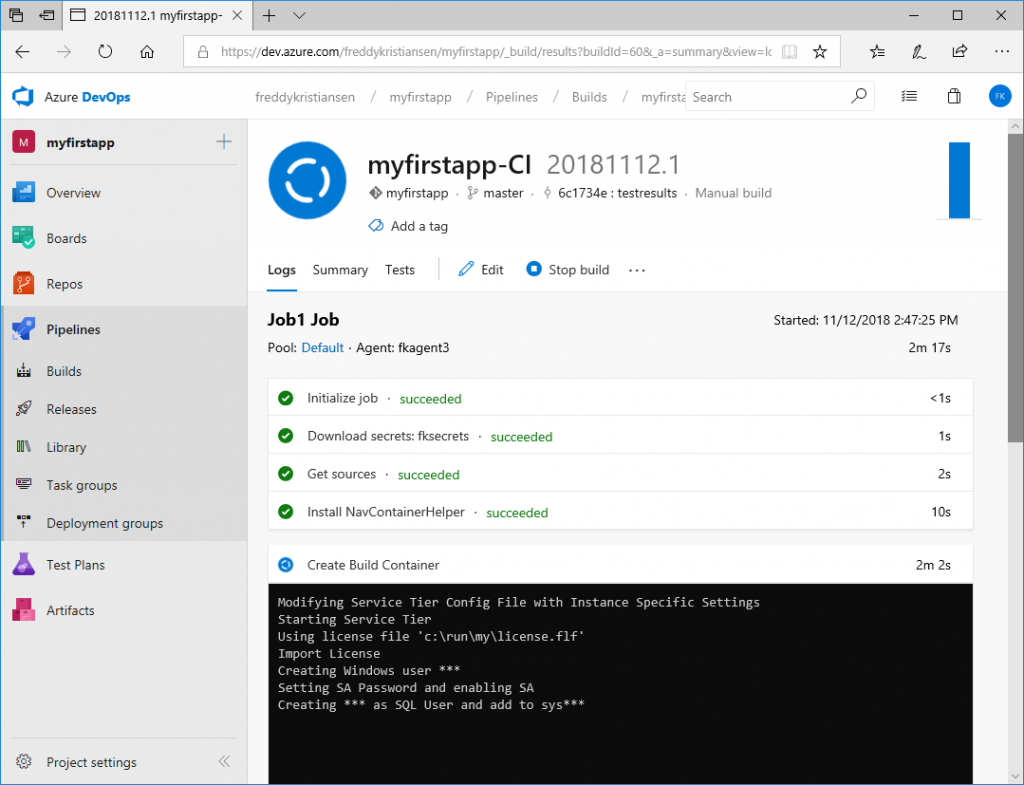
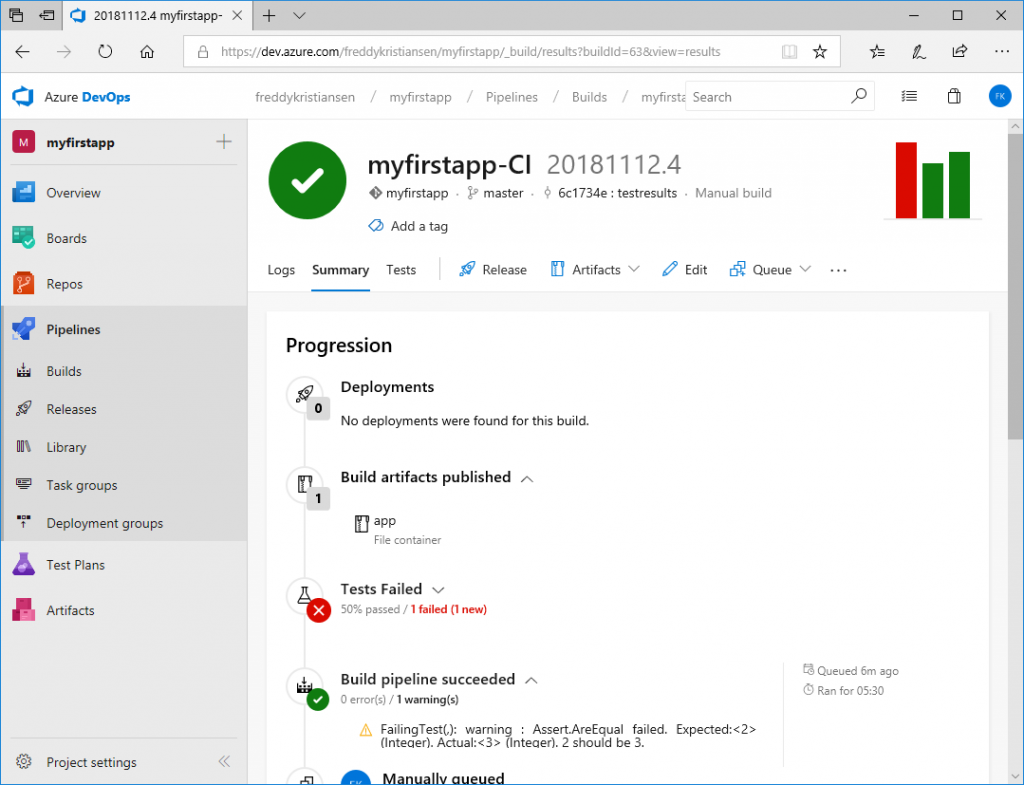
Click Save & queue and queue a build. You can click the link of the build to see the log...
Note: The first time you run a build on the agent, it will take significantly longer because it needs to pull the Business Central Docker image.
After some time, you should see your build successfully completed and one failing test.
A few words about Tests
Update February 27th - the helloworld template repository has been updated with a new way of running tests - a special blog post on test execution will be added to this series soon.
I should mention here, that the way tests are executed in the repository while writing this blog post is still work in progress. Currently the setup just invokes a Codeunit in a container and there are multiple reasons why this isn't sufficient. We are working on making a better approach to this and I will include this in a later blog post.
What's next
Now, we have our source in Azure DevOps and we have local and hosted builds running.
In the next Blog Post we will setup checkin policies with code reviews and pull requests - and we will create a few more pipelines for testing our app against insider builds.
Enjoy
Freddy Kristiansen
Technical Evangelist
Comments
- Anonymous
November 12, 2018
Hi Freddy, one question - have it some reason that you are linking the secrets to Azure key vault? You can put the values directly into the variable groups and use them as environment variables in scripts. It will make it much simpler to config. But may be there is some additional value in this I do not see now.- Anonymous
November 12, 2018
Keyvaults are very easy to use:-)Multiple reasons reallyI can use the keyvaults locally and run local builds and when spinning up sandboxes, get the right license file.I can reuse the same keyvault across projects.I can automate generation of keyvaults.
- Anonymous
- Anonymous
November 13, 2018
The option YAML is unfortunately not available for External Git Repositories - this means, you have to setup the pipeline for each project or move to VSTS Repo.MS support answer: "...It's by design..." :/- Anonymous
November 14, 2018
I should add a PowerShell script in the scripts folder, which is the pipelineMuch like build-local, much like the content of the yaml file.- Anonymous
November 27, 2018
Yeah YAML Style Build looks great, but TFS Users can not use it like that (or am I missing something here?)A Powershell Version would be great and more flexibel in this case- Anonymous
November 30, 2018
YAML currently only supports stuff in Azure DevOps. Some info on how to convert is here: https://blogs.msdn.microsoft.com/freddyk/2018/11/17/developing-business-central-extensions-part-5/
- Anonymous
- Anonymous
- Anonymous
- Anonymous
November 16, 2018
For me the build pipeline fails on the "Run Tests" task. 2018-11-16T11:13:45.1858869Z Formatted command: . 'C:\Agent_work\1\s\scripts\Run-Tests.ps1' -version "current" -credential ([PSCredential]::new("", (ConvertTo-SecureString -String "" -AsPlainText -Force))) -TestResultsFile (Join-Path "C:\Agent_work\1\s" "TestResults.xml") -test "unittests"2018-11-16T11:13:45.2641729Z ##[command]"C:\Windows\System32\WindowsPowerShell\v1.0\powershell.exe" -NoLogo -NoProfile -NonInteractive -ExecutionPolicy Unrestricted -Command ". 'C:\Agent_work_temp\a6f21efc-f670-4eef-8329-867ac0a1f71b.ps1'"2018-11-16T11:13:49.1375029Z You do not have the following permissions on TableData CAL Test Enabled Codeunit: Insert.2018-11-16T11:13:49.1375954Z To view details about your permissions, see the Effective Permissions page. To report a problem, refer to the 2018-11-16T11:13:49.1376544Z following server session ID: '48'.Any suggestions?- Anonymous
November 16, 2018
For that, I think you need to specify your own license file in the key vault.- Anonymous
November 19, 2018
Thanks, that did work.
- Anonymous
- Anonymous
- Anonymous
November 21, 2018
Hi Freddy, When I try to Queue a Build it is giving below error "The value specified for SourceVersion is not a valid commit ID."What value we have to put in Commit field on Queue build page? If I leave it blank then it is giving different error "Unable to resolve the reference 'refs/heads/master' to a specific version. Verify the reference exists in the source repository."Any suggestions?- Anonymous
November 30, 2018
I am not a git expert and it sounds like something is wrong at that level.Maybe you can clone the repo to a different folder and use that?
- Anonymous
- Anonymous
December 19, 2018
The comment has been removed- Anonymous
December 21, 2018
I have seen that a few times and also AJ has reported this here: https://github.com/Microsoft/navcontainerhelper/issues/290It doesn't seem to be consistent, but I will double check and might just include your fix.
- Anonymous
- Anonymous
January 30, 2019
Is it possible to setup a build agent outside of Azure, like a local machine/server? Could you elaborate on this scenario a bit more?PS. the link https://github.com/Microsoft/nav-arm-templates/blob/master/initagent.ps1 does not work...- Anonymous
January 31, 2019
All files are here: https://github.com/Microsoft/nav-arm-templates/ - it looks like I renamed the file to initbuildagent...https://github.com/Microsoft/nav-arm-templates/blob/master/initbuildagent.ps1- Anonymous
February 11, 2019
I'm getting this error during Installation of Powershell -step. Any idea?2019-02-11T21:49:08.5351213Z ##[section]Starting: Install NavContainerHelper2019-02-11T21:49:08.5456801Z ==============================================================================2019-02-11T21:49:08.5456921Z Task : PowerShell2019-02-11T21:49:08.5456993Z Description : Run a PowerShell script on Windows, macOS, or Linux.2019-02-11T21:49:08.5457061Z Version : 2.140.22019-02-11T21:49:08.5457118Z Author : Microsoft Corporation2019-02-11T21:49:08.5457198Z Help : More Information2019-02-11T21:49:08.5457280Z ==============================================================================2019-02-11T21:49:09.2927101Z Generating script.2019-02-11T21:49:09.3016376Z Formatted command: . 'C:\Agent_work\2\s\scripts\Install-NavContainerHelper.ps1'2019-02-11T21:49:09.3487472Z ##[command]"C:\Windows\System32\WindowsPowerShell\v1.0\powershell.exe" -NoLogo -NoProfile -NonInteractive -ExecutionPolicy Unrestricted -Command ". 'C:\Agent_work_temp\1fd65b53-09a2-44ff-9d20-45021f4bc309.ps1'"2019-02-11T21:49:12.1192345Z Installing NavContainerHelper2019-02-11T21:49:15.4103483Z Install-NuGetClientBinaries : Exception calling "ShouldContinue" with "2" argument(s): "Windows PowerShell is in NonInt2019-02-11T21:49:15.4108572Z eractive mode. Read and Prompt functionality is not available."2019-02-11T21:49:15.4130392Z At C:\Program Files (x86)\WindowsPowerShell\Modules\PowerShellGet\1.0.0.1\PSModule.psm1:1725 char:92019-02-11T21:49:15.4172098Z + Install-NuGetClientBinaries -CallerPSCmdlet $PSCmdlet -Proxy ...2019-02-11T21:49:15.4174145Z + ~~~~~~~~~~~~~~~~~~~~~~~~~~~~~~~~~~~~~~~~~~~~~~~~~~~~~~~~~~~~~2019-02-11T21:49:15.4174369Z + CategoryInfo : NotSpecified: (:) [Install-NuGetClientBinaries], MethodInvocationException2019-02-11T21:49:15.4174551Z + FullyQualifiedErrorId : PSInvalidOperationException,Install-NuGetClientBinaries2019-02-11T21:49:15.4175008Z 2019-02-11T21:49:15.4884330Z ##[error]PowerShell exited with code '1'.2019-02-11T21:49:15.5038436Z ##[section]Finishing: Install NavContainerHelper- Anonymous
February 14, 2019
(The content was deleted per user request) - Anonymous
February 14, 2019
ps When I open the VM and run Install-NAVContainerHelper.ps1 manually it does not fail:NavContainerHelper 0.5.0.2 is installed Determine latest NavContainerHelper version NavContainerHelper 0.5.0.2 is the latest version- Anonymous
February 15, 2019
The comment has been removed - Anonymous
February 21, 2019
Thank you Peter-Paul. I had exactly same problem and this solved it for me
- Anonymous
- Anonymous
- Anonymous
- Anonymous
- Anonymous
February 28, 2019
Hi Freddy, finally got this working on a VM, but got an error about the testtoolkit: In step "Compile Test App":##[error]C:\Agent_work\2\s\test\Codeunit 50132 - HelloWorld Tests.al(7,17): error AL0185: Codeunit 'Assert' is missing##[error]Codeunit 'Assert' is missingI tried to add "test": "13.0.0.0" to the testapp, but the I got the error:Reference to object Assert is ambiguous. Make sure you are not referencing packages containing objects with the same names.Do you have any idea?- Anonymous
February 28, 2019
ps, using image: mcr.microsoft.com/businesscentral/onprem:cu2-nl- Anonymous
March 01, 2019
The comment has been removed
- Anonymous
- Anonymous
