Learn Exchange Online PowerShell with Command Logging
When you are navigating or making changes in the Exchange Online portal, PowerShell is being executed in the background. Using the Command Logger, you can see exactly what that these background PowerShell command looks like! This tool is a great way to learn PowerShell and can give you a head start in your own scripting.
Exchange 2010 offered ways to view the Exchange shell to see what was happening in the background when changes were made. This feature disappeared in Exchange 2013, but reappeared in Exchange 2013 SP1. The Command Logger is now also present in both Exchange Online and Exchange Online Protection.
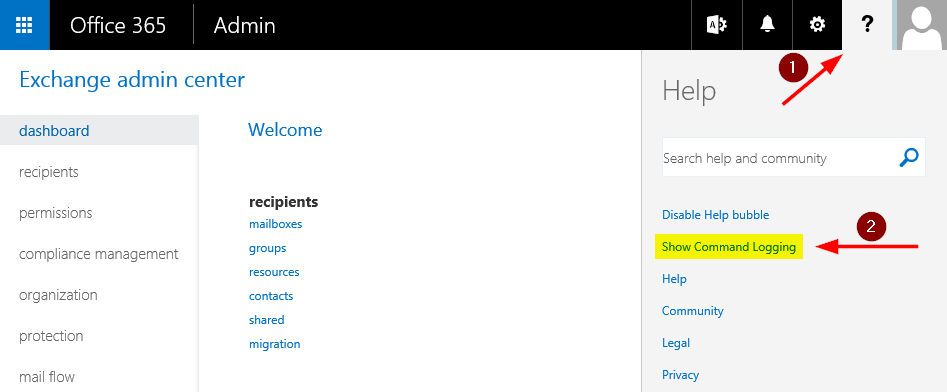
Show Command Logging
To enable Command Logging, first browse to the Exchange Admin Center. Then click the question mark in the top right corner of the screen, and then select Show Command Logging from the menu.
Once enabled, the Command Logger will appear in a new Windows and will show the background PowerShell executed by the portal based on your mouse clicks from that point forward.
Whether your portal actions are pulling information or making changes, the background PowerShell command that is run will appear in the Command Logging window. Commands can easily be copied out of this Window, allowing you to copy a command from the Logger into your own script where you can tweak it.
Example
Exchange Online Protection recently introduced a new Allow and Block list in the Spam Filter policy. Let’s say we want to populate some domains in this new Allow List, but being brand new we aren’t sure what the PowerShell would look like to accomplish this. Sure, we can look on TechNet, but let’s instead use the Command Logger.
Once the Command Logger is enabled, I’m going to add four domains to the Allow List in my default Spam Filter.
Once I click save in the spam filter, here’s what the Command Logger shows me.
Set-HostedContentFilterPolicy –Identity ‘Default’ –TestModeAction ‘None’ –MarkAsSpamBulkMail On –BulkThreshold ‘7’ –BlockedSenders @() –BlockedSenderDomains @() –AllowedSenders @() –AllowedSenderDomains @(‘Microsoft.com’,’contoso.com’,’fabrikam.com’,’tailspintoys.com’) –RegionBlockList $null –LanguageBlockList $null
The PowerShell provided by the Command Logger is not the most efficient, but it is more than enough to get you started. With some trial and error, I know I can trim the above to be as follows.
Set-HostedContentFilterPolicy –Identity ‘Default’ –AllowedSenderDomains @(‘Microsoft.com’,’contoso.com’,’fabrikam.com’,’tailspintoys.com’)
Something to note for this particular cmdlet. This won’t add the domains to the existing list, it will replace the existing list with these domains. To append to this list, you could setup a script to first read the existing list into a variable, and then append new domains to this variable, and then write the domains in the variable back to the list.
Final thoughts
Whether learning PowerShell or trying to script an action, the Command Logger is a wonderful tool for learning. Also be sure to check out PowerShell for Office 365, which is a new site targeted towards individuals that administer Office 365.
Resources
PowerShell for Office 365
Connect to Exchange Online using remote PowerShell
Connect to Exchange Online Protection using remote PowerShell
Comments
- Anonymous
July 23, 2015
The comment has been removed - Anonymous
July 23, 2015
I think is where I go "OMG!". What great news and what a valuable tool for learning.... - Anonymous
July 31, 2015
Yeah, I thought you guys might like that one :) I use this all the time myself!


