SharePoint 2010 Claims-Based Auth with ADFS v2
I have a really cool 2010 lab environment at home and one of the things I wanted to do was to make sure I was able to demo SharePoint 2010 ‘s claims-based authentication capabilities, especially using ADFS v2.
I was amazed at how straight forward the process was. Just a few lines of PowerShell and I was authenticating with our Microsoft IT’s ADFS v2 end point. Very cool stuff. So here’s what I did:
Pre-requisites
-First, have your security admin configure your relying point URL in ADFS v2. This tells ADFS that you are a trusted end point and you are allowed to authenticate. This is what allows/prevents anyone in the world from authenticating with your service (assuming they knew a correct username/password).
-Next, you will need to get the certificate used by your security team for ADFS. Save it locally.
-Lastly, you’ll need a web application that was created using “Claims-based Authentication” (not “Classic” )
Steps to configure
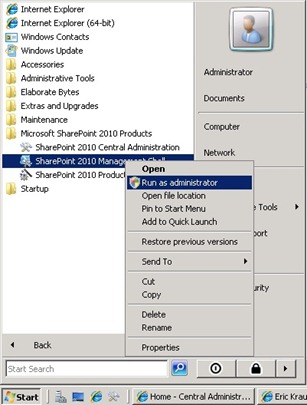
1. After that is complete, Open PowerShell Management Console for SharePoint 2010 as an Administrator.
2. After PowerShell opens, run the two commands below to get a reference to the certificated provided to you.
$certPath = "<path to cert>\<cert>.cer"
$cert = New-Object System.Security.Cryptography.X509Certificates.X509Certificate2("$certPath")
3. Next, create a new trusted root authority provider within SharePoint. Run the following command:
New-SPTrustedRootAuthority "MSIT ADFS Token Signing Trusted Root Authority" -Certificate $cert
Note: you’ll want to repeat this for each of the cert(s) in the chain, but you’ll want to end with a reference to the last cert (not the parent/root) for the rest of the process below
4. Now, create a new claim type mapping to the claim that you will use as your identifier (e.g. “username”). In this case, I’ll be using the “EmailAddress” claim.
$map1 = New-SPClaimTypeMapping -IncomingClaimType "https://schemas.xmlsoap.org/ws/2005/05/identity/claims/emailaddress" -IncomingClaimTypeDisplayName "EmailAddress" –SameAsIncoming
5. Next, specify the realm (a unique URI for your site) and the sign-in URL for your site. The realm must match what is configured for your site in ADFS. This how ADFS knows which site to pass the claim back to.
$realm = "https://www.yoursite.com"
$signinurl = "https://corp.sts.yourcompany.com/adfs/ls"
6. The last step in PowerShell creates the actually trusted identity token issuer (provider). Run the following command using the variables you set in earlier steps:
$ap = New-SPTrustedIdentityTokenIssuer -Name "ADFSv2" -Description "ADFSv2 Federated Identity" -Realm $realm -ImportTrustCertificate $cert -ClaimsMappings $map1 -SignInUrl $signinurl –IdentifierClaim $map1.InputClaimType
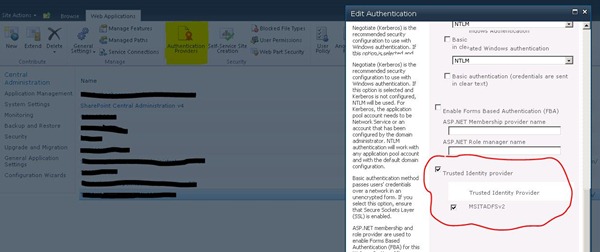
7. Now, browse to Manage Web Applications in Central Administration (you may need to run Central Admin as an Administrator). Click on a web application and choose Authentication Providers button in the ribbon. And choose the appropriate zone you want to configure.
8. Scroll down to the Claims-based Authentication Providers section and put a checkbox next to “Trusted Identity Provider” and again next to the name of the provider you created in step #5.
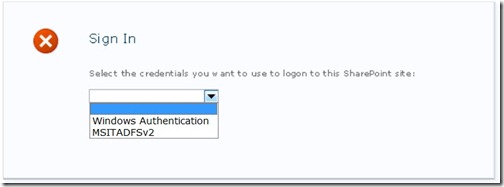
Note: a great new feature in SharePoint 2010 is the ability to specify multiple authentication providers on a given zone within a web application. e.g. you can leave Windows Authentication (NTLM) checked and also check Trusted Identity Provider. Doing so will give you an option when you load the web application to choose which authentication method you want.
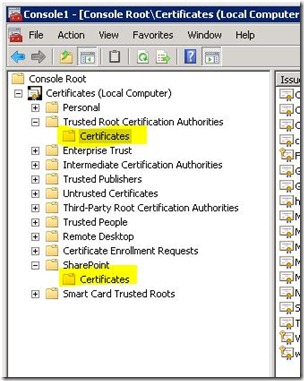
9. The last step is to ensure all of the certificate(s) [all certs in the chain] are added to the following stores:
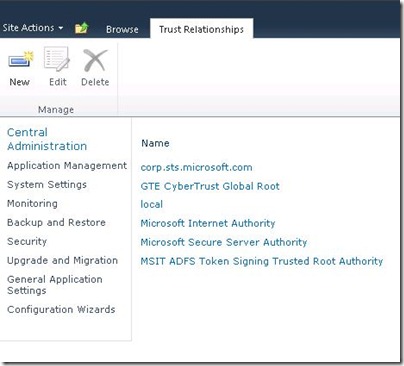
Also, confirm that your cert(s) were added to the trusted root authority (in Step 3 by viewing the certs under “Trusts” in Central Administration:
NOTE: if your certs are issued in a chain like mine were, you will also need to set the trust on your web application to Medium (via web.config) or you will receive errors like the following or create a custom trust level to include the certs.
The issuer of the token is not a trusted issuer
The root of the certificate chain is not a trusted root authority.
Comments
- Anonymous
June 16, 2010
Excellent!! this is what I was looking for, time to get hold of sec admin!! Regards Yogesh Pawar
