SharePoint Calculator Service Part 4 – New Service Application UI
In Part 3 of this series, we created a service application class that represents a logical endpoint of our Calculator service in the SharePoint server farm topology.
We also created a temporary installer (a batch file) to put our service files in the right places on the disk. (We’ll revisit the proper way to do this in a future article.)
And finally, we saw how an administrator can use PowerShell commands to create a new service application object and deploy our service to any server in the farm.
Pretty neat, except that the PowerShell commands were far from intuitive. Time to fix that.
In this article, we’ll see how to integrate our service application creation and provisioning experience with the SharePoint Central Administration web site. This will allow administrators to simply point and click to deploy a Calculator service application to servers in the farm.
The first thing we’ll do is implement the IServiceApplicationAdministration interface on our CalculatorService class:
CalculatorService.cs
- internal sealed class CalculatorService : SPIisWebService, IServiceAdministration
- {
- #region IServiceAdministration Members
- public Type[] GetApplicationTypes()
- {
- return new Type[] { typeof(CalculatorServiceApplication) };
- }
- public SPPersistedTypeDescription GetApplicationTypeDescription(
- Type serviceApplicationType)
- {
- if (serviceApplicationType != typeof(CalculatorServiceApplication))
- {
- throw new NotSupportedException();
- }
- return new SPPersistedTypeDescription(
- "Calculator Service",
- "Performs calculations to demonstrate the SharePoint Service Application Framework.");
- }
- public override SPAdministrationLink GetCreateApplicationLink(
- Type serviceApplicationType)
- {
- return new SPAdministrationLink("/_admin/sample/calculator/createapplication.aspx");
- }
- public override SPCreateApplicationOptions GetCreateApplicationOptions(
- Type serviceApplicationType)
- {
- // Do not support farm creation wizard
- return SPCreateApplicationOptions.None;
- }
- public SPServiceApplication CreateApplication(
- string name,
- Type serviceApplicationType,
- SPServiceProvisioningContext provisioningContext)
- {
- throw new NotSupportedException();
- }
- public SPServiceApplicationProxy CreateProxy(
- string name,
- SPServiceApplication serviceApplication,
- SPServiceProvisioningContext provisioningContext)
- {
- throw new NotSupportedException();
- }
- #endregion
- }
The GetApplicationTypes method (lines 5-8) tells SharePoint the types of service applications that are supported by our service. In this case, we have one service application type: CalculatorServiceApplication.
The GetApplicationTypeDescription method (lines 10-21) return a user-friendly description of our service application type for display purposes.
The GetCreateApplicationLink method (lines 23-27) return the URI of the ASPX page that provides the user interface for creating our service application. We’ll need to create this page later.
We don’t need to implement the remaining interface methods for now—they are used for integrating with the Farm Configuration Wizard, which we’ll cover in a future article.
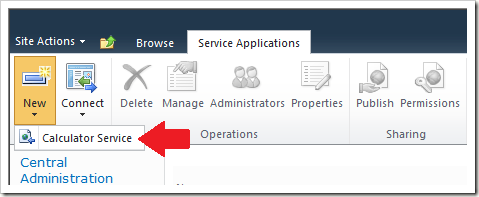
Let’s take a look at what we get for this work:
Nice! The Service Applications management page has a new “Calculator Service” drop-down menu item.
If you click “New”, “Calculator Service” right now, you’ll see a “Page Not Found” error in your browser because we haven’t created the “createapplication.aspx” page yet. So let’s create it:
CreateApplication.aspx.cs
- public class CalculatorServiceApplicationCreatePage : GlobalAdminPageBase
- {
- protected TextBox ServiceApplicationNameTextBox;
- protected IisWebServiceApplicationPoolSection ServiceApplicationPoolSection;
- protected override void OnLoad(EventArgs e)
- {
- ((DialogMaster)Page.Master).OkButton.Enabled = true;
- base.OnLoad(e);
- }
- protected override void OnInit(EventArgs e)
- {
- ((DialogMaster)Page.Master).OkButton.Click += new EventHandler(this.OkButton_Click);
- base.OnInit(e);
- }
- protected void OkButton_Click(object sender, EventArgs e)
- {
- if (Page.IsValid)
- {
- CalculatorService service = SPFarm.Local.Services.GetValue<CalculatorService>();
- if (service != null)
- {
- using (SPLongOperation longOperation = new SPLongOperation(this))
- {
- longOperation.Begin();
- string serviceApplicationName = ServiceApplicationNameTextBox.Text.Trim();
- CalculatorServiceApplication serviceApplication = new CalculatorServiceApplication(
- serviceApplicationName,
- service,
- this.ServiceApplicationPoolSection.GetOrCreateApplicationPool());
- serviceApplication.Update();
- serviceApplication.Provision();
- longOperation.EndScript("window.frameElement.commitPopup();");
- }
- }
- else
- {
- throw new InvalidOperationException("The Calculator service is not installed.");
- }
- }
- }
- }
The protected members (lines 3-4) reference controls that will be used to prompt for the new service application name and application pool.
The OnLoad and OnInit methods (lines 6-18) enable the “OK” and “Cancel” buttons on the page, which is displayed as a dialog.
The OkButton_Click method (lines 20-51) is called when the OK dialog button is clicked.
Line 24 looks up our CalculatorService object in the configuration database. If it’s not found, we throw an exception (line 47). (It should be installed, otherwise the link to this page in the “New” drop-down menu wouldn’t be there.)
Lines 27-29 start a new SPLongOperation, which displays a fancy progress bar. This will give the administrator something nice to look at while SharePoint churns away deploying the new service application to all of our online service instances in the farm.
Lines 33-38 create a new service application from the administrator input and persist it in the configuration database.
Line 40 is where the magic happens. The Provision method instructs SharePoint to deploy the service application to all online Calculator service instances in the server farm, to include creating an IIS web site and virtual directory as necessary to host our WCF service.
And finally, line 42 ends the SPLongOperation by closing the dialog window.
Here’s the matching ASPX page:
- <%@ Page Language="C#" Inherits="Sample.Calculator.Service.UI.Administration.CalculatorServiceApplicationCreatePage, Sample.Calculator.Service, Version=1.0.0.0, Culture=neutral, PublicKeyToken=d5d38459f57e2f46" MasterPageFile="~/_layouts/dialog.master" %>
- <%@ Assembly Name="Microsoft.SharePoint.ApplicationPages.Administration, Version=14.0.0.0, Culture=neutral, PublicKeyToken=71e9bce111e9429c"%>
- <%@ Assembly Name="Microsoft.SharePoint.ApplicationPages.Administration" %>
- <%@ Register Tagprefix="wssawc" Namespace="Microsoft.SharePoint.WebControls" Assembly="Microsoft.SharePoint, Version=14.0.0.0, Culture=neutral, PublicKeyToken=71e9bce111e9429c" %>
- <%@ Register TagPrefix="wssuc" TagName="InputFormSection" src="~/_controltemplates/InputFormSection.ascx" %>
- <%@ Register TagPrefix="wssuc" TagName="InputFormControl" src="~/_controltemplates/InputFormControl.ascx" %>
- <%@ Register TagPrefix="wssuc" TagName="IisWebServiceApplicationPoolSection" src="~/_admin/IisWebServiceApplicationPoolSection.ascx" %>
- <%@ Import Namespace="Microsoft.SharePoint" %>
- <%@ Import Namespace="Microsoft.SharePoint.ApplicationPages" %>
- <asp:Content ContentPlaceHolderId="PlaceHolderAdditionalPageHead" runat="server">
- <wssawc:FormDigest ID="FormDigest" runat="server" />
- </asp:Content>
- <asp:Content ContentPlaceHolderId="PlaceHolderDialogHeaderPageTitle" runat="server">
- <asp:Literal ID='PageTitle' Text="Create New Calculator Service Application" runat="server" />
- </asp:Content>
- <asp:Content contentplaceholderid="PlaceHolderDialogDescription" runat="server">
- <asp:Literal ID='PageDescription' Text="Specify the settings for this new service application." runat="server" />
- </asp:Content>
- <asp:content contentplaceholderid="PlaceHolderDialogBodyMainSection" runat="server">
- <table border="0" cellspacing="0" cellpadding="0" width="100%" class="ms-propertysheet">
- <wssuc:InputFormSection
- Title="Name"
- runat="server">
- <Template_InputFormControls>
- <wssuc:InputFormControl LabelText="Service Application Name" runat="server" >
- <Template_Control>
- <wssawc:InputFormTextBox
- id="ServiceApplicationNameTextBox"
- title="Name"
- maxlength="256"
- columns="35"
- class="ms-input"
- runat="server" />
- <wssawc:InputFormRequiredFieldValidator
- ID="ServiceApplicationNameValidator"
- ControlToValidate="ServiceApplicationNameTextBox"
- ErrorMessage="You must specify a value for this required field."
- runat="server" />
- </Template_Control>
- </wssuc:InputFormControl>
- </Template_InputFormControls>
- </wssuc:InputFormSection>
- <wssuc:IisWebServiceApplicationPoolSection
- id="ServiceApplicationPoolSection"
- runat="server" />
- </table>
- </asp:content>
And here’s a new line in our temporary installer batch file to copy the ASPX page to the right place on disk:
xcopy /y "%_SETUPPATH%\UI\Admin\*.aspx" "%_INSTALLPATH%\template\admin\Sample\Calculator\*.*"
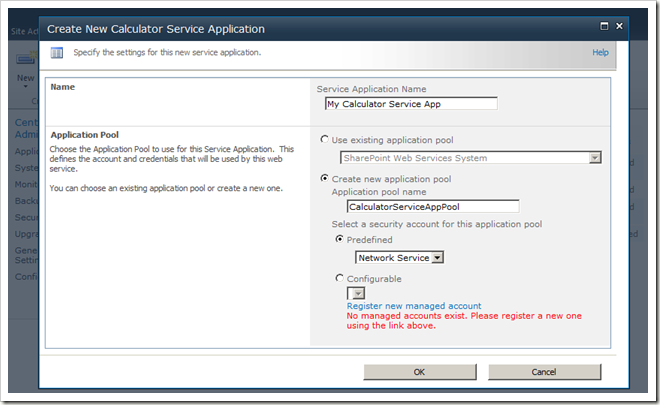
I won’t go through the ASPX code line-by-line, but here’s what it looks like after I filled in some values:
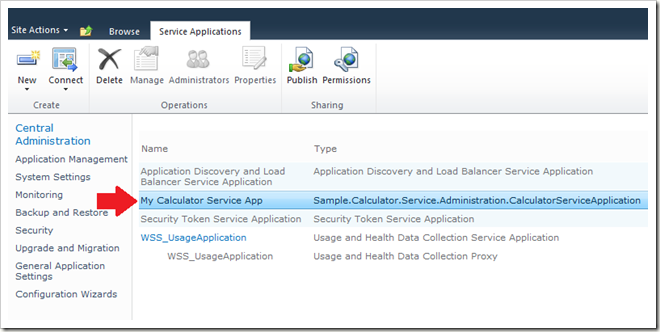
Simply click the “OK” button to create and deploy the new service application to the farm:
Note that SharePoint automatically provides the Delete, Publish, and Permissions pages. So administrators can publish your service application to remote server farms and manage who can access it—without any further coding!
So there you have it—a deployment experience that fits our custom Calculator service neatly into the SharePoint Central Administration site just like the built-in services that ship with the product. Now SharePoint administrators will feel right at home creating and deploying our Calculator service in their server farms.
No doubt some of you are noting that a few of the ribbon buttons are still disabled, namely, the Manage, Administrators, and Properties buttons. Never fear—we’ll fix that soon.
Comments
Anonymous
November 18, 2010
Hello, this is a really nice article, thanks for all the useful info. I still had one question though that i couldn't find any answer for neither in this article nor in any other article discussing the new SharePoint Shared Services model. In your code samples above, you mentioned that the GetApplicationTypes override is used to indicate what are the supported derivatives of SPApplicationService that this SPService supports; and this sounds really logical since the method returns a Type array. The thing is i couldn't find a single concrete example anywhere, that illustrates the usage of multiple SPApplicationService implementations in the same SPService. I tried to do that myself, but whenever i got to create an new service application I always got an instance of the first type in the returned array created. So any help on this matter would be extremely appreciated as we are building a new product totally centered around SharePoint Shared Services and it would be nice if I could package all of my logical services (i.e. SPServiceApplication implementations) in a single SPService package. Thanks in advanceAnonymous
November 29, 2011
Hi Gabriel, Sorry I missed your comment more than a year ago now! In short, override GetApplicationTypes() to return an array of the types of service applications your SPService supports (e.g., "SimpleCalculatorServiceApplication" and "AdvancedCalculatorServiceApplication") and override GetApplicationTypeDescription() to return the appropriate description of each type. The tricky part is to then modify your GetCreateApplicationLink implementation to provide a URL that is unique for each service application type (as specified in the 'serviceApplicationType' parameter). For example, you might use a querystring parameter like "/_admin/sample/calculator/createapplication.aspx?apptype=x", where x is '1' when a "SimpleCalculatorServiceApplication" should be created, and x is '2' when an "AdvancedCalculatorServiceApplication" should be created. Or, you might have completely different pages for each supported service application type, e.g., "/_admin/sample/calculator/createsimple.aspx" and "/_admin/sample/calculator/createadvanced.aspx". And finally, modify the implementation of your "create" page(s) to create the appropriate service application type as specified by the URL, e.g., by the 'apptype' querystring parameter. Again, sorry for the very delayed response! -David


