Step-by-Step: Setup the Online Backup Service for Windows Server 2012
Hello Folks,
When is the last time you had to restore data and you realized that the tape you need is in the vault at the offsite archive, across town… Anyone for a road trip? These situations are thing of the past. The Microsoft Online Backup Service is a cloud based backup solution for Windows Server 2012. It provides you the ability to backup and recover files and folders in the cloud.
that provides you off-site protection against data loss due to disasters. The service gives IT administrators with the option to back up and protect critical data in an easily recoverable way from any location with no upfront hardware cost or resources other than an Internet connection.
This service is built on the Windows Azure platform and uses Windows Azure blob storage for storing customer data. Windows Server 2012 uses the downloadable Microsoft Online Backup Agent to transfer file and folder data securely and efficiently to the Microsoft Online Backup Service. Once installed, the Microsoft Online Backup Agent exposes its functionality through the familiar Windows Server Backup interface.
If you are looking to evaluate Windows Azure you should checkout these following online courses Windows Azure training,
- Introduction To Windows Azure Training
- Windows Azure for IT Pros Jump Start
- Windows Azure Security Overview
And to build your test server to evaluate Azure Backup, you can use the evaluation versions you can download here:
Both these download site will offer a ISO and a VHD you can just download and run in Hyper-v.
Key features
Simple configuration and management. Integrated with Windows Server Backup utility in order to provide a seamless backup and recovery experience to a local disk, or to the cloud.
- Simple user interface to configure and monitor the backups.
- Integrated recovery experience to transparently recover files and folders from local disk or from cloud.
- Easily recover any data that was backed up onto any server of your choice.
- Windows PowerShell command-line interface scripting capability.
Block level incremental backups. The Microsoft Online Backup Agent performs incremental backups by tracking file and block level changes and only transferring the changed blocks, hence reducing the storage and bandwidth utilization. Different point-in-time versions of the backups use storage efficiently by only storing the changes blocks between these versions.
Data compression, encryption and throttling. The Microsoft Online Backup Agent ensures that data is compressed and encrypted on the server before being sent to the Microsoft Online Backup Service over the network. As a result, the Microsoft Online Backup Service only stores encrypted data in the cloud storage. The encryption passphrase is not available to the Microsoft Online Backup Service, and as a result the data is never decrypted in the service. Also, users can setup throttling and configure how the Microsoft Online Backup service utilizes the network bandwidth when backing up or restoring information.
Data integrity is verified in the cloud. In addition to the secure backups, the backed up data is also automatically checked for integrity once the backup is done. As a result, any corruptions which may arise due to data transfer can be easily identified and they are fixed in next backup automatically.
Configurable retention policies for storing data in the cloud. The Microsoft Online Backup Service accepts and implements retention policies to recycle backups that exceed the desired retention range, thereby meeting business policies and managing backup costs.
The Microsoft Online Backup Service only supports the Windows Server 2012 operating system. It does not support Windows 8 client operating systems or any Windows operating systems released prior to Windows Server 2012
Here is how we set it up.
Install Windows Server Backup
First we need to install Windows Server Backup
- In Server Manager, click Manage, and then click Add Roles and Features.
- Click Next at each step in the wizard until you reach the Select features page.
- Check Windows Server Backup.
- Click Next, and then click Install.
- When the installation completes, click Close.
Create the backup vault and install the Windows Azure Online Backup Agent
The Windows Azure Backup Agent is an add-on for Windows Server 2012. The Windows Azure Backup Agent provides the MMC snap-in user interface to use when scheduling backups and recovering content. It also installs the online backup cmdlets for Windows PowerShell.
The easiest way to download the Windows Azure Backup Agent is to go to the Windows Azure Management Portal.
Sign in to your account. (You can get your free trial account here.)
Click Recovery Services. If you have already created a backup vault click the name of backup vault to view the vault dashboard. Otherwise, click New and Create a Backup Vault using the Quick Start wizard. (this will take a few minutes…)
- Click Download Agent
- save it locally and then execute it.
- Accept the service agreement, and then click OK.
- Click Next twice.
- Click I do not want to use Microsoft Update, and then click Install. (just to speed things up. use the Windows Update if you want to)
- Check I accept the terms in the license agreement and privacy statement, then click Install.
- Click Finish.
- Uncheck the Check for newer updates check box, and then click Finish.
Register the server
In this step, you will register your server with Windows Azure Online Backup.
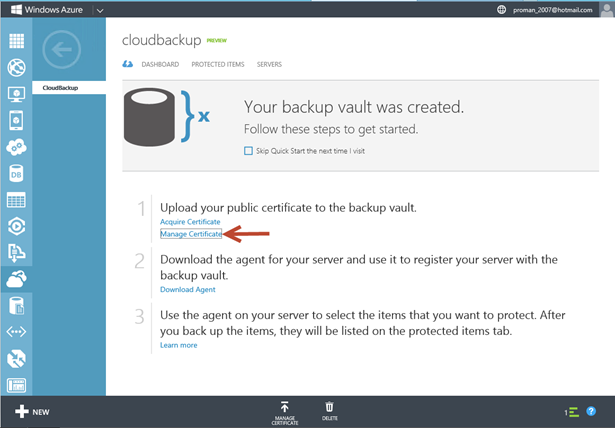
- You will need a certificate to complete the next steps. more info on obtain a self-signed certificate can be found here.
- Once you have a certificate you have to upload it to your backup vault.
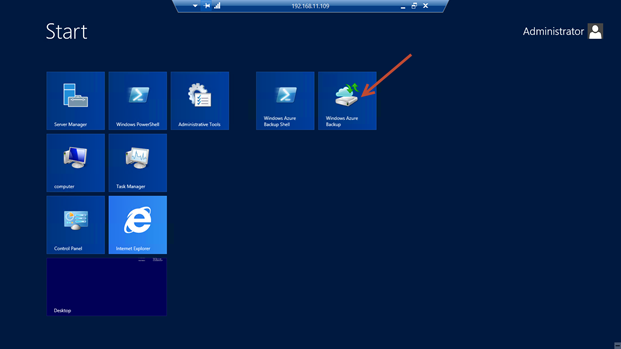
- Open the Start screen, and then click Windows AzureOnline Backup.
- In Windows Azure Online Backup Service, click Register Server.
- Click Next to accept the default proxy settings.
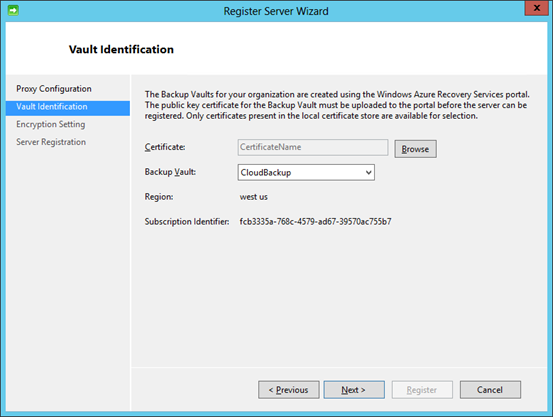
- In the Vault Identification screen browse for and select the certificate for the server. and select the Backup Vault you created when you ran the Quick Start wizard earlier. Click Next
- Click Generate Passphrase.
- Click Browse, select C:\Users\Administrator\Desktop, and then click OK.
- Click Next.
- Click Register.
- Click Close.
Perform a backup
In this step, you will manually start one of your scheduled backups.
In Windows Azure Online Backup Service, click Schedule Backup.
Click Next.
Click Add Items.
Expand C: \ , select the directories where you have data. check box, and then click OK.
Click Next.
Check Sunday, click 12:00AM, and then click Next.
Specify the retention settings, and then click Next.
and Finish.
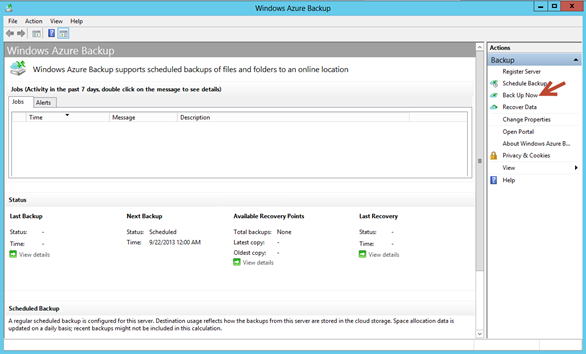
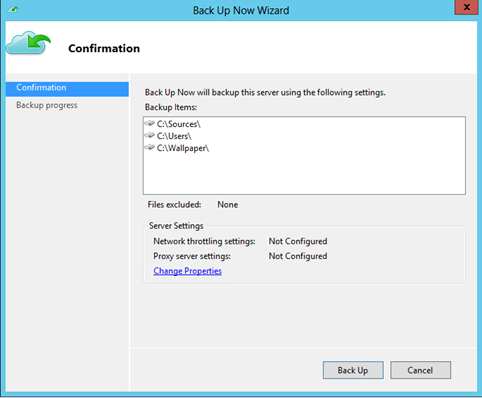
In Windows Azure Online Backup Service, click Run Now.
- And click Back up
We now have an Encrypted backup of our data on the cloud, ready to be restored should we experience a failure.
I hope this helps.
As always, I highly encourage you to set it up for yourself. And start reaping the benefits.
You can get the preview of Windows Server 2012 R2 here. It is available to TechNet and MSDN subscribers and general availability has been announced for October 18th.
Also, to continue your learning, check out those MVA Modules:
- Introduction To Windows Azure Training
- Windows Azure for IT Pros Jump Start
- Windows Azure Security Overview
Cheers!
Pierre Roman | Technology Evangelist
Twitter | Facebook | LinkedIn
Comments
Anonymous
September 24, 2013
Would be great to provide a walk through of the restore process as well.Anonymous
September 24, 2013
The comment has been removedAnonymous
September 25, 2013
Hey Spike, That is the plan. soon. ThanksAnonymous
October 08, 2013
Thanks for the great article.Anonymous
October 09, 2013
@Gizmo: it's uses the Azure IaaS infrastructure. so where it's stored depends on what region you picked when you created your Backup Vault.


