Hyper-V: Clustering & Resiliency. Step 3: Networking Part 3
hello folks,
This is the 5th post in our Hyper-V 2012 R2 from the ground up series. in the previous week we covered the following:
- Host Configuration using SCVMM 2012 R2
- Clustering & Resiliency – Storage.
- Networking - Creating NIC teams and Virtual Switches
- Networking – Creating and Assigning Logical Networks
Today we keep building our environment. In our “from the ground up” series we are working towards highly available Hyper-V cluster that will support our workloads and that we will manage using SCVMM. We have our servers, storage, and our NIC teams and virtual Switches. Now we will create and configure our Virtual Networking. In SCVMM you can consistently configure identical capabilities for network adapters across multiple hosts by using port profiles and logical switches. Port profiles and logical switches act as containers for the properties or capabilities that you want your network adapters to have.
Instead of configuring individual properties or capabilities for each network adapter, you can specify the capabilities in port profiles and logical switches, which you can then apply to the appropriate adapters. In SCVMM, port classifications provide global names for identifying different types of virtual network adapter port profiles. A port classification can be used across multiple logical switches while the settings for the port classification remain specific to each logical switch.
For example, you might create one port classification named FAST to identify ports that are configured to have more bandwidth, and another port classification named SLOW to identify ports that are configured to have less bandwidth. You will need at least one port profile for uplinks before you can create a logical switch. An uplinks profile is used for passing the VM traffic to an upstream switch so they have connectivity to the rest of your network. The recommended sequence for creating port profiles and logical switches is to create the port profiles first. You will need at least one port profile for uplinks before you can create a logical switch.
let’s get to it.
Create a Port Profile & Classification
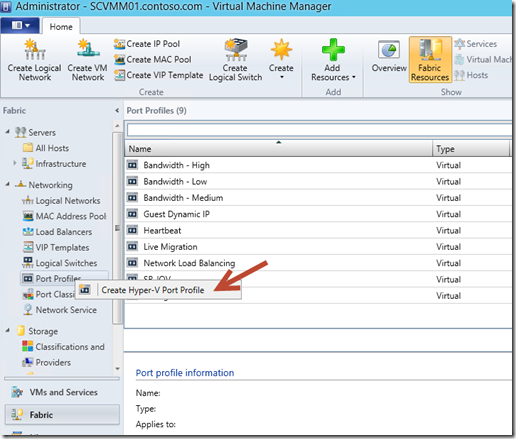
1. In SCVMM01 select the Fabric workspace and on the navigation pane, expand Networking, right-click Port Profiles, and select Create Hyper-V Port Profile.
2. In the Create Hyper-V Port Profile Wizard, on the General page, type Contoso-Uplink in the
Name field. Select the Uplink port profile radio button, select Address Hash from the Load balancing
algorithm dropdown, and then click Next.
3. On the Network configuration page, under Network sites, select Contoso LAN_0, click the box for
Enable Hyper-V Network Virtualization, and then click Next.
4. back to the Fabric workspace , on the navigation pane, right-click Port Profiles and select Create Hyper-V Port Profile. on the General page, type Contoso-vNIC in the Name field, ensure that the Virtual network adapter port profile radio button is selected, and then click Next.
5. On the Offload Settings page, review the choices that can be enabled for this particular vNIC port profile, but leave them all unselected, and then click Next.
6. On the Security Settings page, select Enable DHCP guard, Allow router guard, and Allow guest
specified IP addresses, and then click Next.
7. On the Bandwidth Settings page, change the Maximum bandwidth (Mbps) to 100, and then click
Next. and click finish on the Summary page
8. Select the Fabric workspace. on the navigation pane, expand Networking, right-click Port Classifications and select Create Port
Classification.
19. In the Create Port Classification Wizard, type Contoso Standard Port in the Name field, and then
click OK.
That’sit. we have now defined our port profiles and classification. that means the we are now ready to define our switched that will be assigned to our Hyper-V hosts. For information about prerequisites and settings for port profiles and logical switches, see Configuring Ports and Switches for VM Networks in VMM.
We’re almost there…. just a few more steps and we will have a highly available Hyper-V cluster, managed by SCVMM and we’ll be able to setup our VMs.
Until next week. keep learning!!!
Cheers!
Pierre Roman | Technology Evangelist
Twitter | Facebook | LinkedIn


