Hinweis
Für den Zugriff auf diese Seite ist eine Autorisierung erforderlich. Sie können versuchen, sich anzumelden oder das Verzeichnis zu wechseln.
Für den Zugriff auf diese Seite ist eine Autorisierung erforderlich. Sie können versuchen, das Verzeichnis zu wechseln.
Overview
In this module we learn about client applications connecting to WCF Services. We will also learn how to host WCF applications from inside another application that acts as a host for the WCF Service. In this post we will use a Windows Presentation Foundation style application to host our WCF Service.
A WCF service can be hosted in 3 places
(1) Self-hosting in any managed .NET application (2) Hosting in a Windows service (3) Hosting in different versions of IIS.
Objectives
In this hands-on lab, you will learn how to:
- Host a WCF Service inside of a WPF Application
- Programatically make a WCF Service Operational
- Programatically add Endpoints to a ServiceHost object
- Connect to a running WCF Service from a Console Service Client Application
Prerequisites
The following is required to complete this hands-on lab:
- Visual Studio 2010 - 2013
- Finished the steps about my previous post (https://blogs.msdn.com/b/brunoterkaly/archive/2013/10/18/getting-started-with-wcf-windows-communication-foundation-running-and-debugging-quickly.aspx)
Setup
In order to execute the exercises in this hands-on lab you need to set up your environment.
- Start Visual Studio and open the previous project here: (https://blogs.msdn.com/b/brunoterkaly/archive/2013/10/18/getting-started-with-wcf-windows-communication-foundation-running-and-debugging-quickly.aspx)
Task 1 – Adding a Windows Presentation Foundation (WPF) style app to host our WCF Service
This post is about hosting a WCF Application.
Hosting a service in a managed application is the most flexible option because it requires the least infrastructure to deploy. However, it is also the least robust hosting option, because managed applications do not provide the advanced hosting and management features of other hosting options in WCF, such as Internet Information Services (IIS) and Windows services.
Hosting in a Windows Service This scenario is enabled by the managed Windows service hosting option that is a long-running WCF service hosted outside of Internet Information Services (IIS) in a secure environment that is not message activated. The lifetime of the service is controlled instead by the operating system. This hosting option is available in all versions of Windows. - Windows services can be managed with the Microsoft.ManagementConsole.SnapIn in Microsoft Management Console (MMC) and can be configured to start up automatically when the system boots up. This hosting option consists of registering the application domain (AppDomain) that hosts a WCF service as a managed Windows service so that the process lifetime of the service is controlled by the Service Control Manager (SCM) for Windows services.
A WCF service that runs in the IIS environment takes full advantage of IIS features, such as process recycling, idle shutdown, process health monitoring, and message-based activation. This hosting option requires that IIS be properly configured, but it does not require that any hosting code be written as part of the application. You can use IIS hosting only with an HTTP transport.
Task 2 – Starting from the previous code base
The screen below is where we left off from the last post. You can download the code here: (https://sdrv.ms/1aOGgVQ).
Let’s begin where we left off from the last post. As you can see in the red box we have a client front-end and a WCF service backend. The client is a console application and the FlipCaseService is a WCF Service Library application.
Starting with the default project
We will now add a third project. It will act as the host application for the WCF service. Right mouse click on the solution and choose add new project.
Adding a WPF project
From the install templates choose Windows, WPF Application. Then provide a name below (WCFHostApplication) .
Adding a WPF Project
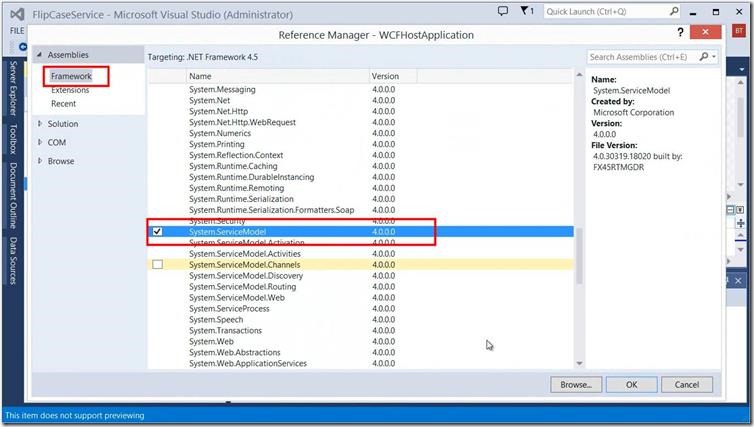
We will need to set two references from the WCF host appliHimation. The first reference is to the WCF service we created earlier. The second reference is to the system.servicemodel assembly, which provides us the basic functionality needed to leverage the WCF framework.
Add a new Reference
Selecting appropriate assembly below.
Selecting System.ServiceModel
Add a second reference.
Add a new Reference
The second reference is the Visual Studio project for the previously written WCF service.
Setting a Project Reference
The screen below validates that our references are correctly set.
Verifying our References
Task 3 – Building the user interface for our WCF Client
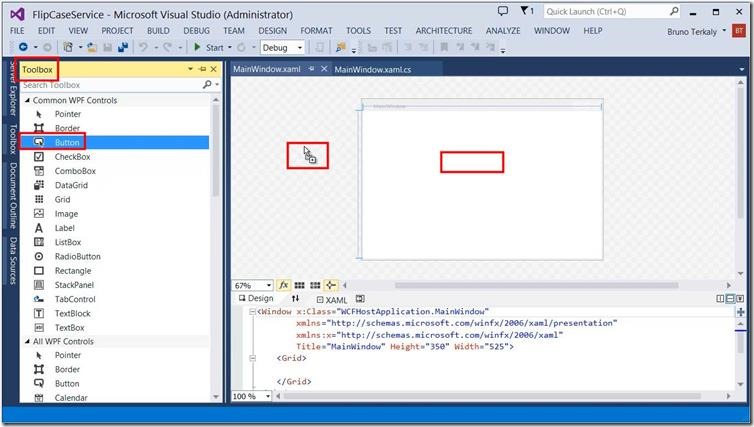
Now we are going to edit our main screen for our WPF Hosting Application. From server Explorer double click on MainWindow.xaml. The designer should appear. Bring the tool box into view and drag a couple of buttons over to MainWindow.xaml.
Dragging some button controls
You can edit the XAML directly (lowest red box) or you can use the Visual Studio tooling (the properties window on the right). Or you can do a combination. Notice set two properties (Content and Name).
Naming the buttons and changing their caption
There’s a few things to notice. (1) were talking about the WCF host application. (2) you could just edit the XAML come directly. (3) it’s probably easier to right-click on the button in the designer and select properties. (4) this is where we provide the name for the control. (5) this is the text visible to the user (content).
Five things to realize
I appreciate that you took the time to read this post. I look forward to your comments.
MainWindow.xaml (WPF Host Application) 1 2 3 4 5 6 7 8 9 10 11 12 13 14 15 16 17 18 19 20 21 22 23 24 25 26 27 <Window x:Class="WCFHostApplication.MainWindow" xmlns="https://schemas.microsoft.com/winfx/2006/xaml/presentation" xmlns:x="https://schemas.microsoft.com/winfx/2006/xaml" Title="MainWindow" Height="350" Width="525"> <Grid> <Button x:Name="cmdStartService" Content="Start FlipCaseService" HorizontalAlignment="Left" Margin="174,63,0,0" VerticalAlignment="Top" Width="130" Click="cmdStartService_Click"/> <Button x:Name="cmdStopService" Content="Stop FlipCaseService" HorizontalAlignment="Left" Margin="174,119,0,0" VerticalAlignment="Top" Width="130" RenderTransformOrigin="0.103,0.859" Click="cmdStopClick"/> </Grid> </Window> Screen below shows in the finished two buttons both in terms of the designer and the lower window containing xaml.
Verifying our changes to the UI of our WPF Application
Task 4 – Adding Code to make the WCF Service Operational
Let’s now turn our attention to the WCF Host application. Notice for the command button event cmdStartService_Click we have code that instantiates a new ServiceHost object. We will add Endpoints programmatically. The constructor for an endpoint is passed three arguments: (1) the contract or interface (2) the Binding (3) the URI that represents the endpoint into which the client connects. There are a few things to notice. Once is that the ServiceHost object has an Open() method. Also note we have both the using syntax as well as try/throw/catch.
Add some code to the WPF Application (code that makes our WCF Service Operational)
I appreciate that you took the time to read this post. I look forward to your comments.
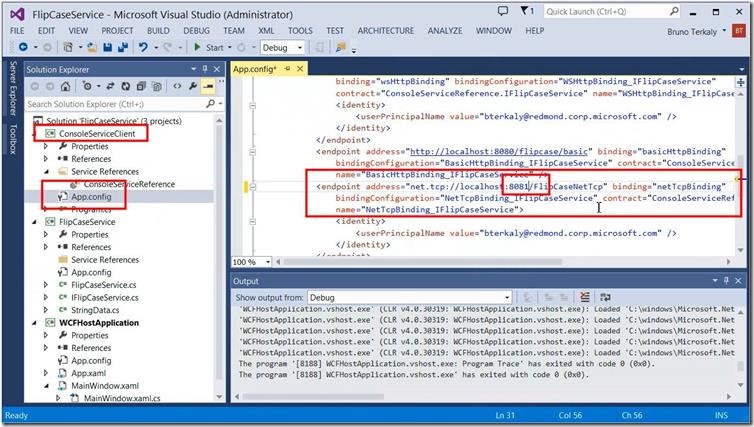
MainWindow.xaml.cs (WPF Host Application) 1 2 3 4 5 6 7 8 9 10 11 12 13 14 15 16 17 18 19 20 21 22 23 24 25 26 27 28 29 30 31 32 33 34 35 36 37 38 39 40 41 42 43 44 45 46 47 48 49 50 51 52 53 54 55 56 57 58 59 60 61 62 63 using System; using System.Collections.Generic; using System.Linq; using System.Text; using System.Threading.Tasks; using System.Windows; using System.Windows.Controls; using System.Windows.Data; using System.Windows.Documents; using System.Windows.Input; using System.Windows.Media; using System.Windows.Media.Imaging; using System.Windows.Navigation; using System.Windows.Shapes; using System.ServiceModel; namespace WCFHostApplication { /// /// Interaction logic for MainWindow.xaml /// public partial class MainWindow : Window { ServiceHost host = null; public MainWindow() { InitializeComponent(); } private void cmdStartService_Click(object sender, RoutedEventArgs e) { try { using (host = new ServiceHost(typeof(FlipCaseService.FlipCaseService))) { host.AddServiceEndpoint(typeof(FlipCaseService.IFlipCaseService), new BasicHttpBinding(), "https://localhost:8080/flipcase/basic"); host.AddServiceEndpoint(typeof(FlipCaseService.IFlipCaseService), new WSHttpBinding(), "https://localhost:8080/flipcase/wsAddress"); host.AddServiceEndpoint(typeof(FlipCaseService.IFlipCaseService), new NetTcpBinding(), "net.tcp://localhost:8081/FlipCaseNetTcp"); host.Open(); } } catch (Exception ex) { host.Abort(); MessageBox.Show("Error = " + ex.Message); } } private void cmdStopClick(object sender, RoutedEventArgs e) { host.Close(); } } }The configuration code below is showing what the client wants to connect to. It is better that you don’t try to create this file by hand. You can get it generated for you in 2 ways. The first way is with Adding a Service Reference from the client application to the WCF Service. This was explained in a previous post. The second way is with the svcutil.exe utility (explained previously). Note the red box on the right shows the endpoint configuration information for the client to use to connect to the WCF Service. For example, the client will connect by issuing at net.tcp://localhost:8081/FlipCaseNetTcp. The reason this is being discussed is that the WCF service in this post that we are creating must match the endpoint definition used by clients that are connecting to the WCF service.
Looking at the configuration file of the client (making sure it matches the WCF Service)
I appreciate that you took the time to read this post. I look forward to your comments.
App.config (ConsoleServiceClient) 1 2 3 4 5 6 7 8 9 10 11 12 13 14 15 16 17 18 19 20 21 22 23 24 25 26 27 28 29 30 31 32 33 34 35 36 37 38 39 40 41 42 43 44 45 46 47 48 49 50 51 <?xml version="1.0" encoding="utf-8" ?> <configuration> <startup> <supportedRuntime version="v4.0" sku=".NETFramework,Version=v4.5"/> </startup> <system.serviceModel> <bindings> <basicHttpBinding> <binding name="BasicHttpBinding_IFlipCaseService"/> </basicHttpBinding> <netTcpBinding> <binding name="NetTcpBinding_IFlipCaseService"/> </netTcpBinding> <wsHttpBinding> <binding name="WSHttpBinding_IFlipCaseService"> <reliableSession enabled="true"/> </binding> </wsHttpBinding> </bindings> <client> <endpoint address="https://localhost:8080/flipcase/wsAddress" binding="wsHttpBinding" bindingConfiguration="WSHttpBinding_IFlipCaseService" contract="ConsoleServiceReference.IFlipCaseService" name="WSHttpBinding_IFlipCaseService"> <identity> <userPrincipalName value="bterkaly\@redmond.corp.microsoft.com"/> </identity> </endpoint> <endpoint address="https://localhost:8080/flipcase/basic" binding="basicHttpBinding" bindingConfiguration="BasicHttpBinding_IFlipCaseService" contract="ConsoleServiceReference.IFlipCaseService" name="BasicHttpBinding_IFlipCaseService"/> <endpoint address="net.tcp://localhost:8081/FlipCaseNetTcp" binding="netTcpBinding" bindingConfiguration="NetTcpBinding_IFlipCaseService" contract="ConsoleServiceReference.IFlipCaseService" name="NetTcpBinding_IFlipCaseService"> <identity> <userPrincipalName value="bterkaly\@redmond.corp.microsoft.com"/> </identity> </endpoint> </client> </system.serviceModel> </configuration> Let us now start the WPF Application that is hosting the WCF Service. Right mouse click on the WCFHostApplication project as seen below.
Starting the WPF Application (which makes the WCF Service operational and available to clients to connect to)
Task 5 – Starting our WCF Service
Note that the app is running. For the WCF Service to be operational, this command button in red must be clicked. It executes the code we just discussed.
Click on the WPF Application button to start the WCF Service programmatically
Task 6 – Connecting to the service from the client
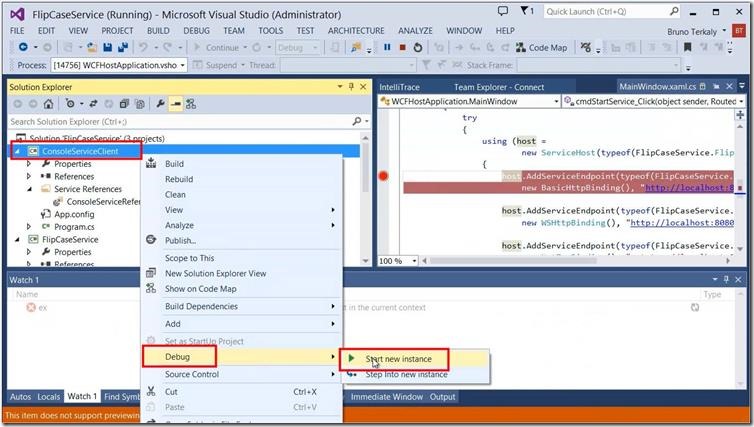
By now the WCF Service is running. It is waiting for clients to connect to it. So now we will turn our attention to the client. Right mouse click on the WCF client application called ConsoleServiceClient and follow the debug commands.
Because the WCF Service is now available, we can start the client application to connect to the WCF Service
Notice that it worked. The client successful passed a parameter to the WCF Service and had that service flip the case of the string passed to it by the client.
Verifying success
Summary
In this post, you learned a few things:
- In this module we learned about client applications connecting to WCF Services.
- We illustrated how a host application can make a WCF Service operational.
- We could have chosen the console application template, but instead we chose a Windows Presentation Foundation (WPF) application template.
- You could extend a WPF style application much more than a console style application, providing a dashboard of an interface to enable a developer to watch what is happening with the service.
Comments
Anonymous
December 21, 2013
b-stivo@microsoft.com: Trying to implement this solution, but running into problems. First, I would like the WPF app to run properly even without administrative rights. That appears to make the HTTP endpoints a problem. I removed those endpoints, leaving only the TCP endpoint, the service comes up and pretends to run. Assuming it is running, I use the WCF test client to connect and the connection is rejected. Argh. The WCF contract worked when executed in debug from Visual Studio, but not when I embed it in the WPF.Anonymous
December 21, 2013
Configuration Issue I've provided all the source code here. If this code won't run properly, you may have configuration challenge on your particular system. This is code that runs on my system. HTHs. Source Code http://sdrv.ms/JUcOEPAnonymous
February 28, 2014
Using your solution as is, the console application works fine, but I believe that is because the WCF Service Host is being started automatically (it is not necessary to start WCFHostApplicaton). If I uncheck the option to "Start WCF Service HOst when debugging another project in the same solution," start the WCFhostApplication (including starting service) and then start console app, I get error "no endpoint listening at http:://localhost:8080/flipcase/basic" Is there something I am missing?Anonymous
April 22, 2014
I am also getting the same error as Brian said.... Do we need to do any more configuration?Anonymous
June 19, 2014
Ditto...this code does not work. The service runs stand-alone but when attempting to host within the WPF application, the host.Open() fires without exception but when attempting to connect to the service (via another console app, browser, etc.) all connections are rejected.Anonymous
June 19, 2014
FYI, the link below is the correct way to host a WCF service within a WPF app. To re-iterate, the code in this article doe not work...quite epicly, and will cause developers to waste a lot of time trying to figure out why it doesn't work. I would consider modifying this article or taking it down. Working implementation: soumya.wordpress.com/.../wcf-simplified-part-7-hosting-a-wcf-service-using-wpfAnonymous
June 22, 2014
Hi Everyone, Not sure why it doesn't work for so many of you. Just a couple of right mouse clicks "Debug / Start New Instance", first on the host, then on the client. (1) Run the console host (2) Run the console client I just re-ran the code again and it works. Here is the code: http://1drv.ms/1lKNqA7 Also, make sure you are running as Administrator.Anonymous
August 03, 2015
Just tried to build your code and run it and get the same issue about the endpoints. Not going to spend to much time on this though.


