Using the Windows Azure Tools for Eclipse with PHP
Following on the heels of announcements a couple of weeks ago, the Interoperability Team at Microsoft is announcing the availability of another update to the Windows Azure Tools for Eclipse. In this post, I’ll use the updated Eclipse plug-i to walk you through creating and running a project in the Windows Azure Compute Emulator Fabric, readying a project for deployment to Windows Azure, and deploying a project to Windows Azure. (This post assumes you have a Windows Azure account and have set up a storage service and SQL Azure. If you haven’t, these posts have directions for doing so: How to Run PHP in Windows Azure and Getting Started with PHP and SQL Azure.)
Installing the Windows Azure Tools for Eclipse
All the information you need to install the Windows Azure Tools for Eclipse is in the Installation Guide on the Windows Azure Tools for Eclipse website here: https://www.windowsazure4e.org/download/.
Creating Development Project
One of the nice things about creating a Windows Azure project in Eclipse is that, by default, 3 files are created in the project that test your SQL Azure and Windows Azure storage facilities (more on this later). I’ll use those files to demonstrate how to get a project up and running in the Windows Azure Development Fabric, now called the Windows Azure Compute Emulator.
Note: The screenshots in this section have been updated to reflect the latest version of the Windows Azure Tools for Eclipse (which is compatible with the Windows Azure SDK 1.3). For information about installing this version of the Eclipse plug-in, see this article: Windows Azure Tools for Eclipse Now Support Windows Azure SDK 1.3.
0. After you have followed the directions for setting up Eclipse here, if you don’t see Windows Azure in the Eclipse menu, or you don’t see Windows Azure PHP Project under File>New, you need to select Windows Azure Perspective from the Windows menu:
1. Start Eclipse and click File >New>Windows Azure PHP Project:
2. Supply a project name and click Next:
3. Supply a role name, check Windows Azure Data Storage, choose Use Development Storage, check SQL Azure, and supply your connection info:
Note: If you choose to enable MySQLin the dialog above, MySQL will be run in a worker role (you will be taken to a dialog for configuring the worker role). You will, of course, have to pay for this additional role running in Windows Azure.
4. Continuing with the configuration dialog above, select the PHP runtime you want to use. The default “built-in” version is PHP 5.2.12. The “built-in” version is a complete PHP runtime that is bundled with your Web Role. After you finish creating the project, you may want to inspect/change this installation, which you can do just like you would any other PHP installation. You can, at this point in the project creation process, specify a custom PHP installation to be used by your Web Role. I’ll show you how to do that in the Using a Custom PHP Installation section below. For now, I’ll use the default “built-in” version:
5. In the same dialog, click the Diagnostics tab and fill in as shown here:
Notes about Diagnostics:
- Windows Azure Diagnostics enables you to collect diagnostic data from a service running in Windows Azure. Diagnostics data will be written to your Windows Azure storage service. . For more information, see Windows Azure Diagnostics in PHP.
- By default, only Error information is stored. For more detailed reporting, choose the Verbose option.
- The Transfer Frequency (second) setting determines how often diagnostic information will be written to your storage service.
- If you want to enable Windows Azure Drives (see below), you MUST enable Diagnostics also (because the credentials for needed for implementing Windows Azure Drives are taken from the Diagnostics dialog).
6. Now click the Windows Azure Drives tab and fill out as shown below. (You’ll have to click Add to enable editing of the Windows Azure Drive to be Mounted setting:
Notes about Windows Azure Drives:
- A Windows Azure drive acts as a local NTFS volume that is mounted on the server’s file system and that is accessible to code running in a role. The data written to a Windows Azure drive is stored in a page blob defined within the Windows Azure Blob service, and cached on the local file system. Because data written to the drive is stored in a page blob, the data is maintained even if the role instance is recycled. For this reason, a Windows Azure drive can be used to run an application that must maintain state, such as a third-party database application. For more information, see Using Windows Azure Drive (aka X-Drive).
- The Clean On Role Recycle and Size in MB settings do not apply to Windows Azure Drives. They apply to the local cache for the role. Checking the Clean on Role Recycle box will clear the role cache when the role is recycled. The Size in MB setting determines the size of the local cache. Note that the Size in MB value must exceed sum of all Mount Read Cache Size <MB> by at least 20 MB.
7. Click Finish. (By clicking Next at this stage, you can add more Web Roles and Worker Roles to your project.)
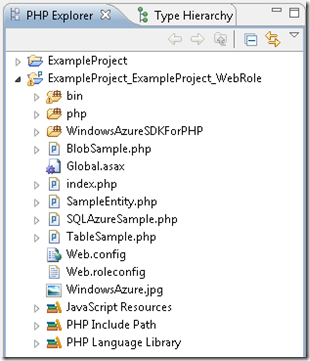
Now, back in Eclipse, you should see two project created. One (ExampleProject) simply contains configuration files needed by Windows Azure. The other (ExampleProject_ExampleProject_WebRole) contains the working pieces of the project. If you expand the Web Role project, you’ll see what Eclipse has created:
Note that the Windows Azure SDK for PHP has been added. The BlobSample.php, SampleEntity.php, TableSample.php files use the SDK to write and read data from your Windows Azure storage service. If you look closely at the PHP installation, you’ll see that the Microsoft Drivers for SQL Server for PHP have been added to the extension directory (and enabled in the php.ini file). The SQLAzureSample.php file uses the sqlsrv driver to write and read data from a SQL Azure database. You will also see that the php_azure.dll file has been added to the extension directory. It is used to read/write Azure configuration information and diagnostic information. You can learn more about this dll file here: https://phpazurecontrib.codeplex.com/.
Running a Project in the Development Fabric
The development fabric simulates the Windows Azure fabric on your local computer so that you can run and test your service locally before deploying it. The Windows Azure development storage is a utility that simulates the blob, queue, and table services available in the cloud. However, note that this does not include simulation for SQL Azure. You will be charged for any SQL Azure activity while running an application in the development fabric. For more information, see Using the Development Fabric.
To start the development fabric, execute the following command from the command line:
>csrun /devfabric:start
Note: I added the Windows Azure SDK directory to my PATH environment variable so I can call functions more easily (csrun is one of the functions in the SDK).
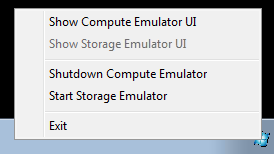
You will now see the development fabric icon (  ) in your system tray. By right-clicking the icon, you can also start development storage:
Now you are ready to run your project in the compute emulator. Back in Eclipse, select your Web Role project in the project explorer, then click Windows Azure>Run Windows Azure PHP Project in Compute Emulator (formerly called Development Fabric) from the main Eclipse menu (this option will not be available if you haven’t started both the compute emulator and the storage emulator (formerly called development storage):
It takes a minute or so for the project to launch, but then you should see the output of phpinfo() and the following text:
Those links will execute the code in the BlobSample.php, TableSample.php, and SQLAzureSample.php files respectively. (If you aren’t familiar with writing code for Azure storage services and/or SQL Azure, looking at the source for those files might be helpful.)
Using a Custom PHP Installation
The default PHP installation that is bundled with a Windows Azure PHP application is PHP 5.2.12. However, you can specify a custom PHP installation to be used for your application. You can do this at project creation time (see step 4 in Creating a Development Project). Here’s how to do it:
1. On the PHP Runtime tab, click Installed PHP:
2. In the Preferences dialog that opens, navigate to PHP Executables, then click Add:
3. In the Add new PHP Executable dialog, provide a name, navigate to the php-cgi.exe and php.ini files of your custom PHP installation:
4. Click Finish.
After you finish the project creation process, you will notice some changes have been made to the php.ini that is used by the custom PHP installation that is added to your project (so you may want to make some adjustments):
- .\WindowsAzureSDKForPHP is added to include_path
- The following lines are added:
- extension="php_sqlsrv_53_nts_vc6.dll"
- extension="php_pdo_sqlsrv_53_nts_vc6.dll"
- extension="php_azure.dll"
- extension="php_mysql.dll"
If you have the php_sqlsrv and php_pdo_sqlsrv drivers already enabled in your PHP installation, you’ll want to delete the corresponding added lines above. If your PHP installation was compiled with the VC9 compiler, you’ll want to make sure the correct .dll files are added to your extension folder and enabled i your php.ini file. (Same for the php_mysql extension.)
The php_azure.dll file will be added to your extension directory and enabled in the php.ini file (as you can see above). However, the php_azure.dll file that is added to your PHP installation may not be the correct one (depending on your custom installation). You can download the php_azure.dll files here: https://phpazurecontrib.codeplex.com/releases. Make sure that you add the file that matches your PHP version, matches the thread-safe or non-thread-safe nature of your PHP installation, and matches the compiler used to compile your PHP installation.
One last note here: be sure that paths are relative in your php.ini file.
Readying a Project for Deployment
Before you deploy a project to Windows Azure, you need to configure it to use your Azure storage service (instead of development storage). To do this, right click the Web Role project in the Eclipse project explorer and choose Properties. In the dialog that opens, expand Windows Azure and select Data Storage: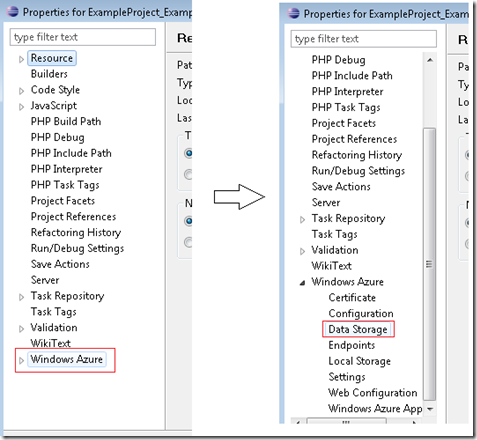
Next, select Use Cloud Environment, supply your storage account name and key:
Click OK and your project is ready for deployment.
Creating a Certificate
Before you can deploy a project to Windows Azure, you have to establish trust between Azure and you machine. To do this, you must create and upload a certificate to Windows Azure.
Note: Once you have created and uploaded a certificate, you will not need to leave Eclipse for future deployments.
1. There are several ways to create a certificate. I’ll use the Windows SDK makecert executable (more about this executable here). After adding the directory for makecert.exe to your PATH environment variable (for me, it was in C:\Program Files (x86)\Microsoft SDKs\Windows\v7.0A\Bin), execute the following command from an command line prompt running with Administrator privileges:
>makecert -r -pe -a sha1 -n CN=AzureMgmt -ss My -sky exchange -b 04/30/2010 -e 12/31/2039 "AzureMgmt.cer"
This will create a certificate valid from 4-30-2010 to 12-31-2039.
2. Now, from your Windows Start menu, select Run and type certmgr.msc to open the Certificate Manager. In the tree view of the Certificate Manager, expand Personal and click Certificates:
3. Next, right-click the AzureMgmt certificate and select All Tasks>Export:
4. The Certificate Export Wizard will be launched. Click Next for the next two boxes with the options shown here:
Finally, specify a location for the exported certificate and complete the wizard.
5. Next, you need to upload the certificate to your Windows Azure account. To do this, go to https://windows.azure.com, sign in, click on your subscription name, and click on Account:
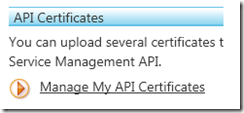
6. Now click on Manage My API Certificates, browse to the certificate that you exported, and upload it:
7. While you are in the Windows Azure Portal, you need to create a hosted service to which you will deploy your project. Instructions for how to do this are in the Creating an Azure Hosted Service section of this post.
Deploying a Project
1. To deploy a project to Windows Azure, click Windows Azure>Deploy Windows Azure PHP Project to Windows Azure in the main Eclipse window:
2. In the next dialog, click Add to add the certificate you created:
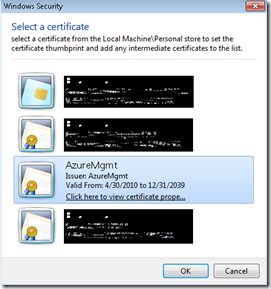
3. Now click on the browse button, select the AzureMgmt certificate, and supply your subscription ID (from the Windows Azure portal) and a name for the credentials:
4. If everything worked correctly (the certificate was uploaded to Azure and you specified the correct certificate above), then back in the Publish Cloud Service dialog the hosted services and storage accounts that are in your subscription should be available to choose from in the drop downs:
When you click OK, the project will be deployed to Windows Azure. (It will take several minutes before the application is accessible, however.)
That’s it for now. I hope this post was helpful, and I would certainly be interested in your feedback.
Thanks.
-Brian
Comments
- Anonymous
October 12, 2010
Nice tutorial. Eclipse tools for azure is a nice piece of work. But, you need to reduce the $ for azure. - Anonymous
October 19, 2010
Fantastic Tutorial and What a great piece of tooling for PHP.Kudos MS.Does this work with Zend studio? - Anonymous
October 19, 2010
I understand total topic very meaningfully explain for php programming , give more details about that point of PHP in future. Thanks - Anonymous
October 21, 2010
@Thomas-I know that there is Windows Azure support in Zend Framework 1.10 (more information here: blogs.msdn.com/.../new-version-of-zend-framework-adds-support-for-microsoft-windows-azure.aspx), but I don't know to what extent that support is included in Zend Studio. I'd be interested to find out.Thanks.-BrianEdit: Looks like this tooling IS available in Zend Studio. Check out this post by Josh Holmes, he walks you through getting things set up: http://www.joshholmes.com/blog/2010/10/22/zend-simplecloud-and-azure. - Anonymous
March 09, 2011
The comment has been removed - Anonymous
May 08, 2012
argh.. spend the whole night trying to to that tutorial. I did it exactly step by step. on a fresh win7 and a fresh win8 in a VM. both times I got the same error:If I click on Windows Azure>Run Windows Azure PHP Project in Development Fabric .. nothing happens..no Webbrowser that pops up.. nothing. whats wrong?


