Azure Kubernetes Service (AKS) - Deploying Angular, ASP.NET Core and SQL Server on Linux
Azure Kubernetes Service (AKS) makes it simple to deploy a managed Kubernetes cluster in Azure. The sample application for this article is developed in Angular, ASP.net core and SQL Server. I will go through the steps needed to deploy these components to AKS.
The dev tools used to develop these components are Visual Studio for Mac/Visual Studio 2017 and Visual Studio Code. AKS Dashboard as well as kubectl commands are used to create Kubernetes resources in AKS.
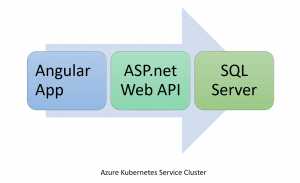
The sample use case is a front end app (Angular) which loads users from Web API (ASP.net Core) and these users are saved in SQL Server DB. The steps needed to deploy these components to AKS are
- SQL Server on Linux
- Create PersistentVolumeClaim
- Create Secret to specify sa user password
- Create service for SQL Server
- Create deployment for SQL Server
- ASP.net Core Web API
- Create ASP.net Core Web API sample application
- Create a Docker Hub repository
- Create a docker image
- Publish docker image to Docker Hub
- Create service for ASP.net Core Web API
- Create deployment for ASP.net Core Web API
- Angular App
- Create an Angular App sample application
- Create a Docker Hub repository
- Create a docker image
- Publish docker image to Docker Hub
- Create service for Angular App
- Create deployment for Angular App
This is the first part of this series. You can go though second part of this series which explains multiple ways to load App Configuration in ASP.net Core Web API.
Azure Kubernetes Service (AKS) Cluster
In case you don’t have AKS cluster up and running, please go through this article to Create AKS Cluster. Once AKS cluster is up and running, you can go through the rest of the article. The code snippets in this article are mostly yaml snippets and are included for reference only as formatting may get distorted thus please refer to GitHub repository for formatted resources.
SQL Server on Linux
The steps needed to deploy SQL Server to AKS are listed below
Create a Persistent Volume
Persistent volume claim is needed to store SQL Server data and yaml snippet to create a 5 GB storage is displayed below. The deployment file is going to mount files to this storage claim. You can read more about Persistent Volumes. apiVersion: v1kind: PersistentVolumeClaimmetadata: name: mssql-sample-data-claimspec: accessModes: - ReadWriteOnce resources: requests: storage: 5Gi
Create a Kubernetes Secret
The password for sa user will be created as a Kubernetes Secret. Please replace 'UEBzc3dvcmQxJA==' password with actual base64 password you intend to specify for your SQL Server instance. Your can read more about Secrets. kind: SecretapiVersion: v1metadata: name: mssql-sample-secret namespace: defaultdata: # Password is P@ssword1$ so update it with password of your choice SA_PASSWORD: UEBzc3dvcmQxJA==type: Opaque
Create a Kubernetes Service
The next step is to create a Kubernetes Service for SQL Server. As you can see in yaml snippet below, port 1433 is used and type is ClusterIP i.e. this service doesn't has external endpoints. Kubernetes will use to selector 'app: mssql-sample' to map to the deployment as you are going to see next. You can read more about Services. apiVersion: v1kind: Servicemetadata: name: mssql-sample-servicespec: selector: app: mssql-sample ports: - protocol: TCP port: 1433 targetPort: 1433 type: ClusterIP
Create a Deployment
The next step is to create a SQL Server deployment which is defined in yaml snippet displayed below and a few pointers are
app: mssql-samplematches to the selector defined in the service.- I have specified
replicas: 1which means that only one instance of Pod will be created by Kubernetes for this deployment. You can update this value as needed. - The docker image being used to create this deployment is
image: microsoft/mssql-server-linux. - The secret defined in previous step is used in this deployment file to specific sa user password i.e.
secretKeyRef: name: mssql-sample-secret. Please note that there are SQL server password policy requirements. - Lastly, persistent volume claim created above is also used in this deployment file i.e.
persistentVolumeClaim: claimName: mssql-sample-data-claim.
apiVersion: apps/v1beta1kind: Deploymentmetadata: name: mssql-sample-deploymentspec: replicas: 1 template: metadata: labels: app: mssql-sample spec: terminationGracePeriodSeconds: 10 containers: - name: mssql image: microsoft/mssql-server-linux ports: - containerPort: 1433 env: - name: ACCEPT_EULA value: "Y" - name: SA_PASSWORD valueFrom: secretKeyRef: name: mssql-sample-secret key: SA_PASSWORD volumeMounts: - name: mssql-persistent-storage mountPath: /var/opt/mssql volumes: - name: mssql-persistent-storage persistentVolumeClaim: claimName: mssql-sample-data-claim
The Kubernetes files for setting up SQL Server are available at GitHub.
After creating all the resources needed to configure SQL Server, the next step is to setup ASP.net Core Web API.
ASP.net Core Web API
The idea was to create a plain vanilla ASP.net Core Web API which communicates with SQL Server database and is hosted in AKS cluster. Thus, to keep things simple Auth isn't implemented for this component. The main steps needed to deploy ASP.net Core Web API to AKS are
Create a ASP.net Core Web API solution
You can view source code for this solution at GitHub. Please update DatabaseConnectionString setting in 'appsettings.json' file with the database connection string based on your 'sa' user password. This Web.API uses EntityFrameworkCore to create database and seed sample data. There is only one method in the Controller to get list of users from database to keep things simple.
The main steps needed to deploy this web api to AKS are
Create Docker Image
ASP.net Core Web API project has DockerFile as displayed below
FROM microsoft/dotnet:2.1-aspnetcore-runtime AS baseWORKDIR /appEXPOSE 80FROM microsoft/dotnet:2.1-sdk AS buildWORKDIR /srcCOPY ["SampleWebApp/SampleWebApp.csproj", "."]RUN dotnet restore "SampleWebApp.csproj"COPY . .RUN dotnet build "SampleWebApp.csproj" -c Release -o /appFROM build AS publishRUN dotnet publish "SampleWebApp.csproj" -c Release -o /appFROM base AS finalWORKDIR /appCOPY --from=publish /app .ENTRYPOINT ["dotnet", "SampleWebApp.dll"]
The next step is to create a Docker Hub repository. The commands to build Docker Image are listed below
- Build Docker Image: docker build -t samplewebapp .
- Tag Docker Image: docker tag samplewebapp {YOUR_DOCKER_REPO}
- Publish Image to Docker Hub: docker push {YOUR_DOCKER_REPO}
Please update {YOUR_DOCKER_REPO} placeholder with your docker repository.
Create a Kubernetes Service
The next step is to create a Kubernetes Service for this Web API. As you can see in yaml snippet below since type: LoadBalancer, AKS is going to create a external endpoint/load balancer ingress for this service. The creation of this service is going to take a while and once done you can get the external endpoint of this service either by opening AKS Dashboard or running Kubectl command kubectl describe services samplewebappapiVersion: v1kind: Servicemetadata: name: samplewebapp labels: app: samplewebappspec: type: LoadBalancer ports: - protocol: TCP port: 80 selector: app: samplewebapp
Please take a note of this endpoint as it is going to be used by Angular App.
Create a Kubernetes Deployment
The next step is to create a Kubernetes Deployment for ASP.net Web API application. The yaml snipped is displayed below and a few pointers are
- You need to update image path i.e.
image: atverma/samplewebappwith your docker hub repository - You can change the number of pods by updating
replicas: 1 - Label
app: samplewebapphas to match the selector defined in the service
apiVersion: apps/v1beta1kind: Deploymentmetadata: name: samplewebapp namespace: default labels: app: samplewebappspec: replicas: 1 selector: matchLabels: app: samplewebapp template: metadata: name: samplewebapp labels: app: samplewebapp spec: containers: - name: samplewebapp image: atverma/samplewebapp resources: {} terminationMessagePath: "/dev/termination-log" terminationMessagePolicy: File imagePullPolicy: Always securityContext: privileged: false restartPolicy: Always terminationGracePeriodSeconds: 30 dnsPolicy: ClusterFirst securityContext: {} schedulerName: default-scheduler
The Kubernetes snippets to create these resources can be downloaded from GitHub. The next step is to setup Angular App.
Angular App
This is the final component and before we proceed, we need to update external endpoint value of the Web API Service in Angular App. You can view the source code of Angular App at GitHub.
You will need to update environment.ts and environment.prod.ts to update API_URLexport const environment = { ApplicationConfig: { 'API_URL': 'https://{YOUR_WEB_API_ENDPOINT}/api/' } };
The main steps needed to deploy Angular App to AKS are
Create Docker Image
Angular App project has DockerFile as displayed below
FROM node as node# set working directoryRUN mkdir /usr/src/appWORKDIR /usr/src/appCOPY package.json /usr/src/app/package.jsonRUN npm installCOPY . /usr/src/appARG env=prodRUN npm run build -- --prodFROM nginxCOPY --from=node /usr/src/app/dist/ /usr/share/nginx/htmlCOPY nginx-custom.conf /etc/nginx/conf.d/default.conf
The next step is to create a Docker Hub repository. The commands to build Docker Image are listed below
- Build Docker Image: docker build -t sampleangularapp .
- Tag Docker Image: docker tag sampleangularapp {YOUR_DOCKER_REPO}
- Publish Image to Docker Hub: docker push {YOUR_DOCKER_REPO}
Please update {YOUR_DOCKER_REPO} placeholder with your docker repository.
Create a Kubernetes Service
The next step is to create a Kubernetes Service for this Anguar App. As you can see in yaml snippet below since type: LoadBalancer, AKS is going to create a external endpoint/load balancer ingress for this service. The creation of this service is going to take a while and once done you can get the external endpoint of this service either by opening AKS Dashboard or running Kubectl command kubectl describe services sampleangularappapiVersion: v1 kind: Service metadata: name: sampleangularapp labels: app: sampleangularapp spec: type: LoadBalancer ports: - protocol: TCP port: 80 selector: app: sampleangularapp
Please take a note of external endpoint as this will be needed to launch Angular App in browser later.
Create a Kubernetes Deployment
The next step is to create a Kubernetes Deployment for Angular application. The yaml snippet is displayed below and a few pointers are
- You need to update image path i.e.
image: atverma/sampleangularappwith your docker hub repository - Two pods will be created for this deployment. You can change the number of pods by updating
replicas: 2 - Label
app: sampleangularapphas to match the selector defined in the service
kind: DeploymentapiVersion: extensions/v1beta1metadata: name: sampleangularapp namespace: default labels: app: sampleangularappspec: replicas: 2 selector: matchLabels: app: sampleangularapp template: metadata: name: sampleangularapp labels: app: sampleangularapp spec: containers: - name: sampleangularapp image: atverma/sampleangularapp resources: {} terminationMessagePath: "/dev/termination-log" terminationMessagePolicy: File imagePullPolicy: Always securityContext: privileged: false restartPolicy: Always terminationGracePeriodSeconds: 30 dnsPolicy: ClusterFirst securityContext: {} schedulerName: default-scheduler
The Kubernetes snippets to create these resources can be downloaded from GitHub.
Running Angular App
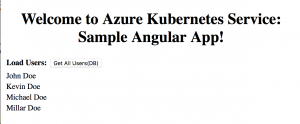
After all the components have been configured and deployed to Azure Kubernetes Service (AKS) cluster, run the Angular App by opening external endpoint (of Angular App Service) in browser and you will see list of users on click of 'Get All Users (DB)' button.
Summary
This article covered the ease of deploying multi-tier components to Azure Kubernetes Service (AKS). The complete source code for this application can be downloaded from GitHub
Comments
- Anonymous
September 17, 2018
very useful, thanks for sharing!

