Desktop Bridge – The Migrate phase: invoking a Win32 process from a UWP app
In the last posts we’ve seen, so far, three different approaches to use the Desktop Bridge:
- Taking an existing Win32 installer and converting it into an AppX package through the Desktop App Converter tool or by leveraging manual conversion
- Taking an existing Win32 application and enhancing it, by adding UWP APIs to send toast notifications, update the live tile, use the Speech APIs, etc.
- Taking an existing Win32 application and expanding it, by adding a UWP component like a background task.
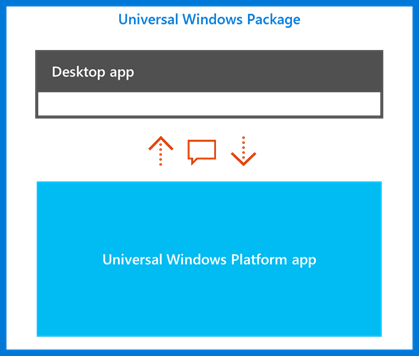
In this new article we’re going to see a new and different approach in the migration: how to integrate a full Universal Windows Platform app with a Win32 process. The biggest difference, compared to the other approaches, is that, in all the past scenarios, the desktop application was the main protagonist, while the Universal Windows Platform was the sidekick that helped our Win32 process to achieve more. In this case, instead, we won’t start from a traditional installer, a package folder manually converted into an AppX or a Desktop to UWP deployment project in Visual Studio 2017, but the main protagonist will be a real UWP app, capable of running on all the existing Windows 10 devices, like computers, phones, Xbox One, etc. However, only when it’s running on a desktop, the UWP app, at some point, will be able to communicate with a Win32 process.
There are many scenarios where this approach can be very helpful. Let’s say that, after having started to play with the Universal Windows Platform, you’ve understood its potential and how easy can be to achieve some complex tasks, like using XAML to create modern and delightful user interfaces that can automatically scale on new devices with very high resolution and DPIs. Or maybe you are the maintainer of a big enterprise application and your customers have started to show interest in using it not just on standard desktop computers, but also in mobility using tablets and smartphones.
In all these cases, creating a UWP app can solve many challenges: for example, Windows 10 has many built-in mechanisms that make easier to create user interfaces that are automatically optimized for touch screen devices, traditional mouse & keyboard computers, inking or gaming controllers. However, as we’ve seen in the previous posts, the Universal Windows Platform may have some limitations (for security and performance reasons) that may not play well with the requirement of our business application. Or maybe your application has a very complex form, that would take a lot of time to be fully converted as UWP, but you don’t want it to be a blocker for starting to deploy the work you have done so far with the UWP app.
In this post we’re going to see a possible solution for this scenario: we’ll start migrating our solution to a real UWP app, so that we can leverage all the modern features offered by the platform. At the same time, we’ll integrate a Windows Forms application, that will take care of displaying a Win32 form where the user will be able to insert some data and pass it to the UWP app. The communication between the two worlds will be handled by something called App Services, which is a new feature introduced in Windows 10. Let’s know more about them.
App services
App services, from a code point of view, are nothing else than a background task: they are Windows Runtime Components, which contain a class that implements an interface called IBackgroundTask and defines a method called Run() , which includes the code to execute when the task is triggered. Exactly like any background task, they are stored in a separate project of our solution, which will be installed together with the main app that registers it. The biggest difference compared to a traditional background task is that they aren’t connected to a specific trigger, but they are accessible by any other application installed on the device. The trigger, in this case, it’s another app, that wants to leverage the operation that the service exposes. You can think of them in a similar way as Windows services: once the app which includes the app service is installed on Windows 10, every other app will be able to invoke the task, ask it to perform some operations and get back a result.
An app service leverages the following flow:
- The solution with an app service is typically made by two projects: a UWP app and a Windows Runtime Component.
- The UWP app, in the manifest file, registers the component as an app service.
- The user installs the app from the Store, which will trigger also the installation of the app service.
- From now on, every other app installed on the device will be able to invoke the task, by using its name and the package family name (the unique identifier) of the app that installed it.
- The communication between the app and the service is handled using a class called ValueSet, which is similar to a dictionary, and it’s based on key / value pairs. Using this collection, the app can send some data to the task, which will process them and will send the result back to the app, always using a ValueSet collection.
App services are extremely useful when you want to offer a feature you have implemented in your app to other developers; or if, in an enterprise scenario, you want to centralize a specific operation, which needs to be leveraged by multiple applications. For example, you may have wrote a set of enterprise apps which have one feature in common: they all allow the user to scan a barcode and decode it. Thanks to app services, you can move the logic that performs the decoding operation in a Windows Runtime Component and let all your applications leverage it: the app will simply pass the captured image to the task (for example, as binary data) and will receive, in return, the decoded barcode.
In the context of a converted app using the Desktop Bridge, an app service can be leveraged as the channel that will allow us to communicate back and forth between the native UWP app and the Win32 process. However, in this post we’re going to introduce something else new: the single process background model, which is a new Anniversary Update feature.
Before this new Windows 10 release, the Universal Windows Platform has always supported only a separate process background model. Every background task (including app services) was handlde by a specific Windows Runtime Component, which has always been a different project than the app’s one. Additionally, the task was executed by a completely different Windows process than the app’s one, called backgroundTaskHost.exe. This approach has often required extra work to the developers, because he was forced to refactor his project in case he needed to share some resources (classes, assets, localization strings) between the app and the task.
To make the developer’s life easier, the Anniversary Update now supports a single process model, which means that the Run() method that, in the past, we have always defined in a class of the Windows Runtime Component, can now be implemented in the app itself and, more specifically, in the same class that handles all the various stages of the application’s lifecycle: the App class (stored in the App.xaml.cs file). With this new approach, the task is executed by the same process that handles the UWP app.
When you leverage the single process model, the class that implements the IBackgroundTask interface is replaced by the App class of the UWP app and the Run() method by a new method introduced in the Anniversary Update, which you need to override, called OnBackgroundActivated() .It’s a big change in the execution model, but it doesn’t require to completely rethink the way you create background tasks: in most of the cases, you simply need to move the code you would have written in the Run() method inside the OnBackgroundActivated() one. However, we’ll see more technical details later, when we’re going to actually implement the app service.
You can learn more about App Services on MSDN https://msdn.microsoft.com/en-us/windows/uwp/launch-resume/how-to-create-and-consume-an-app-service
The Visual Studio solution
As already mentioned at the beginning of the article, there’s an important difference between the approach we’re going to use in this post and one used in the previous articles. In the past, we took a Win32 application and we’ve packaged it as an UWP app, by eventually adding some UWP specific features. This is why we have leveraged Visual Studio 2017 RC and the Desktop Bridge Debugging project to deploy and debug our application. In this case, instead, we are going to have two separate applications: a UWP one and a Win32 one, with a communication channel in the middle to exchange data between the two of them.
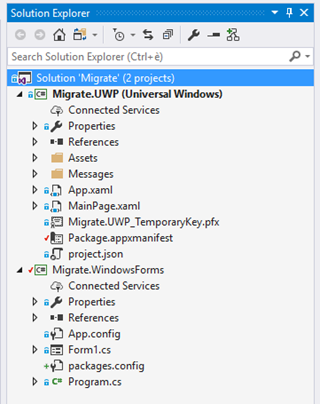
As such, for our sample app we can indifferently use Visual Studio 2017 RC or the official Visual Studio 2015 version, since we won’t need to use the Desktop Bridge Debugging project anymore. Here is how our final solution will look like:
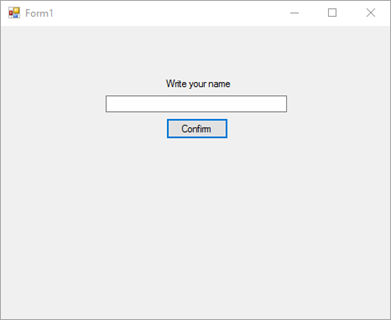
As a sample, we’re going to leverage one of the scenarios we have mentioned in the beginning. We have an application, which was originally developed using Windows Forms and that we have already migrated to a full UWP app. However, we’ll simulate that one of the forms of the app has a set of requirements (it’s complex, it performs operations currently not supported by a UWP app, etc.) which are a blocker for us to port all the original codebase to UWP. Consequently, we’re going to reuse the part of the Windows Forms application that we can’t migrate for the moment and to include it into the AppX package: the UWP app will be able to launch the Windows Forms one and the two will communicate together using an app service. Of course, our example will be much simpler: the form of the Windows Forms app will contain just a TextBox, where the user will be able to write his name, and a Button. Once pressed, the name will be sent and displayed in the UWP app. We’ll also see how can we detect the device where the app is running, so that we can enable this feature only on a desktop device: when the app will be running on a device which doesn’t support the Win32 ecosystem (like a phone or the Xbox One), we’ll disable this feature.
The Windows Forms app
As we have just stated, the user interface of Windows Forms app will be very simple: a TextBox and a Button. When the user presses the button, the name written in the TextBox will be sent to the UWP app using an App Service.
What actually happens when you press the button? We need to start using the App Service APIs, which belong to the Universal Windows Platform. As such, as first step, we would need to configure the Windows Forms project to add the proper references like we did in the post where we introduced the “Enhance” phase of the Desktop Bridge. However, a member of the Desktop Bridge team has recently released a very cool NuGet package called UWPDesktop, which is described in the following blog post: https://blogs.msdn.microsoft.com/universal-windows-app-model/2016/12/14/uwpdesktop-nuget/ With this package, you can skip all the steps required to manually add a reference to the UWP platform: just right click on your Windows Forms project, choose Manage NuGet packages, search and install the package called UWPDesktop and you’re all set. You will be able to start using UWP APIs out of the box.
In our specific scenario, we need to create a connection to an App Service, using the AppServiceConnection class which is part of the Windows.ApplicationModel.AppService UWP namespace. Take a look at the code we need to use:
 private async void btnConfirm_Click(object sender, EventArgs e)
{
    AppServiceConnection connection = new AppServiceConnection();
    connection.AppServiceName = "CommunicationService";
    connection.PackageFamilyName = Windows.ApplicationModel.Package.Current.Id.FamilyName;
    var result = await connection.OpenAsync();
    if (result == AppServiceConnectionStatus.Success)
    {
        ValueSet valueSet = new ValueSet();
        valueSet.Add("name", txtName.Text);

        var response = await connection.SendMessageAsync(valueSet);
        if (response.Status == AppServiceResponseStatus.Success)
        {
            string responseMessage = response.Message["response"].ToString();
            if (responseMessage == "success")
            {
                this.Hide();
            }
        }
    }
}
After we have created a new AppServiceConnection object, we need to set two important properties:
- AppServiceName, which is the name of the app service we want to connect with. The App Service is created and defined by the UWP app, so this is the name that it’s defined in the manifest file of the UWP app. We’re going to learn more about this name when we’re going to see the other side of the project, which is the UWP app.
- PackageFamilyName, which is the PFN (Package Family Name) of the app that exposes the App Service. However, unlike other regular App Services usage scenario, in this case we don’t have to use a fixed name, but we can leverage the property Windows.ApplicationModel.Package.Current.Id.FamilyName. The reason why we’re doing this can be found in the previous post on this blog: since both the UWP app and the Win32 process are running inside the same container, they share the same identity. As such, we can use the Windows.ApplicationModel.Package.Current API to retrieve all the information about the current package.
Now we can try to open the connection using the OpenAsync() method. The other side of the channel (in this case, the UWP app) will answer to the request and, if the connection is successfully established, we will receive as result the Success value of the AppServiceConnectionStatus enumerator. If that’s the case, we can continue and package the information to send back to the UWP app using a ValueSet object. This package will contain a new item identified by the name key with the name written by the user in the TextBox control. Once the package is ready, we send it to the UWP app by passing it as parameter of the SendMessageAsync() . Again, also in this case we will get a response, which will tell us if the UWP app has received successfully or not the package. The response, other than the outcome in the Status property, can contain also some data sent back by the UWP app, stored inside the Message collection. As we’re going to see later when we’ll analyze the code of the UWP app, if we’ve been able to receive with success the message from the Windows Forms app, we will send back another ValueSet collection with an item identified by the key response and as value success. If that’s the case, we just close the form by calling the Hide() method, so that the focus of the user can return to the UWP app (let’s not forget that, in this scenario, the Windows Forms app is just a sidekick, the main one is the UWP app).
We’re done from the Win32 process side. Now let’s see the code of the Universal Windows Platform app.
The Universal Windows Platform application
The user interface of the Universal Windows Platform app is very simple:
 <Grid Background="{ThemeResource ApplicationPageBackgroundThemeBrush}">
    <StackPanel HorizontalAlignment="Center"
            VerticalAlignment="Center">
        <TextBlock Text="Communication between UWP and Win32" Style="{StaticResource HeaderTextBlockStyle}"
                   TextAlignment="Center" HorizontalAlignment="Center" TextWrapping="Wrap" />
        <Button x:Name="OpenForm" Content="Open form" Click="OnOpenForm" HorizontalAlignment="Center" Margin="0, 20, 0, 0" />
        <Button Content="Say hello!" Click="OnSayHello"  HorizontalAlignment="Center" x:Name="SayHello" Margin="0, 20, 0, 0" />
        <TextBlock x:Name="Result" Style="{StaticResource SubheaderTextBlockStyle}" HorizontalAlignment="Center" Margin="0, 20, 0, 0" />
    </StackPanel>
</Grid>
It includes two buttons: one called OpenForm, to launch the Win32 process, and one called SayHello, to show a simple message in the TextBlock control placed below. As you can see from the definition of the event handler connected to the Click event of the second button, the message we’re going to display is really simple:
 private void OnSayHello(object sender, RoutedEventArgs e)
{
    Result.Text = "Hello world!";
}
Which is the real purpose of this button? To show you that, despite the fact that we’re building an application that will be able to communicate with a Win32 process, we will have to chance to launch it also on a non-desktop device, like a phone or a game console. In fact, in the OnNavigatedTo() method of the page, we’re going to use a set of UWP APIs to understand the device where the app is running and, in case it isn’t a desktop, we’re going to hide the first button (the one that launches the Win32 process).
 protected override void OnNavigatedTo(NavigationEventArgs e)
{
    if (AnalyticsInfo.VersionInfo.DeviceFamily != "Windows.Desktop")
    {
        OpenForm.Visibility = Visibility.Collapsed;
    }
}
We’re using a static class included in the namespace Windows.System.Profile, called AnalyticsInfo, which provides, using the VersionInfo.DeviceFamily property, the info about the family where the device is running. In case the result is anything but the fixed string Windows.Desktop, we’re going to hide the button: the Win32 runtime, in fact, is available only on the full Windows 10 version that you find on computer and tablets. A phone or a game console wouldn’t be able to execute a Windows Forms app, since it doesn’t come with the full .NET Framework.
Let’s talk now about the core feature of our scenario, App Services. As we mentioned in the beginning of the post, we’re going to leverage the new background single process model. As such, the App Service won’t be hosted in a separate Windows Runtime Component, but it will be handled by a dedicated method in the App class of the UWP app, called OnBackgroundActivated() .Here is how it looks like:
 public static AppServiceConnection Connection = null;

protected override void OnBackgroundActivated(BackgroundActivatedEventArgs args)
{
    base.OnBackgroundActivated(args);
    if (args.TaskInstance.TriggerDetails is AppServiceTriggerDetails)
    {
        BackgroundTaskDeferral appServiceDeferral = args.TaskInstance.GetDeferral();
        AppServiceTriggerDetails details = args.TaskInstance.TriggerDetails as AppServiceTriggerDetails;
        Connection = details.AppServiceConnection;
        Messenger.Default.Send<ConnectionReadyMessage>(new ConnectionReadyMessage());
    }
}
First we define a static AppServiceConnection property, which we’re going to leverage in the main page of the app to get access to the app service. Then we check which is the trigger that has activated the background request: in our case, it can happen only due to an App Service activation, but it’s a best practice to always check the type of the TriggerDetails property stored in the TaskInstance object, because the OnBackgroundActivated() method could be used in a real app to handle multiple triggers and background activations.
In case of an activation of the app in background by an App Service, the TriggerDetails’s type will be AppServiceTriggerDetails: consequently, we need to store the AppServiceConnection property of the object in the static property we’ve created before, so that we’ll be able to access to the communication channel from the main page.
The last part of the code can be considered a bit of a trick ![]() We need to tell to the main page of the application when the connection has been established, so that we can start exchanging data between the UWP app and the Windows Forms one. As such, I’ve decided to leverage a messaging system: we’re going to send a message to the main page, which will subscribe itself to receive this message. However, since I didn’t want to reinvent the wheel, I decided to reuse an already existing infrastructure, provided the popular library MVVM Light by Laurent Bugnion. The purpose of this library is to help developers to implement the Model-View-ViewModel pattern in their applications. However, I won’t use any of its main features, because the UWP app I’ve created is really simple and it doesn’t leverage this pattern. However, the library offers a feature that exactly fits my requirement: a messenger (you can think of it like a postman), which is a class that can be used to exchange messages between two different classes. So, before moving on, I have right clicked on the UWP project, I’ve chosen Manage NuGet Packages and I’ve installed the package identified by the id MvvmLightLibs.
We need to tell to the main page of the application when the connection has been established, so that we can start exchanging data between the UWP app and the Windows Forms one. As such, I’ve decided to leverage a messaging system: we’re going to send a message to the main page, which will subscribe itself to receive this message. However, since I didn’t want to reinvent the wheel, I decided to reuse an already existing infrastructure, provided the popular library MVVM Light by Laurent Bugnion. The purpose of this library is to help developers to implement the Model-View-ViewModel pattern in their applications. However, I won’t use any of its main features, because the UWP app I’ve created is really simple and it doesn’t leverage this pattern. However, the library offers a feature that exactly fits my requirement: a messenger (you can think of it like a postman), which is a class that can be used to exchange messages between two different classes. So, before moving on, I have right clicked on the UWP project, I’ve chosen Manage NuGet Packages and I’ve installed the package identified by the id MvvmLightLibs.
In our case:
- In the OnBackgroundActivated() method, we’re going to use the messenger to send a message to the main page.
- In the main page of the app, we’re going to use the messenger to receive these kind of messages.
The message is nothing else than a simple class, in this case called ConnectionReadyMessage. Since we don’t need to pass any parameter to the main page, the definition of the class is just empty, since the message will act like an event notifier:
 namespace Migrate.UWP.Messages
{
    public class ConnectionReadyMessage
    {
    }
}
To access to the messenger we use the static Messenger.Default instance provided by MVVM Light, which is available in the GalaSoft.MvvmLight.Messaging namespace. Since, in this case, we need to send a message, we call the Send<T>() method specifying, as parameter, a new instance of the ConnectionReadyMessage object.
Now let’s see the other side of the channel: in the OnNavigatedTo() method of the main page, other than detecting the current device family to show or hide the button to launch the Windows Forms app, we use again the same Messenger.Instance class. However, this time, we use the Register<T>() method to subscribe the page to receive it:
 protected override void OnNavigatedTo(NavigationEventArgs e)
{
    if (AnalyticsInfo.VersionInfo.DeviceFamily != "Windows.Desktop")
    {
        OpenForm.Visibility = Visibility.Collapsed;
    }

    Messenger.Default.Register<ConnectionReadyMessage>(this, message =>
    {
        if (App.Connection != null)
        {
            App.Connection.RequestReceived += Connection_RequestReceived;
        }
    });
}
When we use the Register<T>() method, we need to specify as T the kind of message we want to receive (in this case, it’s ConnectionReadyMessage) and, as parameter, the action we want to execute when the message is received. This is where we’re going to leverage the AppServiceConnection object we have instantiated in the App class: specifically, we subscribe to the RequestReceived event, which is triggered every time another application requests to establish a connection with our app service. In our case, this happens when the user has wrote his name and pressed the Confirm button in the Windows Forms app.
What happens when we receive this request? Here is the code of the event handler:
 private async void Connection_RequestReceived(AppServiceConnection sender, AppServiceRequestReceivedEventArgs args)
{
    var deferral = args.GetDeferral();
    string name = args.Request.Message["name"].ToString();
    Result.Text = $"Hello {name}";
    ValueSet valueSet = new ValueSet();
    valueSet.Add("response", "success");
    await args.Request.SendResponseAsync(valueSet);
    deferral.Complete();
}
First, we get a deferral by calling the GetDeferral() method, which is an object required to keep the connection alive even when we are performing asynchronous operations. If we go back in the post now and we take a look at the operation performed by the Confirm button in the Windows Forms app, the rest of the code should be easy to understand: the Windows Forms app has sent us a ValueSet object (which is stored inside the Message property of the Request instance) with the name written in the TextBox, stored with the key name. Then we display a simple message to the user in the UWP app: a “Hello” followed by the name written by the user in the Windows Forms app. Then, if you remember, the app is expecting a message back identified by the response key and with success as a value. So we create a new ValueSet with this item and we send it back to the Win32 app by passing it to the SendResponseAsync() method of the Request object. We’re done, so we call the Complete() method on the deferral object.
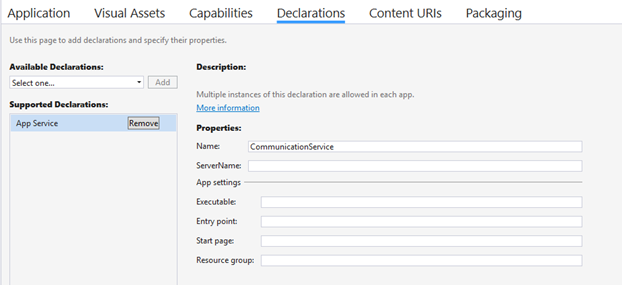
The last step is to define the App Service: since it’s an extension point of the Universal Windows Platform, we need to configure it in the manifest, so that all the other applications installed on the device can be aware of it. As such, double click on the Package.appmanifest file of the UWP project and move to the Declarations section. You will have to choose, from the Available declarations dropdown list, the App Service entry and specify, in the Name field, a unique identifier, which will be leveraged by the other apps to invoke it. In fact, if you remember, when we have set up the connection in the Windows Forms app, we had to set a property of the AppServiceConnection class called AppServiceName: this is exactly the name we have specified in the manifest.
Handling the Windows Forms app registration
So far we’ve seen how to handle the communication between the UWP app and the Windows Forms app using App Services. However, we haven’t seen how the UWP app can launch the Win32 process: what happens when the UWP app is running on a desktop and the user presses on the Open form button? To set up the Desktop Bridge configuration required by our scenario, there are some steps we need to follow. The first one is to specify which is the Win32 process that we want to launch: we do it in the manifest file but, since this feature isn’t supported by the visual designer, we need to manually edit the XML file, by right clicking on the Package.appxmanifest file and by choosing View code.
The first change to apply is inside the Package root node, since we need to leverage a set of namespaces which aren’t part of a UWP manifest by default:
 <Package xmlns="https://schemas.microsoft.com/appx/manifest/foundation/windows10"
         xmlns:mp="https://schemas.microsoft.com/appx/2014/phone/manifest"
         xmlns:uap="https://schemas.microsoft.com/appx/manifest/uap/windows10"
         xmlns:rescap="https://schemas.microsoft.com/appx/manifest/foundation/windows10/restrictedcapabilities"
         xmlns:desktop="https://schemas.microsoft.com/appx/manifest/desktop/windows10"
         IgnorableNamespaces="uap mp rescap desktop">
Now, in the Extensions section, we can add the following code:
 <Extensions>
  <uap:Extension Category="windows.appService">
    <uap:AppService Name="CommunicationService" />
  </uap:Extension>
  <desktop:Extension Category="windows.fullTrustProcess" Executable="Migrate.WindowsForms.exe" />
</Extensions>
The first extension entry is the App Service we have previously declared: the work we did with the visual interface has been translated into this XML entry, so it will be already there. The entry we need to manually add is the second Extension point, which, however, this time is part of the desktop namespace. In the Category attribute we need to set the fixed value windows.FullTrustProcess, while in the Executable attribute we need to specify the name of the Win32 process. In our case, it’s the executable of the Windows Forms application we have previously created.
The second change is in the Capabilities section where, in addition to the standard capabilities that our UWP app uses, we need to add the runFullTrust one, which is the usual one that every converted app needs to leverage to get access to the Desktop Bridge features:
 <Capabilities>
  <Capability Name="internetClient" />
  <rescap:Capability Name="runFullTrust" />
</Capabilities>
The first change to apply is in code: the Universal Windows Platform offers an API to launch the Win32 process that we have just specified in the manifest.
 private async void OnOpenForm(object sender, RoutedEventArgs e)
{
    await Windows.ApplicationModel.FullTrustProcessLauncher.LaunchFullTrustProcessForCurrentAppAsync();
}
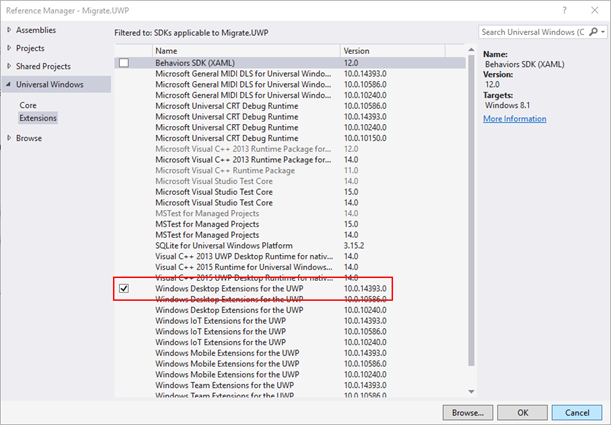
However, by default you will get an error because complaining about the lack of the FullTrustProcessLauncher class in the Windows.ApplicationModel namespace: the reason is that, since this feature can be leveraged only on a desktop machine, is part of the Extensions APIs specific for the desktop. Consequently, you will need to right click on your UWP app, choose Add reference and, in the Universal Windows –> Extensions section, choose the library called Windows Desktop Extension for the UWP. If you find multiple entries (because you have installed multiple Windows 10 SDK versions on your machine), make sure to add the version 14.0.0.14393.0, which is the Anniversary Update one that contains the FullTrustProcessLauncher class.
There’s a last step to do: we have wrote some code that, when the button is pressed, launches the Windows Forms executable that is defined in the manifest. But where the UWP app can find this executable? It needs to be included in the folder which becomes the content of the AppX package and that is turned into an AppX file when you publish it on the Store or you sideload it on another computer. However, to generate this folder, you have to deploy the UWP application at least once on your computer: this process will generate a folder called AppX inside the bin one of your project, based on the configuration and on the architecture you’re using for compilation. For example, if you’re compiling the application in Debug mode for a x86 device, the path of the folder will be bin\x86\Debug\AppX. Inside this folder, you will have to copy your executable and every other file (like additional DLLs) from which your Win32 process may depend on, pretty much like we did when we used the Desktop Debugging Project in the enhance or expand scenarios. The quickest way to achieve this goal and to avoid having to manually copy the Windows Forms executable every time we make some changes to the app is to define a set of post build operations, which are accessible when you right click on the Windows Forms project and you choose Build events.
This is an example of the command I’ve setup for my sample project:
 xcopy /y /s "$(SolutionDir)Migrate.WindowsForms\bin\$(ConfigurationName)\Migrate.WindowsForms.exe" "$(SolutionDir)\Migrate.UWP\bin\x64\$(ConfigurationName)\AppX\"
xcopy /y /s "$(SolutionDir)Migrate.WindowsForms\bin\$(ConfigurationName)\Migrate.WindowsForms.exe" "$(SolutionDir)\Migrate.UWP\bin\x86\$(ConfigurationName)\AppX\"
Of course, the previous paths aren’t fixed, so you can’t just copy and paste them: they contain a reference to the project name and the app executable, so they need to be tailored based on the configuration of your solution.
That’s all!
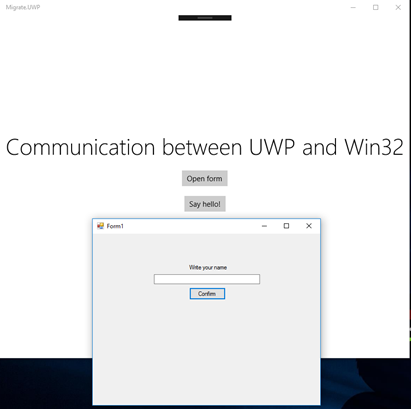
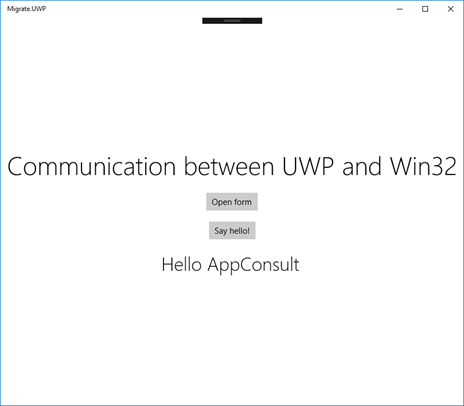
That’s all! If everything goes well, now you should be able to:
- Launch the UWP app
- Press the Open form button to launch the Windows Forms app
- Write your name in the Windows Forms app and press the Confirm button
- The Windows Forms app will be closed and, in the UWP app, you will see the message Hello followed by the name you have written.
 |
 |
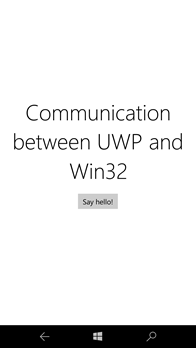
Before wrapping up, let’s not forget one of the biggest advantages of this approach: even if we have been able to launch a Win32 process, the main app is still a true Universal Windows Platform app. As such, you can try to deploy it for example on a phone or on the XBox One and it will work just fine. However, on these devices, you will see only the Say hello! button and not the Open form one, due to the device family detection we have added when the main page is loaded.
As usual, you can find the sample we have used in this post on my GitHub repository: https://github.com/qmatteoq/DesktopBridge/tree/master/6.%20Migrate
Happy coding!
Comments
- Anonymous
February 07, 2017
Hi Matteo,Another great tutorial on UWP! Just a quick question. I am trying to implement your solution above my having it open the form from your previous desktop bridge tutorials. The form performs familiar tasks like; creating the text file, audio file, as well as registering the background task with time trigger. This means that I have four projects in my solution: (1) WinForms, (2) Desktop Bridge Debugging Project, (3) BackgroundTask, and (4) UWP XAML UI.Unfortunately this has been unsuccessful for me as I am receiving an error that my project.json does not list 'win10' as a targeted runtime. Doing a quick google search, I found that it may be an issue with the build configuration and having "Any CPU" as the Platform.My question for you is how would an inexperienced UWP developer implement the migration step on a converted/enhanced/extended WinForms app using the Visual Studio 2017 with the Desktop Bridge Debugging Project?- Anonymous
February 19, 2017
Hello Tyson,can you elaborate a little bit more your scenario? I'm asking because I have the feeling that in your solution there are too many things that don't necessarily have a connection between them. For example, you mention having the Desktop Bridge Debugging Project and a UWP XAML UI, but the first one is needed only to debug and test applications in the Convert / Enhance or Extend phase, it isn't needed instead if you're working with the Migrate phase.Regarding your "Any CPU" question, I guess your problem could happen when you try to launch the UWP app: Universal Windows Platform applications are compiled using .NET Native, a tool that is able to automatically convert the managed code into native code during the compilation phase, improving the startup times and reducing the memory footprint. The "downside" of .NET Native is that native code can't be cross-architecture compiled (like, instead, you can do with a managed environment like the .NET Framework), so you can't compile a UWP app using the Any CPU configuration: you need to choose the specific architecture for your device (x86, x64 and ARM). Let me know if you have additional questions.Best - Anonymous
February 19, 2017
The comment has been removed
- Anonymous
- Anonymous
March 13, 2017
Hi Matteo,In this case, our Win32 applications can communicate with UWP apps that has implement the App Services, and if we want to communicate with some UWP, we must to custom a special UWP app for the win32 application, so if Win32 apps want to communicate with other UWP apps directly , the App Services is not available, isn't it?Thanks!- Anonymous
March 14, 2017
Hello Shirley,A Win32 app can communicate with other installed UWP apps on the system through App Service, but:1) The UWP app must expose an App Service, so it's up to the developer to satisfy this requirement2) You need to know the full Package Family Name (PFN) of the target app and the name of the App Service it exposes.In a "self made" scenario like the one described in this post, everything is easy because the Win32 process and UWP app are running inside the same container (so they share the same Package Family Name) and, since you're the developer that has created and exposed the App Service, you know the name that you have assigned.Best
- Anonymous
- Anonymous
June 02, 2017
Nice!It might be very useful, but I’ve try replicate this solution, and there is one problem: It works only ones. In second try I received an error: Exception from HRESULT: 0x8001010E (RPC_E_WRONG_THREAD))'System.Exception occurred HResult = 0x8001010E Message = The application called an interface that was directed to another thread.- Anonymous
June 02, 2017
Hello, it seems to be a dispatching issue from a background thread to the main thread. Can you try the samples of the Migrate stage I've published here: https://github.com/qmatteoq/DesktopBridge and here: https://github.com/qmatteoq/BridgeTour-Workshop and see if they work for you? With my samples, I'm not able to reproduce your issue, it always works, not just the first time.Keep me posted!Best- Anonymous
June 02, 2017
Thx, for such a quick response! I’ll try your sample.Is there any way to pass parameters from UWP to desktop app in LaunchFullTrustProcessForCurrentAppAsync?- Anonymous
June 04, 2017
I admit I never tried it personally because me or my customers never tried this use case, but according to the documentation (https://docs.microsoft.com/en-us/uwp/api/windows.applicationmodel.fulltrustprocesslauncher) the answer should be yes, there's an overload of the method which accepts a string, which is passed as parameter of the Win32 executable.- Anonymous
September 19, 2017
Unfortunately, the string parameter is only a "group identifier" that selects parameters for the full-trust app from the manifest. It isn't passed directly to the full-trust app. Since the manifest is read-only at runtime, this means you cannot pass dynamically-generated parameters to the full-trust app. See https://stackoverflow.com/questions/46008948/how-to-launch-a-full-trust-desktop-bridge-app-from-uwp-with-arbitrary-paramete
- Anonymous
- Anonymous
- Anonymous
June 04, 2017
Thank you! It’s really good job! The sample is very good, step by step explained (in attached doc) and full of useful information. It helped me a lot. Thank you again.Best
- Anonymous
- Anonymous
- Anonymous
June 06, 2017
The comment has been removed- Anonymous
June 06, 2017
Hello Daniel,in terms of performance UWP performs well, the only issues I see is that, currently, not all the typical controls used in the business world (like the DataGrid) are available in UWP. However, we have many partners that have worked on such controls also for UWP (like Telerik, which has just released a free and open source version for personal projects http://www.telerik.com/universal-windows-platform-ui).Regarding your first question, actually it's exactly the scenario that is demoed in the blog post: the UWP app can launch a win32 executable that processes some data and sends it back, using an AppService, to the UWP application. You can find another sample of this scenario here: https://github.com/qmatteoq/BridgeTour-Workshop in the Migrate scenario.Let me know if you have further question.Best
- Anonymous
- Anonymous
July 19, 2017
The comment has been removed- Anonymous
August 02, 2017
Hello Daniel,sorry for the late reply but I've recently returned from a business trip from the US which kept me very busy.Yes, the approach described in this post is the right one for the scenario you have outlined: from the UWP app, you can launch the Win32 apps which are packaged together with it and, using App Services, exchange data between the two "worlds". If you wanna take a look at a more detailed sample, you can start from here: https://github.com/qmatteoq/BridgeTour-Workshop/tree/master/04-Migrate It's a sample UWP app that performs bidirectional communication (the UWP app sends some data to the Win32 executable, which is processed in background and then the response is sent back to the UWP one) using App Services. Regarding the maturity of the Desktop Bridge, I would say that the technology itself, despite it's fairly new, is quite mature, if you think that thanks to it we've been able to port on the Store such a complex Win32 app like Office. But, for sure, there's space for improvements regarding the tooling experience, but hold tight, lot of good stuff is coming in the near future :)
- Anonymous
- Anonymous
July 22, 2017
Hello,Thanks for your tutorial. But it seems I cannot create store package after add the extension?- Anonymous
August 02, 2017
Hello, unfortunately Visual Studio doesn't support yet the creation of packages in the Migrate stage using the visual wizard. You will need to manually build a Release version of the application, deploy it on your PC and then perform a manual packaging using the makeappx tool (as explained in the section titled "Repackaging your app" in the following post https://blogs.msdn.microsoft.com/appconsult/2016/10/17/desktop-bridge-converting-an-installer/) on the folder bin\x86\Release\AppX or bin\x64\Release\AppX that is created after the deployment process.I hope it helps!Best
- Anonymous
- Anonymous
August 29, 2017
can win32 process keep running even we close or minimize uwp app? - Anonymous
August 29, 2017
can win32 keep running even uwp app is closed or minimized? - Anonymous
September 06, 2017
are there any restrictions to win32 process inside UWP package? if there are, any docs please?- Anonymous
September 06, 2017
Hello, the win32 process invoked by the UWP application runs in the Desktop Bridge context, so the same requirements of a standard packaged application are applied. You can refer to the following page: https://docs.microsoft.com/en-us/windows/uwp/porting/desktop-to-uwp-prepare- Anonymous
September 06, 2017
thank you!
- Anonymous
- Anonymous
- Anonymous
September 07, 2017
do I have to fill a form provided by MS to get my UWP app onboard or just upload it to Windows Store ?- Anonymous
September 07, 2017
The comment has been removed- Anonymous
September 07, 2017
really thanks
- Anonymous
- Anonymous
- Anonymous
September 10, 2017
The comment has been removed- Anonymous
September 10, 2017
seems that I did it- Anonymous
September 11, 2017
Thanks for the update! I confirm that probably something was incorrect in your project, because debugging a win32 process launched from a UWP app is definitely supported.- Anonymous
September 11, 2017
yes, I used Desktop bridge debugging project, and it worked. any better choice?
- Anonymous
- Anonymous
- Anonymous
- Anonymous
September 18, 2017
The comment has been removed- Anonymous
September 18, 2017
OK, problem is solved! thanks
- Anonymous
- Anonymous
September 18, 2017
Hi Matteo,my project needs two dlls which have same name, one is referenced by my project, the other is included in win32 subfolder used by a exe file, and Vistual Studio shows a yellow warning on the name of the dll in References list.how to have two same name dll included in project? Please help.- Anonymous
September 18, 2017
of course I need both of them, they just have the same name, but they are actually different.
- Anonymous
- Anonymous
September 22, 2017
Hi Matteo, Great tutorial! Is there a way of specifying more than one Win32 process with full trust? For example, you may want to have a separate process for opening Outlook and another for creating an Excel file. I see that you add '' with a specified Executable, if I try to add another I get a build error stating 'windows.fullTrustProcess can only be specified once'? Also, this may be outside the scope of this tutorial, can you invoke Win32 processes as background task in a UWP app?- Anonymous
September 23, 2017
Thanks, I'm glad you found it useful!No, there can be only one win32 process directly invoked by the UWP app. However, once the win32 process is started, it can invoke any other executable included in the same package. Regarding the second question, also in this case the answer is no. Background tasks have been created with the goal to provide background features without impacting on performance and battery life. The capability of invoking win32 processes that don't follow the app model of the Universal Windows Platform would defeat this purpose.
- Anonymous
- Anonymous
October 12, 2017
The comment has been removed - Anonymous
November 17, 2017
The comment has been removed - Anonymous
November 17, 2017
The comment has been removed- Anonymous
November 17, 2017
The comment has been removed- Anonymous
November 17, 2017
Hello, MatteoI am sure the UWP does not crashes, you can use your demo to reproduce this issue. https://github.com/qmatteoq/DesktopBridge/tree/master/6.%20Migrateand here I have a video showing you how to reproduce that.Thanks for helping me.- Anonymous
November 17, 2017
Hello Xiaoyan, I'll take a look at the issue next week and get back to you. I'm travelling for events so unfortunately I'm rarely in front of a computer these days. Thanks for your patience!- Anonymous
November 17, 2017
You are so so kind.Thanks.
- Anonymous
- Anonymous
- Anonymous
November 17, 2017
video available on OneDrive: https://1drv.ms/u/s!AuaHm_T1yhYsjh6QlSgqcKokNtJg - Anonymous
November 18, 2017
you are right, it is because of 'unexpected terminations of the connection', but no exception raised.
- Anonymous
- Anonymous
- Anonymous
December 06, 2017
Will this work on "Windows 10 S" ?- Anonymous
December 06, 2017
Hello, yes. As long as the Win32 executable is included in the package, you're allowed to invoke it.
- Anonymous
- Anonymous
February 02, 2018
Hi Matteo, thank you for your tutorial.I want to develop an app from scratch use this technique (use UWP to provide UI, and use Win32 to do works that can't be done in UWP), and I don't have an already-existing Win32 application. I find that the form on https://developer.microsoft.com/en-us/windows/projects/campaigns/desktop-bridge requires App Website. It seems that I must have a finished Win32 application (and a download page) before I can apply the permission to publish apps using this technique, is this right?- Anonymous
February 02, 2018
Hello, no the website isn't a required field, especially if like in your case you don't have an existing win32 app to port, but you want to enhance a new UWP app. Just leave it blank and make sure to follow the instructions on the confirmation mail you'll receive after filling the form!
- Anonymous
