An easier way to generate the packages for a Desktop Bridge converted app
In one of the posts on this blog we’ve seen how to use the manual approach to generate a converted app starting from a regular desktop app. This approach is perfect when you have a simple executable or a self-packaged app, which doesn’t need an installer that you can process through a tool like the Desktop App Converter, but there are a lot of manual steps involved: after manually creating the folder with the converted app structure (the assets, the manifest, etc.), we have to use a set of command line tools (like makeappx.exe and signtool.exe) in order to get a sharable app package. Additionally, every time we make a change to the original desktop app, we need to repeat the process and manually recreate the package again.
Thanks to the Desktop Bridge Debugging Project for Visual Studio 2017 (described in the same post), we have learned how to make the experience a little better. Thanks to this extension, we are able to:
- Automatically copy all the required files of the Win32 app inside the folder that will be converted into an AppX package every time we make some changes to the desktop application.
- Have a real debugging experience, so that we can place breakpoints, intercept exceptions, etc. even if the application is running as converted and not as native.
However, this extension doesn’t save us from having to deal with command line tools: once we have tested our app and we are ready to create the AppX package in order to publish it on the Store or to side load it on a computer, we still need to use the makeappx tool to generate the package and the signtool one to sign it with a valid certificate. Additionally, if we want to add the proper assets for our application (the images used for the tile, the taskbar icon, etc.), there’s even more work to do, especially if we want to support devices with high resolutions and high DPIs. It’s quite a different scenario compared to the one that a Universal Windows Platform developer experiences: everything is automatically done by Visual Studio, we just need to build and deploy our project (to generate all the required files) or right click on it and choose the option Store –> Create app packages to generate an app package that we can upload on the Store or share with other users.
Is there a way to achieve the same experience also with a converted app, without having to rely every time on command line tools? The answer is yes and the procedure has been recently describedin the official Desktop Bridge documentation. However, let’s dig a bit more the procedure so that we can understand how to achieve this goal.
Expanding our solution
For our sample, we’re going to reuse the same HelloCentennial app we have used to demo both the automatic and manual conversion approach, which can be downloaded from here: https://github.com/qmatteoq/DesktopBridge/tree/master/1.%20Desktop%20App%20Converter/HelloCentennial
For those who don’t remember it, it’s a very simple Windows Forms apps that offers the option, by pressing a button, to create a text file on the desktop, which is a scenario currently not supported by the Universal Windows Platform (since the user’s desktop isn’t one of the folders where a UWP app can directly write, like instead it can do with the Pictures or Music library).
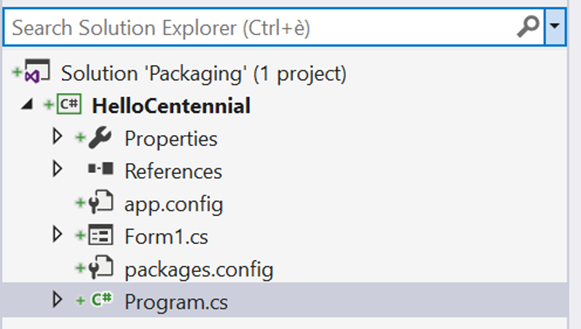
The starting point will be the plain solution, made just by the Windows Forms project:
The first step to make our life easier is to add a new UWP project to our solution, based on WinJS as a development language. If you’re a C# developer like me and you just had a panic attack, don’t worry ![]() We won’t have to write a single line of code of Javascript: we need this project just to make our life easier in assigning an identity to the converted app and generating the packages. The WinJS template is perfect for our purpose, since it doesn’t actually try to compile anything, like instead happens with the C# / XAML template.
We won’t have to write a single line of code of Javascript: we need this project just to make our life easier in assigning an identity to the converted app and generating the packages. The WinJS template is perfect for our purpose, since it doesn’t actually try to compile anything, like instead happens with the C# / XAML template.
As such, right click on the solution and choose Add –> New project. If, like me, you have set C# as default language for the environment, you will have to expand the Other Languages section and look for Javascript –> Windows Universal. Choose the Blank App (Universal Windows) template, give it a meaningful name (like HelloCentennial.Package) and create it. A new WinJS project will be automatically created, with a lot of files which we don’t really need. Feel free to delete:
- The folder called css
- The folder called js
- The file called index.html
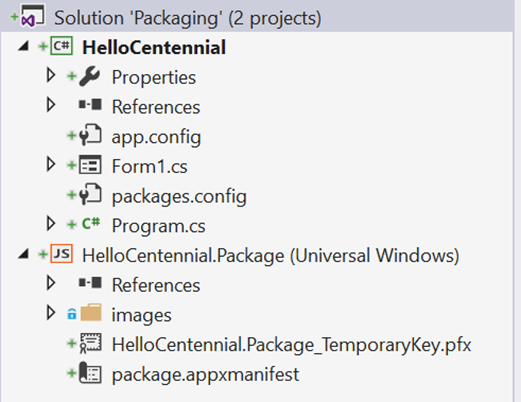
Here is how your solution should look like:
Now, to make it working, we need to make a few changes. Let’s see all of them in details.
Include the Win32 files in the UWP one
This step is required in order to include the files of your desktop app inside the WinJS package, so that they can be stored inside the AppX that Visual Studio will generate. To achieve this goal, we can use a special post build process command, which can we add in the configuration of the project. Right click on the desktop project (in our scenario, the one called HelloCentennial), choose Unload project and, once the project has been unloaded from Visual Studio, right click again on it and choose Edit <nameoftheproject.csproj> (in our scenario, it will be Edit HelloCentennial.csproj). You will see the XML definition of the project. Right at the end, before the end tag </Project> , add the following post build command:
 <Target Name="AfterBuild">
  <PropertyGroup>
    <TargetUWP>..\HelloCentennial.Package\win32\</TargetUWP>
  </PropertyGroup>
  <ItemGroup>
    <Win32Binaries Include="$(TargetDir)\*" />
  </ItemGroup>
  <Copy SourceFiles="@(Win32Binaries)" DestinationFolder="$(TargetUWP)" />
</Target>
There is one key in this configuration that must be adapted based on your project: the <TargetUWP> element must point to a sub folder of your WinJS project. Consequently:
- The first part (in our scenario, HelloCentennial.Package) must match the name you have assigned to the WinJS project.
- The second part (the win32 folder) is up to you: it’s simply the name of folder where you want that all the executables and DLLs of your desktop project are copied every time you build it.
Of course, this sample applies only to a Windows based project that can be opened in Visual Studio (like in our scenario, which is made by a Windows Forms project). In another scenario, it would be up to you to find the best way (like a batch or a PowerShell script) to copy all the files of the desktop app in the subfolder of the WinJS project.
If you now right click again on the desktop project, you reload it and then you build it… well, as a first impression you may have the feeling that nothing has happened. Instead, if you right click on the WinJS project and you choose Open folder in File Explorer, you will find a folder called win32 with exactly the output of the build of the desktop project, as you can see in the following screenshot:
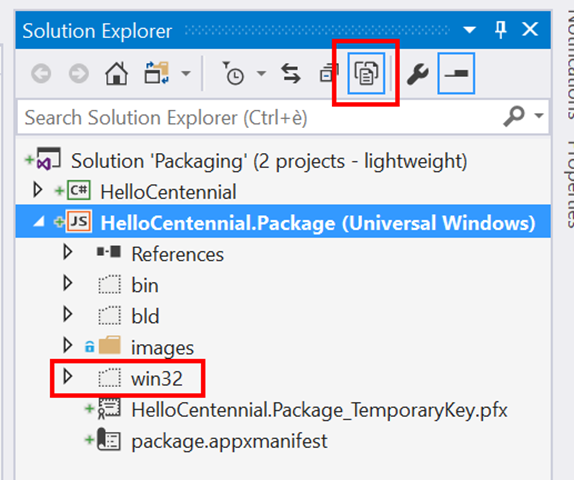
However, the post build command takes care only of copying the output of the build in the WinJS project: it’s up to us to manually include the win32 folder in the project. We can do it by clicking on the WinJS project and then press the button highlighted in the image below: it will show all the files and folders included in the folder, even the ones that aren’t part of the project, like the win32 one.
Right click on the win32 folder and choose Include in project. The last step is to expand the folder, select all the files inside the win32 folder, open the Properties panel (if it isn’t visible, you can find it in the View –> Properties menu) and make sure that the options are configured in the following way:
- Package Action: Content
- Copy to output directory: Copy if newer
Thanks to this configuration, the desktop processes will be considered as content (so Visual Studio won’t try to compile them) and they will be copied in the folder that Visual Studio will use to generate the app package .
Edit the manifest file
By default, the manifest file included in the WinJS project is the standard one for a UWP application, so it misses many of the declaration that we’ve learned in the blog post about the manual conversion. This is how the standard manifest looks like if you try to right click on the package.appxmanifest file and choose View code:
 <?xml version="1.0" encoding="utf-8"?>
<Package
  xmlns="https://schemas.microsoft.com/appx/manifest/foundation/windows10"
  xmlns:mp="https://schemas.microsoft.com/appx/2014/phone/manifest"
  xmlns:uap="https://schemas.microsoft.com/appx/manifest/uap/windows10"
  IgnorableNamespaces="uap mp">

  <Identity
    Name="7963a539-c1eb-408a-a1a5-aed2419f35ab"
    Version="1.0.0.0"
    Publisher="CN=mpagani" />

  <mp:PhoneIdentity PhoneProductId="7963a539-c1eb-408a-a1a5-aed2419f35ab" PhonePublisherId="00000000-0000-0000-0000-000000000000" />

  <Properties>
    <DisplayName>HelloCentennial</DisplayName>
    <PublisherDisplayName>Matteo Pagani</PublisherDisplayName>
    <Logo>images\storelogo.png</Logo>
  </Properties>

  <Dependencies>
    <TargetDeviceFamily Name="Windows.Universal" MinVersion="10.0.0.0" MaxVersionTested="10.0.0.0" />
  </Dependencies>

  <Resources>
    <Resource Language="x-generate" />
  </Resources>

  <Applications>
    <Application
      Id="App"
      StartPage="index.html">

      <uap:VisualElements
        DisplayName="HelloCentennial"
        Description="HelloCentennial"
        BackgroundColor="transparent"
        Square150x150Logo="images\Square150x150Logo.png"
        Square44x44Logo="images\Square44x44Logo.png">

        <uap:DefaultTile Wide310x150Logo="images\Wide310x150Logo.png" />
        <uap:SplashScreen Image="images\splashscreen.png" />

      </uap:VisualElements>
    </Application>
  </Applications>

  <Capabilities>
    <Capability Name="internetClient" />
  </Capabilities>

</Package>
If you compare it to the manifest of a converted desktop app (like the following one https://github.com/qmatteoq/DesktopBridge/blob/master/2.%20Manual/PackageLayout/AppxManifest.xml) you will notice some differences, like:
- The TargetDeviceFamily in the Dependencies element is Windows.Universal with a minimum and maximum version tested equal to 10.0.0.0
- The entry point of the application is an html page (since it’s a WinJS project, in a XAML project it would have been the full signature of the App class)
- We don’t have the runFullTrust capability
As a consequence, there a few changes that we need to apply in order to make the manifest, which are easy to identify if we compare this manifest with the one of the converted app. First, we need to add to the Package entry a new namespace to get access to the runfullTrust restricted capability:
 <Package xmlns="https://schemas.microsoft.com/appx/manifest/foundation/windows10"
         xmlns:uap="https://schemas.microsoft.com/appx/manifest/uap/windows10"
         xmlns:mp="https://schemas.microsoft.com/appx/2014/phone/manifest"
         xmlns:rescap="https://schemas.microsoft.com/appx/manifest/foundation/windows10/restrictedcapabilities"
         IgnorableNamespaces="uap rescap mp">
As you can see, compared to the other one, we have added a new namespace identified by the rescap keyword and we have included it in the IgnorableNamespaces list.
The second change is the TargetDeviceFamily element, which can’t be Windows.Universal: a converted desktop can run only on a standard pc with, as minimum, Windows 10 Anniversary Update (build 14393). As such, the entry must be changed in the following way:
 <Dependencies>
  <TargetDeviceFamily Name="Windows.Desktop" MinVersion="10.0.14393.0" MaxVersionTested="10.0.14393.0" />
</Dependencies>
The third change is to modify the Application entry, in order to not point anymore to the HTML page that we have previously deleted but to the desktop executable which we have included in the previous step inside the win32 folder. Here is how the updated Application element looks like:
 <Application Id="HelloCentennial"
             Executable="win32\HelloCentennial.exe"
             EntryPoint="Windows.FullTrustApplication">
The fourth change is in the way the resources language are handled. Since Win32 apps work in a different way and they don’t leverage the same resources-based language approach used by UWP apps, we can’t leave the default value x-generate for the Language attribute, but we need to set a fixed culture, like en-US. It will be up to the traditional desktop app, then, to continue handling the multi language and culture support like it has always done using the features provided by the .NET Framework or any other development technology. Consequently, this is how the <Resources> section should look like:
 <Resources>
  <Resource Language="en-US" />
</Resources>
Last but not the least, we need to add the runFullTrust capability in the list of supported capabilities. Consequently, inside the Capabilities section, you will have to add the following entry:
 <Capabilities>
  <Capability Name="internetClient" />
  <rescap:Capability Name="runFullTrust" />
</Capabilities>
If you have read the previous articles, you’ll already know what it is: it’s the restricted capability that allows a converted desktop app to run as it is, unlike a pure UWP app that runs inside a sandbox. This capability is also the reason why, at the moment, if you want to publish a converted app on the Store you need first to nominate it using the following form: you will work with an AppConsult engineer to validate it and unlock your account .
After all the changes you have made, this is how your final package.appxmanifest should look like:
 <?xml version="1.0" encoding="utf-8"?>
<Package xmlns="https://schemas.microsoft.com/appx/manifest/foundation/windows10"
         xmlns:uap="https://schemas.microsoft.com/appx/manifest/uap/windows10"
         xmlns:mp="https://schemas.microsoft.com/appx/2014/phone/manifest"
         xmlns:rescap="https://schemas.microsoft.com/appx/manifest/foundation/windows10/restrictedcapabilities"
         IgnorableNamespaces="uap rescap mp">
  <Identity Name="HelloCentennial" Version="1.0.0.0" Publisher="CN=mpagani" ProcessorArchitecture="x64" />
  <mp:PhoneIdentity PhoneProductId="6f6600a4-6da1-4d91-b493-35808d01f8de" PhonePublisherId="00000000-0000-0000-0000-000000000000" />
  <Properties>
    <DisplayName>Hello Centennial</DisplayName>
    <PublisherDisplayName>Matteo Pagani</PublisherDisplayName>
    <Logo>images\storelogo.png</Logo>
  </Properties>
  <Dependencies>
    <TargetDeviceFamily Name="Windows.Desktop" MinVersion="10.0.14393.0" MaxVersionTested="10.0.14393.0" />
  </Dependencies>
  <Resources>
    <Resource Language="en-us" />
  </Resources>
  <Applications>
    <Application Id="HelloCentennial"
                 Executable="win32\HelloCentennial.exe"
                 EntryPoint="Windows.FullTrustApplication">
      <uap:VisualElements DisplayName="HelloCentennial" Description="HelloCentennial.Package" BackgroundColor="transparent" Square150x150Logo="images\Square150x150Logo.png" Square44x44Logo="images\Square44x44Logo.png">
        <uap:DefaultTile Square310x310Logo="images\LargeTile.png" Wide310x150Logo="images\WideTile.png" Square71x71Logo="images\SmallTile.png">
        </uap:DefaultTile>
      </uap:VisualElements>
    </Application>
  </Applications>
  <Capabilities>
    <Capability Name="internetClient" />
    <rescap:Capability Name="runFullTrust" />
  </Capabilities>
</Package>
You probably would be tempted (like I tried to do) to delete the <mp:PhoneIdentity /> element from the XML, since we’re talking about a converted app that will run only on a desktop machine. Don’t do it, because if you’ll remove it Visual Studio will consider the manifest as invalid and, as such, the WinJS project will fail to build or you won’t be able to generate the AppX packages using the guided wizard.
That’s all. Now we can use the WinJS project to work with our converted app. But which are the benefits compared to the manual approach we have seen in the previous post?
No more manual package creation
Do you remember that, every time we made a change to our original desktop app and we wanted to share the converted version with someone, publish it on a website or submit it on the Store, we have always needed to use command line tools like makeappx and signtool? That’s not the case anymore. If you want to create an AppX, just right click on the WinJS project, choose Store –> Create App Packages and:
- If you just want to side load your application (meaning sharing it on another computer or using an enterprise tool), just choose No in the first step and follow the wizard.
- If you want to upload your app on the Store, choose Yes and, other than following the wizard, you will first be asked to reserve a name for your app on the Store or, if you have already done that, select the name from the available list.
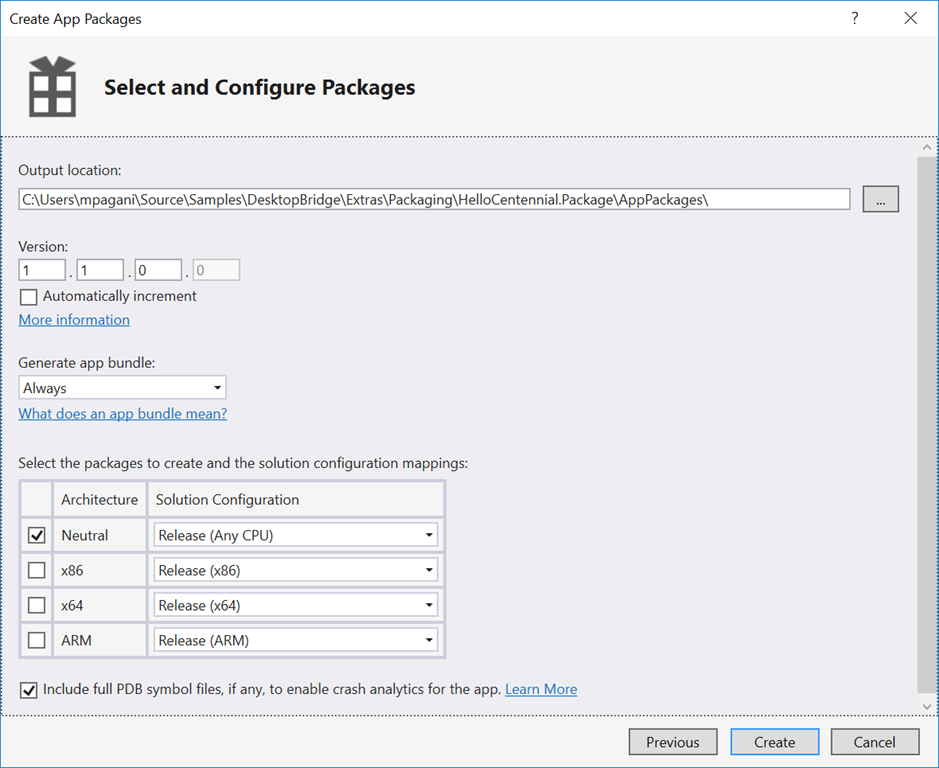
In both cases, you will be prompted with a screen like the following one:
Here you can specify the version number, if you want to generate a bundle (choose Always, you’ll understand why in the next paragraph) and the architectures you want to include in your package. In this case, since we’re converting a pure Win32 app (which hasn’t been enhanced or extended with any API or feature from the Universal Windows Platform), you can just choose Neutral, otherwise if you are already in the Enhance or Extend phase you will need to choose the specific architecture (x86 or x64), since UWP APIs and component can’t be cross-compiled for multiple architecture due to .NET Native, the technology that takes care of converting your managed app directly into native code. Just remember to not include an ARM package, since it would be useless: converted desktop apps run only on devices with x86 / x64 CPUs. In the end, from the dropdown menu choose if you want to compile the app in Debug mode (useful when you want to share the package to testers, because you can get more debug information if something bad happens) or Release mode (which, instead, is the right choice when you are ready to submit your app on the Store or release it to customers).
Once you press the Create button, Visual Studio will start the compilation and will warn you when the operation is completed. The result will be a new subfolder, created in the AppPackages folder included in your project’s folder:
As you can see, we have our .appxbundle file, which we can:
- Submit to the Store (always remember that, before doing that, you need to have worked with an AppConsult engineer and get approved by following this form).
- Install on our machine and share with other people. In this case, we need to share also the certificate that has been used to sign the application, which is the HelloCentennialPackage_1.1.0.0_AnyCPU.cer file, and we need to install it in our machine as a trusted certificate, exactly like we did in the manual conversion process when we generated our own certificate and installed it. However, this time Visual Studio took care of it and it has generated a testing certificate for us.
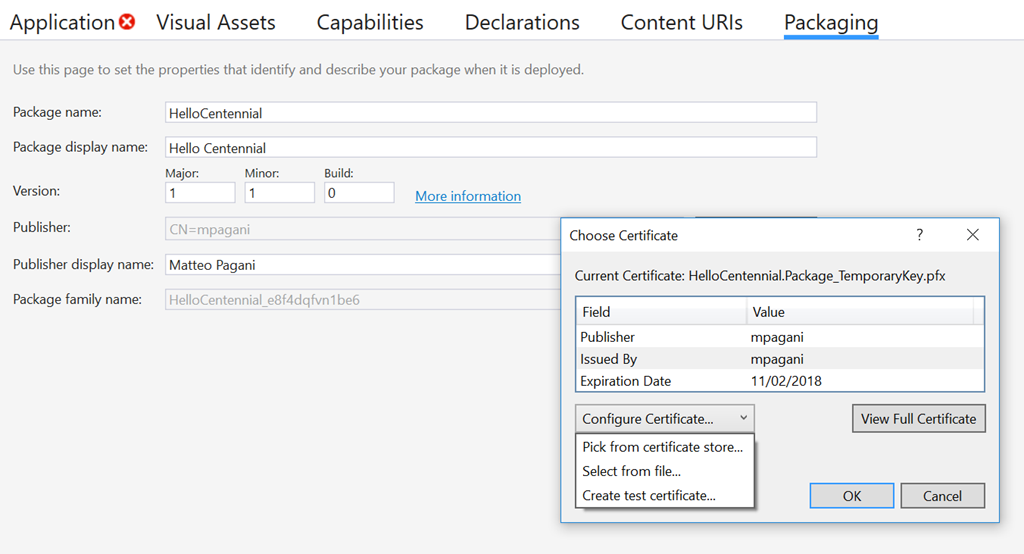
What if I want to share the app to my customers or using an enterprise tool like Intune and I want to sign the AppX with a real certificate? Just double click on the package.appxmanifest and, in this case, make sure to open the visual editor and not the XML one. Move to the Packaging tab and, in the Publisher field , press Choose certificate: you will be able to pick a certificate from your Certificate’s store or select a .pfx file to use it to sign the package. This way, when you’re going to generate the package with the visual wizard, it won’t be signed anymore with the test certificate, but with a real certificate that you may have acquired from a certification authority or that you have created by yourself for your company and it’s installed on every employee’s machine.
As you can see, generating a package for your app is a simpler procedure now: no more command line tools, no more manual editing of the AppxManifest.xml file to specify the right identity, etc. The experience is exactly the same that you get with a real UWP application.
In the screenshot, you can also notice that the Application tab displays an error mark: you can safely ignore it. The reason is that the Start page field, which should contain the reference to the main page of the app, will be empty, since we have manually replaced it in the XML with the reference to the Win32 executable. At the time of writing, Visual Studio doesn’t support this scenario, thus the warning.
Easier generation of the assets
Another pain point of the manual conversion is the asset generation: we need to manually provide all the assets that are used for the various tiles and icons and place them inside the Assets folder of the package. Additionally, if you want to do a job well-done and properly support all the devices with high resolution DPIs and screens, you need to create multiple versions of the same asset, one for each scale factor supported by Windows 10. This way, we can be sure that our icons won’t be blurry, no matter if the app is running on a small and not very recent laptop or on a high resolution device. If you are new to the UWP world, you can learn more at the following link: https://docs.microsoft.com/en-us/windows/uwp/layout/design-and-ui-intro Long story short: since UWP apps can run on a wide range of devices, from small screens to big screens, and the latest computers on the market (like the Surface Pro or the Surface Book) offer higher resolution and DPIs compared to the past, the Universal Windows Platforms supports a way to provide multiple versions of the same image (at different resolutions) and to let Windows to pick the best one, based on the scale factor that the operating system has assigned to the device (calculated as a combination of various factors, like the DPIs, the size of the screen and the viewing distance). We are able to get some help thanks to the UWP Tile Generator extension for Visual Studio 2015 or to the new embedded feature in the visual manifest editor offered by Visual Studio 2017, which allows us to choose an image (at the highest possible resolution) and then automatically generate all the images for all the various supported scales. The image generation follows a very simple naming convention: <nameofthefile>-<scalefactor>.<extension>. For example, if you have a tile icon called Square150x150Logo.png, the tool will generate for you a set of images called Square150x150Logo-scale100.png, Square150x150Logo-scale200.png, etc. But it isn’t enough: a reference to these images must be included into a resources.pri file, which is a special file that is part of the UWP world and that is leveraged by:
- Windows, to automatically load only the resources that are required for the current devices.
- Do you remember then, when you have generated the app package using the wizard, I suggested you to set the Generate bundle option to Always? Thanks to the bundle approach, the package will be split into two different part: a common one (the executable, the DLLs, etc.) and multiple resources files, one for each scale factor. This way, the user won’t have to download from the Store or install on his machine all the images, even the ones he will never use because they are meant for a different scaling factor.
With the manual approach explained in the old post, you needed to:
- Create a blank UWP project with Visual Studio 2015 and the tile generator extension or Visual Studio 2017
- Generate all the assets
- Copy all of them in the Assets folder of the app package
- Manually generating the resource file, by using a command line tool called makepri and running a set of commands as explained in the official documentation: https://docs.microsoft.com/en-us/windows/uwp/porting/desktop-to-uwp-manual-conversion#add-unplated-assets
Additionally, if you don’t follow step 4, you don’t get proper support for unplated assets. What does it mean? That your converted app, by default, will apply a background to the icon that is displayed in the taskbar, even if you have set transparent as BackgroundColor in the <uap:VisuaElements> item in the manifest, like in the following sample:
 <uap:VisualElements
    DisplayName="HelloCentennial"
    Description="HelloCentennial.Package"
    BackgroundColor="transparent"
    Square150x150Logo="images\Square150x150Logo.png"
    Square44x44Logo="images\Square44x44Logo.png" />
With a proper resources file, instead, you’ll be able to get an icon taskbar with a nice transparent background. You can see the difference between the two approaches in the following image (I apologize if they’re a bit blurry, but it’s just to give you an idea of the final effect).
 |
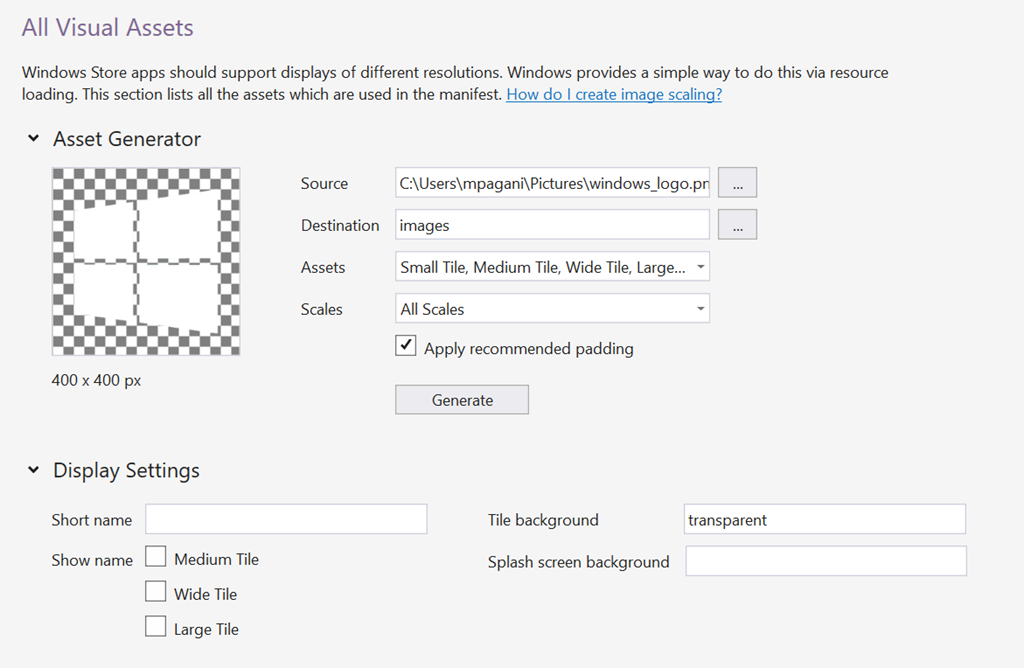
Thanks to the new WinJS project, everything will be done automatically when you build the project or create the AppX packages. And if you’re using Visual Studio 2017, everything will be even easier because you’ll be able to generate all the assets directly from the visual manifest editor. Just double click on the package.appxmanifest file, choose the tab Visual Assets, press the button with the three dots near the Source field and pick up an image from your computer (the higher is the resolution, the better the final result will be). To achieve the best result, open the Assets dropdown and make sure to:
- Include the Package Logo, which is used as icon for the package.
- Remove the Splash Screen, since this is a concept that applies only to full UWP apps.
Now just press the Generate button and Visual Studio 2017 will take care of generating all the assets for you at all the supported scales.
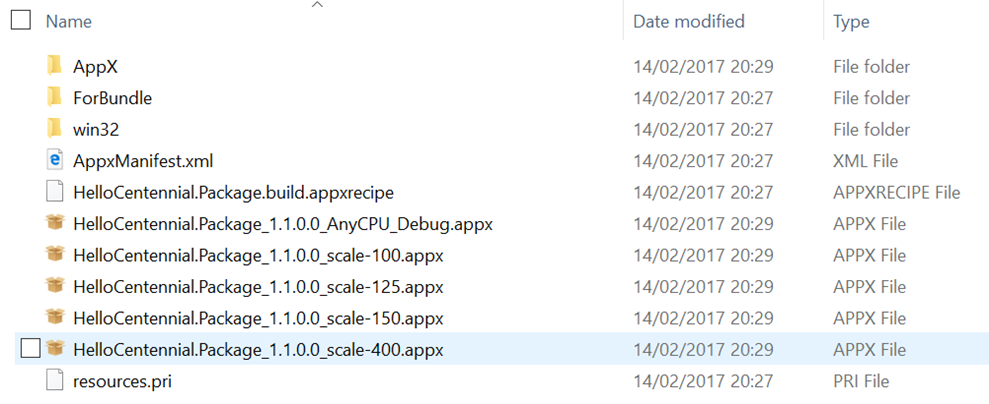
Now, when you build the project or you generate an app package from Visual Studio, the resources.pri file will be automatically generated for you, without using any command line tool. You can see the outcome of the build process by opening the folder where Visual Studio generate the content of the AppX package (typically, it’s bin\<architecture>\<configuration>\AppX, like bin\x64\Debug). Inside it, you will find a file called resources.pri, which in the past was generated only after manually using the makepri.exe tool. Additionally, you will find the base package (in the screenshot below, it’s the file with name HelloCentennial.Package_1.1.0.0_AnyCPU_Debug.appx) plus a separate AppX package for every main scale factor supported by Windows. The base package will be downloaded by every user, together with the specific package that matches the scale factor that Windows has assigned to his device.
Extending the application in an easier way
If you have read the posts about the Extend or the Migrate phases, you will remember that we needed to register any extension (like a background task or an App Service) by manually editing the manifest file and by adding the right XML entries. This operation, in 99% of the cases, requires the developer to look for an example to copy and paste, since hardly you will exactly remember all the values you need to add. The visual editor makes everything much easier. Let’s use, as example, the same we’ve see in the post about the Extend phase, in which we added a background task connected to the TimeZoneChange trigger. The core part of the implementation is the same: we still need to add a new Windows Runtime Component project in our solution, with a class that implements the IBackgroundTask interface, define the code we want to run in background and, in the end, in the desktop app, leverage the UWP APIs to use the BackgroundTaskBuilder class to register the task when the app starts. However, we also needed to open the AppxManifest.xml file with a text editor and to manually add, in the <Extensions> section, the following declaration:
 <Extensions>
  <Extension Category="windows.backgroundTasks" EntryPoint="TileBackgroundTask.TileTask">
    <BackgroundTasks>
      <Task Type="systemEvent" />
    </BackgroundTasks>
  </Extension>
</Extensions>
Additionally, we also needed to manually define a post build operation in the background task’s project, in order to include the build output (the .winmd file) inside the folder that gets converted into an app package.
Thanks to the WinJS project, both last operations are easier to achieve.
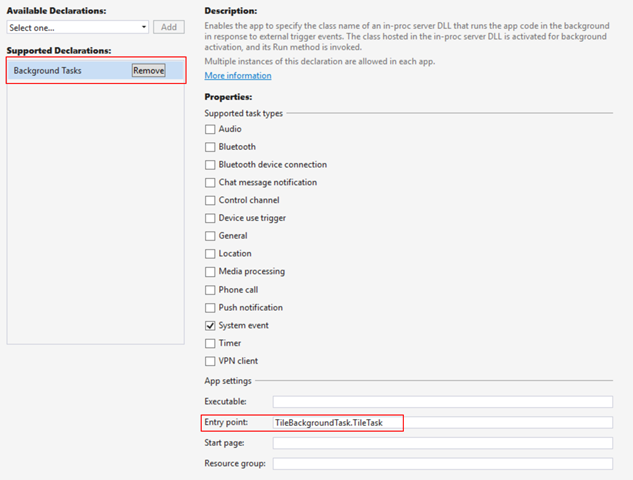
To setup the manifest file in the proper way, we can use the visual editor. Double click on the package.appxmanifest file, move to the Declarations section and, in the dropdown called Available declarations, choose Background Tasks. Now you can configure the background task with a visual interface. For example, for the scenario described in the post about the Extend phase, we just need to check the type of trigger we want to use (System event)and, in the Entry point field, specify the full signature (namespace and class name) of the class that implements the IBackgroundTask interface (TileBackgroundTask.TileTask).
To include the build output of the Windows Runtime Component in the app package, it’s enough to right click on the WinJS project, choose Add reference and, from the Project –> Solution section, select the project which implements the background task. That’s all. If you try to build again the WinJS project now and you open again the AppX folder (bin/<architecture>/<configuration>/AppX, like bin/x64/Debug/AppX) you will find a file called TileBackgroundTask.winmd.
Is everything glorious and great?
For sure, the approach of using the WInJS project makes our life much easier in many scenarios: assigning an identity to the application, adding new components in the manifest, setting the assets, etc. However, let’s not forget that the WinJS project isn’t born specifically for apps converted through the Desktop Bridge: it’s simply a great workaround for our scenario, since a WinJS project (being made by HTML, Javascript and CSS file) doesn’t require compilation like a XAML / C# one. As such, there are a few caveats to keep in mind. Let’s see the most important ones.
No support for debugging
You can either choose to right click on the WinJS project and choose Deploy or set it as startup project and then choose Debug –> Start without debugging from the Visual Studio menu, but you can’t use the WinJS project to perform debugging operations on the converted versions of the app. If you want to achieve this goal, you still need to include a Desktop Bridge Debugging Project inside your solution, like we did in the post about the manual conversion. However, there are a couple of differences. In the scenario described in the original post, we had a Desktop Bridge Debugging Project in our solution which contained the folder which was turned into an app package and a file called AppXPackageFileList.xml, which purpose was to keep the app folder up to date with the latest version of the desktop project. Since, in the new scenario described in the post, we already have an AppX folder generated by the WinJS project, after having added a new Desktop Bridge Debugging Project (right click on the solution, Add –> New project –> Other project types –> Desktop Bridge Debugging Project) we need to right click on it, choose Properties and, in the Package Layout field, set the path of the build output of the WinJS folder. In our example, this is how the configuration of the project looks like:
The second difference is that, this time, we don’t need any more to keep the two projects in sync, since the WinJS one already takes care of it for us, thanks to the post build command we have added in the beginning of the post in the original desktop project (the one that copies the build output in the win32 folder of the WinJS project). As such, it’s enough to define the AppXPackageFileList.xml in the following way:
 <?xml version="1.0" encoding="utf-8"?>
<Project ToolsVersion="14.0" xmlns="https://schemas.microsoft.com/developer/msbuild/2003">
  <PropertyGroup>
    <MyProjectOutputPath>$(PackageLayout)</MyProjectOutputPath>
  </PropertyGroup>
  <ItemGroup>
    <LayoutFile Include="$(MyProjectOutputPath)\win32\HelloCentennial.exe">
      <PackagePath>$(PackageLayout)\win32\HelloCentennial.exe</PackagePath>
    </LayoutFile>
  </ItemGroup>
</Project>
Now you will have to switch, as startup project, to the new one based on the Desktop Bridge Debugging Project and launch it. This way, you’ll be able to recreate the same debugging experience that was described in the manual conversion post: place breakpoints, add watchers, perform step by step debugging, etc.
No support for Desktop Bridge extensions
If you have read the documentation about the Desktop Bridge, you’ll know that there are some new extensions which are specific for converted apps: the capability to automatically start an application when the computer boots, the integration with File Explorer, etc. All these specific extensions are documented here: https://docs.microsoft.com/en-us/windows/uwp/porting/desktop-to-uwp-extensions
However, the Visual Studio manifest editor doesn’t support these special extensions, so you won’t find them in the Declarations sections of the editor: you will have to continue manually adding them, by right clicking on the package.appxmanifest, choosing View code and manually editing the XML file, by following the guidance reported in the documentation.
Wrapping up
In this post, we have learned a new way to handle a manually converted desktop app based on Microsoft technologies, like Windows Forms or WPF. Sure, there’s still space for improvements and the Desktop Bridge team is working hard to provide better tools and a better experience day by day: however, it’s still a big improvement compared to the approach described in the manual conversion post, since it will make much easier for us to sign the app with the certificate we prefer, to associate an identity so that we can publish it on the Store, to generate all the assets required to provide a better user experience, etc.
I hope you had the patience to read the post until the end: it has been quite a long journey, but I hope it has helped you to understand better how to improve your workflow when it comes to work with desktop applications converted using the Desktop Bridge. You’ll find a working sample of this new approach in the following folder of my repository: https://github.com/qmatteoq/DesktopBridge/tree/master/Extras/Packaging
Happy conversion! And don’t forget that, if you’re interested into bringing your desktop app on the Store, to nominate it using the following form: https://developer.microsoft.com/en-us/windows/projects/campaigns/desktop-bridge
Comments
- Anonymous
March 03, 2017
Thanks for the detailed tutorial, I've learned a lot about Desktop bridge from reading your blog posts.This works for me, except my desktop .exe requires elevated privilege, so debugging using either manual or this approach does not work for me even if VS was launched as admin. It complained that the .exe requires elevation. My current workaround for me was to manually install the appx, launch the installed app, and then attach its process with the debugger. I wonder if there is better solution? Thanks!- Anonymous
March 04, 2017
Hello Chao, unfortunately your scenario isn't supported by the Desktop Bridge. Converted apps are meant to always work in user mode, so they can't require elevation to admin mode. You can learn about all the requirements requested for a converted app in the official documentation https://docs.microsoft.com/en-us/windows/uwp/porting/desktop-to-uwp-prepare
- Anonymous
- Anonymous
March 10, 2017
Thanks Matteo, your series of articles have made it easier for me to understand the Desktop Bridge. I have a question that other developers might also ask;Can this approach also be used with WPF apps that use Process.Start() as described in your article here; https://blogs.msdn.microsoft.com/appconsult/2016/11/28/desktop-bridge-multiple-desktop-processes-a-single-uwp-container/i.e. By including an AppXPackageFileList.xml file in one of the projects?- Anonymous
March 10, 2017
Hello Norman,thanks very much, I'm really glad that my posts have been useful!Yes, absolutely, you can do that like I've described in the article you've linked. The only thing you have to remind, as highlighted in the post, is that you can't use the .NET APIs to get the current working directory (since it's redirected in a converted desktop app), but you need to find an alternative way to get the path of the installation folder (like using the Reflection APIs to get the location of the running executable, as demoed in the post you have linked).Best
- Anonymous
- Anonymous
March 13, 2017
Hello Matteo,Thanks for the article, this seems to work fine except for a strange problem in a packaged WPF App...After adding the JS UWP project and creating the App Package (not for the store, just for local) via "Store --> Create App Packages..." I am seeing TWO copies of the "MainWindow.xaml.cs" file when I do searches for specifc strings across the entire solution. Perhaps Visual Studio is creating two copies, one for the JS UWP project and one for the WPF project?If I change the MainWindow XAML then I can't find any way to make the change appear when I reset the Startup Project to be the JS UWP Project. Perhaps you have not seen this because you have been testing with WinForms?I am using Visual Studio 2017 Community Edition - Anonymous
March 13, 2017
Further to my last post. I just repeated the entire process you described in this article and the problem of the two copies of the “MainWindow.xaml.cs” file appearing seems to have gone away...However, Visual Studio 2017 still SOMETIMES fails to copy the WPF ".exe" to the JS UWP project automatically, i.e. The code can dissapear intermittently from the WPF ".csproj" file and has to be added again.This can happen if you switch the solution "Startup project" from JS UWP to WPF or vice-versa, so that the WPF ".exe" does not get copied automatically, and it has to be copied by hand and selected as "Include in project" manually.It seems clear to me that Visual Studio 2017 has some problems processing the two projects, which is not so surprising....I hope this helps other developers if this happens to them too. - Anonymous
June 28, 2017
So this is the EASIER way to do it? **** YOU microsoft.- Anonymous
June 28, 2017
Hello Manjia,I'm sorry for your negative feedback, but such a strong language isn't tolerated on a Microsoft blog and, as such, I've remove the rude sentence. If you have any feedback is more than welcome, but always with a constructive approach and respecting the people that are working hard to make the experience better day by day.Having said that, I agree that there's space for improvements and I can confirm that the Visual Studio team is already working on making the Visual Studio experience for the Desktop Bridge better.Kind regards
- Anonymous
- Anonymous
July 11, 2017
The comment has been removed
