How to customize the table styles in content editor webpart
Requirement:
- How to customize the table styles in content editor webpart
Attachment:
- The attachment contains Sample_Files zip which in turn contains 2 files for reference:
- sample.master file
- CustomHtmlEditorTableFormats.css
Steps to REPRO the OOB functionality:
- ADD Content Editor Webpart to your Webpart page
- Click on Rich text editor in the tool pane of the webpart
- Click on Insert table
- You will see the check box "Apply Table template"
(Note: In case its disabled. Please follow instructions as per : https://support.microsoft.com/kb/948320) - If its enabled, Click on the check box Apply Table template
- There are some predefined templates. Now, if we want to add our own table template, then how to do that? The resolution for the same is below
Resolution / WorkAround:
- Browse to the location: C:\Program Files\Common Files\Microsoft Shared\web server extensions\12\TEMPLATE\LAYOUTS\1033\STYLES
- Make a copy of HtmlEditorTableFormats.css (Note: DO NOT make any changes in the OOB files without using SharePoint Designer. Changing any OOB Files using Visual Studio/ text editor is not supported & recommended. )
- Rename the copy to (say) CustomHtmlEditorTableFormats.css
- Now, open the CustomHtmlEditorTableFormats.css in any text editor
- Add your styles for table to it. Few very point points to take care:
- It should be with the below prescribed format.
- The whole set of below .css classes describes one single table format.
- We cannot change the name of the .CSS classes except the highlighted number
- The highlighted number “10” in all the below classes can be any other number. Make sure it is numeric only
- Add the following bunch of .css classes in the custom css file (as created in POINT NO. 3) as per the instructions mentioned in the POINT NO. 5
.ms-rteTable-10 {
border-width: 0px;
border-style: none;
border-collapse: collapse;
font-family: Tahoma;
}
.ms-rteTable-10 tr.ms-rteTableHeaderRow-10 {
margin: 10px;
padding: 10px;
color: #3F4D6B;
background: #D6E8FF;
text-align: left;
font-size: 10pt;
font-style: normal;
font-family: Tahoma;
text-transform: capitalize;
font-weight: bold;
border-spacing: 10px;
line-height: 14pt;
vertical-align: top;
}
.ms-rteTable-10 td.ms-rteTableHeaderFirstCol-10 {
padding: 0in 5.4pt 0in 5.4pt;
color: #3a4663;
line-height: 14pt;
}
.ms-rteTable-10 td.ms-rteTableHeaderLastCol-10 {
padding: 0in 5.4pt 0in 5.4pt;
color: #3a4663;
line-height: 14pt;
}
.ms-rteTable-10 td.ms-rteTableHeaderOddCol-10 {
padding:0in 5.4pt 0in 5.4pt;
color: #3a4663;
line-height: 14pt;
}
.ms-rteTable-10 td.ms-rteTableHeaderEvenCol-10
{
padding:0in 5.4pt 0in 5.4pt; color: #3a4663;
line-height: 14pt;
}
.ms-rteTable-10 tr.ms-rteTableOddRow-10 {
color: #666666;
background-color: #F2F3F4;
font-size: 10pt;
vertical-align: top;
}
.ms-rteTable-10 tr.ms-rteTableEvenRow-10 {
color: #666666;
background-color: #E7EBF7;
font-size: 10pt;
vertical-align: top;
}
.ms-rteTable-10 td.ms-rteTableFirstCol-10 {
padding: 0in 5.4pt 0in 5.4pt;
}
.ms-rteTable-10 td.ms-rteTableLastCol-10 {padding:0in 5.4pt 0in 5.4pt;}
.ms-rteTable-10 td.ms-rteTableOddCol-10 {
padding: 0in 5.4pt 0in 5.4pt;
}
.ms-rteTable-10 td.ms-rteTableEvenCol-10 {
padding:0in 5.4pt 0in 5.4pt;
}
.ms-rteTable-10 tr.ms-rteTableFooterRow-10 {
background-color: #D6E8FF;
color: #4A5A80;
font-weight: 500;
font-size: 10pt;
font-family: Tahoma;
line-height: 11pt;
}
.ms-rteTable-10 td.ms-rteTableFooterFirstCol-10 {
padding: 0in 5.4pt 0in 5.4pt;
border-top: solid gray 1.0pt;
text-align: left;
}
.ms-rteTable-10 td.ms-rteTableFooterLastCol-10 {
padding:0in 5.4pt 0in 5.4pt;
border-top:solid gray 1.0pt;
text-align:left;
}
.ms-rteTable-10 td.ms-rteTableFooterOddCol-10 {
padding: 0in 5.4pt 0in 5.4pt;
text-align: left;
border-top: solid gray 1.0pt;
}
.ms-rteTable-10 td.ms-rteTableFooterEvenCol-10 {
padding: 0in 5.4pt 0in 5.4pt;
text-align: left;
border-top: solid gray 1.0pt;
} - Open the respective master page for the site, if default.master (open in SharePoint Designer) and if a custom master page (open either in SharePoint Designer or Visual Studio or any text editor) (Note: In case, the site is using default.master, then please make changes using SharePoint designer only. Changing default.master using Visual Studio is not supported & recommended. In case wanted to make changes using Visual Studio, then make copy of default.master and name it as (say) custom.master and now make changes
- If there is any URL specific for HtmlEditorTableFormats.css, remove the link from master page. And now, attach the URL for the stylesheet CustomHtmlEditorTableFormats.css to the respective master page.
- Upload the changed master page to the respective site and thereby publish & approve the changed one.
- Check the table formats now in the content editor webpart.
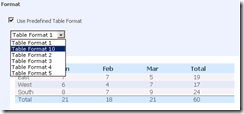
- The name of the custom table format will be: "Table Format [the number given]". In our case it will be "Table Format 10"
End Result:
How this WORKS in SharePoint:
- In order to know as how the table styles are loaded for the Content Editor WebPart; best is to use Fiddler tool (found at
- https://www.fiddlertool.com
- )
- After we have click the RichText Editor; we are with the writ up space with many formatting options
- Click on the "Insert Table". A new window opens up with table format.
- This window is designed using RTE2ETable.aspx (located at ..\12\TEMPLATE\LAYOUTS)
- Now, if we look at the javascript files which are been added to this page; we find 4 files of which we will drill down 2
- BForm.js (located at ..\12\TEMPLATE\LAYOUTS\1033)
- HtmlEditor.js (located at ..\12\TEMPLATE\LAYOUTS\1033)
- Assumption: We clicked on "Insert Table" option & the Page: RTE2ETable.aspx opens. Now, how the table templates are build. They are build using javascript. Flow is below:
- Calls Method: RTE2_InsertTable, when page loads(File: HtmlEditor.js)
Description:- This method calls the RTE2_GetReservedTableStyleRules method
- Method: RTE2_GetReservedTableStyleRules (File: HtmlEditor.js)
Description:- This method calls RTE_GetReservedStyleRules
- It passes the default css file for the table formats (i.e. HtmlEditorTableFormats.css) as the parameter
- Method: RTE_GetReservedStyleRules (File: BForm.js)
Description:- It gets the collection of all the stylesheets and there by calls the method: RTE_GetReservedStyleRulesFromStyleSheet for each of them in a loop
- Method: RTE_GetReservedStyleRulesFromStyleSheet (File: BForm.js)
Description:- This is the method which adds all the classes of the stylesheets into the array
- Check out the conditional check for the prefix to be numeric in this method
- Calls Method: RTE2_InsertTable, when page loads(File: HtmlEditor.js)
