Monitoring for GPO Modifications in SCOM: A Custom Composite Module Approach
Recently one of my customers came to me for help implementing monitoring of GPO Modifications using System Center 2012 R2 Operations Manager (SCOM). My customer pointed me to a great blog article written by Nathan Olmstead entitled: Monitoring for GPO Modifications with SCOM. Nathan Olmstead’s article updated a previously existing article for SCOM 2007 from Jan Varšavský entitled SCOM: Monitoring GPO Changes using SCOM and PowerShell. Both articles follow essentially the following logic:
1. Create a SCOM rule (Rule #1) to listen for Event ID 5136, 5137 or 5141 in the Security Event Log of domain controllers, and raise an alert.
2. Create a command-line channel which listens for alerts from Rule #1, and kicks of a PowerShell script to dig up more information on the GPO changed.
3. The PowerShell script closes the existing alert from Rule #1, and writes a new event log entry (custom Event ID 11101) in the Operations Manager Event Log.
4. Create a new SCOM rule (Rule #2) to listen for the new event 11101 and generate a new SCOM alert with the new GPO change information.
The approach is clever, and I would like to praise both writers for a great take on how to implement this very useful bit of monitoring. However, I feel that the use of a command-line channel to tie together two separate SCOM rules seemed less than efficient. Why not do everything with one workflow, and generate the needed alert directly? Of course, to listen for an event log entry, then execute a PowerShell script using data from the event, and then raise an alert accordingly requires the use of a custom composite module. This means management pack development, and getting our hands dirty with XML.
Fortunately there are some great resources available which provided me guidance in solving this problem. The Operations Manager Management Pack Authoring Guide created by Brian Wren is a great starting point, especially is article: Creating a Monitor Based on a Custom Module. In addition, Kevin Holman (THE Kevin Holman) recently published an equally useful article: How to monitor for event logs and use a script to modify the output – a composite data source. Kevin’s article uses VB Script, and the SCOM 2007 Authoring Console, both of which I wanted to avoid using, opting instead for PowerShell and Visual Studio 2015 with the Visual Studio Authoring Extensions (VSAE) for SCOM.
I like Brian Wren’s approach of giving step by step instructions and as I myself am learning more about developing management packs with the VSAE I thought I would put together step by step instructions for developing a management pack which creates a custom composite module to listen for GPO changes in the event log, running a PowerShell script with data from the event log, and then raising an alert in SCOM.
DISCLAIMER: The below example uses a PowerShell script which calls the Get-GPO command. Get-GPO is only available on Windows Server 2008 R2 and above, and is not available on domain controllers running Windows Server 2008 or Windows Server 2003.
Without further ado:
Create a project and add a reference
1. Open Visual Studio 2015 on a workstation where you have install the System Center Operations Manager Visual Studio Authoring Extensions.
2. Click on the File menu item and select New-> Project.
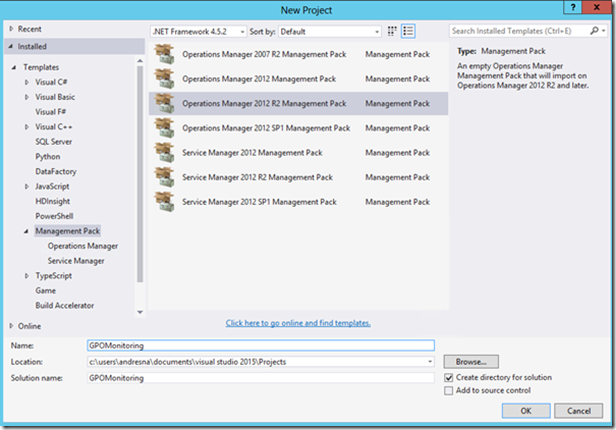
3. In the New Project dialog box, select Management Pack from the Templates pane on the left.
4. In the middle pane select “Operations Manager 2012 R2 Management Pack” as the project type.
5. Enter the project name in the Name text box. I named mine GPOMonitoring, then click OK.
The new Solution will consist of a single project also named GPOMonitoring. We need to add a reference to the Active Directory Library Management pack as our workflows will be targeted at Domain Controllers:
6. In the Solution Explorer window, right-click on the References folder item and select Add Reference...
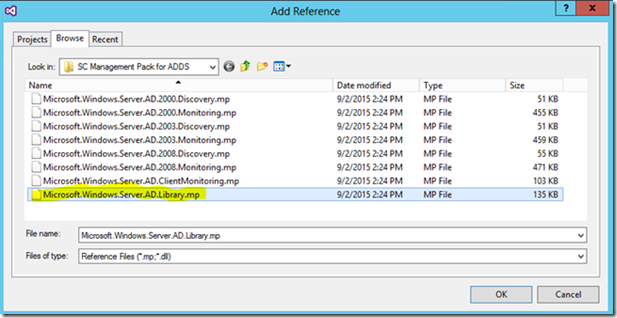
7. In the Add Reference dialog box, select the Browse tab, and navigate to a directory where you have downloaded and extracted the Active Directory Management Pack for SCOM. Select the management pack called Microsoft.Windows.Server.AD.Library.mp:
8. Click OK.
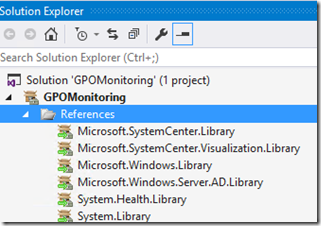
Your project will now have the following references:
Add the PowerShell script
With the project created and the references sorted out, it is now time to start creating the artifacts we need, starting with the PowerShell script:
1. In the Solution Explorer window, right-click the project name (NOT the solution) and select Add->New Item.
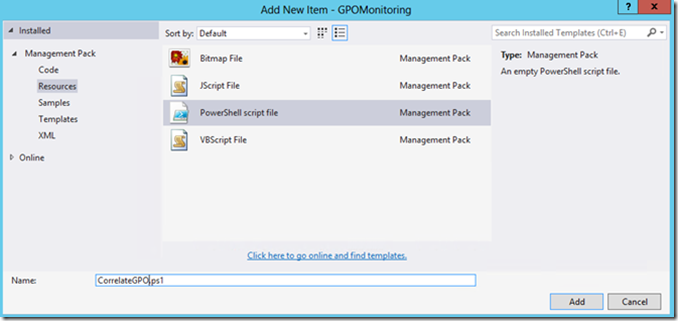
2. In the Add New Item dialog box, make sure the Management Pack node is expanded on the left pane and select Resources.
3. In the middle pane select PowerShell script file.
4. In the Name text control at the bottom type the name of your PowerShell script. I named mine CorrelateGPO.ps1.
5. Click Add to add a blank PowerShell script file to our project.
6. Add the following PowerShell code to the new empty PowerShell script file:
  1 param($gpoGUIDRaw,$gpoDomainRaw,$gpoUserRaw)
 2
 3 function debug($msg)
 4 {
 5   #Function to write debug information to disk.  Modify path below per your needs.
 6   [string]::Format("{0} {1}",[datetime]::Now,$msg) | Out-File -FilePath C:\temp\CorrelateGPO.txt -Append
 7 }
 8 $error.Clear()
 9 #debug("Starting Execution of CorrelateGPO.ps1 " + $error[0])
10 #debug("Initial Variables - gpoGUIDRaw: " + $gpoGUIDRaw + ", gpoDomainRaw: " + $gpoDomainRaw + ", gpoUserRaw: " + $gpoUserRaw + " . Error: " + $error[0])
11 $api = new-object -comObject 'MOM.ScriptAPI'
12 $api.LogScriptEvent("CorrelateGPO.ps1", 1701, 2, "PowerShell Script to correlate GPO changes ran.")
13 $bag = $api.CreatePropertyBag()
14
15 #The following lines parse the input values to extract the data we need:
16 $gpoGUID = $gpoGUIDRaw.Split('{}')[1]
17 $gpoDomain = $gpoDomainRaw.Split('"')[1]
18 $gpoUser = $gpoUserRaw.Split('"')[1]
19
20 $gpoName = Get-GPO -Guid $gpoGUID -Domain $gpoDomain
21
22 $Text = "A Group Policy Has been Modified`n User: $($gpoUser)`n GPO Domain: $($gpoDomain) `n GPO Name: $($gpoName.DisplayName) `n GPO GUID: $($gpoGUID) `n Event Description: $($AlertDescription)"
23
24 $bag.AddValue('gpoGUID', $gpoGUID)
25 $bag.AddValue('gpoDomain', $gpoDomain)
26 $bag.AddValue('gpoUser', $gpoUser)
27 $bag.AddValue('text', $Text)
28 $bag.AddValue('status', "OK")
29
30 $bag
31
32
33
The script takes 3 parameters: the GUID of the GPO which was changed, the name of the domain and the name of the user who made the GPO change.
The debug function is useful when trying to debug the script to figure out what it is doing or whether it is doing it correctly. Once the script is working, invocations of the debug method can be commented out or removed.
The script parses out the three input variables to remove unnecessary characters or string information. It then uses the Get-FPO PowerShell command to obtain information about the GPO which was modified.
Finally, we build the output in the form of a property bag and return it to the calling workflow. A property bag is simple a data structure, a collection of Name and Value pairs, which we can use in discoveries, rules, and monitors to return data to Operations Manager.
Learning Notes – Part 1
While I am not what you would call a management pack development expert, nor a PowerShell expert, I have learned a few lessons I would like to share with the community about both. The Learning Notes section will highlight any additional lessons I have learned the hard way and which I would like others to learn from.
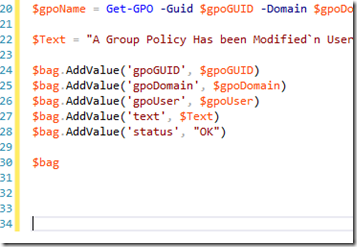
I. the last line of the script returns the property bag which was instantiated and populated during the rest of the script. Make sure you add a few new lines AFTER the property bag return statement in the final line ($bag). Without the extra newlines the script continues to execute and doesn’t realize it needs to return execution flow to the calling workflow. This applies to scripts in discoveries, rules, monitors, you name it. Notice in the screenshot of my Visual Studio window below how I have lines 31-34 empty. They are there, just a carriage return:
II. ALWAYS test your script by itself, from a PowerShell command line. It is far easier to debug the script when running it outside of the control of SCOM than when it is executed by SCOM.
With the script ready to go, we need to execute the script, which means we need to define the workflow that will execute it.
Add a Probe Action Module Type
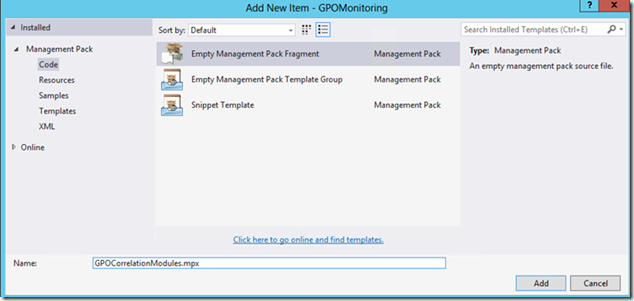
We will first add a Management Pack Fragment to our project which will let us write the XML necessary for our custom workflows:
1. In the Solution Explorer, right-click on the Project GPOMonitoring (NOT the solution) and select Add->New Item.
2. In the Add New Item dialog box, in the left pane select Code.
3. In the middle pane select Empty Management Pack Fragment.
4. Enter the name of the fragment in the Name text box at the bottom. I named mine GPOCorrelationModules.mpx:
This will add a new code document to our GPOMonitoring management pack, which will be empty except for the opening and closing <ManagementPackFragment> XML tags. All the management pack XML we will write will go inside these tags, and will determine the behavior and look of our workflows.
We will begin by adding a Probe Action Module Type to our management pack, which executes the PowerShell Script. In the space between the opening and closing <ManagementPackFragment> tags, paste the following code:
  1   <TypeDefinitions>
 2     <ModuleTypes>
 3
 4       <ProbeActionModuleType
 5         ID="GPOMonitoring.ProbeActionModule.GPOCorrelationScript"
 6         Accessibility="Public"
 7         Batching="false"
 8         PassThrough="false">
 9         <!--The module, when called, will receive 3 string parameters:-->
10         <Configuration>
11           <xsd:element minOccurs="1" name="gpoGUID" type="xsd:string" />
12           <xsd:element minOccurs="1" name="gpoDomain" type="xsd:string" />
13           <xsd:element minOccurs="1" name="gpoUser" type="xsd:string" />
14         </Configuration>
15         <ModuleImplementation Isolation="Any">
16           <Composite>
17             <MemberModules>
18               <!--The module will execute a PowerShell Script which returns a Property Bag data structure-->
19               <ProbeAction ID="Script"
20                            TypeID="Windows!Microsoft.Windows.PowerShellPropertyBagProbe">
21                 <ScriptName>CorrelateGPO.ps1</ScriptName>
22                 <ScriptBody>$IncludeFileContent/CorrelateGPO.ps1$</ScriptBody>
23                 <!--This block passes the necessary values for GPO GUID, Domain and User to the script as parameters-->
24                 <Parameters>
25                   <Parameter>
26                     <Name>gpoGUID</Name>
27                     <Value>$Config/gpoGUID$</Value>
28                   </Parameter>
29                   <Parameter>
30                     <Name>gpoDomain</Name>
31                     <Value>$Config/gpoDomain$</Value>
32                   </Parameter>
33                   <Parameter>
34                     <Name>gpoUser</Name>
35                     <Value>$Config/gpoUser$</Value>
36                   </Parameter>
37                 </Parameters>
38                <TimeoutSeconds>300</TimeoutSeconds>
39               </ProbeAction>
40             </MemberModules>
41             <!--The below block dictates this custom type only executes one module with identifier "Script" aka the PowerShellPropertyBagProbe above-->
42             <Composition>
43               <Node ID="Script"/>
44             </Composition>
45           </Composite>
46         </ModuleImplementation>
47         <!--The module outputs a property bag data type, and receives Base data as input-->
48         <OutputType>System!System.PropertyBagData</OutputType>
49         <InputType>System!System.BaseData</InputType>
50       </ProbeActionModuleType>
51     </ModuleTypes>
52   </TypeDefinitions>
I have added comments in the most important sections of the module to explain its behavior.
Learning Notes – Part 2
III. In the above XML the parameters passed to the script are passed using the syntax: $Config/gpoGUID$ or $Config/gpoDomain$ or $Config/gpoUser$ . The “Config” portion of the syntax is XPATH syntax referring to the Configuration XML block near the top of the module definition. The Config, Data, Target and MPElement variables are well documented in the TechNet article appropriately titled: Variables.
IV. Learn from my mistake. After I wrote this management pack, it would not work as expected. For some reason, when I attempted to call my script, the script would run but it would not receive my input values from the $Config/gpoGUID$ or $Config/gpoDomain$ or $Config/gpoUser$ elements. If I manually passed the data without using the $Config variable, it worked, but not with the $Config element. Major Kudos go to Kevin Holman who pointed out that I was using the variable with a lower case “c” as in $config. Apparently a capital letter makes all the difference in the world. So, when using these variables make sure you use $Config, $Data, $Target, etc; with a capital letter in front.
Add a New Data Source Module Type
With the Probe Action Module Type which runs our PowerShell script defined, we now need to integrate it with the event log workflow which listens for the events indicating a GPO modification has been made. For this purpose we must build a new Data Source composed of an event log module, and the PowerShell module we just defined.
1. In between the opening <ModuleTypes> tag, and the <ProbeActionModuleType> tag, add the following XML definition. Once again I have commented the XML itself to explain its behavior:
  1       <DataSourceModuleType ID="GPOMonitoring.Event.DS"
 2                             Accessibility="Public"
 3                             Batching="false">
 4         <Configuration> </Configuration>
 5         <ModuleImplementation Isolation="Any">
 6           <!--This is a composite workflow consisting of two modules, first an EventProvider module, which triggers our ProbeAction PS module-->
 7           <Composite>
 8             <MemberModules>
 9               <!--The event log module will listen in the Security Event log for for Event ID 5136, 5137, and 5141 with groupPolicyContainer in the event description-->
10               <DataSource ID="Event" TypeID="Windows!Microsoft.Windows.EventProvider">
11                 <ComputerName/>
12                 <LogName>Security</LogName>
13                 <Expression>
14                   <And>
15                     <Expression>
16                       <SimpleExpression>
17                         <ValueExpression>
18                           <XPathQuery Type="String">Params/Param[11]</XPathQuery>
19                         </ValueExpression>
20                         <Operator>Equal</Operator>
21                         <ValueExpression>
22                           <Value Type="String">groupPolicyContainer</Value>
23                         </ValueExpression>
24                       </SimpleExpression>
25                     </Expression>
26                     <Expression>
27                       <Or>
28                         <Expression>
29                           <SimpleExpression>
30                             <ValueExpression>
31                               <XPathQuery Type="UnsignedInteger">EventDisplayNumber</XPathQuery>
32                             </ValueExpression>
33                             <Operator>Equal</Operator>
34                             <ValueExpression>
35                               <Value Type="UnsignedInteger">5136</Value>
36                             </ValueExpression>
37                           </SimpleExpression>
38                         </Expression>
39                         <Expression>
40                           <SimpleExpression>
41                             <ValueExpression>
42                               <XPathQuery Type="UnsignedInteger">EventDisplayNumber</XPathQuery>
43                             </ValueExpression>
44                             <Operator>Equal</Operator>
45                             <ValueExpression>
46                               <Value Type="UnsignedInteger">5137</Value>
47                             </ValueExpression>
48                           </SimpleExpression>
49                         </Expression>
50                         <Expression>
51                           <SimpleExpression>
52                             <ValueExpression>
53                               <XPathQuery Type="UnsignedInteger">EventDisplayNumber</XPathQuery>
54                             </ValueExpression>
55                             <Operator>NotEqual</Operator>
56                             <ValueExpression>
57                               <Value Type="UnsignedInteger">5141</Value>
58                             </ValueExpression>
59                           </SimpleExpression>
60                         </Expression>
61                       </Or>
62                     </Expression>
63                   </And>
64                 </Expression>
65               </DataSource>
66               <!--The Data Source will call the second module, our custom PowerShell probe-->
67               <ProbeAction ID="Probe" TypeID="GPOMonitoring.ProbeActionModule.GPOCorrelationScript">
68                 <!--SCRIPTPARAMETERS - pass parameters to the script module-->
69                 <gpoGUID>"$Data/Params/Param[10]$"</gpoGUID>
70                 <gpoDomain>"$Data/Params/Param[7]$"</gpoDomain>
71                 <gpoUser>"$Data/Params/Param[4]$"</gpoUser>
72               </ProbeAction>
73             </MemberModules>
74             <!--The composition block dictates the order of module execution in the Data Source.-->
75             <!--First we listen for the event log event, and if found we trigger the PowerShell probe-->
76             <Composition>
77               <Node ID="Probe">
78                 <Node ID="Event"/>
79               </Node>
80             </Composition>
81           </Composite>
82         </ModuleImplementation>
83         <!--We will return the output of the PowerShell Probe as a Property Bag data structure of Name-Value pairs-->
84         <OutputType>System!System.PropertyBagData</OutputType>
85       </DataSourceModuleType>
Learning Notes – Part 3
V. Note that the Probe Action module above is of the custom Probe Action Module type we defined earlier. Further, note that the Probe Action Module passes 3 parameters to the PowerShell script. I could not find any samples out there which described how to pass multiple parameters like this, so I wondered whether it was possible. Brian Wren’s samples only pass one parameter, the Machine Name. When I ran into difficulties passing data to my script I questioned whether multiple inputs were possible. Well, they are!
VI. In the Probe Action we pass 3 pieces of information to the script. The 3 pieces of information (gpoGUID, gpoDomain and gpoUser) are obtained from the data string of the event which was just processed by the Event module, and which triggered the execution of the Probe Action module. Note the syntax of the values: $Data/Params/Param[10]$ . $Data refers to information in the workflow’s data stream, as described in the previously mentioned TechNet article entitled Variables. The construct is useful enough to warrant mentioning again. Params/Param[10] refers to the tenth parameter in the event description, in this case containing information about the GUID of the GPO modified.
With the Data Source workflow defined, we can now call it from a SCOM Rule or from a Monitor. I choose to use a Rule here. Why? Well, when a GPO is modified my customer wanted to know about it, but did not need to affect the health of any object. An Alert Generating Rule is good enough for our purposes.
Add an Alert Generating Rule
1. After the closing </TypeDefinitions> tag, and before the closing </ManagementPackFragment> tag, insert the following XML code for an alert generating rule:
  1   <Monitoring>
 2     <Rules>
 3       <!--Define a new rule, which will use our custom Data Source.  The new rule is targetted at Domain Controllers-->
 4       <Rule ID="GPOMonitoring.EventAndScript.Rule"
 5             Enabled="true"
 6             Target="MWSAL!Microsoft.Windows.Server.AD.DomainControllerRole"
 7             ConfirmDelivery="true"
 8             Remotable="true"
 9             Priority="Normal"
10             DiscardLevel="100">
11         <Category>Custom</Category>
12         <DataSources>
13           <DataSource ID="DS" TypeID="GPOMonitoring.Event.DS">
14           </DataSource>
15         </DataSources>
16         <WriteActions>
17           <!--When the desired event is found and the script executes, raise an alert, with the following parameters-->
18           <WriteAction ID="Alert" TypeID="Health!System.Health.GenerateAlert">
19             <Priority>1</Priority>
20             <Severity>2</Severity>
21             <AlertMessageId>$MPElement[Name="GPOMonitoring.EventAndScript.Rule.GPOChange.AlertMessage"]$</AlertMessageId>
22             <AlertParameters>
23               <AlertParameter1>$Data/Property[@Name='gpoGUID']$</AlertParameter1>
24               <AlertParameter2>$Data/Property[@Name='gpoDomain']$</AlertParameter2>
25               <AlertParameter3>$Data/Property[@Name='gpoUser']$</AlertParameter3>
26               <AlertParameter4>$Data/Property[@Name='text']$</AlertParameter4>
27               <AlertParameter5>$Data/Property[@Name='status']$</AlertParameter5>
28             </AlertParameters>
29           </WriteAction>
30         </WriteActions>
31       </Rule>
32     </Rules>
33   </Monitoring>
Once again I have commented the XML to explain its behavior. The one aspect worth expanding on is the use of the <AlertMessageID> tag, which refers to a segment of XML code we have not yet added: the Language Packs section.
Define the Presentation and Language Packs sections
1. Add the following XML block AFTER the closing </Monitoring> tag which defined the rule in the last section, and before the closing </ManagementPackFragment> tag:
  1   <Presentation>
 2     <StringResources>
 3       <StringResource ID="GPOMonitoring.EventAndScript.Rule.GPOChange.AlertMessage"/>
 4     </StringResources>
 5   </Presentation>
 6   <LanguagePacks>
 7     <LanguagePack ID="ENU" IsDefault="true">
 8       <DisplayStrings>
 9
10         <DisplayString ElementID="GPOMonitoring.EventAndScript.Rule.GPOChange.AlertMessage">
11           <Name>GPO Change Occurred</Name>
12           <Description>GPO Change Information-
13           GPO GUID: {0}
14           GPO Domain: {1}
15           User: {2}
16           Details: {3}
17
18           </Description>
19         </DisplayString>
20         <DisplayString ElementID="GPOMonitoring.Event.DS">
21           <Name>GPO Change Event then run correlation script DS</Name>
22           <Description/>
23         </DisplayString>
24         <DisplayString ElementID="GPOMonitoring.EventAndScript.Rule">
25           <Name>GPO Change Event then run correlation script Rule</Name>
26           <Description/>
27         </DisplayString>
28       </DisplayStrings>
29     </LanguagePack>
30   </LanguagePacks>
This block of XML provides user friendly, readable strings for the alert rule’s alert details section, as well as a name for the rule itself. These strings are displayed in the Operations Manager Administration console when the alert is raised.
Build and Deploy
The management pack is ready for use:
1. From the Build menu at the top select Build Solution, or click Ctrl+Shift+B.
2. Resolve any build errors and rebuild the solution until you get output like this:
You may encounter some Warnings or Messages in the Error List window of Visual Studio, but as long as they are not errors you should be fine. In my case I get the 67 messages as in the following screenshot, but my management pack works flawlessly:
The management pack itself will be generated as a .mpb file or a management pack bundle file. You can find the file in your project’s directory in the “bin” folder, as either a debug or release build:
You can import the management pack bundle file directly in to SCOM using either the Operations Manager administration console, PowerShell, or you can use Visual Studio itself to deploy the management pack (I will write another blog post on doing this soon).
Testing
In order for GPO Monitoring to occur, you need to configure Audit Policies. This process is described in various TechNet articles, but I found the AD DS Auditing Step-by-Step Guide particularly helpful. Once Directory Service changes have been configured:
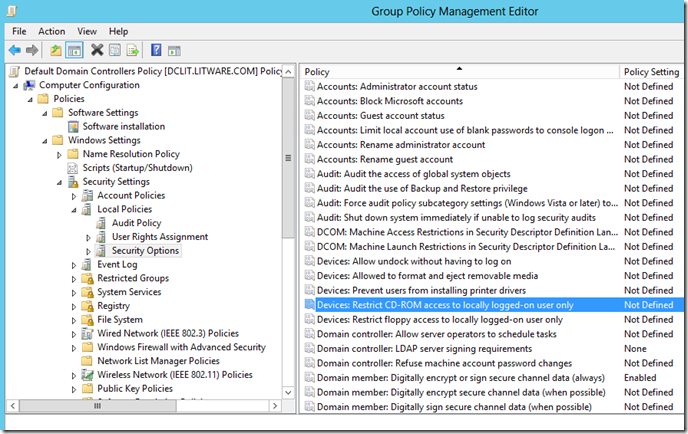
1. Make a change to a GPO Setting. In my testing I changed the “Devices: Restrict CD-ROM access to locally logged-on user only” policy under the Default Domain Controllers Policy:
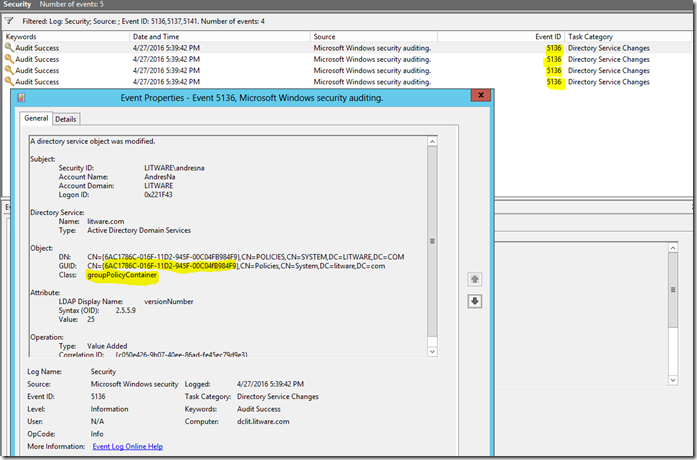
2. Make a change to the policy by defining it as either Enabled or Disabled. This will generate 4 new events with Event ID 5136 in the Domain Controller’s Security event log:
The event description includes the name of the domain, the name of the user making the change, and the GUID of the GPO which was modified.
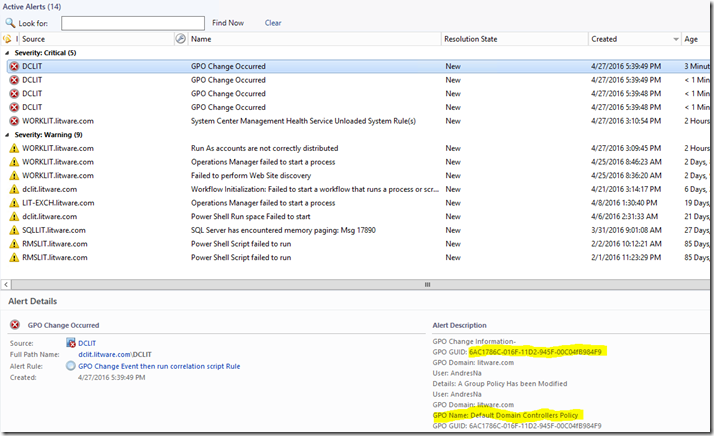
3. Check the Active Alerts view in the Operations Manager Admin Console under the Monitoring workspace. In this particular instance, because we had 4 new events with ID 5136, we get 4 alerts in the Active Alerts view:
As evidenced in the above screenshot, we receive alerts in SCOM about a change to a GPO. The PowerShell script allowed us to translate the GUID in the event into an actual name of a GPO so that we can better track what was changed.
Conclusion
Although there are other samples out there illustrating how to monitor GPO changes, they used a command-line channel calling a PowerShell script to tie together two alert generating rules. We can bypass the notifications engine, and instead use only one rule by using a custom composite Data Source module which ties the event log reader with our PowerShell script probe. This approach could be taken to solve a great many problems when we need to take data from an event log, and use it to acquire more information using a script. In addition, Visual Studio 2015 and the Visual Studio Authoring Extensions for Operations Manager 2012 can be versatile and powerful tools in our arsenal to implement monitoring solutions.
Acknowledgements
This post would not have been possible without the initial ideas from Jan Varšavský and Nathan Olmstead. Kevin Holman and Brian Wren’s articles also heavily influenced my approach here, and Kevin actually helped me spot a problem with the management pack which had me stumped. Finally I would like to acknowledge the help and input from Tyson Paul, always a fountain of great ideas. I extend my thanks to all of them. If you find this post useful it is due to their brilliance. Conversely, if you have any problems with it, they are entirely of my own making.
