Creating Custom endpoint detection policy and script for IAG
I happened to create a sample endpoint detection policy and script which I am posting for your reference. You can use this in your deployment.
------------------------------------------------------------
- Create a custom registry key.
- I had created RIL_Corp in HKLM\Software\RIL_Corp with value Corporate and data 1.
· Create a vbscript that would perform the detection. The sample is as shown in the figure below.
- Copy this vbs script in the following folder –
<Whale_installation_folder>\e-Gap\von\InternalSite\CustomUpdate
- Copy Detect.inc file from C:\Whale-Com\e-Gap\von\InternalSite\samples folder in to C:\Whale-Com\e-Gap\von\InternalSite\inc\CustomUpdate folder.
- Open the Detect.inc and make the following changes –
- Update the name of registry checking vbs script in the line –
g_scriptList("/InternalSite/CustomUpdate/registrycheck.vbs") = false
-
- Save the file as “<TrunkName><https:1/http:0>Detect.inc”. My Trunk was called Portal1 hence I saved the file as “portal11detect.inc”.
- Ensure that the “<TrunkName><https:1/http:0>Detect.inc” file is saved in the correct path.
- Create PolicyDefinition.xml and Policytemplate.xml as shown below –
- These files needs to be saved in C:\Whale-Com\e-Gap\von\conf\CustomUpdate folder.
- Upon completing this activity, you can Activate the configuration by clicking on
 in the IAG Configuration.
 - After the activation is complete, Close and then reopen the IAG Configuration console.
- In the console tree, click the trunk to which you want to apply the new endpoint detection setting, and then click Configure next to Advanced Trunk Configuration.
- On the Session tab, click Manage Policies, and then click Add.
- In the Policy Editor window, provide appropriate details like Name, Explanatory text etc.
- Select Manage Windows Policies => Add Policy.
- Manage Windows Policies and Expression window appears.
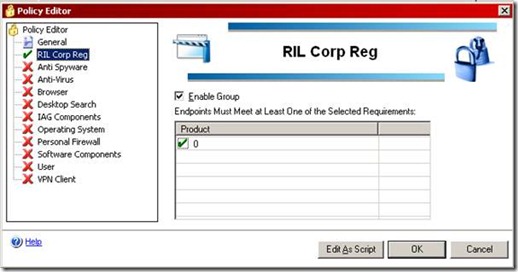
- You would notice your Policy definition, select the Group and enable it. Also select the value you had set.
- Save the policy and assign it as Session Access or Privileged Endpoint Policy or Endpoint Policy for Application Access. :)
- Note- Don’t forget to activate the configuration again :)
Checks:
- Connect from Client system where the registry is updated with new Key.
- Open Webmonitor in IAG console => Active Sessions è Session details.
You would see the policy that you created (Shown in the above figure), or the name of registry key as shown below.
This implies that you reg check is working.


