Building a Java-based Restful Service to run in DC/OS
Building a Restful Service using Jersey in Eclipse (Mars 4.2)
This is a kickoff blog post for AllThingsContainer. This blog post is all about container-based workloads in the cloud. We will explore many different components that make up the world of containerization.
So let's get started.
This is a first step in a journey that will take us to running web applications in a DC/OS cluster. DC/OS is an open source project, which has elements of Mesos, primarily written by Mesosphere.
We start at the beginning - the very beginning, starting with building a RESTful Java application that can be run in a cluster.
The cluster is hosted in Microsoft Azure using the Azure Container Service. The code that we write will run on any DC/OS cluster. The virtual machines that are provisioned by the after container service do not contain any proprietary software. It is all 100% open source.
By the end of this post we will have a WAR file. This war file represents a Java application that supports Restful queries.
We will build the restful application first, and then produce a war file. This war file will then be used in another blog post which will demonstrate how to containerize this restful application and scale across a cluster.
Two types of clusters will be supported using the Azure container service. The first cluster will be a Mesosphere cluster, later followed up by a Docker Swarm cluster.
What is amazing about the technologies that we will be talking about is that we can create this restful service, and in a matter of minutes have that restful service running at scale across the cluster.
The ability to easily leverage a cluster that supports scaling, failure recovery and a significant degree of automation is one of the most significant breakthroughs in the IT landscape over the past couple years.
Historically, this type of capability was available only to a select few experts. Thankfully for us, this technology has been democratized. I hope to prove how simple it is to build out a Web oriented application and easily scaling across a cluster of virtually any size.
That's the power of the Azure container service and of a DC/OS cluster.
This solution is built on 100% open source technologies.
Be sure to see part 2 of this post here, where we apskctually run this service in an Azure hosted cluster.
https://github.com/brunoterkaly/run-dcos-on-azure
This post will demonstrate
This post assumes nothing about what you have already set up on the development computer. I will be using Windows 10 as my operating system, but the same steps will work across any environment where the Eclipse IDE is supported.
- Step 1 - A demonstration of the final application that we will build
- Step 2 - The tools and technologies that I have installed to make this possible
- Step 3 - Step-by-step instructions and the instructions on how to build out this project
- Step 4 - The creation of a WAR file that represents the completed application to be containerized
Step 1 of 4 - demonstration of the final application that we will build
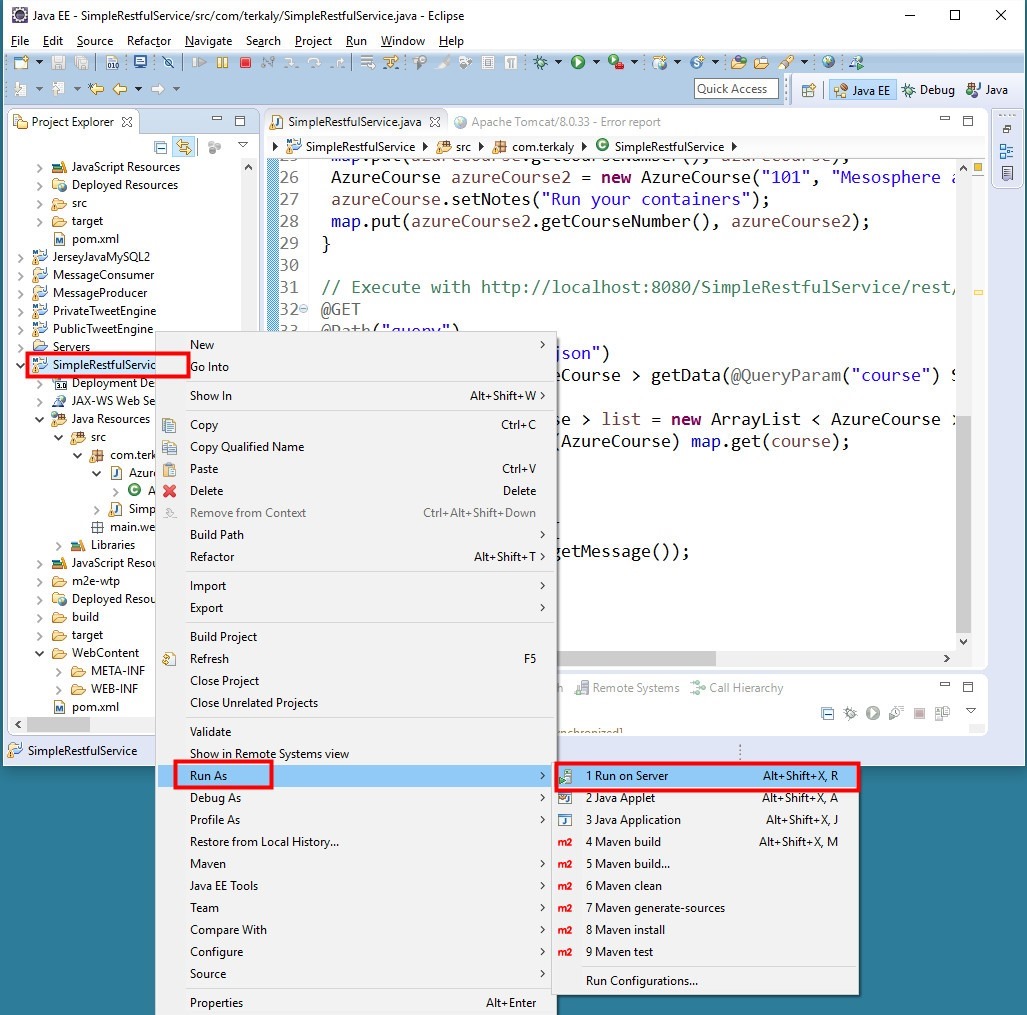
Let's begin by showing you with a completed application that we will build this post. We will be using Eclipse and you can see that in the image below.
The project is called SimpleRestfulService. You are seeing the completed version. We will run the project by right-mouse clicking in Project Explorer and choosing "Run on Server."
Be sure to see part 2 of this post here, where we actually run this service in an Azure hosted cluster.
https://github.com/brunoterkaly/run-dcos-on-azure
Figure 1: Running the Eclipse Project
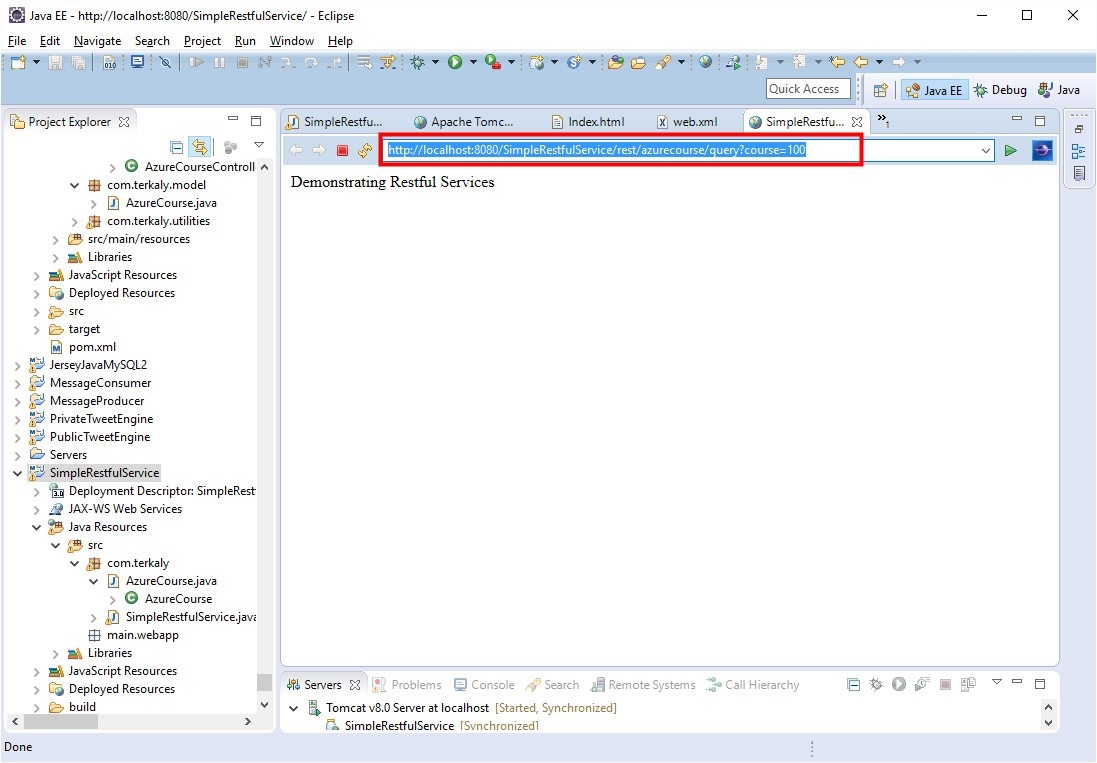
To call into the restful service, we will type https://localhost:8080/rest/azurecourse/query/?course=100. What we are doing is passing a query parameter of 100 as the course variable. This is the way we pass data into a restful service.
Figure 2: Typing the URL to call the Restful Service
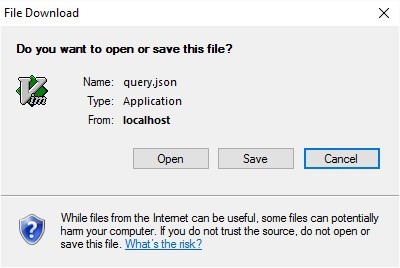
After the call executes, the browser returns the JSON data that relates to course=100. The data is in a text file so a text editor will appear. In my case, my default editor is VIM. Yours could be notepad or something else.
Figure 3: A text editor appears to open up the JSON data that results from the restful call
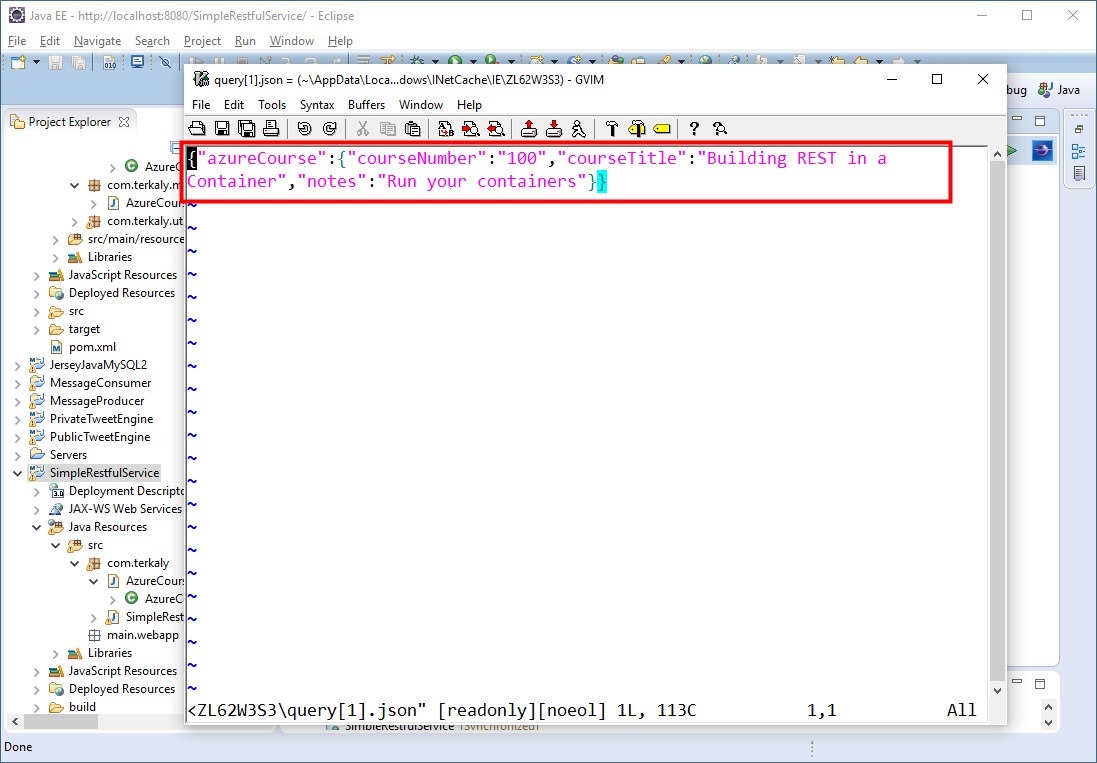
When the text editor opens up, you will see the JSON data that is returned by the restful service. You can see the courseTitle is Building REST in a Container.
Figure 4: The actual JSON data that is returned in VIM (the editor)
Step 2 of 4 - The tools and technologies that I have installed to make this possible
There are 3 technologies that I have installed to develop the Java Application.
- Eclipse Mars (4.52)
- Purpose: Java IDE to develop solution
- Download: https://www.eclipse.org/downloads/packages/release/Mars/M1
- Apache Maven
- Purpose: Maven is a build automation tool used primarily for Java projects
- Download: https://maven.apache.org/download.cgi
- Apache Tomcat
- Purpose: The Apache Tomcat ® software is an open source implementation of the Java Servlet, JavaServer Pages, Java Expression Language and Java WebSocket technologies
- Download: I am running version 8 at https://tomcat.apache.org/download-80.cgi ## Step 3 of 4 - Step-by-step instructions and the instructions on how to build out this project
Step 3A - File New Project
This step is simply creating a new Eclipse project.
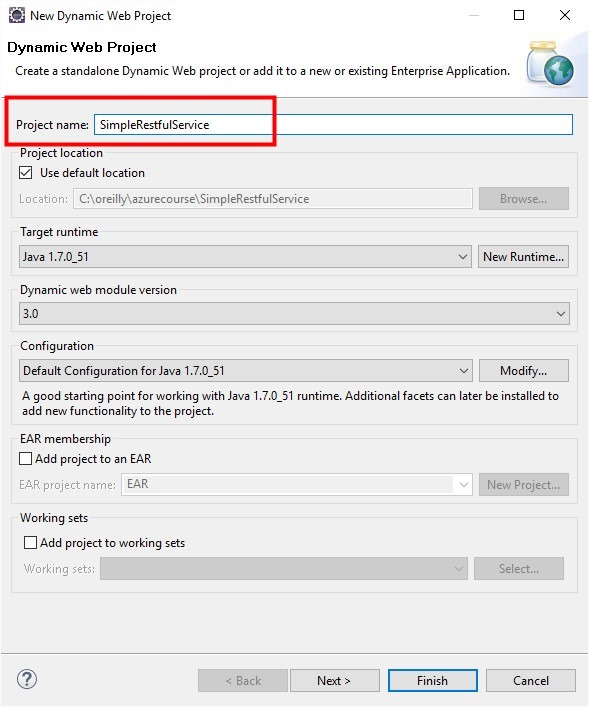
Start by choosing "File/New/Dynamic Web Project." Provide the name you wish to use. I used SimpleRestfulService.
Figure 5: Creating a new Dynamic Web Project
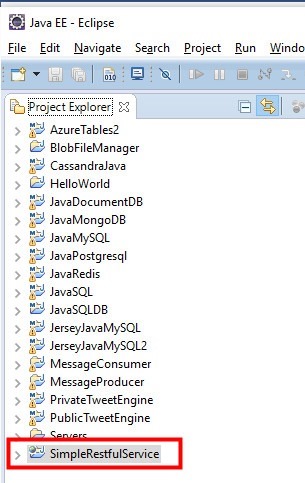
You should see SimpleRestfulService in the Project Explorer.
Figure 6: Eclipse Project Explorer
Step 3B - Convert to Maven project
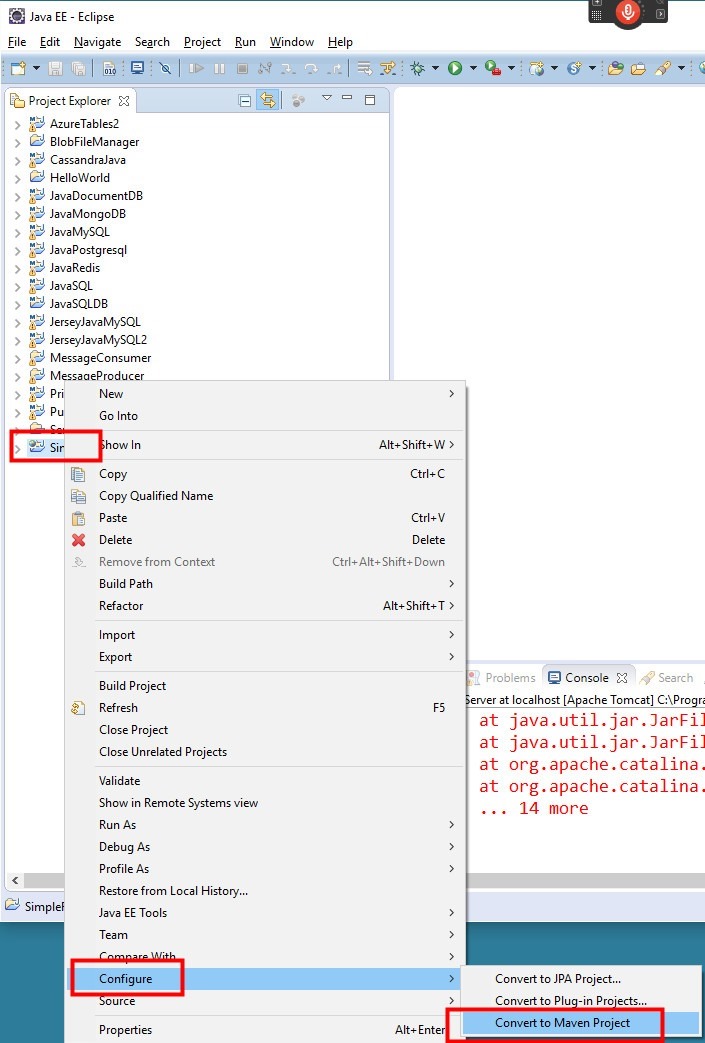
You now need to convert the project to a Maven project. Do this by right-mouse clicking on the project name and choosing "Configure/Convert to Maven Project."
Figure 7: Converting to a Maven project
Step 3C - Edit pom.xml
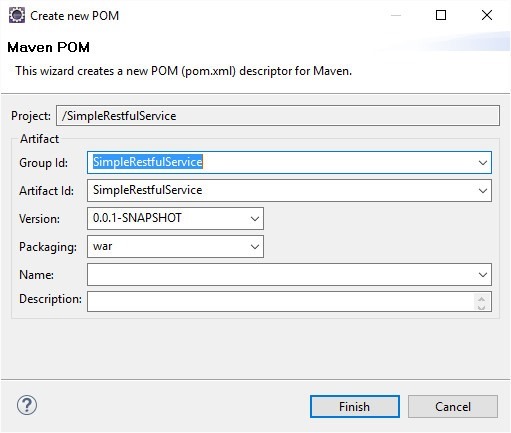
Once you convert, a dialog box will show up indicating that a pom.xml file will be created.
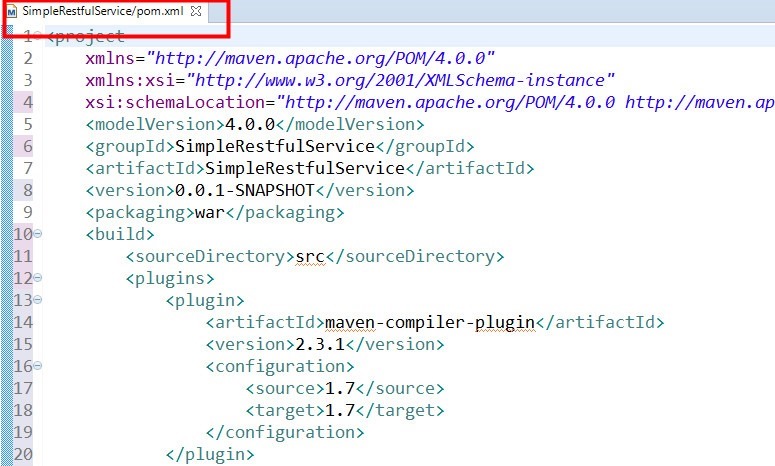
POM stands for "Project Object Model". It is an XML representation of a Maven project held in a file named pom.xml. We will use this file to link to external libraries. Paste the following code into your pom.xml file. You will replace all the existing code inside of pom.xml
For the most part, because we wish to use the Jersey Libraries, we will use the pom.xml to include them into our Eclipse/Maven Project.
What is Jersey?
In order to simplify development of RESTful Web services and their clients in Java, a standard and portable JAX-RS API has been designed. Jersey RESTful Web Services framework is open source, production quality, framework for developing RESTful Web Services in Java that provides support for JAX-RS APIs and serves as a JAX-RS (JSR 311 & JSR 339) Reference Implementation.
Figure 8: Converting to a Maven Project
Just click Finish below. You need not modify anything here.
Figure 9: Wizard used to create pom.xml
Figure 10: The generated pom.xml file
This is the code that is generated that you will replace. Replace the contents of pom.xml with the code below.
 <project
    xmlns="https://maven.apache.org/POM/4.0.0"
    xmlns:xsi="https://www.w3.org/2001/XMLSchema-instance"
    xsi:schemaLocation="https://maven.apache.org/POM/4.0.0 https://maven.apache.org/xsd/maven-4.0.0.xsd">
    <modelVersion>4.0.0</modelVersion>
    <groupId>SimpleRestfulService</groupId>
    <artifactId>SimpleRestfulService</artifactId>
    <version>0.0.1-SNAPSHOT</version>
    <packaging>war</packaging>
    <build>
        <sourceDirectory>src</sourceDirectory>
        <plugins>
            <plugin>
                <artifactId>maven-compiler-plugin</artifactId>
                <version>2.3.1</version>
                <configuration>
                    <source>1.7</source>
                    <target>1.7</target>
                </configuration>
            </plugin>
            <plugin>
              <groupId>org.apache.maven.plugins</groupId>
              <artifactId>maven-war-plugin</artifactId>
              <configuration>
                    <webXml>${project.basedir}/WebContent/WEB-INF/web.xml</webXml>
              </configuration>
            </plugin>
        </plugins>
    </build>
    <dependencies>
        <dependency>
            <groupId>asm</groupId>
            <artifactId>asm</artifactId>
            <version>3.3.1</version>
        </dependency>
        <dependency>
            <groupId>com.sun.jersey</groupId>
            <artifactId>jersey-bundle</artifactId>
            <version>1.19</version>
        </dependency>
        <dependency>
            <groupId>org.json</groupId>
            <artifactId>json</artifactId>
            <version>20140107</version>
        </dependency>
        <dependency>
            <groupId>com.sun.jersey</groupId>
            <artifactId>jersey-server</artifactId>
            <version>1.19</version>
        </dependency>
        <dependency>
            <groupId>com.sun.jersey</groupId>
            <artifactId>jersey-core</artifactId>
            <version>1.19</version>
        </dependency>
        <dependency>
            <groupId>javax.servlet</groupId>
            <artifactId>javax.servlet-api</artifactId>
            <version>3.1.0</version>
        </dependency>
        <dependency>
            <groupId>org.glassfish.jersey.bundles.repackaged</groupId>
            <artifactId>jersey-guava</artifactId>
            <version>2.6</version>
        </dependency>
        <dependency>
            <groupId>org.glassfish</groupId>
            <artifactId>javax.json</artifactId>
            <version>1.0.4</version>
        </dependency>

    </dependencies>
</project>
Code: pom.xml
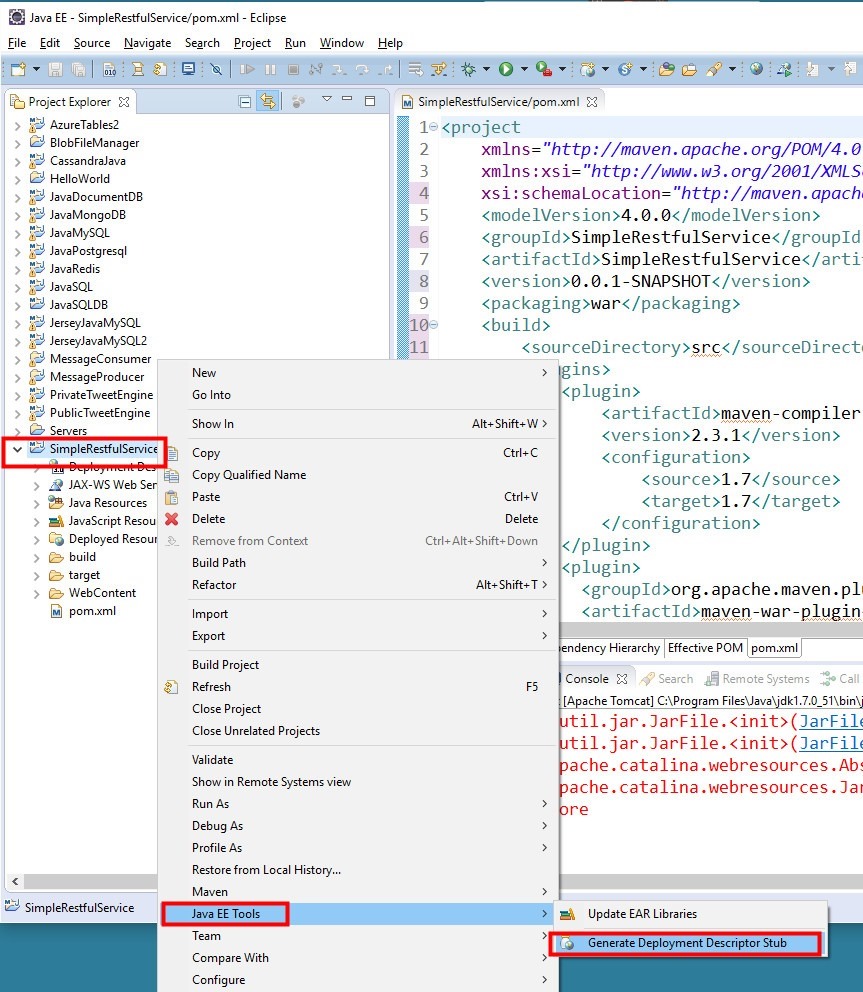
Step 3D - Generate Deployment Descriptor Stub
A deployment descriptor (web.xml) tells the application container how the web app should be configured. This is where you register your servlets and filters, add context parameters, and more.
Figure 11: Generating the Deployment Descriptor file
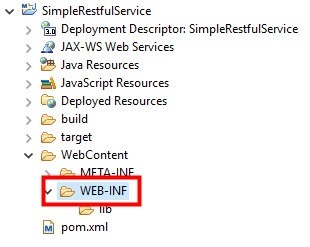
You will need to add a file called web.xml to the following folder. Be sure to right-mouse click on WB-INF
Figure 12: Targeting the WEB-INF folder
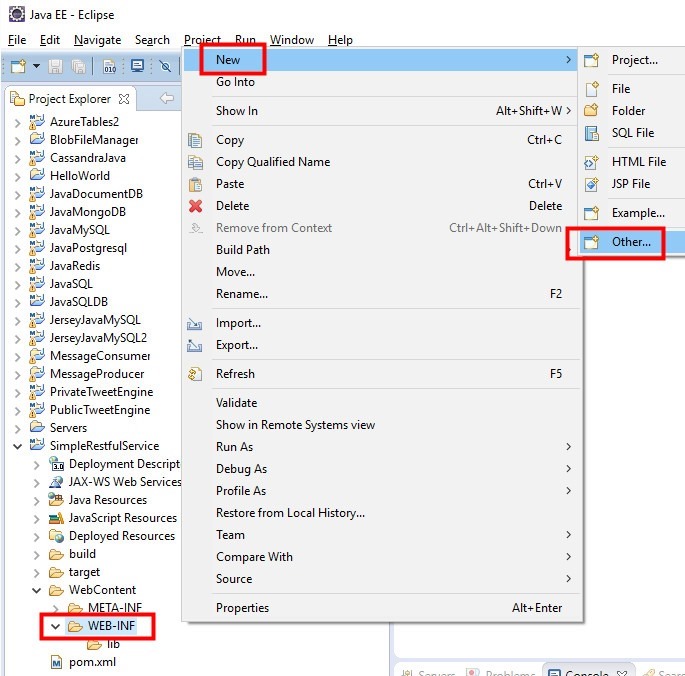
Select "New/Other.."
Figure 13: Adding web.xml to WEB-INF folder
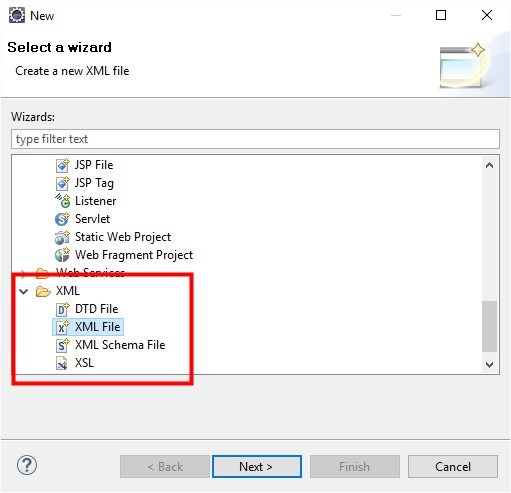
Select "XML File."
Figure 14: Specifying an XML file
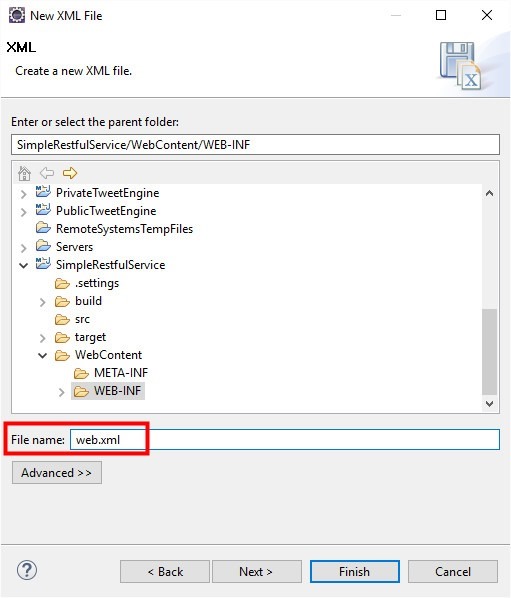
Name the file web.xml.
Figure 15: Naming the file web.xml
Paste the following code into web.xml. Notice that the startup web page is Index.html. Let's add this next to our project.
 <?xml version="1.0" encoding="UTF-8"?>
<web-app xmlns:xsi="https://www.w3.org/2001/XMLSchema-instance"
    xmlns="https://java.sun.com/xml/ns/javaee" xmlns:web="https://java.sun.com/xml/ns/javaee/web-app_2_5.xsd"
    xsi:schemaLocation="https://java.sun.com/xml/ns/javaee https://java.sun.com/xml/ns/javaee/web-app_3_0.xsd"
    version="3.0">
    <display-name>SimpleRestfulService</display-name>
    <welcome-file-list>
        <welcome-file>Index.html</welcome-file>
    </welcome-file-list>

    <servlet>
        <servlet-name>SimpleRestfulService</servlet-name>
        <servlet-class>com.sun.jersey.spi.container.servlet.ServletContainer</servlet-class>
        <load-on-startup>1</load-on-startup>
    </servlet>
    <servlet-mapping>
        <servlet-name>SimpleRestfulService</servlet-name>
        <url-pattern>/rest/*</url-pattern>
    </servlet-mapping>
</web-app>
Code: web.xml
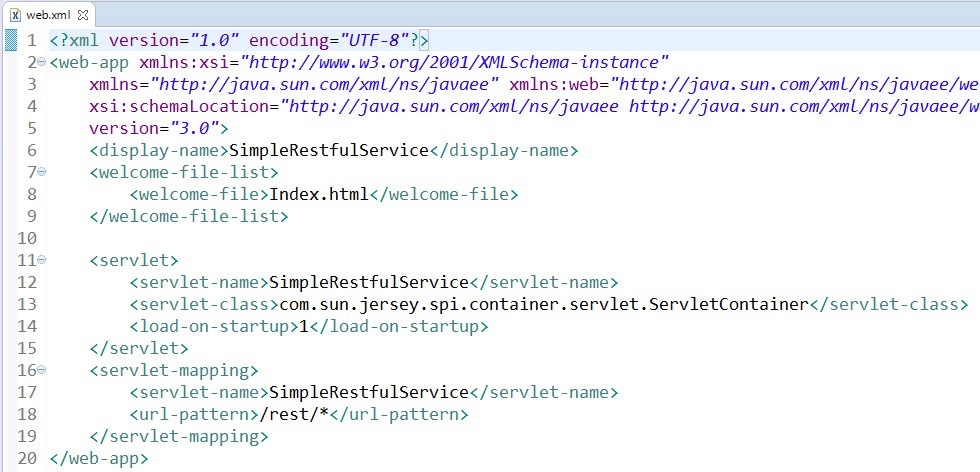
Figure 16: The final web.xml file
Step 3E - Adding Index.html to the project
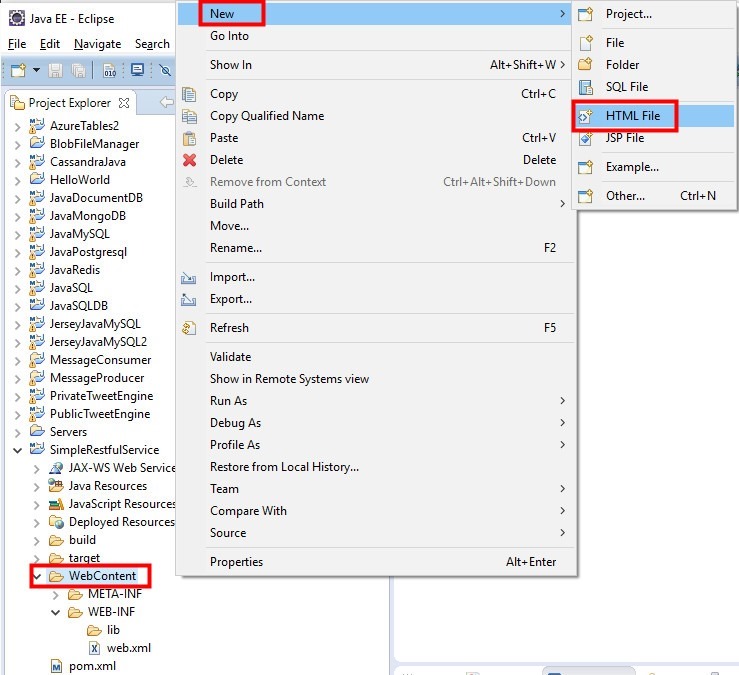
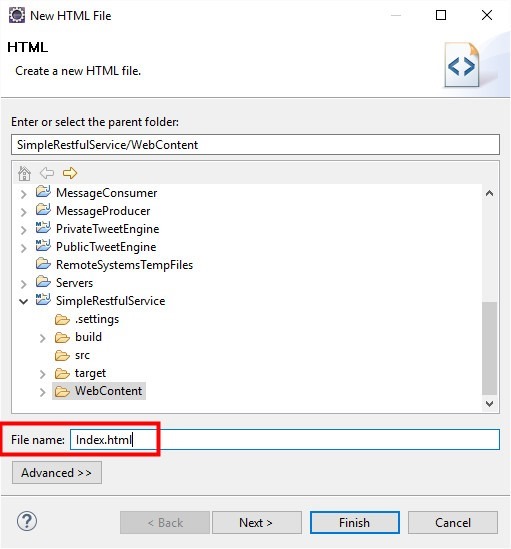
Even though this is a simple restful service, we will indicate a simple startup page. Right-mouse click on WebContent and choose "New/HTML File."
Figure 17: Adding an HTML File (Index.html)
Figure 18: Naming the html file (Index.html)
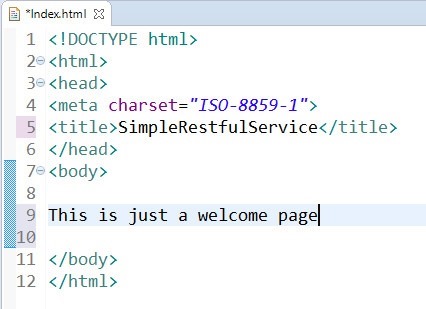
Figure 19: Editing Index.html
Step 3F - Adding the core Java Code for the Restful Service
It is time to now add the main code for our restful service. The two files are;
- AzureCourse.java
- A simple object that represents the data model
- SimpleRestfulService.java
- The main entry point for our restful service. Will return a AzureCourse object formatted as JSON data, as shown in the intro demo.
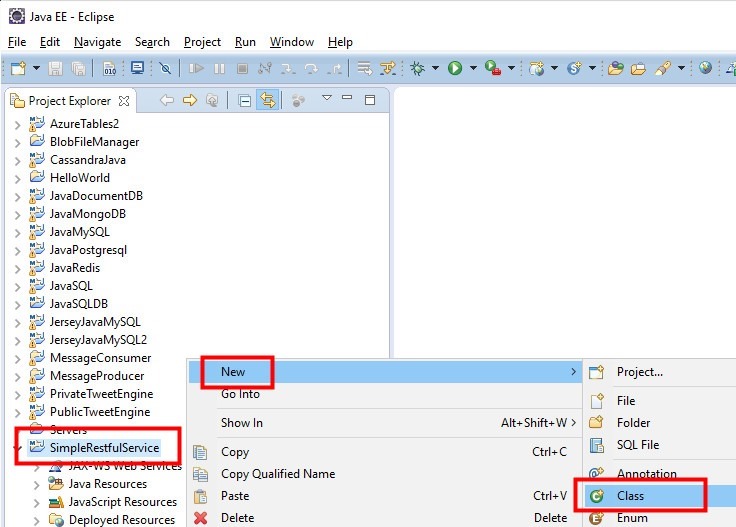
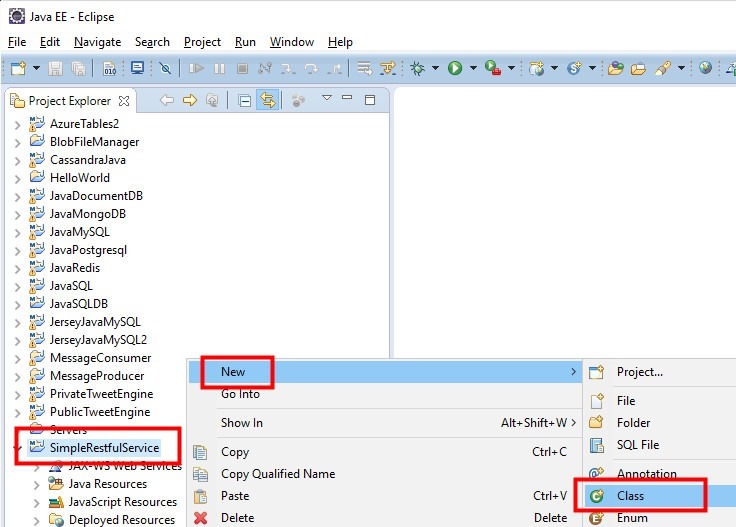
Right-mouse click on the project name and choose "New/Class."
Figure 20: Adding AzureCourse.java
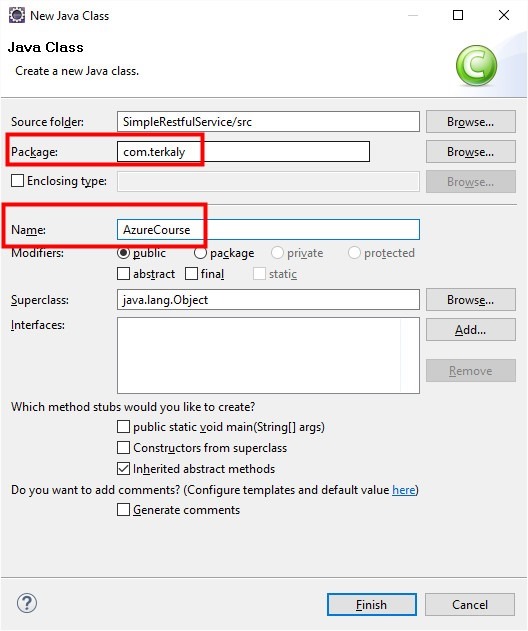
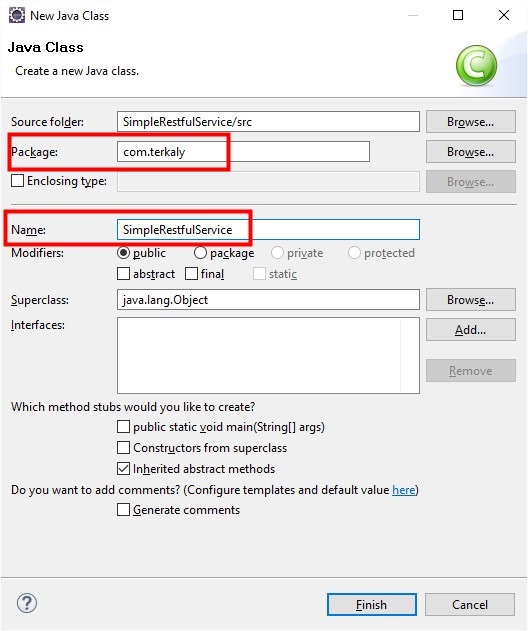
Enter the details for the new source code file.
- Provide a package name
- com.terkaly
- Specify a source code file name
- AzureCourse.java
Figure 21: Name the source code module AzureCourse.java
Paste in the following code.
 package com.terkaly;

import javax.xml.bind.annotation.XmlRootElement;

@XmlRootElement
public class AzureCourse {

    public AzureCourse() { }

    public AzureCourse(String courseNumber, String courseTitle) {
        this.CourseNumber = courseNumber;
        this.CourseTitle = courseTitle;
    }

    // Make sure it is private
    private String CourseNumber;
    private String CourseTitle;
    private String Notes;

    // Jersey tooling uses getter methods
    public String getCourseNumber() {
        return CourseNumber;
    }

    public void setCourseNumber(String courseNumber) {
        CourseNumber = courseNumber;
    }

    public String getCourseTitle() {
        return CourseTitle;
    }

    public void setCourseTitle(String courseTitle) {
        CourseTitle = courseTitle;
    }

    public String getNotes() {
        return this.Notes;
    }

    public void setNotes(String notes) {
        this.Notes = notes;
    }
    @Override
    public String toString() {
        return "AzureCourse [courseNumber=" + CourseNumber + ", courseTitle=" + CourseTitle + "]";
    }

}
Code: AzureCourse.java
Repeat process for SimpleRestfulService.java
Right-mouse click on the project name and choose "New/Class."
Figure 22: Adding AzureCourse.java
As before, provide package name and file name.
Figure 23: Name the source code module SimpleRestfulService.java
Paste in the following code.
 package com.terkaly;


import java.util.ArrayList;
import java.util.HashMap;
import java.util.Map;

import javax.ws.rs.GET;
import javax.ws.rs.Path;
import javax.ws.rs.Produces;
import javax.ws.rs.QueryParam;
import javax.ws.rs.core.Response;


import org.json.JSONException;

@Path("azurecourse")
public class SimpleRestfulService {

 private Map < String, AzureCourse > map = new HashMap < String, AzureCourse > ();

 public SimpleRestfulService() {
  AzureCourse azureCourse = new AzureCourse("100", "Building REST in a Container");
  azureCourse.setNotes("REST in Mesosphere");
  map.put(azureCourse.getCourseNumber(), azureCourse);
  AzureCourse azureCourse2 = new AzureCourse("101", "Mesosphere and Orchestration");
  azureCourse.setNotes("Run your containers");
  map.put(azureCourse2.getCourseNumber(), azureCourse2);
 }

 // Execute with https://localhost:8080/SimpleRestfulService/rest/azurecourse/query?code=100
 @GET
 @Path("query")
 @Produces("application/json")
 public ArrayList < AzureCourse > getData(@QueryParam("course") String course) throws JSONException {
  try {
   ArrayList < AzureCourse > list = new ArrayList < AzureCourse > ();
   AzureCourse result = (AzureCourse) map.get(course);
   list.add(result);
   return list;

  } catch (Throwable t) {
   System.out.println(t.getMessage());
  }
  return null;
 }
}
Code: SimpleRestfulService.java
Step 3G - We are ready to compile
We are code complete at this point. The project is ready to run. Save and close all files.
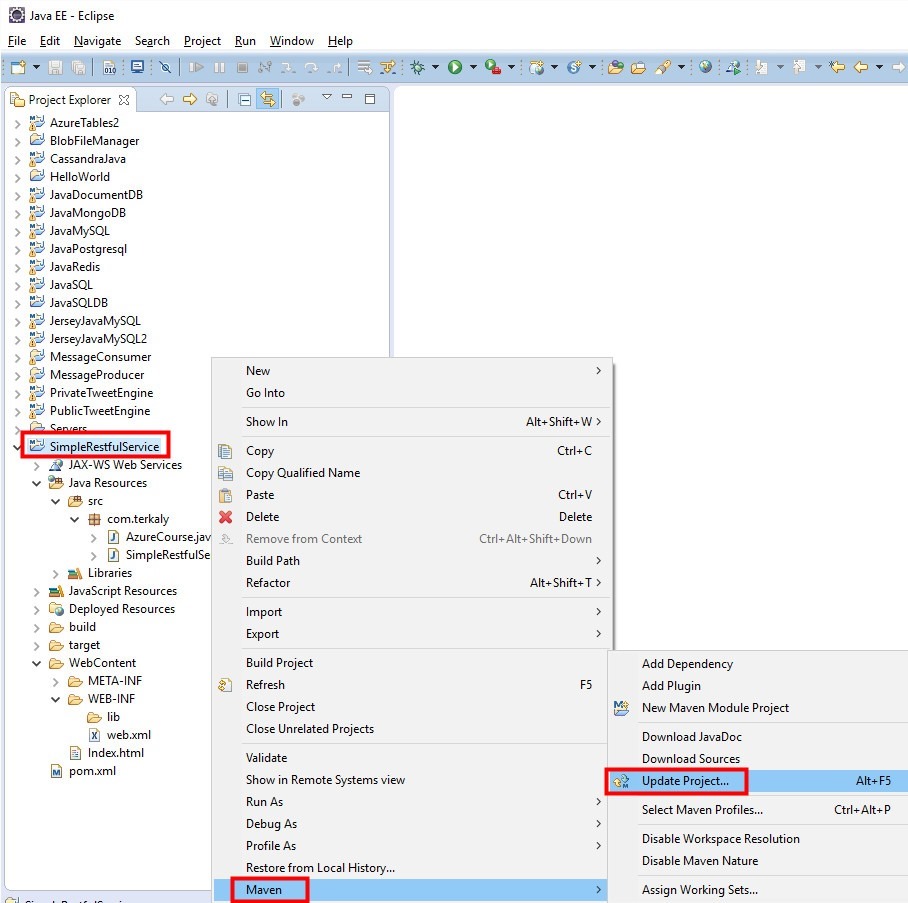
We need Maven to bring in the dependencies (Jersey, etc) from the pom.xml file. Right-mouse click and choose "Maven/Update Project." You will need to repeat this command again later. Stay tuned for that guidance.
Figure 24: Maven/Update Project
Checking the Build Path
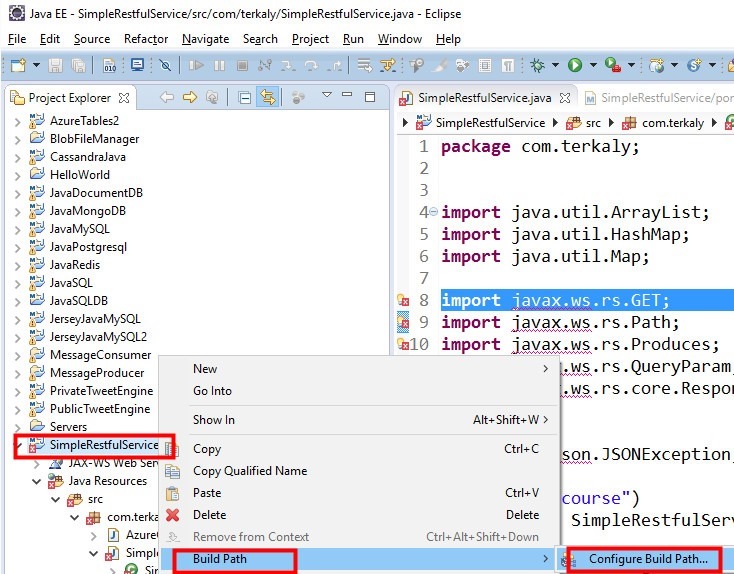
My install had a problem understanding the import statement in my .java file to remedy this problems.
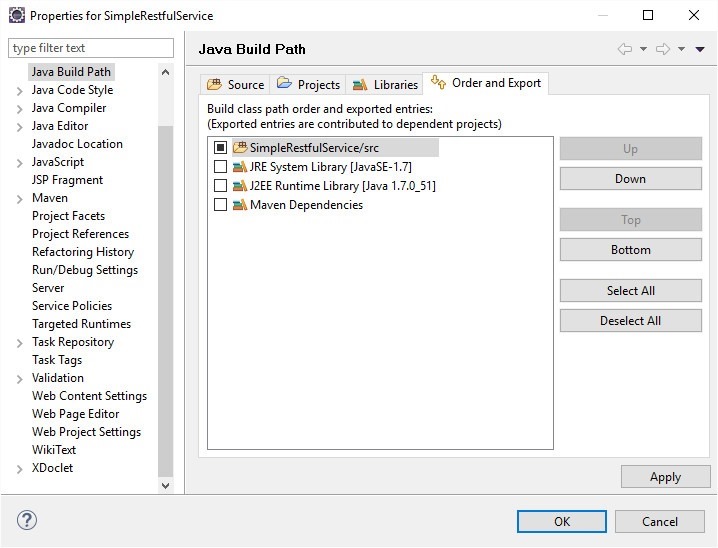
Figure 25: Verifying the Build Path
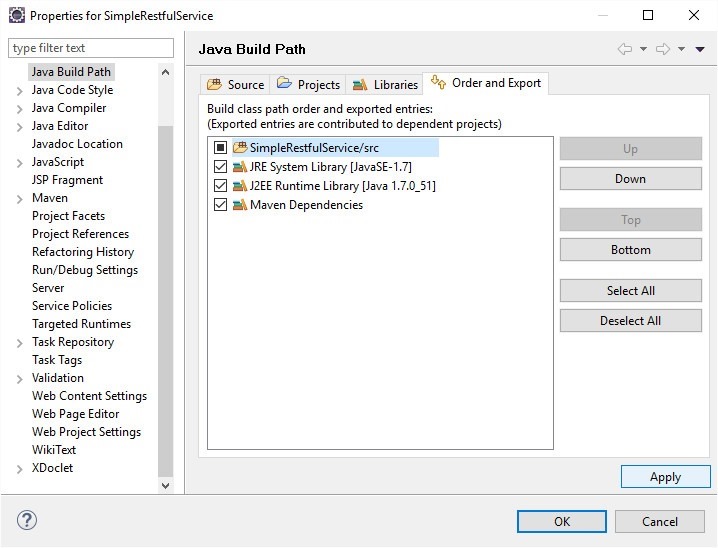
I went to the “Order and Export” and made all the possible selections. Not all of them were excepted, but this appeared to solve some of the issues oddly enough, I had to re-paste the content for pom.xml. This might’ve been an error that I had done, but re-pasting it seemed to work, along with the changes made to the build path.
Figure 26: Specify The "Order And Export"
Although they did not all stick, I did make the following selections.
Figure 27: Selecting All Available Entries
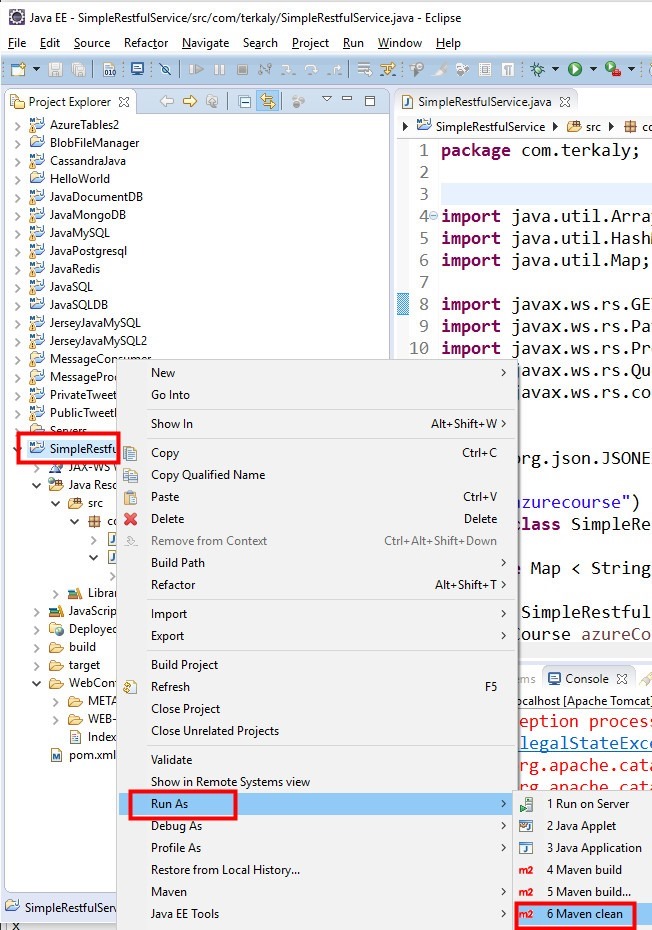
Run As/Maven Clean, Run As/Maven Install
Eclipse can be a little fickle so I end up running for commands over and over. Those commands are:
- From the menu system
- Project/Clean
- Project/Build
- From Right-Mouse Clicking on Project
- Maven/Update Project
- Run As/Maven Clean
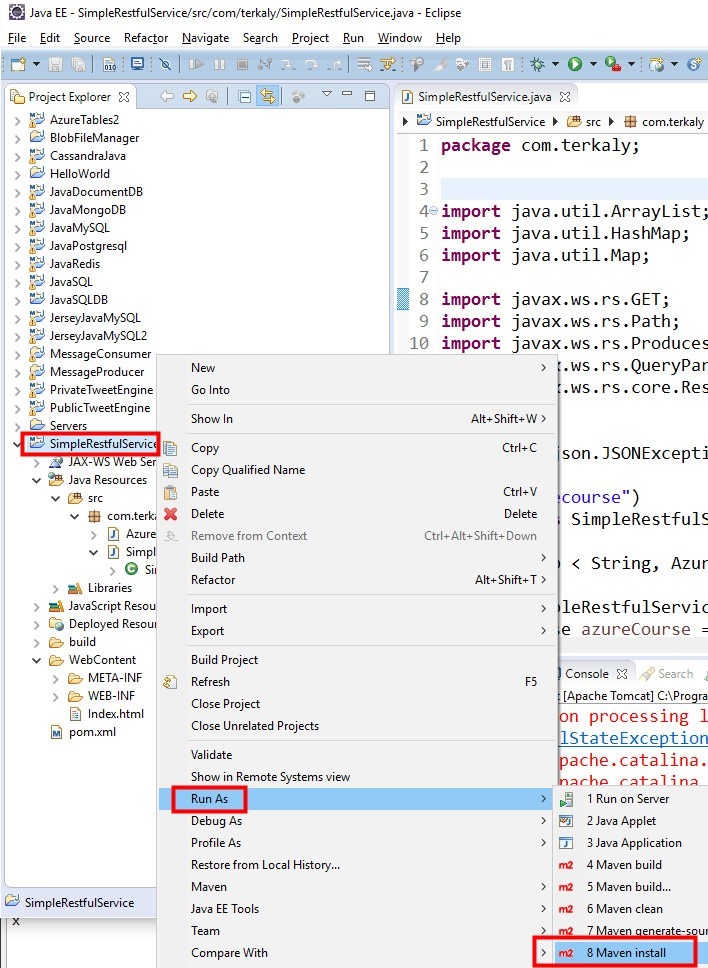
- Run As/Maven Install
Figure 28: Selecting Maven Clean
Ultimately it's the "Run As/Maven Install" that compiles the project so you can run it.
Figure 29: Selecting Maven Install
Step 3H - We are ready to run
Now we are ready to test the finished app.
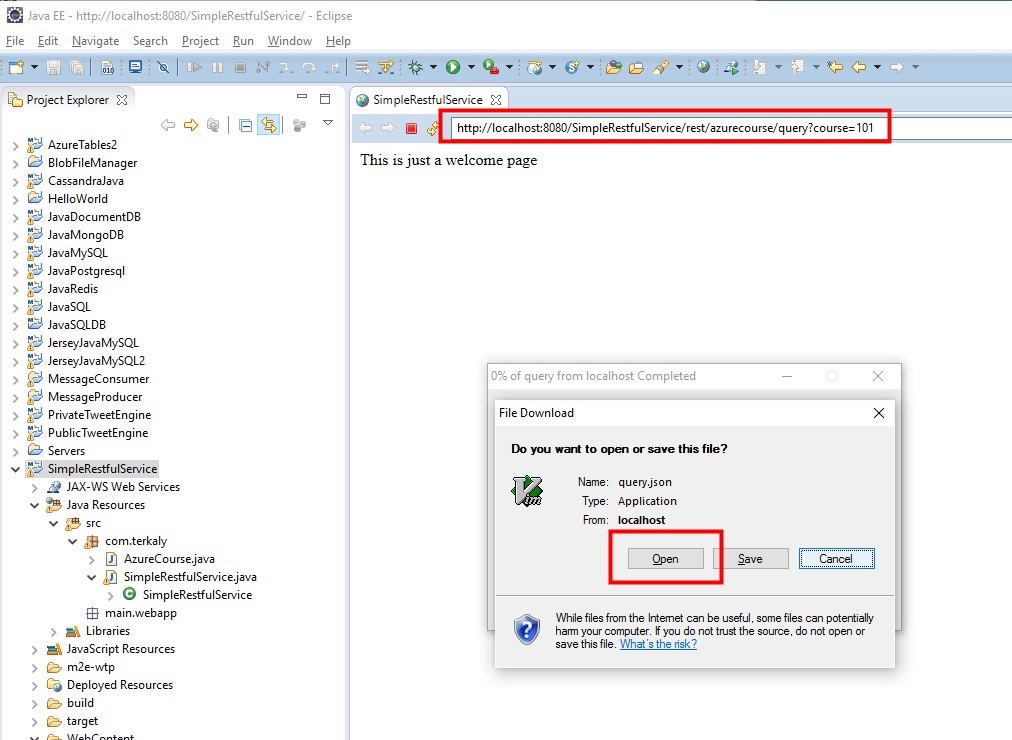
The process to test the application is the exact same as we demonstrated in step one earlier in this post. You’re going to right-mouse click on the project, and choose “Run As/Run on Server.”
And of course the response is that some JSON data is returned that can be opened in your favorite editor or saved to disk through the browser.
Figure 30: Issuing a Restful Query with HTTP
Step 4 of 4 - The creation of a WAR file that represents the completed application to be containerized
In this final step four of four, we are ready to produce the war file, which can be thought of as a zipped up version of our entire application that can be copied to a Tomcat Web server for execution.
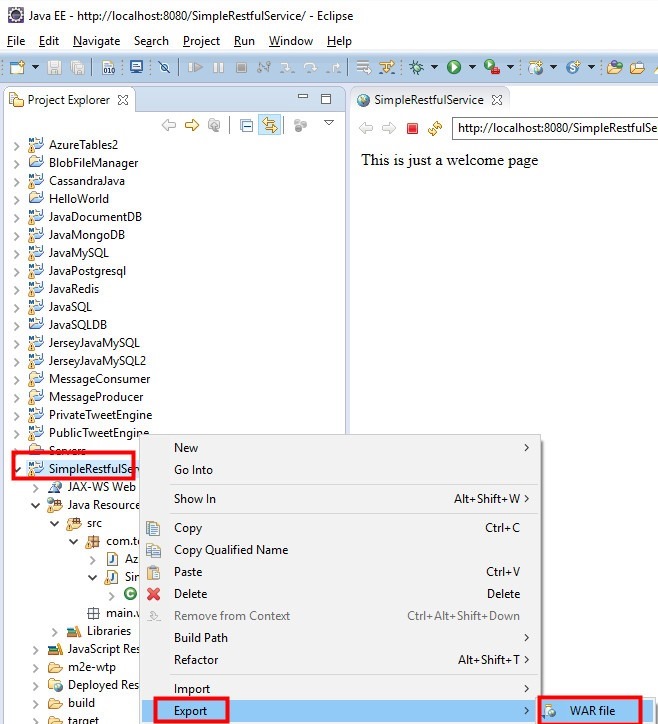
It’s a simple case of right-mouse clicking and selecting “Export/War File."
Figure 31: Exporting the WAR file
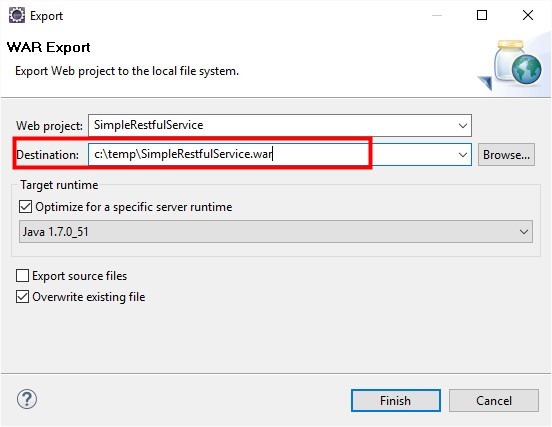
Provide a name and destination for the war file
Figure 32: Providing a name for the WAR file
Conclusion
The goal for this post has been achieved – we now have a WAR file that we copied to a Docker-Tomcat image and run it as a container. This means that we will be able to run numerous restful services across our Mesosphere cluster.
In the next post, we will learn how to provision a Mesosphere cluster using the Azure container service, and how to package up and deploy our WAR file across the provisioned cluster.
