Exercise - Archive a SharePoint list on a schedule
In the previous exercise, you created an automated cloud flow that an action in another system triggered, namely, the creation of a new item in a SharePoint list. However, other ways are available to initiate flows in Power Automate. In this exercise, you learn how to create a scheduled cloud flow to automate the archiving of data in SharePoint on a regular basis.
Because you use the same Issue Tracker list from the previous Exercise: Send a Teams message when an item is added to SharePoint unit, make sure that you already completed the first steps in that unit to set up your source list. After you create a source list, you can create the destination list, which serves as the archive.
Create a blank archive list
To create a blank archive list, follow these steps:
- From your SharePoint site, select New > List.
- Select From existing list because you want this new archive list to precisely match the schema of the old list.
- Find and select Issue Tracker from the choices and then select Next.
- Name the list Issue Tracker Archive and then select Create.
These steps are the only ones that you complete in SharePoint. You complete the rest of the exercise in Power Automate.
Create a flow
To create a flow, follow these steps:
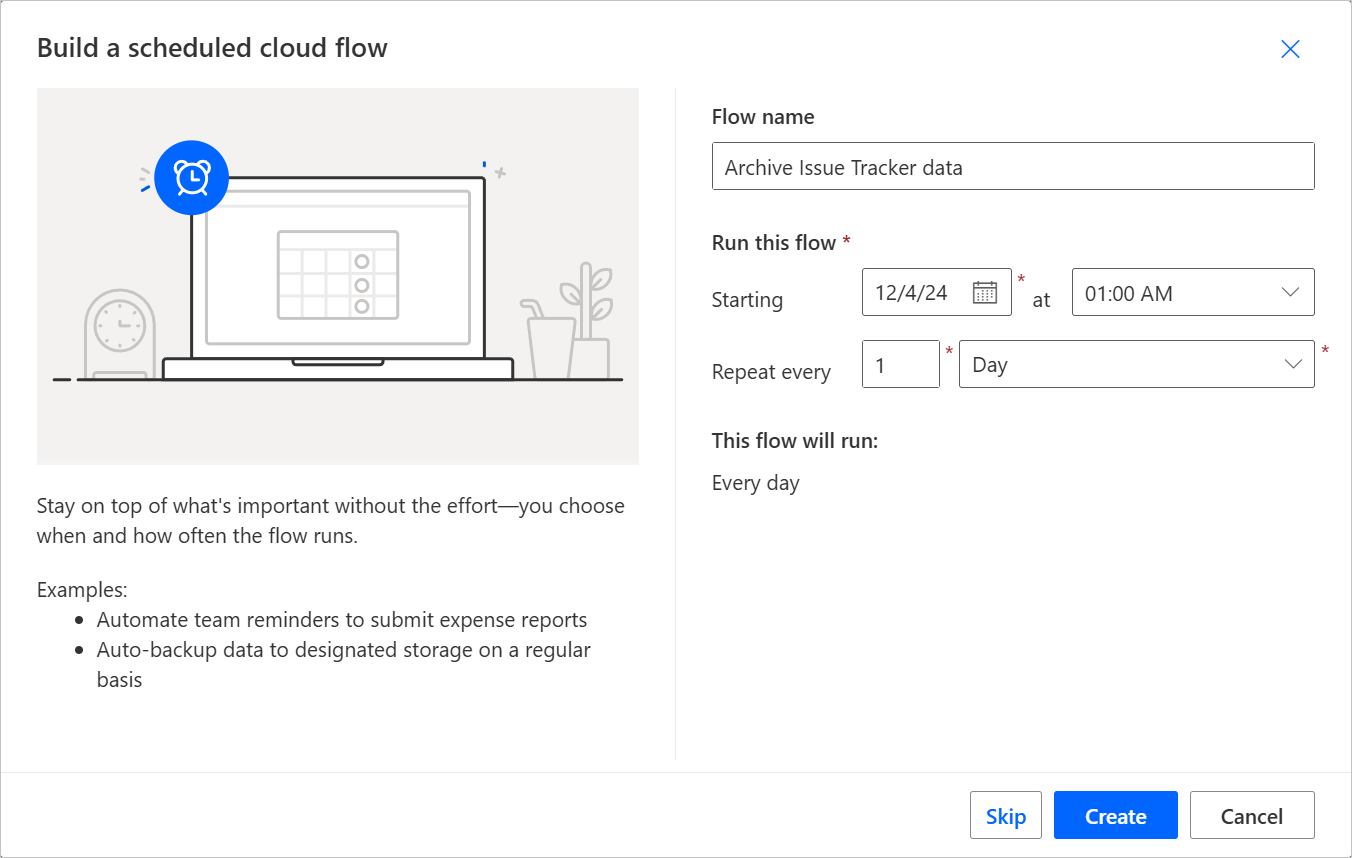
Go to https://make.powerautomate.com and select Create > Scheduled cloud flow.
Give the flow a meaningful name, such as Archive Issue Tracker data.
Select a start date for the flow to begin running and then set it to a time that makes sense to update the archive. You might consider selecting a down time when not a lot of activity happens on the list, such as the middle of the night. For this exercise, the date and time don't matter, so choose a date in the future and a time of 1:00 AM.
Tip
Scheduled flows can repeat no more than once every minute. However, the time increment dropdown menu provides Second as an option, and then the interface won't prevent you from creating a scheduled flow that repeats every one second or 10 seconds, for example. The only time when you find out that a problem has occurred is when you try to save the flow, at which point it throws an error. You need to update the Recurrence trigger to be 60 seconds or greater before you can save. The Second option exists to allow more granular scheduling, such as running every 90 seconds, every 318 seconds, or whatever timing that you need for your application. If you schedule a flow recurrence by using the Second option, the number of seconds needs to be 60 or more.
Depending on how active your list is, choose a recurrence schedule that works for you. Once a day is likely a good choice for many applications, so select that option and then select Create.

Before you add actions, make sure that you review your overall strategy for this flow. You could use an archival flow to:
- Add new items from the source list to the destination.
- Add new items and also look for updates to the source list, which updates the corresponding item in the archive.
- Add new items and add a new copy of updated items, which keeps the original intact to preserve a record of the changes.
For this exercise, you employ the third option.

Add the Get items action
With the Get items action, you can find the newest item in your archive list. The created date of that item shows the last time when your flow added something to the archive. This date is your starting point for finding new items in the source list to archive. If the archive list is empty when you run the flow for the first time, you have options to work around the issue, which is addressed later in this module.
Under Recurrence, select the plus (+) icon and then select Add an action.
In the search box, search for and select the Get items action under the SharePoint heading.
Select Site Address and then find your SharePoint site.
Select List Name and then find the name of your Archive list, not the source.
Select Show all next to the Advanced parameters dropdown menu to expose the extra parameters for this action.
You're using this action to capture the created date and time of the newest item in your archive list. Therefore, you only need to get one item, but you need it to be the newest item. To do so, you can use a simple ODATA query by entering the following information:
In the Order By field, enter Created desc.
Note
This ODATA query tells the action to order by the field Created, which is a datetime in SharePoint. Desc is the code for descending, meaning that the newest items are listed first. To reverse that order, you would use the shorthand asc for ascending.
In the Top Count field, enter 1.
Note
Top Count indicates the maximum number of records to return. You only need the single newest record; therefore, you enter 1 in the field.


Initialize a variable to store the Created Date and Time
Later in the flow, another Get items action retrieves all items from your source list that have a Created or Modified date after the newest item in the archive list. To determine this starting point, use the varCreatedDatetime variable. However, if the archive list is empty (like it is the first time that you run the flow), no item is present to provide a starting datetime. In this case, set the variable to an early date, such as January 1, 1900, to make sure that all items in the source list are included. The system formats this date in the ISO 8601 UTC format, which is the standard that SharePoint uses to store datetime values.
Under Get items, select the plus (+) icon and then select Add an action.
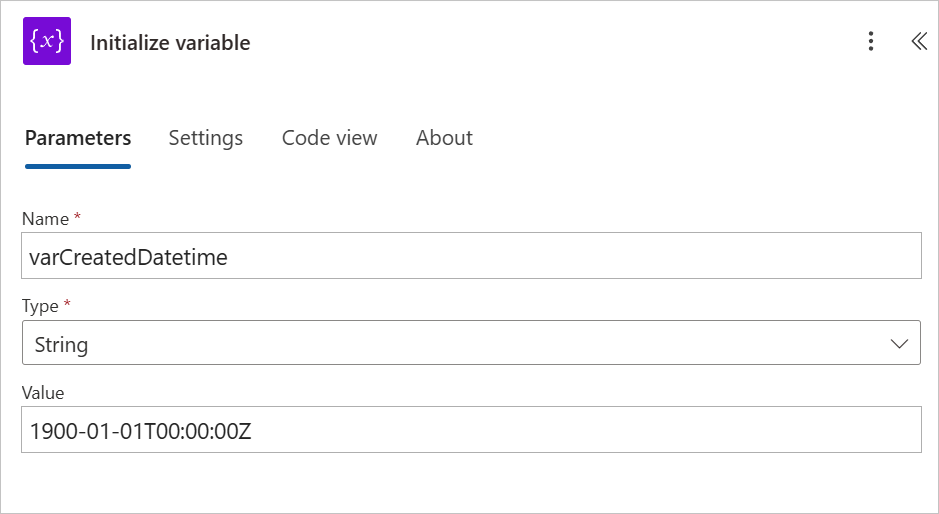
In the search box, search for and select Initialize variable under the Variable header.
Select Name and and then enter varCreatedDatetime.
Select the Type dropdown menu and then select String.
Select Value and then paste this value: 1900-01-01T00:00:00Z

Set the varCreatedDatetime variable if items are in the archive list
To set the varCreatedDatetime variable if items are in the archive list, follow these steps:
- Under Initialize variable, select the plus (+) icon and then select Add an action.
- In the search box, search for and select the Set variable option from the list.
- Select the Name dropdown menu and then select varCreatedDatetime.
- Select Value and then select the lightning bolt icon.
- In the Search box, enter Created.
- Several fields from the Get items action appear with the word Created in them. Select the one that is only Created on its own, not Created By.
At this point, Power Automate automatically creates a For each loop and places the Set variable action inside it. This might be unexpected if you're new to Power Automate, but the reason why it happens is because the Get items action returns a list of items (called an array). When applying another action to an array, Power Automate creates a loop to process each item in the array. If you didn't limit the Top Count to 1, then the Get items action would return all items in the archive list, and Power Automate would loop through each one, updating the varCreatedDatetime variable with the Created date of every item in the list. In this case, because you limited the results to 1, the loop runs only once (setting varCreatedDatetime to the Created date of the newest item) or not at all if the archive list is empty. If the loop doesn't run, the variable stays at its default value of January 1, 1900.
Add another Get items action
Now you need to get the items from your source list that have a Created or Modified datetime newer than varCreatedDatetime.
Rather than adding the Get items action again, you can use the copy/paste functionality in Power Automate. To do so, right-click on the Get items card and then select Copy action.

Select the plus (+) icon under the For each loop (not under Set variable, but under the bounding box around the For each loop). Select Paste action. Now, a Get item-copy action appears on the screen. Whenever your flow has numerous variants of the same action, it's good practice to rename these actions in a way that clearly differentiates them. This approach is especially helpful for when you need to know what fields go with what action as you're selecting dynamic data for other actions. Therefore, before you continue, you need to update your names as follows:
- Select the first Get items card. In the parameters blade that opens on the left, select the Get items title toward the upper part of the screen. The plain text turns into a text input that you can rename. Keep the name of the action intact, but add a hyphen and descriptive title to yield a different title, such as Get items - Latest Archive Record.
- Select the Get items-copy card and then update it, renaming it to Get items - Source Items to Archive.
Stay in the Get items - Source Items to Archive action and change the List Name to the source list, Issue tracker.
Select Show all to the right of Advanced parameters.
Delete the Order By and Top Count parameters; you won't need them for this action. To do so, select the X to the right of the input field or select the text in each field and delete it.
To retrieve only those items that are newer than the newest item from your archive list, you must create an OData query. The query needs to filter on Created and Modified criteria because your flow captures items that were created since the previous backup and items that were modified since the last backup.
Select the Filter Query input field.
Enter Created gt '' or Modified gt ''
Note
The instruction is to put two single quotes after the gt, not a double quotation mark. When in doubt, copy and paste from these instructions.
Place your cursor between the first set of single quotes and then select the lightning bolt icon.
Select varCreatedDatetime under the Variables heading.
Repeat the same steps, placing your cursor between the single quotes after Modified gt and selecting varCreatedDatetime.


Add the Create item action
Now it's time to loop through all items that the Get items - Source Items to Archive action collects and then copy each item to the archive list by using the Create item action. Your Create item action should resemble the following screenshot.

Under Get items - Source Items to Archive, select the plus (+) icon then select Add an action.
In the search box, search for and select the Create item action under the SharePoint heading.
Select Site Address and then find your SharePoint site.
Select List Name and then find the name of your Archive list, not the source.
Select Show all next to the Advanced parameters dropdown menu to expose the extra parameters for this action.
Select the Title field, select the lightning bolt icon, and then in the Search box, enter Title.
From the list under the Get items - Source Items to Archive heading, select Title.
Because the system applies this action to every item that the Get items - Source Items to Archive action returns, Power Automate automatically creates a For each loop and places the Create item action inside it. This response is expected. You could manually complete this action by creating your own Apply to each action first and then putting Create item inside, but the easiest method in this case is to allow Power Automate do the work for you.
The next field under Title in the Create item action is Issue Description, and the remaining columns proceed underneath. For each column, complete the following actions:
Select the field, select the lightning bolt icon, and then search for the column name in the Search box.
Find the match under the Get items - Source Items to Archive heading and select it.
A few columns are Choice columns or Lookup columns, and you need to handle them differently. For example, Priority Value and Status Value are Choice columns, whereas Assigned to Claims is a Lookup column.
For each column, select the dropdown menu under the field heading and then scroll, if necessary, to the bottom of the list and select Enter custom value. Then, select the lightning bolt icon and proceed as normal in selecting the matching item from Get items - Source Items to Archive.
When you're working with Choice columns, be sure to select the Value version of the field (for example, Priority Value, not Priority). This information is important to know because of the way that Choice columns are stored in SharePoint.
After you map each column of the Create item action to the correct column from the source list, you can save and test your flow. Before you test, make sure that your archive list is empty and that at least a row or two of data shows in your source list. Then, to test your flow, follow these steps:
- Select Save.
- Select Test.
- Select Manually.
- Select Test.
- Select Run Flow.
- Select Done.
After a moment, your flow should run and a green banner should appear across the top of the flow with the Your flow ran successfully message. Before continuing, make sure that you take note that the information in the Run History of a flow is extensive, and you can learn a lot about how your flow works (and critically, when it doesn't work) by reviewing the successes and failures of your test runs.
Because this is the first time that your flow ran, and because the archive list was empty, the varCreatedDatetime variable remains at the default January 1, 1900 date. This result is evident in the first For each loop, where the skipped icon appears in the upper-right corner of the Set variable action, indicating that the action was skipped.

To observe the changes when the Archive list is populated, follow these steps:
- Go to your Archive SharePoint list and refresh it. Copies of everything that's in your source list should display.
- Go to your source list and add another item to it.
- Return to your flow and select Edit.
- Select Test > Manually > Test > Run Flow > Done.
- This time, a 1 of 1 indicator appears under the first For each loop, and a green check mark appears in the upper-right corner of Set variable. The appearance of these components indicates that the For each action had an item to work with from the Get items – Latest Archive Record action and that it set varCreatedDatetime to its Created datetime.
- Refresh your Archive list. The new item should show as added to the list. Make sure that no duplicates of items are present. If duplicates appear, then an issue might have occurred with your Filter Query in Get items - Source Items to Archive.
- As a final test, modify one of the existing records in the source list, which should force the system to add a fresh copy to the archive, leaving the original intact.
- Return to your source list, select one of the records, and then change something about it, such as its Issue description or Priority. Be sure that you commit the change before returning to your flow.
- Return to your flow and select Edit.
- Select Test > Manually > Test > Run Flow > Done.
- Review your Archive list. A fresh copy of the modified item should appear, with the original left intact with no other duplicates.
In this exercise, you completed an example flow that you can use in a real-world scenario when you're automating the process of archiving data in SharePoint. If you set the Recurrence of the flow to run sometime in the next 24 hours, add some items to your source list and then return tomorrow to see if the flow ran on schedule and updated your archive. Congratulations, you're automating like a pro.