Manually install SQL Server
Azure DevOps Server 2022 | Azure DevOps Server 2020 | Azure DevOps Server 2019 | TFS 2018
Follow the steps in this article to install SQL Server 2017. You can use similar steps to install previous versions. Azure DevOps Server requires SQL Server 2016 and above. In this example, all the SQL Server features that Azure DevOps Server requires are installed on the same server. Using the same server isn’t a requirement, because Azure DevOps Server is flexible with its use of SQL Server topologies.
Tip
You can use an existing installation of SQL Server for Azure DevOps Server. To do so, you need administrative credentials granted by the SQL Server administrator. You must be a member of the sysadmin server role in SQL Server to install and configure Azure DevOps Server. For more information, see Add server-level administrators to Azure DevOps Server.
One server or two?
If you plan to use one server for Azure DevOps Server, you can skip this section.
If more than 500 users need to access Azure DevOps Server, install SQL Server on a second server. An additional server splits the load between Azure DevOps Server and its configuration database. The SQL Server features that Azure DevOps Server requires can be installed on the second server or split between the two. For example, you can install the report server on the Azure DevOps Server instance, while other components are installed on a second server. This sort of configuration separates the traffic between HTTP and the SQL server.
There are many different topology choices you can make. With Azure DevOps Server, you can install SQL Server instance features, such as Database Engine, Reporting Services, and Analysis Services, on multiple servers. Here are some SQL Server topology caveats to keep in mind:
- Azure DevOps Server requires the Database Engine and Full text search features. These features must be installed together, although each can go on their own server.
- Azure DevOps Server reporting is optional. If needed, install both Analysis Services and Reporting Services, although each can go on its own server.
- If none of the above SQL Server features are installed on the Azure DevOps Server instance, install Client Tools Connectivity.
To install SQL Server features on different servers, run the installation for each server. Use the instructions that follow, but only install the feature required.
Tip
A multi-server installation of Azure DevOps Server requires either an Active Directory domain and domain accounts, or the Network Service account. You can't use local accounts for service accounts.
Install SQL Server
You must be a member of the Windows Administrators security group before you run the installation.
Tip
For versions of Windows prior to Windows Server 2016 and Windows 10, make sure that .NET Framework 3.5 is installed. For Windows Server, install .NET Framework 3.5 by using the Add Features wizard from Server Manager. For more information, see Add server roles and features (Windows 2012/Windows 2012 R2) and Add server roles and features (Windows Server 2008 R2).
Download and install a supported version of SQL Server from the SQL Server Download Center.
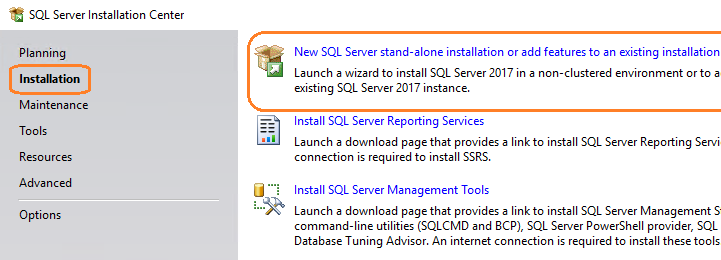
On the SQL Server Installation Center page, select Installation. Then select New SQL Server stand-alone installation or add features to an existing installation.
On the Product Key page, enter your product key or specify a free edition. Select Next.
On the License Terms page, accept the license agreement. Select Next.
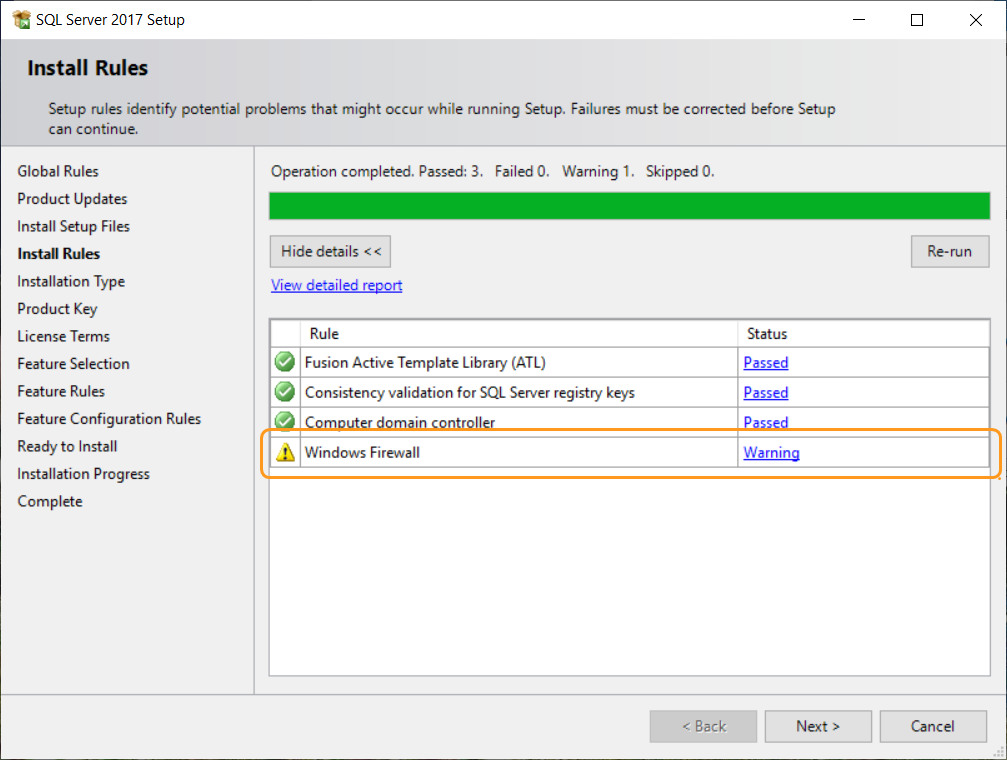
On the Install Rules page, select Next.
Tip
A Windows Firewall warning might appear. You can safely ignore this warning if you plan to also install Azure DevOps Server on this server. The Azure DevOps Server installation automatically adds this exception to the Windows Firewall. If you install Azure DevOps Server on another server, open a port for SQL Server in Windows Firewall on this server.
For more information, see Ports required for installation of Azure DevOps Server.
On the Feature Selection page, select the check boxes for one or more of the following components based on the topology you intend to use:
Database Engine Services is required.
Full-Text and Semantic Extractions for Search is required.
Analysis Services is for reporting only.
Client Tools Connectivity is used only if no other SQL Server components are installed on the server that runs Azure DevOps Server.
Note
In previous versions of SQL Server, you installed the Management Tools (SQL Server Management Studio) and Reporting Services by selecting them on the Features Selection page. In SQL Server 2017, they're installed separately. For more information, see Install SQL Server Management Studio and Install and configure SQL Server Reporting Services.
On the Instance Configuration page, select Default instance. If you select Named instance, enter the name of the instance.
On the Server Configuration page, accept the defaults or enter the name of a domain account. Use NT AUTHORITY\NETWORK SERVICE in the Account Name for every service. If you specify a domain account, enter its password in Password. If you use NT AUTHORITY\NETWORK SERVICE, leave Password blank.
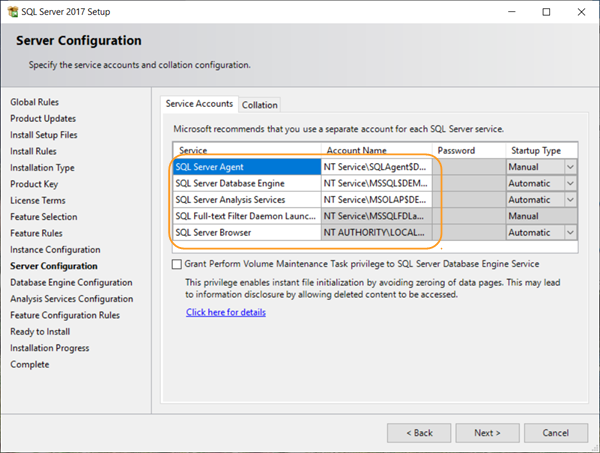
In the Startup Type column, verify that Automatic appears for all services that you can edit. Select Next.

Note
Are you using a non-English version of SQL Server? The default collation settings for U.S. English meet the requirements for Azure DevOps Server. You also can set the collation settings for the Database Engine on this page. For more information, see SQL Server collation requirements for Azure DevOps Server.
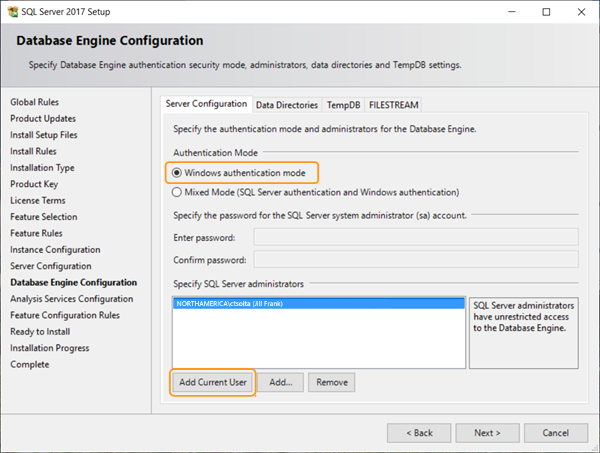
If you previously selected the Database Engine Services check box, on the Database Engine Configuration page, select Windows authentication mode. Then select Add Current User. Otherwise, skip to the next step.
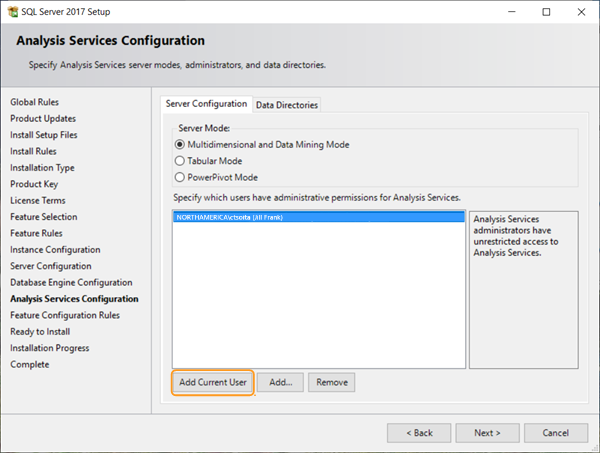
If you previously selected the Analysis Services check box, on the Analysis Services Configuration page, select Add Current User. Otherwise, skip to the next step.
On the Ready to Install page, review the list of components to be installed. Then select Install.
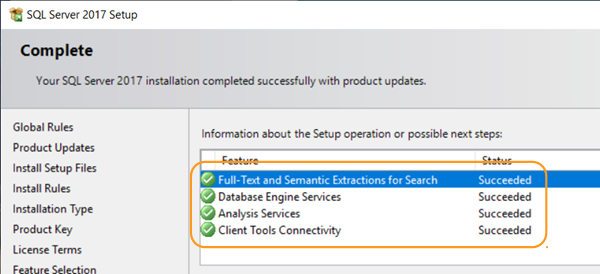
Select Close after the installation finishes.
Install and configure SQL Server Reporting Services
If you don't use Azure DevOps Server reporting, you don't need to install SQL Server Reporting Services or SQL Server Analysis Services.
If Reporting Services is installed on the same server as Azure DevOps Server and isn't configured, you finish its configuration during the Azure DevOps Server installation.
To change a report server manually, you must be a member of the Windows Administrators on the server where the report database is located.
Install and configure a report server
Note
If the User Account Control dialog box appears, select Yes to continue.
On the SQL Server Installation Center page, select Installation. Then select Install SQL Server Reporting Services.
On the Microsoft SQL Server 2017 Reporting Services page, select Download. Run the installation.
After the installation finishes, select Configure report server.
The Reporting Services Configuration Connection dialog box appears.
In Server Name, enter the name of the report server. If you use an instance name, enter the name of the instance in Report Server Instance. Select Connect.
On the main page, select Start if the Report Service status reads Stopped.
In the navigation bar, select Web Service URL.
- Select Apply to accept the default values in the Virtual Directory, IP Address, and TCP Port boxes.
In the navigation bar, select Database.
On the Report Server Database page, select Change Database.
The Report Server Database Configuration Wizard appears.
In Action, select Create a new report server database, and then select Next.
In Database Server, enter the name of a local or remote instance of SQL Server to host the database for the report server in Server Name, and then select Next.
In Database, accept the default values in the Database Name, Language, and Native Mode boxes. Select Next.
In Credentials, accept the default values in the Authentication Type, User name, and Password boxes. Select Next.
In Summary, verify your information, and then select Next.
In Progress and Finish, select Finish.
In the navigation bar, select Web Portal URL.
- Select Apply to accept the default value in the Virtual Directory box.
Select Exit to close the Report Server Configuration Manager wizard.
Install SQL Server Management Studio
To install Azure DevOps Server, SQL Server Management Studio isn't required. Use SQL Server Management Studio only if you need to verify your installation of SQL Server.
On the SQL Server Installation Center page, select Installation. Then select Install SQL Server Management Tools.
On the Download SQL Server Management Studio page, follow the instructions to download and install.
Create a SQL Server database
You can create an empty database for Azure DevOps Server. An empty database is useful for managing the one or many instance databases your Azure DevOps Server requires. This database can be hosted on a single or managed instance of SQL Server. This article shows you how to create an empty SQL Server database for use with Azure DevOps Server.
This procedure has two steps:
Create the database and name it based on established guidelines.
Identify the database when you install Azure DevOps Server.
Azure DevOps Server includes a database that can be used as an empty database during installation:
- Tfs_DatabaseLabelConfiguration
This database must use the naming structure as shown. You can either remove the string DatabaseLabel or use a custom string that uniquely describes this database.
During the Azure DevOps Server installation, when you use an existing SQL Server instance, you have the option to use this database. Select the Use pre-existing empty database(s) check box under Advanced Options during the installation. If you added a label, enter it in Server Databases Label. The wizard then uses the empty database you created to set up its configuration database.
Note
Each project collection also requires its own database, but you can't configure Azure DevOps Server to use empty project collection databases during installation. The collection databases are automatically created during installation.
Work with SQL Server named instances
You can install Azure DevOps Server by using the default instance of SQL Server or by using a named instance of SQL Server. Based on your business infrastructure and deployment needs, you might want to use a named instance. To use a named instance in your deployment of Azure DevOps Server, either create the named instance in SQL Server before you install Azure DevOps Server, or create a project collection that uses that instance. You can't create a named instance during the installation of Azure DevOps Server.
To use a named instance of SQL Server in a deployment of Azure DevOps Server, do one of the following steps:
- Install SQL Server by using a named instance.
- Move or restore Azure DevOps Server data to a named instance.
- Create a project collection on a named instance.
Verify SQL Server
To verify that your installation of SQL Server works with Azure DevOps Server, check that the required SQL Server features are available. Also, check the underlying Windows services associated with SQL Server are running. Make sure your connection settings are configured and that network ports are open.
To use reporting when SQL Server Reporting Services isn't on the server that runs Azure DevOps Server, install Client Tools Connectivity on Azure DevOps Server.
If the Database Engine, Analysis Services, and Reporting Services run on different instances of SQL Server, sign in to each server to verify the instances.
Required permissions
To run SQL Server Configuration Manager, you must be a member of the Users security group on the server hosting SQL Server. To use SQL Server Configuration Manager to modify services, you also must be a member of the Administrators security group.
To run SQL Server Reporting Services Configuration Manager or SQL Server Management Studio, you must be a member of the Administrators security group. This assignment is on the operating system of the server with the SQL Server instance. For SQL Server Management Studio, you also must be a member of the Public server role on the SQL Server instance that needs verification.
Verify the Database Engine and Analysis Services
On the instance of SQL Server that runs the Database Engine, verify that you have the Full-Text and Semantic Extractions for Search feature installed:
Open the SQL Server Installation Center and select Installation.
Select New SQL Server stand-alone installation or add features to an existing installation. If Full-Text and Semantic Extractions for Search isn't available on the instance of SQL Server that runs the Database Engine, install Full-Text and Semantic Extractions for Search.
To verify that Windows services are running by using SQL Server Configuration Manager:
On the instance of SQL Server on which the Database Engine, SQL Server Analysis Services, or both are running, start SQL Server Configuration Manager.
Select SQL Server Services, and verify that Running appears in the State column of all services. Verify that Start Mode is set to Automatic for all services.
- To change the start mode of a service to start automatically, open the context menu for the service. Select Properties, and then select the Service tab. Select the drop-down list to the right of Start Mode, and select Automatic.
- To change a stopped service state to running, open the context menu for the stopped service and select Start.
Select SQL Server Network Configuration, and double-click Protocols for MyInstanceName. Verify that Enabled appears in the Status column for TCP/IP.
If you specified the default instance during installation, MyInstanceName is MSSQLSERVER.
To finish the following procedure, SQL Server Management Studio must be installed. It doesn't have to be installed on the server that runs your instance of SQL Server.
To verify a connection to an instance of SQL Server by using SQL Server Management Studio:
Start SQL Server Management Studio.
The Connect to Server dialog box opens.
In the Server type list, select Database Engine or Analysis Services based on the type of installation to verify.
Enter the name of the server, and then select Connect.
When SQL Server is installed on a cluster, specify the server name rather than the computer name. If you use named instances of SQL Server, specify the name of the server and the name of the instance. If you can't connect to the server, verify the firewall settings and try to connect again.
In Object Explorer, verify that a green arrow appears next to the server name.
Verify Reporting Services
To verify that the Windows service runs by using SQL Server Configuration Manager:
On the server that runs SQL Server Reporting Services, start SQL Server Configuration Manager.
- Select SQL Server Services, and verify that Running appears in the State column for SQL Server Reporting Services.
To verify that the report server URLs run by using SQL Server Reporting Services Configuration Manager:
On the server that runs SQL Server Reporting Services, start Reporting Services Configuration Manager.
Note
On Windows Server, open the context menu for Reporting Services Configuration Manager. Select Run as administrator.
The Reporting Services Configuration Connection dialog box appears.
In Server Name, enter the name of the report server. If you use an instance name, enter the name of the instance in Report Server Instance. Select Connect.
Select Report Manager URL, and select the link to the report manager website.
The report manager website for the report server opens in the browser window.
Select Web Service URL, and select the link to the report server website.
The report server website opens in the browser window.