Share your code in Git using Xcode
TFS 2018
This guide shows you how to share your Xcode projects using Azure Repos.
Prerequisites
- An organization in Azure DevOps. If you don't have an organization, you can sign up for one for free. Each organization includes free, unlimited private Git repositories.
Create a local Git repo for your Xcode project
Create a local Git repo for your code to manage your project in version control.
If your project is already in a local Git repo, you can skip ahead to Create a new Git repo in Azure Repos.
New projects
Create a local Git repo when you create a new project. Choose Create Git repository on My Mac when creating a new project.

Existing projects
Create a local Git repo for your existing projects not in version control by going to Source Control, Create Working Copy... . Select the projects to add to the local Git repo and select Create. Xcode creates a Git repo for your code and adds a commit with your project files.

Create a new Git repo in Azure Repos
Create a new Git repo in Azure Repos for your Xcode project.
If you have already created a repo for your Xcode project in Azure DevOps Services, you can skip ahead to Push your project.
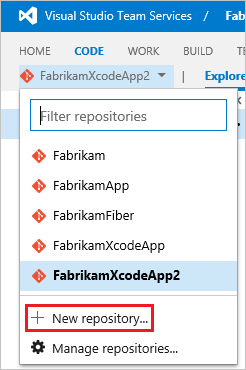
Browse to your Project in your Azure DevOps organization and select the drop-down
 next to the name of the current Git repo. Select New Repository..

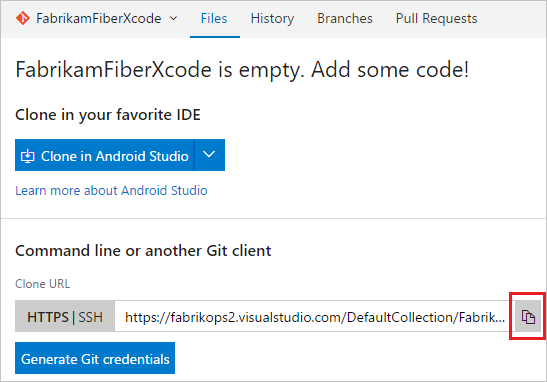
Enter a name for your new Git repo and select Create. Your browser will navigate to your new empty Git repo for your Xcode project. Copy the clone URL to the clipboard so that you can use it in Xcode to connect to VSTS.

Note
If you want to use SSH to connect to your Azure Repos/TFS Git repo, Set up SSH credentials and use the SSH clone URL when adding the remote for your local Git repo.
Push your project
Go to Source Control in Xcode and select Projectname -- main, then Configure...

Select Remotes, then select the
 icon and choose Add Remote...
In the Address field, paste the Git clone URL for your repo copied in the previous step. Select Add Remote, then select Done to finish creating the
originremote for your local Git repo.
Go to Source Control, Push..., enter the branchname on
originto push to, and select Push.
If prompted, enter your Azure DevOps Services credentials. For Username, enter your Azure DevOps Services username. For Password, enter a Personal Access Token created for your user in VSTS. Select OK.
Xcode will push your project to your Azure Repos/TFS Git repo so you can share it with your team.