Package and publish extensions
TFS 2018
Once you develop your extension, you can package and publish it to the Visual Studio Marketplace. The Marketplace is a global repository for private and public extensions, integrations, and other offers from Microsoft.
Note
For information on the discovery properties available in your extension's manifest file that helps users discover and learn about your extension, see the Extension Manifest Reference.
Prerequisites
The following list of requirements must be met before you publish to the Marketplace.
- Install the extension packaging tool (TFX). Run
npm install -g tfx-clifrom a command prompt. - Ensure the proper permissions are granted to use any images, for example, icons, logos, screenshots, and so on.
- Include a thorough
overview.mdfile to describe your listing in the Marketplace. - Include an icon for your extension, which is at least 128x128 pixels in size.
- When you refer to Microsoft products, use full names in place of abbreviations, for example, Azure DevOps vs. AzDO or - any other abbreviation.
- Refrain from using brand names in the name of your extension.
Create a publisher
All extensions and integrations, including extensions from Microsoft, have a publisher. Anyone can create a publisher and publish extensions under it. You can also give other people access to your publisher if a team is developing the extension.
A user owns the publisher, typically the user who created it. You can also share the publisher with other users.
Sign in to the Visual Studio Marketplace Publishing Portal.
If you're not already a member of an existing publisher, + Create a publisher. Enter a name in the publisher name field. The ID field should automatically get set based on the name you entered.
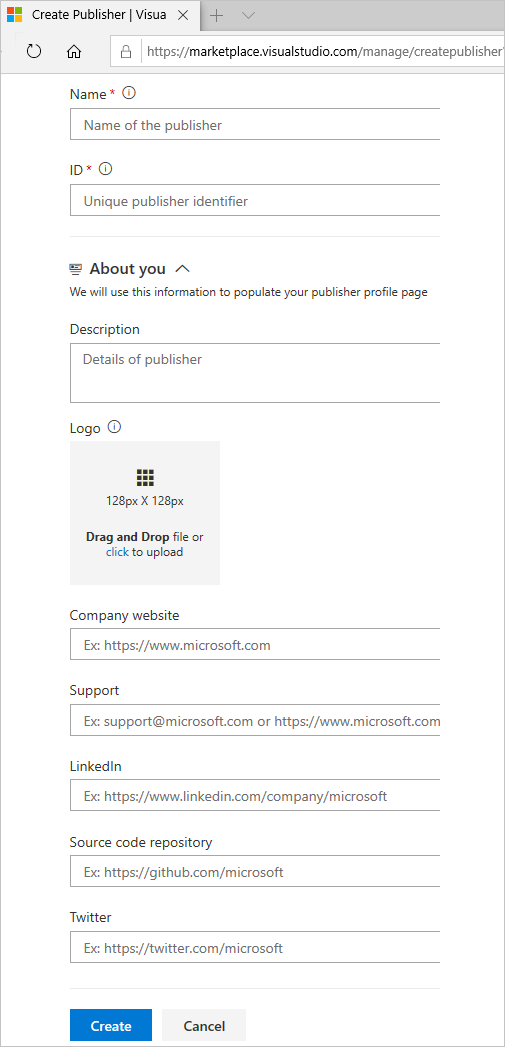
Note
Make note of the ID, as you need to set it in the manifest file of your extension.
If you're not prompted to create a publisher, scroll down to the bottom of the page and select Publish extensions below Related sites.
- Specify an identifier for your publisher, for example:
mycompany-myteam. This identifier is used as the value for thepublisherattribute in your extension manifest file. - Specify a display name for your publisher, for example:
My Team
- Specify an identifier for your publisher, for example:
Review the Marketplace Publisher Agreement, and then select Create.

Once the publisher's created, you're directed to manage items, but there aren't any items.
Package your extension
To upload your extension, you need to package it as a VSIX 2.0-compatible .vsix file. Microsoft provides a cross-platform command-line interface (CLI) to package and publish your extension.
Open your extension manifest file (
vss-extension.json) and set the value of thepublisherfield to the ID of your publisher. For example:{ ... "id": "my-first-extension", "publisher": "AnnetteNielsen", ... }From a command prompt, run the TFX tool's packaging command from your extension directory.
npx tfx-cli extension createA message displays indicating your extension is successfully packaged:
=== Completed operation: create extension ===
- VSIX: C:\my-first-extension\AnnetteNielsen.my-first-extension-1.0.0.vsix
- Extension ID: my-first-extension
- Extension Version: 1.0.0
- Publisher: AnnetteNielsen
Note
An extension/integration's version must be incremented on every update.
If you haven't incremented your extension/integration in the manifest, you should pass the --rev-version command line switch. This increments the patch version number of your extension and saves the new version to your manifest.
Check package size
Check the size of the vsix after it gets packaged. If it's greater than 50 MB, you need to optimize it. To do so, see the following considerations:
- Deduplicate the common dependencies, if any, by stating them once in the extension package.
- Fetch things at runtime or during install time rather than providing it within the package. Consider using the tool installer lib to pull tool dependencies at runtime. Using the lib offers benefits where the tool gets cached by version so for private agents, it doesn't download every build. We made it a lib so it can be used outside of tool installer tasks. But, the task doesn't work in disconnected scenarios (no internet), which should be in the description / docs for the task.
- Some users have success with WebPack to tree shake their dependencies in their tasks.
Publish your extension
Once your extension is packaged, you can upload it to the Marketplace under a publisher. The publisher identifier specified in your extension's manifest file must match the identifier of the publisher the extension is uploaded under.
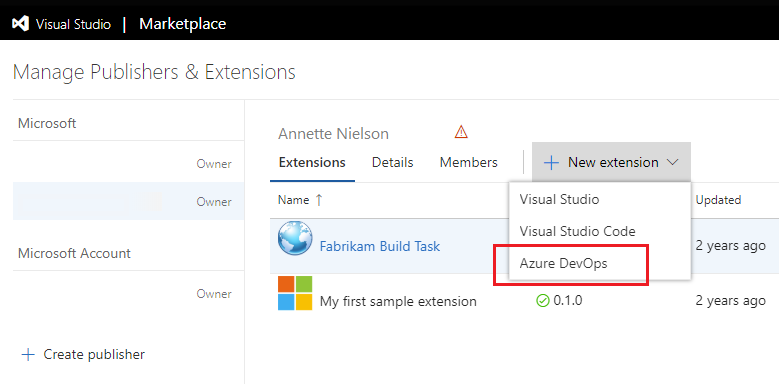
From the management portal, select your publisher from the drop-down menu at the top of the page.
Select New extension > Azure DevOps.
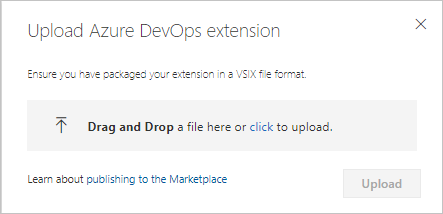
Drag and drop your file or select it to find your VSIX file, which you created in the previous packaging step, and then choose Upload.
After quick validation, your extension appears in the list of published extensions. Don't worry, the extension is only visible to you.

At this point, your extension isn't visible to any accounts and can't be installed until you share it.
Note
Microsoft runs a virus scan on each new and updated extension package published. Until the scan is all clear, we don't publish the extension in the Marketplace for public usage. This way we also avoid surfacing inappropriate or offensive content on the Marketplace pages.
Share your extension
You must share your extension with an organization before you can install it in Azure DevOps. To share an extension, do the following tasks:
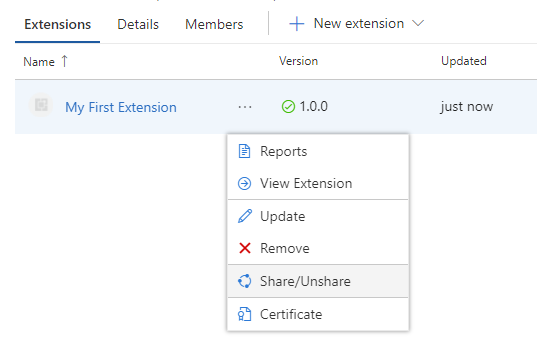
From the Marketplace management portal, select your extension from the list, right-click, and then choose Share/Unshare or Publish/Unpublish, depending on the extension.
Select Organization, and then enter the name of your organization. Select Enter.
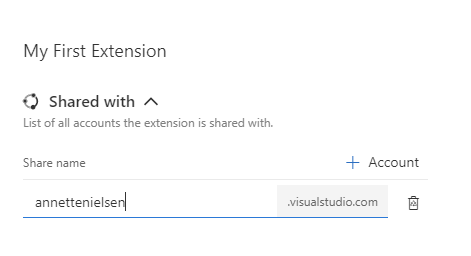
Close the panel.
Your extension can now be installed into this organization.
Install your extension
To install your shared extension, do the following steps.
In the Marketplace, select your extension to open its overview page.
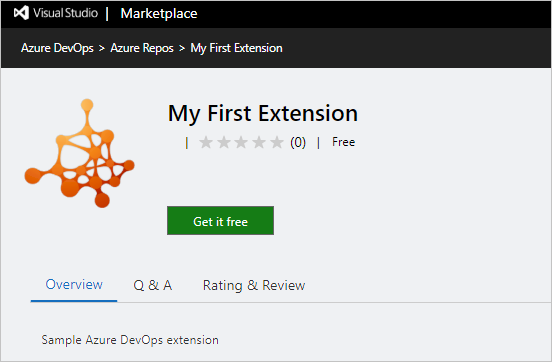
Note
Because your extension is private, only you and any member of the organization it's shared with can see this page.
Select Get it free to start the installation process. Select the organization you shared the extension with from the dropdown menu.
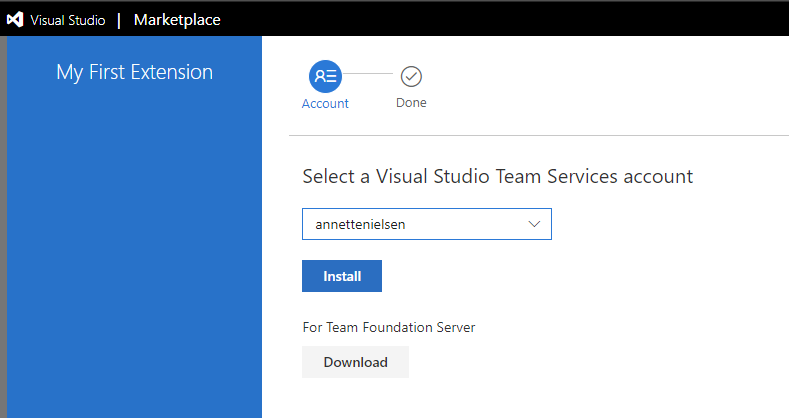
Select Install.
Congratulations! You installed your extension into an organization and you're ready to try it.
Try your extension
Select Proceed to organization at the end of the installation wizard to go to the home page of the organization the extension was installed to (
https://dev.azure.com/{organization}).Refresh your browser.
Open Organization settings, and then select Extensions.
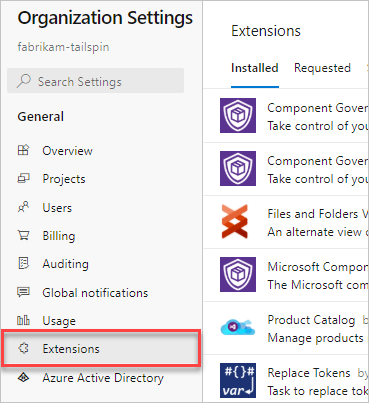
You should see the new extension on the Installed tab.
Debug your extension
To debug the extension using Visual Studio or Browser Developer Tools, change the manifest by adding the baseUri property. This action speeds up the development without the need to redeploy the extension each time you change source code.
{
    ...
    "baseUri": "https://localhost:44300",
    ...
}
When you change the manifest, it loads the extension from your local web server instance. For example, IISExpress in Visual Studio. After you change the manifest, deploy and install this debugging extension only once.
Note
Run your local web server in SSL mode because Azure DevOps demands that the web page is served from a secure source. Otherwise, you get an error in the browser console during the extension IFRAME loading.
Update your extension
To change an extension that's already published, update it.
Tip
We recommend updating the extension over removing and re-uploading. We also recommend having two extensions, for example, publisher.extension and publisher.extension-dev.
Publisher.extension is public in the Marketplace, where customers can install it in their Azure DevOps organizations. Publisher.extension-dev is kept private in the Marketplace and can be shared with an organization that you own and control.
You don't need to maintain two copies of source code of the extension. You can maintain two manifest files - one for each extension and during packaging of the extension you can provide the respective manifest file to the tfx-cli tool. For more information on arguments required for the tool, see TFX extension commands.
- Select an extension from the list of displayed items.
- Right-click and select Update for the
publisher.extension-dev, for example. - Validate your extension.
- Make the same updates to the production version,
publisher.extension, for example. - Browse to the .vsix for your extension and upload it.
The updated version of your extension automatically gets installed to accounts that have it already installed. New accounts where the extension is installed in the future also receive the latest version.
Make your extension public
While you develop your extension or integration for the Marketplace, keep it private. To make your extension available publicly, set the public flag to true in your manifest.
Qualifications
To have a public listing on the Marketplace, your integration or extension must meet the following qualifications:
- Works with or extends Azure DevOps.
- You, or your company, own, develop, and are licensed to distribute and advertise the integration or extension.
- The extension or integration is actively maintained.
Microsoft might also request a demo and to review the content planned for your Marketplace entry.
Top Publisher
The Top Publisher program is only available for publishers with Azure DevOps extensions or integrations. It's not applicable for Visual Studio IDE and Visual Studio Code extension publishers.

The Top Publisher program recognizes publishers with commitment to their customers and the Marketplace through exemplary policies, quality, reliability, and support. Once you become a Top Publisher, all of your public offerings display the Top Publisher badge.
Top Publisher requirements
The Top Publisher program in the Marketplace is designed to help you evaluate or acquire Azure DevOps extensions and integrations with confidence. The Top Publisher badge implies that the publisher shows commitment to their customers and the Marketplace through exemplary policies, quality, reliability, and support. It's for publishers with one or more global Azure DevOps extensions or integrations and isn't applicable for Visual Studio IDE and Visual Studio Code extension publishers.
Marketplace assigns the badge to a publisher after carefully reviewing the publisher across the following parameters:
- Privacy policy
- Licensing policy
- Support policy
- Documentation
- Q & A responsiveness
- Ratings & review for their offerings
- Active uptake and the install count for their offerings
- Manage at least one public Azure DevOps extension from the publisher.
- The public extension should have more than 5000 installs, with an active install count exceeding 1000.
You can expect timely support and a good overall experience when you get an extension from a Top Publisher. Check out the offerings from the Top Publishers.
For more information on adding policies to your offering, see the extension manifest.
Update your publisher profile.
Through the publisher profile, you can showcase all of your offerings in one place along with key publisher-related information. To provide the information, which shows up in the profile, do the following steps:
a. Sign in to https://marketplace.visualstudio.com/manage/publishers using the account with which you publish and manage your offerings in the Visual Studio Marketplace.
b. Select the publisher and complete the About you section in the Details tab.
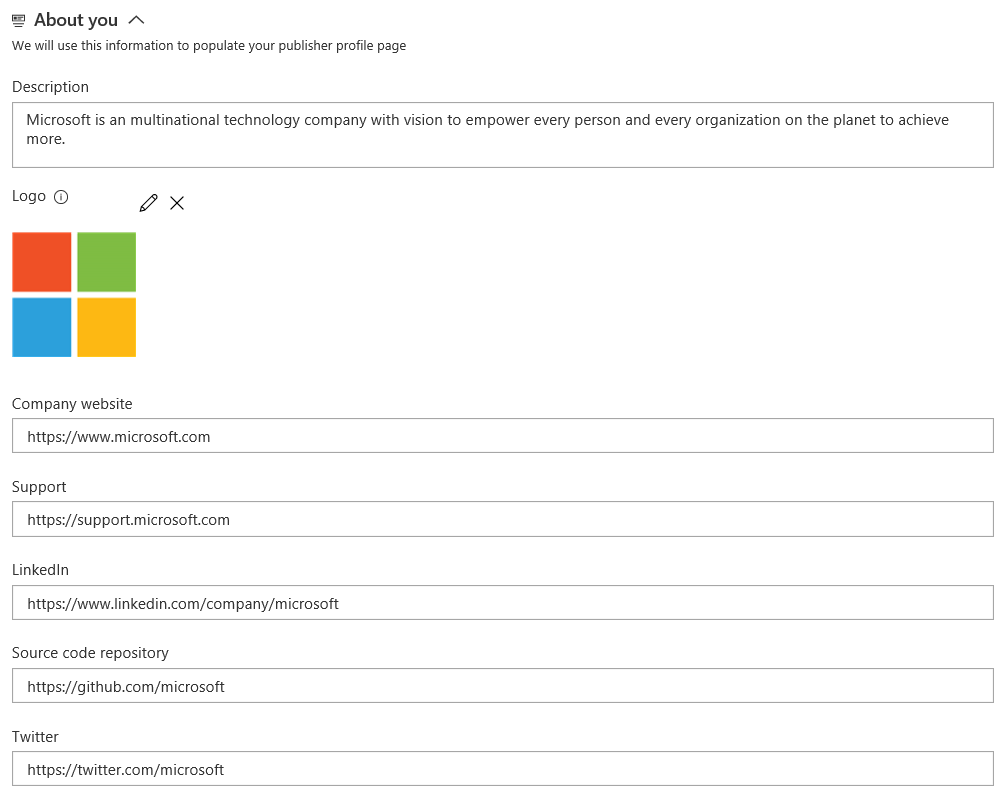 c. Save your changes and select View profile to see how it appears to consumers. You can use this profile page to evangelize your offering(s).
Note
Through this program, it is the publisher that is being certified. This doesn't cover the software or security of their extensions and integrations. We recommend you be aware of the safety information when you're evaluating the offerings from a publisher.
If you got an extension from a Top Publisher and aren't satisfied with your experience, consider engaging with the publisher first. Afterward, if you're still unsatisfied, contact the Marketplace team.
Apply to be a Top Publisher
- Sign in to https://marketplace.visualstudio.com/manage/publishers using the account with which you publish and manage your offerings in Marketplace
- Select the publisher and navigate to its Top Publisher tab. Note: you need to have one or more global Azure DevOps (Server/Service) extension or integration for the tab to appear.
- If you meet part of the previously listed requirements and are the publisher's owner, you see an option to apply for the program. On application, an email is sent to the Marketplace team to review your case. They respond in under 10 business days with next steps, clarifying questions or with the grant of the badge.
The team likely looks at other parameters, such as active uptake of your offerings, install/get started counts and ratings & reviews across your offerings before granting the badge. Microsoft reserves the right to grant, reject or revoke the Top Publisher badge at any time.
Once a publisher is a Top Publisher, then all its future updates and offerings must meet the previously listed requirements.
Respond to Marketplace extension reviews
You can respond to reviews that customers leave for your extensions in the Visual Studio Marketplace. Find and select Reply next to a review if you have one of the following permissions: owner, creator, or contributor.
You can leave only one response. Avoid using reviews as a support forum. If you need more details, please provide a support alias for the reviewer to contact. You can then resolve their problems externally and update your reply with a resolution.
Guidelines for publisher responses
Keep the Visual Studio Marketplace an open, inviting, respectful, and helpful place for customers to find, try, install, and review extensions. Communication plays an important role in keeping a healthy community. To help create this environment, here are guidelines for publishers responding to customer reviews. Think deeply about your customer interactions and reflect on the spirit of the customer experience that the Marketplace is trying to create.
- Reviews are reserved for customer comments. Use Reply only to respond to a review.
- Reviews are for sharing customer opinions, so all opinions are valid. Customers are entitled to their opinions, so treat comments respectfully as feedback without debate, criticism, or argument.
- Make sure that your responses add value and are relevant to your customers' comments.
- Focus on precisely addressing questions or problems. If you need more details, ask the customer to contact you over email, rather discuss in reviews. When you resolve the problem, update your reply with the resolution. You can edit your reply, just like customers can edit their reviews.
- If you come across any inappropriate reviews, like spam, abusive, or offensive content, for any extension, flag it for our review.
Request to void a review
As a publisher, you can appeal to void a review if the issue reported is because of the Marketplace or underlying platform. If the issue is valid, Marketplace admins void the rating. You can Appeal from ratings and review section on your extension hub page.
Unpublish an extension
You can unpublish free extensions, if you no longer want to offer them in the Marketplace.
The following scenarios cover when you might want to remove your extension from the Marketplace:
- You developed another extension and no longer want to offer the current one.
- Your extension has a problem, so you want to remove your extension from the Marketplace until you resolve the problem.
- You published your extension as public by mistake.
Certain criteria must be met for an extension to be unpublished or removed:
| Action | Requirements |
|---|---|
| Unpublish | Only free extensions might be unpublished. |
| Remove | Your extension must have zero (0) installs to be removed. |
Important
If you must remove your extension because of legal or security problems, contact the Marketplace team. We review the request and manually delete the extension.
Select the extension on your publisher page and choose Unpublish on the menu.
Your extension is unpublished immediately from the Marketplace, and new users can't install it. Ratings and reviews for your extension stay intact.
To offer your extension again in the Marketplace, choose Publish on the menu.
You can also choose to remove your extension completely from the Marketplace if your extension has zero (0) installs. To do so, choose Remove on the menu. This action can't be undone.