Elevate access to manage all Azure subscriptions and management groups
As a Global Administrator in Microsoft Entra ID, you might not have access to all subscriptions and management groups in your tenant. This article describes the ways that you can elevate your access to all subscriptions and management groups.
Note
For information about viewing or deleting personal data, see General Data Subject Requests for the GDPR, Azure Data Subject Requests for the GDPR, or Windows Data Subject Requests for the GDPR, depending on your specific area and needs. For more information about GDPR, see the GDPR section of the Microsoft Trust Center and the GDPR section of the Service Trust portal.
Why would you need to elevate your access?
If you are a Global Administrator, there might be times when you want to do the following actions:
- Regain access to an Azure subscription or management group when a user has lost access
- Grant another user or yourself access to an Azure subscription or management group
- See all Azure subscriptions or management groups in an organization
- Allow an automation app (such as an invoicing or auditing app) to access all Azure subscriptions or management groups
How does elevated access work?
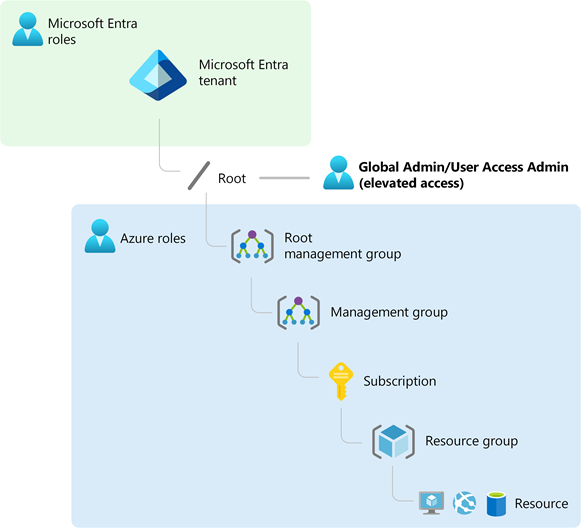
Microsoft Entra ID and Azure resources are secured independently from one another. That is, Microsoft Entra role assignments do not grant access to Azure resources, and Azure role assignments do not grant access to Microsoft Entra ID. However, if you are a Global Administrator in Microsoft Entra ID, you can assign yourself access to all Azure subscriptions and management groups in your tenant. Use this capability if you don't have access to Azure subscription resources, such as virtual machines or storage accounts, and you want to use your Global Administrator privilege to gain access to those resources.
When you elevate your access, you are assigned the User Access Administrator role in Azure at root scope (/). This allows you to view all resources and assign access in any subscription or management group in the tenant. User Access Administrator role assignments can be removed using Azure PowerShell, Azure CLI, or the REST API.
You should remove this elevated access once you have made the changes you need to make at root scope.
Perform steps at root scope
Step 1: Elevate access for a Global Administrator
Follow these steps to elevate access for a Global Administrator using the Azure portal.
Sign in to the Azure portal as a Global Administrator.
If you are using Microsoft Entra Privileged Identity Management, activate your Global Administrator role assignment.
Browse to Microsoft Entra ID > Manage > Properties.
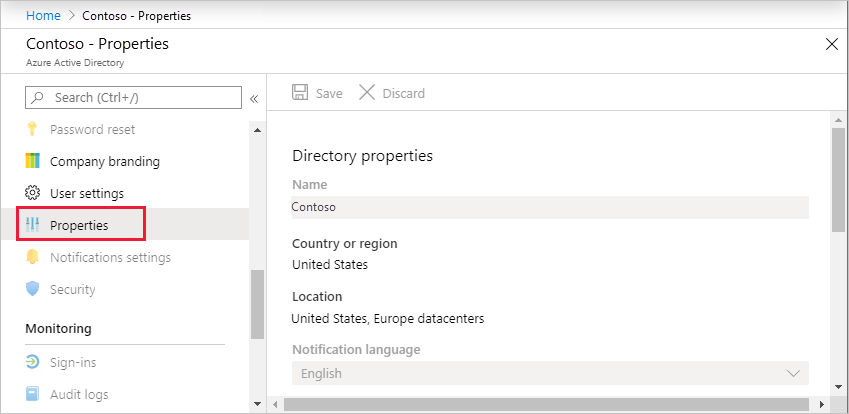
Under Access management for Azure resources, set the toggle to Yes.
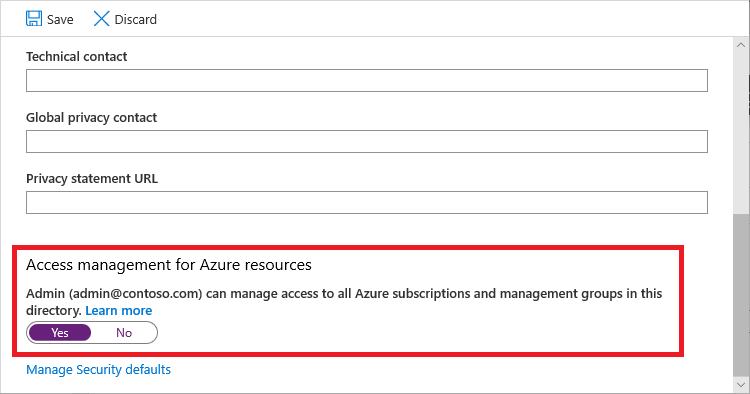
When you set the toggle to Yes, you are assigned the User Access Administrator role in Azure RBAC at root scope (/). This grants you permission to assign roles in all Azure subscriptions and management groups associated with this Microsoft Entra tenant. This toggle is only available to users who are assigned the Global Administrator role in Microsoft Entra ID.
When you set the toggle to No, the User Access Administrator role in Azure RBAC is removed from your user account. You can no longer assign roles in all Azure subscriptions and management groups that are associated with this Microsoft Entra tenant. You can view and manage only the Azure subscriptions and management groups to which you have been granted access.
Note
If you're using Privileged Identity Management, deactivating your role assignment does not change the Access management for Azure resources toggle to No. To maintain least privileged access, we recommend that you set this toggle to No before you deactivate your role assignment.
Select Save to save your setting.
This setting is not a global property and applies only to the currently signed in user. You can't elevate access for all members of the Global Administrator role.
Sign out and sign back in to refresh your access.
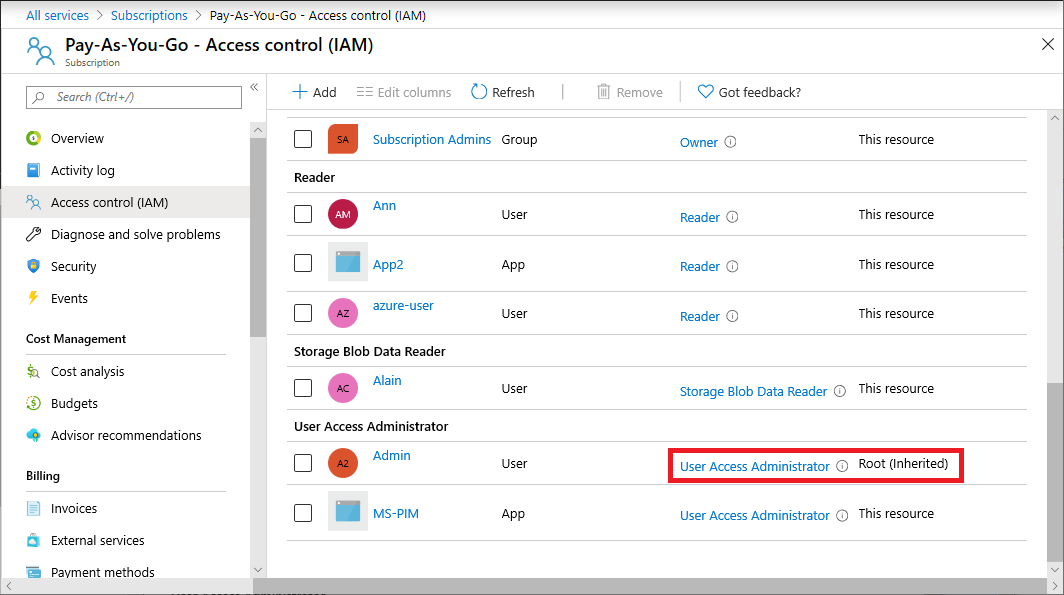
You should now have access to all subscriptions and management groups in your tenant. When you view the Access control (IAM) page, you'll notice that you have been assigned the User Access Administrator role at root scope.
Make the changes you need to make at elevated access.
For information about assigning roles, see Assign Azure roles using the Azure portal. If you are using Privileged Identity Management, see Discover Azure resources to manage or Assign Azure resource roles.
Perform the steps in the following section to remove your elevated access.
Step 2: Remove elevated access
To remove the User Access Administrator role assignment at root scope (/), follow these steps.
Sign in as the same user that was used to elevate access.
Browse to Microsoft Entra ID > Manage > Properties.
Set the Access management for Azure resources toggle back to No. Since this is a per-user setting, you must be signed in as the same user as was used to elevate access.
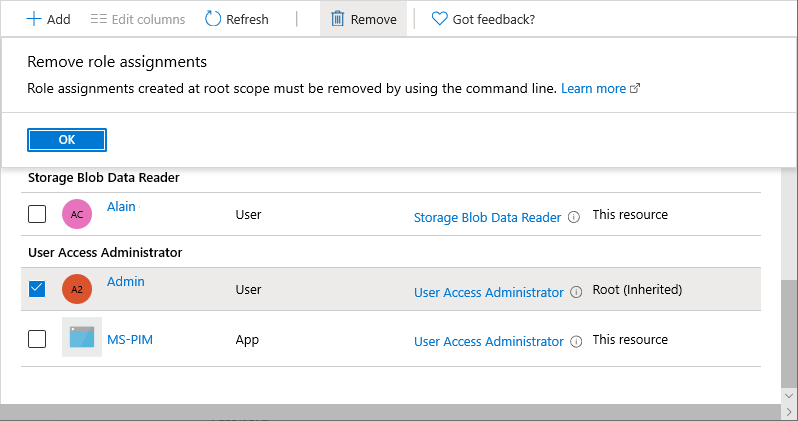
If you try to remove the User Access Administrator role assignment on the Access control (IAM) page, you'll see the following message. To remove the role assignment, you must set the toggle back to No or use Azure PowerShell, Azure CLI, or the REST API.
Sign out as Global Administrator.
If you are using Privileged Identity Management, deactivate your Global Administrator role assignment.
Note
If you're using Privileged Identity Management, deactivating your role assignment does not change the Access management for Azure resources toggle to No. To maintain least privileged access, we recommend that you set this toggle to No before you deactivate your role assignment.
View users with elevated access
If you have users with elevated access and you have the appropriate permissions, banners are displayed in a couple locations of the Azure portal. Global Administrators have permissions to read Azure role assignments from root scope and below for all Azure management groups and subscriptions within a tenant. This section describes how to determine if you have users that have elevated access in your tenant.
Option 1
In the Azure portal, sign in as Global Administrator.
Browse to Microsoft Entra ID > Manage > Properties.
Under Access management for Azure resources, look for the following banner.
You have X users with elevated access. Microsoft Security recommends deleting access for users who have unnecessary elevated access. Manage elevated access users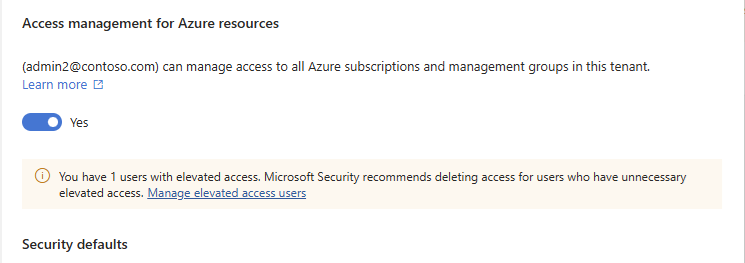
Select the Manage elevated access users link to view a list of users with elevated access.

Option 2
In the Azure portal, sign in as Global Administrator with elevated access.
Browse to a subscription.
Select Access control (IAM).
At the top of the page, look for the following banner.
Action required: X users have elevated access in your tenant. You should take immediate action and remove all role assignments with elevated access. View role assignments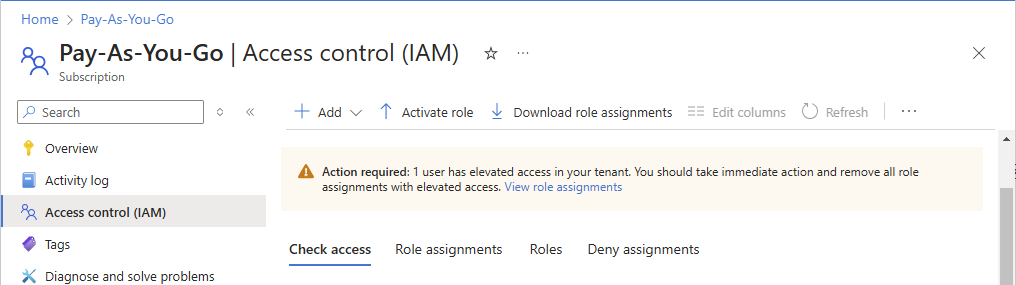
Select the View role assignments link to view a list of users with elevated access.

Remove elevated access for users
If you have users with elevated access, you should take immediate action and remove that access. To remove these role assignments, you must also have elevated access. This section describes how to remove elevated access for users in your tenant using the Azure portal. This capability is being deployed in stages, so it might not be available yet in your tenant.
Sign in to the Azure portal as a Global Administrator.
Browse to Microsoft Entra ID > Manage > Properties.
Under Access management for Azure resources, set the toggle to Yes as described earlier in Step 1: Elevate access for a Global Administrator.
Select the Manage elevated access users link.
The Users with elevated access appears pane appears with a list of users with elevated access in your tenant.

To remove elevated access for users, add a check mark next to the user and select Remove.

View elevate access log entries
When access is elevated or removed, an entry is added to the logs. As an administrator in Microsoft Entra ID, you might want to check when access was elevated and who did it.
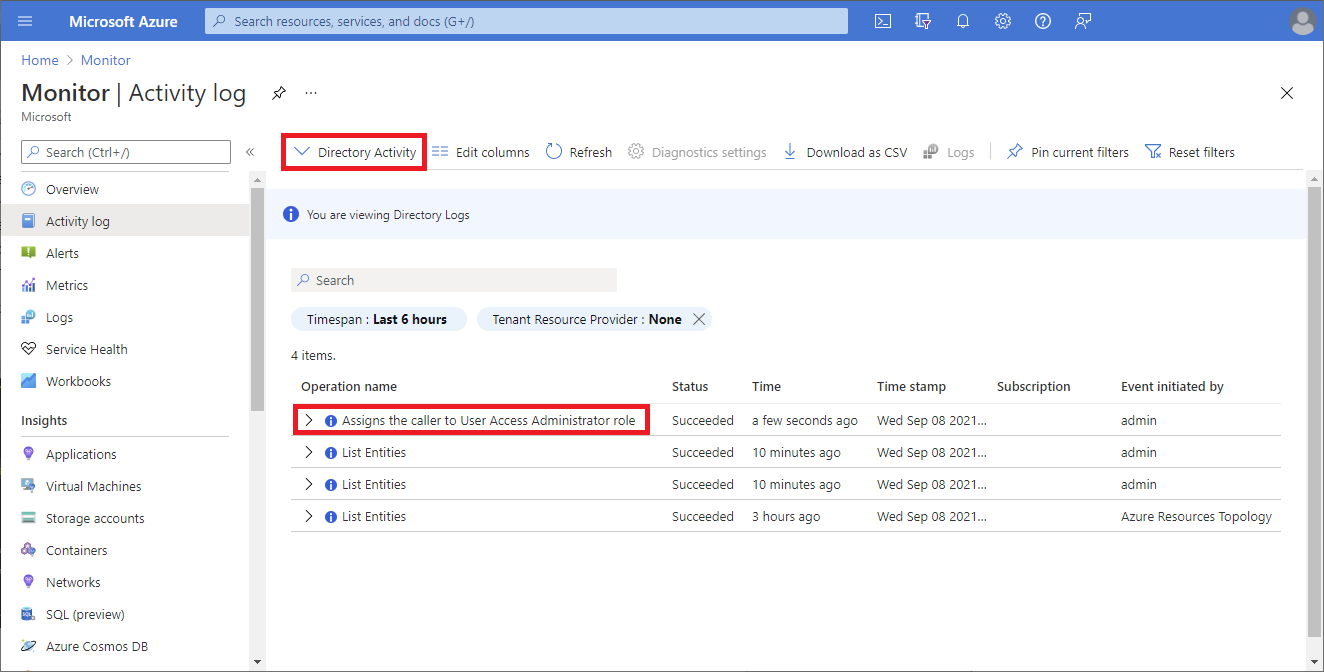
Elevate access log entries appear in both the Microsoft Entra directory audit logs and the Azure activity logs. Elevated access log entries for directory audit logs and activity logs include similar information. However, the directory audit logs are easier to filter and export. Also, the export capability enables you to stream access events, which can be used for your alert and detection solutions, such as Microsoft Sentinel or other systems. For information about how to send logs to different destinations, see Configure Microsoft Entra diagnostic settings for activity logs.
This section describes different ways that you can view the elevate access log entries.
Important
Elevate access log entries in the Microsoft Entra directory audit logs is currently in preview. This preview version is provided without a service level agreement, and it's not recommended for production workloads. Certain features might not be supported or might have constrained capabilities. For more information, see Supplemental Terms of Use for Microsoft Azure Previews.
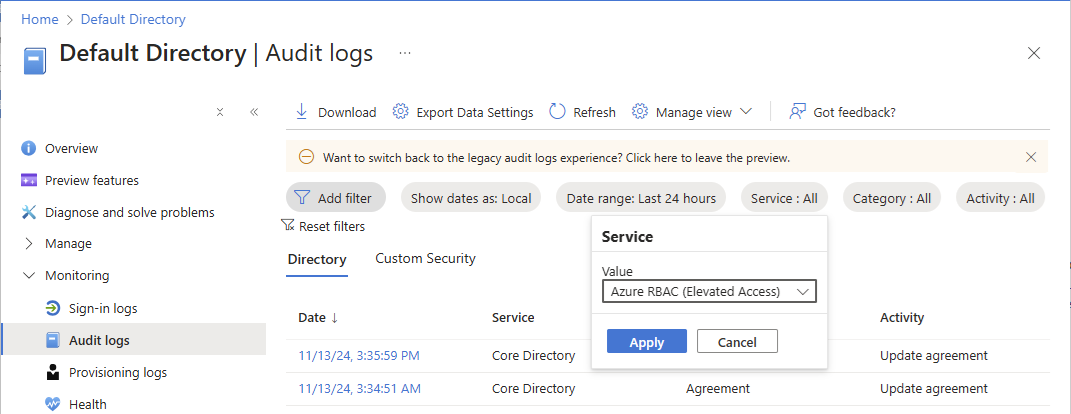
Sign in to the Azure portal as a Global Administrator.
Browse to Microsoft Entra ID > Monitoring > Audit logs.
In the Service filter, select Azure RBAC (Elevated Access) and then select Apply.
Elevated access logs are displayed.
To view details when access was elevated or removed, select these audit log entries.
User has elevated their access to User Access Administrator for their Azure ResourcesThe role assignment of User Access Administrator has been removed from the user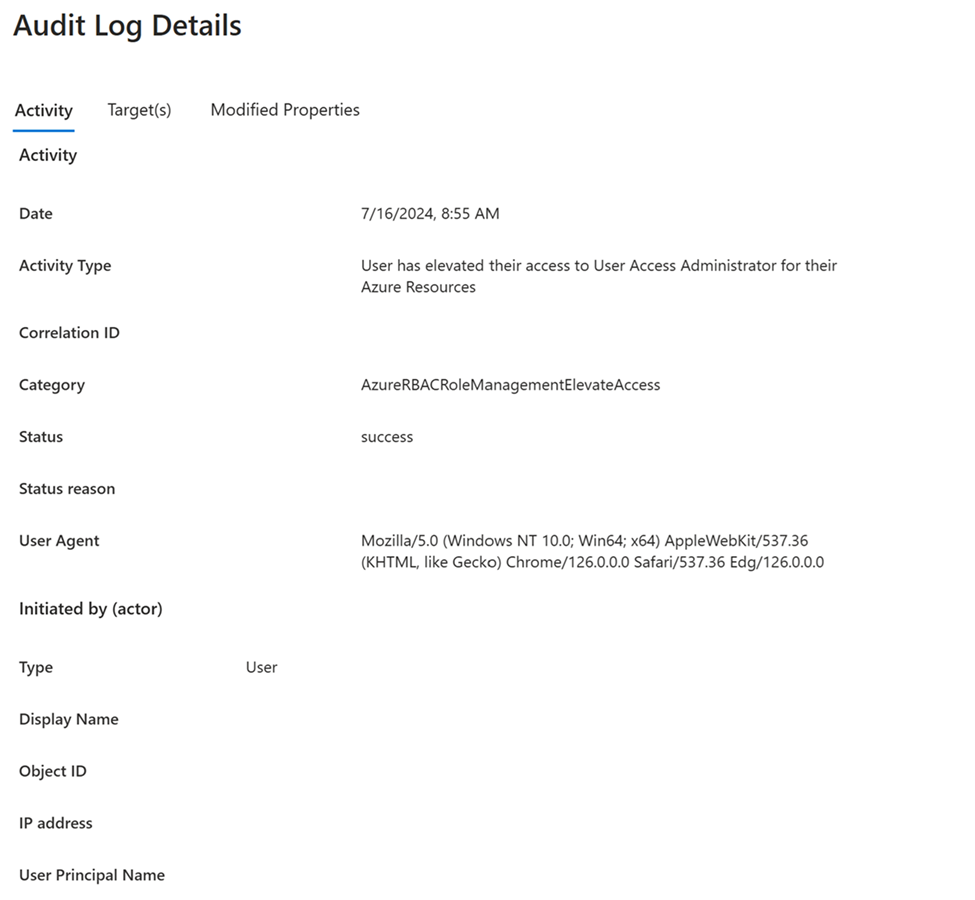
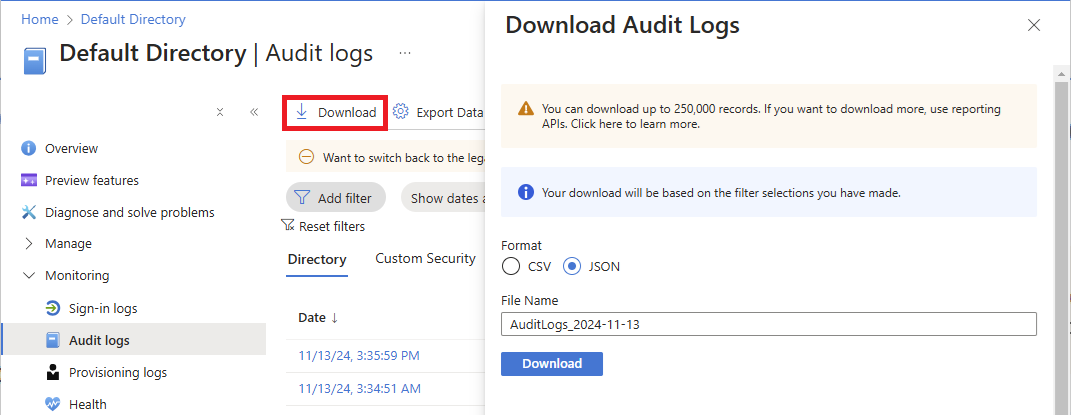
To download and view the payload of the log entries in JSON format, select Download and JSON.


Detect elevate access events using Microsoft Sentinel
To detect elevate access events and gain visibility into potentially fraudulent activities, you can use Microsoft Sentinel. Microsoft Sentinel is a security information and event management (SIEM) platform that provides security analytics and threat response capabilities. This section describes how to connect Microsoft Entra audit logs to Microsoft Sentinel so that you can detect elevate access in your organization.
Step 1: Enable Microsoft Sentinel
To get started, add Microsoft Sentinel to an existing Log Analytics workspace or create a new one.
Enable Microsoft Sentinel by following the steps at Enable Microsoft Sentinel.


Step 2: Connect Microsoft Entra data to Microsoft Sentinel
In this step, you install the Microsoft Entra ID solution and use the Microsoft Entra ID connector to collect data from Microsoft Entra ID.
Your organization might have already configured a diagnostic setting to integrate the Microsoft Entra audit logs. To check, view your diagnostic settings as described in How to access diagnostic settings.
Install the Microsoft Entra ID solution by following the steps at Discover and manage Microsoft Sentinel out-of-the-box content.
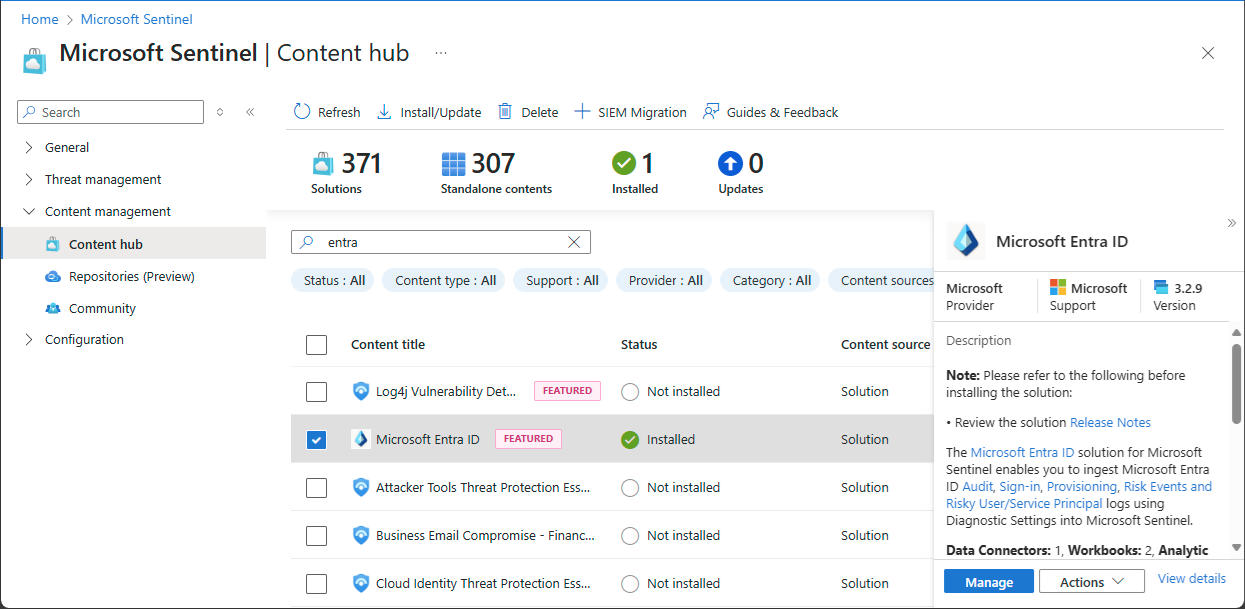
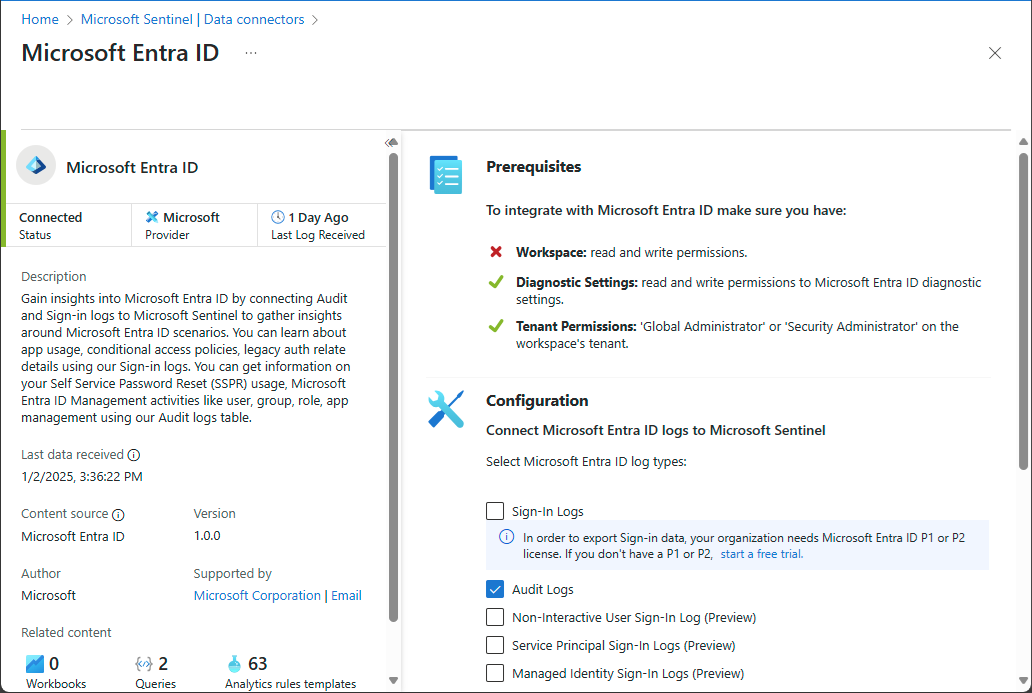
Use the Microsoft Entra ID connector to collect data from Microsoft Entra ID by following the steps at Connect Microsoft Entra data to Microsoft Sentinel.
On the Data connectors page, add a check mark for Audit Logs.


Step 3: Create an elevate access rule
In this step, you create a scheduled analytics rule based on a template to examine the Microsoft Entra audit logs for elevate access events.
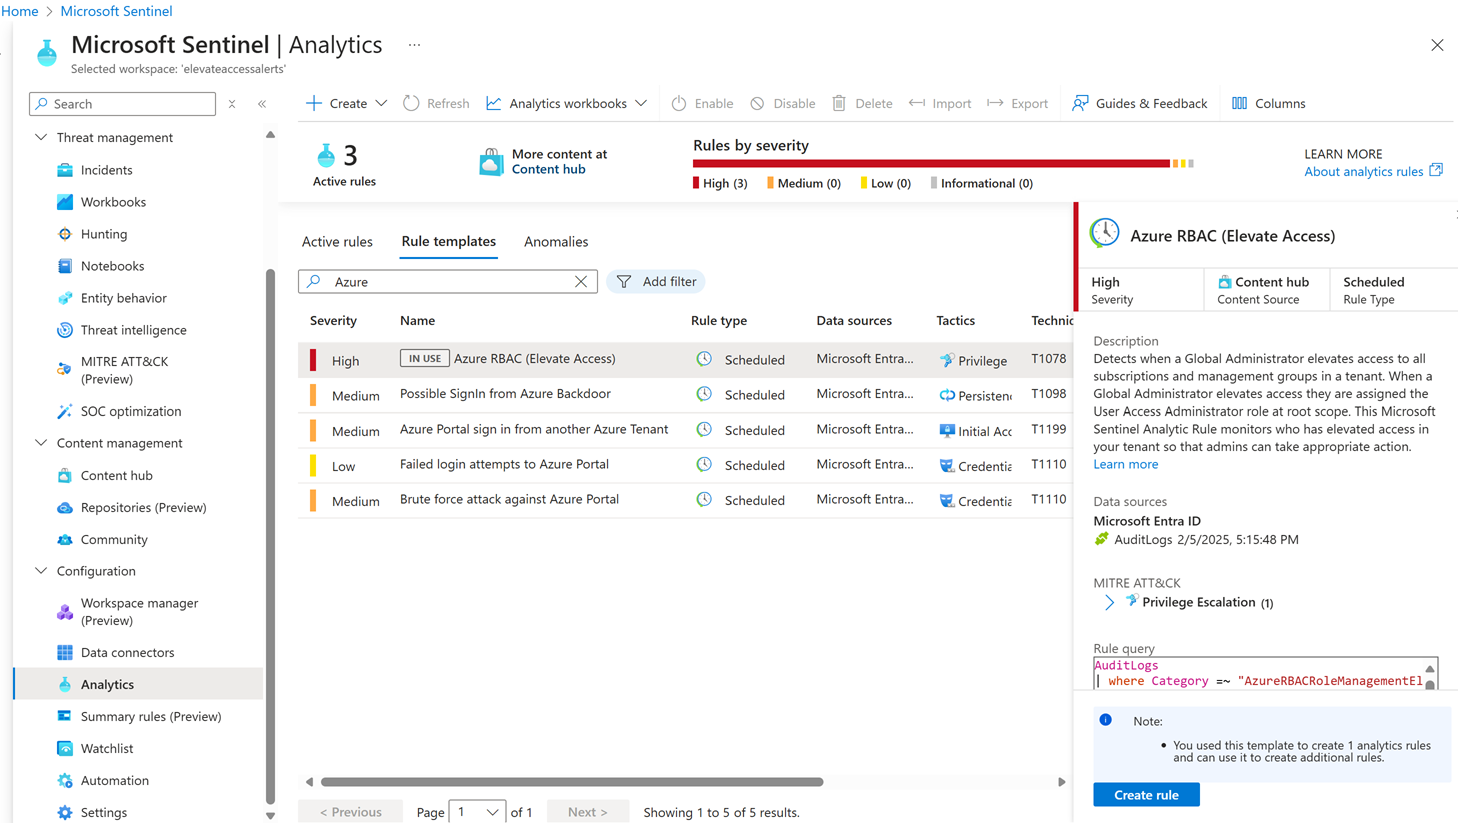
Create an elevate access analytics rule by following the steps at Create a rule from a template.
Select the Azure RBAC (Elevate Access) template then select the Create rule button on the details pane.
If you don't see the details pane, on the right edge, select the expand icon.
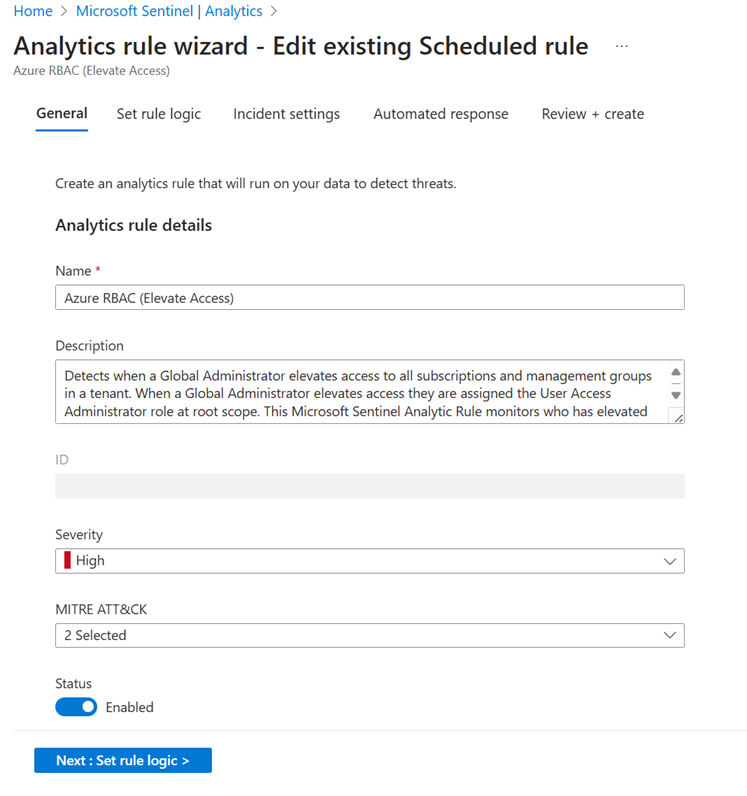
In the Analytics rule wizard, use the default settings to create a new scheduled rule.


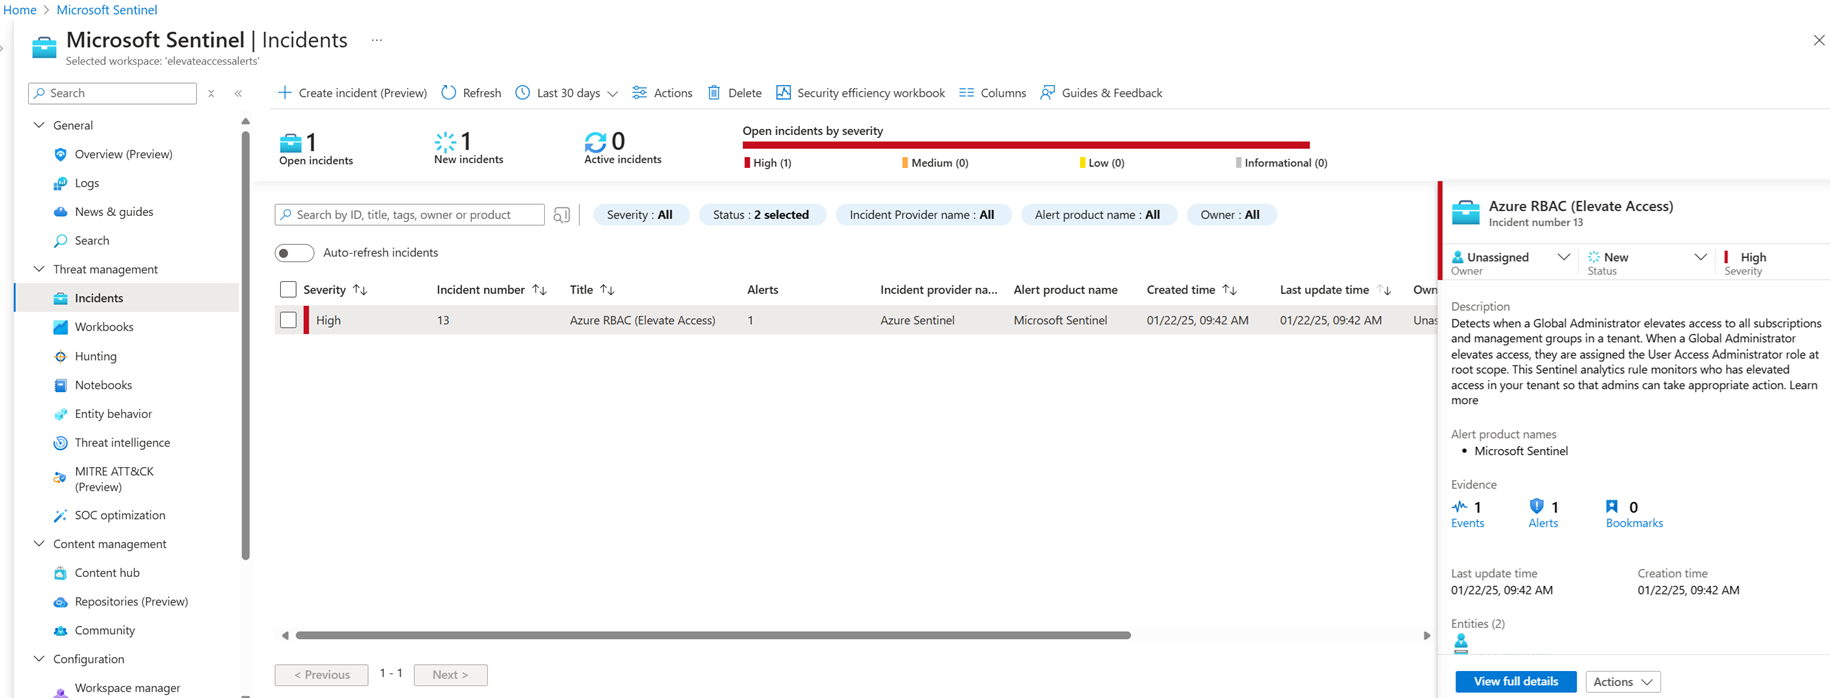
Step 4: View incidents of elevate access
In this step, you view and investigate elevate access incidents.
Use the Incidents page to view incidents of elevate access by following the steps at Navigate and investigate incidents in Microsoft Sentinel.