Use Azure Pipelines to build and push container images to registries
Azure DevOps Services
This article guides you through the creation of a pipeline to build and push a Docker image to an Azure Container Registry or Docker Hub.
Prerequisites
| Product | Requirements |
|---|---|
| Azure DevOps | - An Azure DevOps project. - Permissions: - To grant access to all pipelines in the project: You must be a member of the Project Administrators group. - To create service connections: You must have the Administrator or Creator role for service connections. - If you're using a self-hosted agent, ensure Docker is installed and the Docker engine is running with elevated privileges. Microsoft-hosted agents have Docker preinstalled. |
| GitHub | - A GitHub account. - A GitHub repository with a Dockerfile. Use the sample repository if you don't have your own project. - A GitHub service connection to authorize Azure Pipelines. |
| Azure | - An Azure subscription. - An Azure Container Registry. |
| Product | Requirements |
|---|---|
| Azure DevOps | - An Azure DevOps project. - Permissions: - To grant access to all pipelines in the project: You must be a member of the Project Administrators group. - To create service connections: You must have the Administrator or Creator role for service connections. - If you're using a self-hosted agent, ensure Docker is installed and the Docker engine is running with elevated privileges. Microsoft-hosted agents have Docker preinstalled. |
| GitHub | - A GitHub account. - A GitHub repository with a Dockerfile. Use the sample repository if you don't have your own project. - A GitHub service connection to authorize Azure Pipelines. |
| Docker Hub | - A Docker Hub account. - A Docker Hub image repository. |
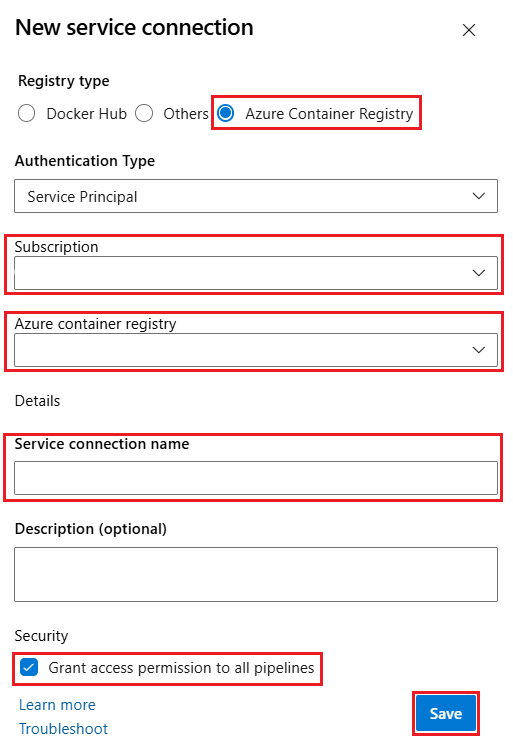
Create a Docker registry service connection
Before pushing container images to a registry, you need to create a service connection in Azure DevOps. This service connection stores the credentials required to securely authenticate with the container registry. For more information, see Docker Registry service connections.
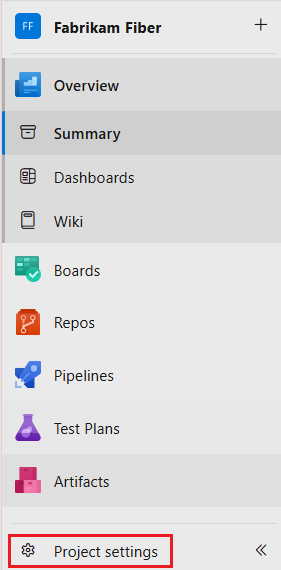
In your Azure DevOps project, select Project settings > Service connections.
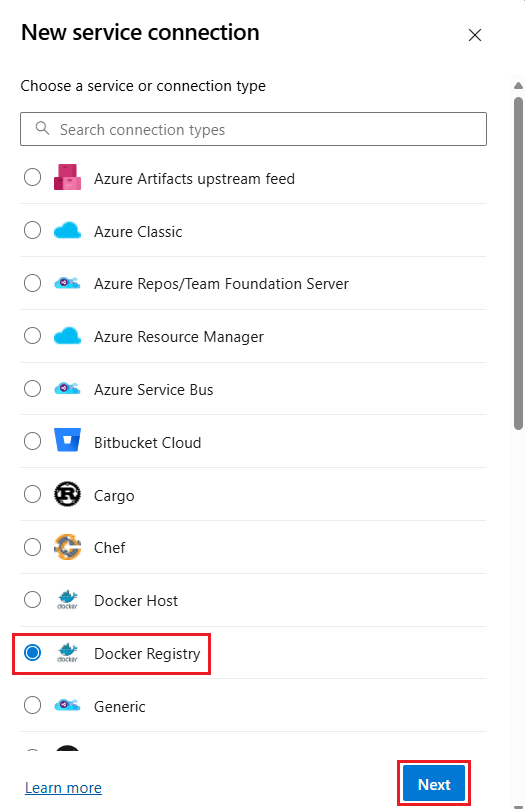
Select New service connection and Docker Registry.
Select Docker Hub and enter the following information:
Field Description Docker ID Enter your Docker ID. Docker Password Enter your Docker password. Service connection name Enter a name for the service connection. Grant access permission to all pipelines Select this option to grant access to all pipelines. 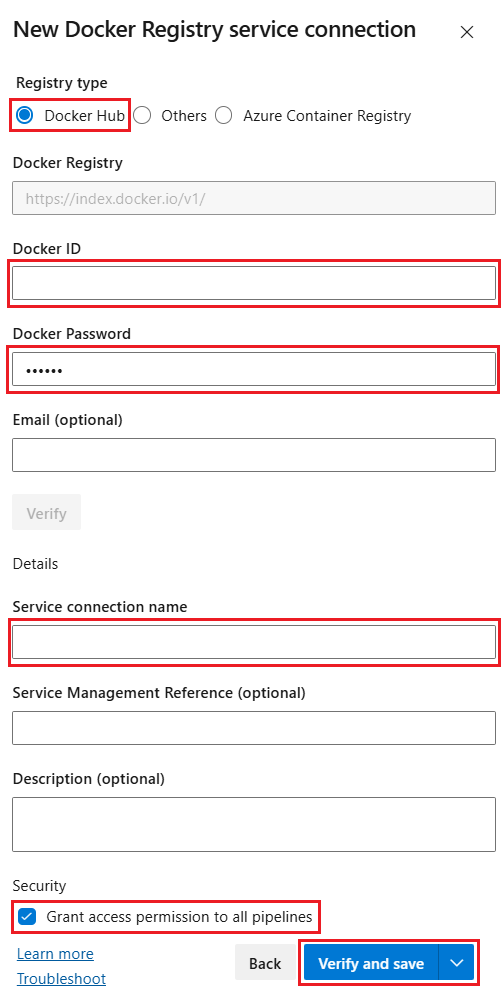
Select Verify and save.
Create a pipeline to build and push a Docker image
The Docker@2 task is used to build and push the image to the container registry. The Docker@2 task is designed to streamline the process of building, pushing, and managing Docker images within your Azure Pipelines. This task supports a wide range of Docker commands, including build, push, login, logout, start, stop, and run.
Use the following steps to create a YAML pipeline that uses the Docker@2 task to build and push the image.
In to your Azure DevOps project, select Pipelines and New pipeline.
Select GitHub as the location of your source code and select your repository.
- If you're redirected to GitHub to sign in, enter your GitHub credentials.
- If you're redirected to GitHub to install the Azure Pipelines app, select Approve and install.
Select your repository.
Select the Starter pipeline template to create a basic pipeline configuration.
Replace the contents of azure-pipelines.yml with the following code:
trigger:
- main

pool:
  vmImage: 'ubuntu-latest'

variables:
  repositoryName: '<target repository name>'

steps:
- task: Docker@2
  inputs:
    containerRegistry: '<docker registry service connection>'
    repository: $(repositoryName)
    command: 'buildAndPush'
    Dockerfile: '**/Dockerfile'
Edit the pipeline YAML file as follows:
- Replace
<target repository name>with the name of the repository in the container registry where you want to push the image. - Replace
<docker registry service connection>with the name of the Docker registry service connection you created earlier.
- Replace
When you're done, select Save and run > Save and run.
Select Job to view the logs and verify the pipeline ran successfully.
Go to your Azure DevOps project and select Pipelines from the left-hand menu.
Select New pipeline.
Select GitHub as the location of your source code and select your repository.
- If you're redirected to GitHub to sign in, enter your GitHub credentials.
- If you're redirected to GitHub to install the Azure Pipelines app, select Approve and install.
Select the Docker - Build and push an image to Azure Container Registry template.
Select your Azure subscription and Continue.
Select your Container Registry, and then select Validate and configure.
Example YAML pipeline:
# Docker
# Build and push an image to Azure Container Registry
# https://docs.microsoft.com/azure/devops/pipelines/languages/docker

trigger:
- main

resources:
- repo: self

variables:
  # Container registry service connection established during pipeline creation
  dockerRegistryServiceConnection: '7f9dc28e-5551-43ee-891f-33bf61a995de'
  imageRepository: 'usernamepipelinesjavascriptdocker'
  containerRegistry: 'repoistoryname.azurecr.io'
  dockerfilePath: '$(Build.SourcesDirectory)/app/Dockerfile'
  tag: '$(Build.BuildId)'

  # Agent VM image name
  vmImageName: 'ubuntu-latest'

stages:
- stage: Build
  displayName: Build and push stage
  jobs:
  - job: Build
    displayName: Build
    pool:
      vmImage: $(vmImageName)
    steps:
    - task: Docker@2
      displayName: Build and push an image to container registry
      inputs:
        command: buildAndPush
        repository: $(imageRepository)
        dockerfile: $(dockerfilePath)
        containerRegistry: $(dockerRegistryServiceConnection)
        tags: |
          $(tag)
Select Save and run and Save and run again.
Select Job to view the logs and verify the pipeline ran successfully.
The Docker template creates the service connection to your Azure Container Registry and uses the Docker@2 task to build and push the Docker image to the registry.
The Docker@2 task is designed to streamline the process of building, pushing, and managing Docker images within your Azure Pipelines. This task supports a wide range of Docker commands, including build, push, login, logout, start, stop, and run.
When using self-hosted agents, be sure that Docker is installed on the agent's host, and the Docker engine/daemon is running with elevated privileges.
