Tutorial: Build a trusted user access service by using Azure Functions
This article describes how to use Azure Functions to build a trusted user access service.
Important
The endpoint created at the end of this tutorial isn't secure. Be sure to read about the security details in the Azure Functions security article. You need to add security to the endpoint to ensure that bad actors can't provision tokens.
In this tutorial, you learn how to:
- Set up a function.
- Generate access tokens.
- Test the function.
- Deploy and run the function.
Download code
Find the finalized code for this quickstart on GitHub.
Prerequisites
- An Azure account with an active subscription. If you don't have an Azure subscription, you can create an account for free.
- Visual Studio Code on one of the supported platforms.
- Node.js, Active LTS and Maintenance LTS versions (10.14.1 recommended). Use the
node --versioncommand to check your version. - The Azure Functions extension for Visual Studio Code.
- An active Communication Services resource and connection string. For more information, see Quickstart: Create and manage Communication Services resources.
Overview
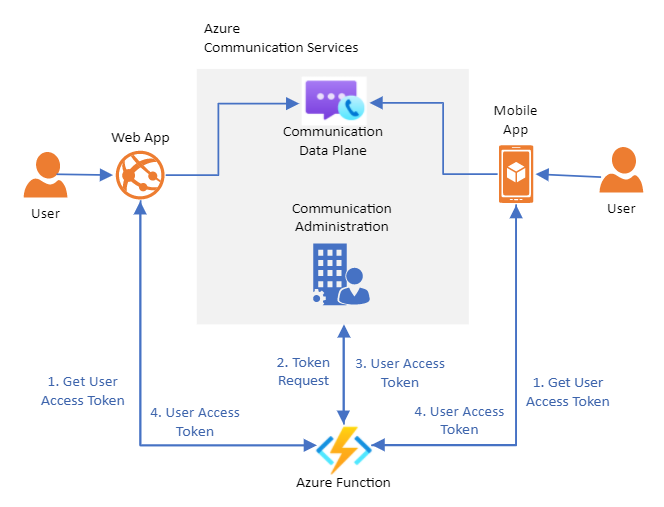
For this tutorial, you create a function app that serves as a trusted token provisioning service. You can use this tutorial to bootstrap your own token provisioning service.
This service is responsible for authenticating users to Communication Services. Users of your Communication Services applications require an access token to participate in chat threads and VoIP calls. The function works as a trusted middleman between the user and Communication Services. You can provision access tokens without exposing your resource connection string to your users.
For more information, see the client-server architecture and authentication and authorization conceptual documentation.
Set up a function
This section describes the procedures to set up a function.
Azure Functions setup
Let's first set up the basic structure for the function. For step-by-step instructions for setup, see Quickstart: Create a C# function in Azure by using Visual Studio Code.
The function requires the following configuration:
- Language: JavaScript
- Template: HTTP Trigger
- Authorization Level: Anonymous (if you prefer a different authorization model, you can switch it later)
- Function Name: User defined
After you follow the instructions in Quickstart: Create a C# function in Azure by using Visual Studio Code with the preceding configuration, you should have a project in Visual Studio Code for the function with an index.js file that contains the function itself. The following code inside of the file should be:
module.exports = async function (context, req) {
    context.log('JavaScript HTTP trigger function processed a request.');

    const name = (req.query.name || (req.body && req.body.name));
    const responseMessage = name
        ? "Hello, " + name + ". This HTTP triggered function executed successfully."
        : "This HTTP triggered function executed successfully. Pass a name in the query string or in the request body for a personalized response.";

    context.res = {
        // status: 200, /* Defaults to 200 */
        body: responseMessage
    };
}
The next step is to install Communication Services libraries.
Install Communication Services libraries
You use the Identity library to generate user access tokens.
Use the npm install command to install the Communication Services Identity SDK for JavaScript.
npm install @azure/communication-identity --save
The --save option lists the library as a dependency in your package.json file.
At the top of the index.js file, import the interface for the CommunicationIdentityClient parameter.
const { CommunicationIdentityClient } = require('@azure/communication-identity');
Generate access tokens
To allow your function to generate user access tokens, you first need to use the connection string for your Communication Services resource.
For more information on how to retrieve your connection string, see Quickstart: Create and manage Communication Services resources.
const connectionString = 'INSERT YOUR RESOURCE CONNECTION STRING'
Next, you modify your original function to generate user access tokens.
To generate user access tokens, use the createUser method to create a user. After the user is created, use the getToken method to generate a token for that user, which the function returns.
For this example, you configure the token scope to voip. Other scopes might be necessary for your application. To learn more about scopes, see Create and manage access tokens.
module.exports = async function (context, req) {
    let tokenClient = new CommunicationIdentityClient(connectionString);

    const user = await tokenClient.createUser();

    const userToken = await tokenClient.getToken(user, ["voip"]);

    context.res = {
        body: userToken
    };
}
For the existing Communication Services CommunicationUser parameter, you can skip the creation step and generate an access token. For more information, see Create and manage access tokens.
Test the function
Run the function locally by using F5. This action initializes the function locally and makes it accessible through http://localhost:7071/api/FUNCTION_NAME. For more information on running locally, see Quickstart: Create a C# function in Azure by using Visual Studio Code.
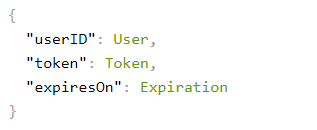
Open the URL on your browser and you see a response body with the Communication User ID, the token, and the expiration for the token.
Deploy the function to Azure
To deploy your function, follow the step-by-step instructions in Quickstart: Create a C# function in Azure by using Visual Studio Code.
In summary, you need to:
- Sign in to Azure from Visual Studio.
- Publish your project to your Azure account. Here you need to choose an existing subscription.
- Create a new function resource by using the Visual Studio wizard or an existing resource. For a new resource, you need to configure it to your desired region, runtime, and unique identifier.
- Wait for deployment to finalize.
- Run the function.
Run the function
Run the function by using the URL http://<function-appn-ame>.azurewebsites.net/api/<function-name>.
To find the URL, right-click the function in Visual Studio Code and copy the function URL.
For more information on how to run your function, see Quickstart: Create a C# function in Azure by using Visual Studio Code.
Secure the endpoint
As part of setting up a trusted service to provide access tokens for users, you need to take into account the security of that endpoint to make sure that no bad actor can randomly create tokens for your service. Azure Functions provides built-in security features that you can use to secure the endpoint by using different types of authentication policies. For more information, see Azure Functions security.
Clean up resources
If you want to clean up and remove an Azure Communication Services subscription, you can delete the resource or resource group. Deleting the resource group also deletes any other resources associated with it. You can find out more about how to clean up Communication Service resources and clean up Azure Functions resources.