How to Clip with an Axis-Aligned Clip Rectangle
This topic describes how to clip an image with an axis-aligned clip rectangle. This approach produces only rectangular clips, because the content bounds are aligned to the axis of the rectangle. This approach is more efficient than using layers with the content bounds. For more information, see Layers Overview.
To clip with an axis-aligned clip rectangle
Load the original image from a resource. For information on how to load a bitmap, see How to Load a Bitmap from a Resource.
Call ID2D1RenderTarget::PushAxisAlignedClip to specify a rectangle. The rendering commands are clipped to the rectangle.
Paint the original image.
Call ID2D1RenderTarget::PopAxisAlignedClip to remove the last axis-aligned clip from the render target.
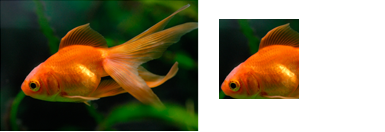
For example, in the following illustration, the original bitmap on the left is 200*130 pixels. The bitmap on the right is the original bitmap clipped to the axis-aligned clip rectangle. The dimensions are (20, 20) to (100, 100).

To create the clipped image, create a rectangle structure as the clipping area. Call PushAxisAlignedClip with the clipping area and paint the original image. Call PopAxisAlignedClip to remove the clip from the render target. The following code shows how to do this.
pRT->PushAxisAlignedClip(
    D2D1::RectF(20, 20, 100, 100),
    D2D1_ANTIALIAS_MODE_PER_PRIMITIVE
    );

pRT->FillRectangle(D2D1::RectF(0, 0, 200, 133), m_pOriginalBitmapBrush);
pRT->PopAxisAlignedClip();