EAP configuration
This article provides a step-by-step guide for creating an Extensible Authentication Protocol (EAP) configuration XML for a VPN profile, including information about EAP certificate filtering in Windows 10.
Create an EAP configuration XML for a VPN profile
To get the EAP configuration from your desktop using the rasphone tool that is shipped in the box:
Run rasphone.exe.
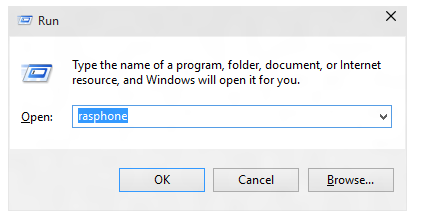
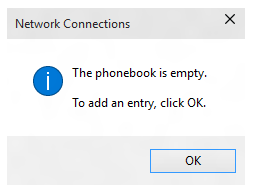
If you don't currently have a VPN connection and you see the following message, select OK.
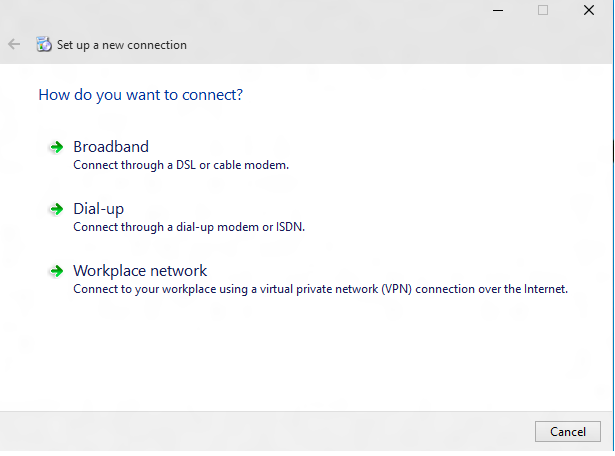
In the wizard, select Workplace network.
Enter an Internet address and connection name. These details can be fake since it doesn't impact the authentication parameters.
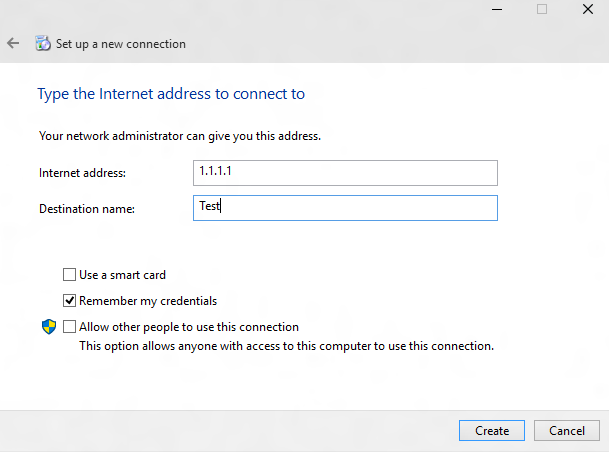
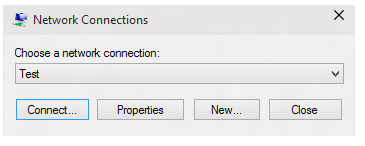
Create a fake VPN connection. In the UI shown here, select Properties.
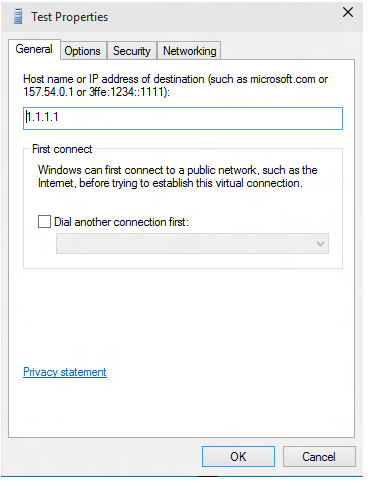
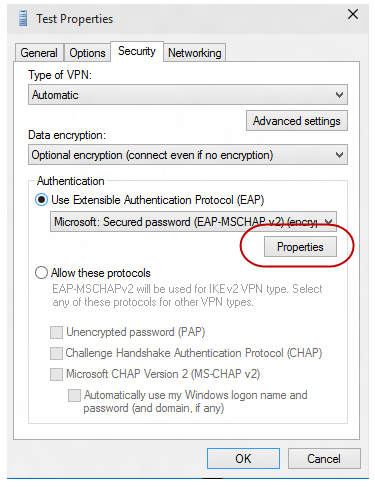
In the Test Properties dialog, select the Security tab.
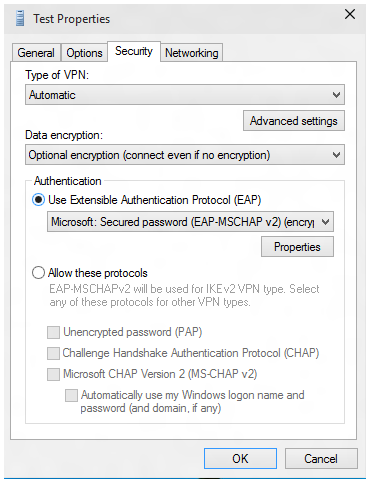
On the Security tab, select Use Extensible Authentication Protocol (EAP).
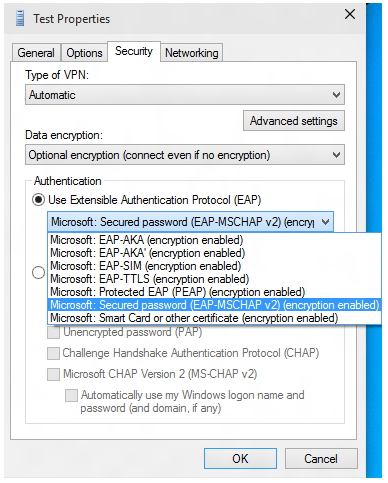
From the drop-down menu, select the EAP method that you want to configure, and then select Properties to configure as needed.
Switch over to PowerShell and use the following cmdlets to retrieve the EAP configuration XML.
Get-VpnConnection -Name TestHere's an example output.
Name                  : Test
ServerAddress         : 1.1.1.1
AllUserConnection     : False
Guid                  : {EC87F6C9-8823-416C-B92B-517D592E250F}
TunnelType            : Automatic
AuthenticationMethod  : {Eap}
EncryptionLevel       : Optional
L2tpIPsecAuth         : Certificate
UseWinlogonCredential : False
EapConfigXmlStream    : #document
ConnectionStatus      : Disconnected
RememberCredential    : True
SplitTunneling        : False
DnsSuffix             :
IdleDisconnectSeconds : 0
$a = Get-VpnConnection -Name Test$a.EapConfigXmlStream.InnerXmlHere's an example output.
<EapHostConfig xmlns="http://www.microsoft.com/provisioning/EapHostConfig">
  <EapMethod>
    <Type xmlns="http://www.microsoft.com/provisioning/EapCommon">13</Type>
    <VendorId xmlns="http://www.microsoft.com/provisioning/EapCommon">0</VendorId>
    <VendorType xmlns="http://www.microsoft.com/provisioning/EapCommon">0</VendorType>
    <AuthorId xmlns="http://www.microsoft.com/provisioning/EapCommon">0</AuthorId>
  </EapMethod>
  <Config xmlns="http://www.microsoft.com/provisioning/EapHostConfig">
    <Eap xmlns="http://www.microsoft.com/provisioning/BaseEapConnectionPropertiesV1">
      <Type>13</Type>
      <EapType xmlns="http://www.microsoft.com/provisioning/EapTlsConnectionPropertiesV1">
        <CredentialsSource>
          <CertificateStore>
            <SimpleCertSelection>true</SimpleCertSelection>
          </CertificateStore>
        </CredentialsSource>
        <ServerValidation>
          <DisableUserPromptForServerValidation>false</DisableUserPromptForServerValidation>
          <ServerNames />
        </ServerValidation>
        <DifferentUsername>false</DifferentUsername>
        <PerformServerValidation xmlns="http://www.microsoft.com/provisioning/EapTlsConnectionPropertiesV2">true</PerformServerValidation>
        <AcceptServerName xmlns="http://www.microsoft.com/provisioning/EapTlsConnectionPropertiesV2">true</AcceptServerName>
        <TLSExtensions xmlns="http://www.microsoft.com/provisioning/EapTlsConnectionPropertiesV2">
          <FilteringInfo xmlns="http://www.microsoft.com/provisioning/EapTlsConnectionPropertiesV3">
            <ClientAuthEKUList Enabled="true" />
            <AnyPurposeEKUList Enabled="true" />
          </FilteringInfo>
        </TLSExtensions>
      </EapType>
    </Eap>
  </Config>
</EapHostConfig>
Note
You should check with Mobile Device Management (MDM) vendor, if you need to pass this XML in escaped format. The XSDs for all EAP methods are shipped in the box and can be found at the following locations:
- C:\Windows\schemas\EAPHost
- C:\Windows\schemas\EAPMethods
EAP certificate filtering
In your deployment, if you have multiple certificates provisioned on the device and the Wi-Fi profile provisioned doesn't have a strict filtering criteria, you might see connection failures when connecting to Wi-Fi. The solution is to ensure that the Wi-Fi profile provisioned has strict filtering criteria so that it matches only one certificate.
Enterprises deploying certificate-based EAP authentication for VPN and Wi-Fi can encounter a situation where there are multiple certificates that meet the default criteria for authentication. This situation can lead to issues such as:
- The user might be prompted to select the certificate.
- The wrong certificate might be auto-selected and cause an authentication failure.
A production ready deployment must have appropriate certificate details as part of the profile being deployed. The following information explains how to create or update an EAP configuration XML such that the extraneous certificates are filtered out and appropriate certificate can be used for the authentication.
EAP XML must be updated with relevant information for your environment. This task can be done manually by editing the following XML sample or by using the step-by-step UI guide. After the EAP XML is updated, refer to instructions from your MDM to deploy the updated configuration as follows:
- For Wi-Fi, look for the
<EAPConfig>section of your current WLAN Profile XML. (This section is what you specify for the WLanXml node in the Wi-Fi CSP.) Within these tags, you'll find the complete EAP configuration. Replace the section under<EAPConfig>with your updated XML and update your Wi-Fi profile. You can refer to your MDM’s guidance on how to deploy a new Wi-Fi profile. - For VPN, EAP configuration is a separate field in the MDM configuration. Work with your MDM provider to identify and update the appropriate field.
For information about EAP settings, see Extensible Authentication Protocol (EAP) for network access.
For information about generating an EAP XML, see the EAP configuration article.
For more information about extended key usage (EKU), see https://datatracker.ietf.org/doc/html/rfc5280#section-4.2.1.12.
For information about adding EKU to a certificate, see https://technet.microsoft.com/library/cc731792.aspx.
The following list describes the prerequisites for a certificate to be used with EAP:
The certificate must have at least one of the following EKU properties:
- Client Authentication: As defined by RFC 5280, this property is a well-defined OID with value 1.3.6.1.5.5.7.3.2.
- Any Purpose: This property is an EKU-defined one and is published by Microsoft. It is a well-defined OID with value 1.3.6.1.4.1.311.10.12.1. The inclusion of this OID implies that the certificate can be used for any purpose. The advantage of this EKU over the All Purpose EKU is that other non-critical or custom EKUs can still be added to the certificate for effective filtering.
- All Purpose: As defined by RFC 5280, if a CA includes EKUs to satisfy some application needs, but doesn't want to restrict usage of the key, the CA can add an EKU value of 0. A certificate with such an EKU can be used for all purposes.
The user or the computer certificate on the client must chain to a trusted root CA.
The user or the computer certificate doesn't fail any one of the checks that are performed by the CryptoAPI certificate store, and the certificate passes requirements in the remote access policy.
The user or the computer certificate doesn't fail any one of the certificate object identifier checks that are specified in the Internet Authentication Service (IAS)/Radius Server.
The Subject Alternative Name (SubjectAltName) extension in the certificate contains the user principal name (UPN) of the user.
The following XML sample explains the properties for the EAP TLS XML, including certificate filtering.
Note
For PEAP or TTLS profiles, the EAP TLS XML is embedded within some PEAP-specific or TTLS-specific elements.
<EapHostConfig xmlns="http://www.microsoft.com/provisioning/EapHostConfig">
 <EapMethod>
  <Type xmlns="http://www.microsoft.com/provisioning/EapCommon">13</Type>
  <!--The above property defines the Method type for EAP, 13 means EAP TLS -->

  <VendorId xmlns="http://www.microsoft.com/provisioning/EapCommon">0</VendorId>
  <VendorType xmlns="http://www.microsoft.com/provisioning/EapCommon">0</VendorType>
  <AuthorId xmlns="http://www.microsoft.com/provisioning/EapCommon">0</AuthorId>
  <!--The 3 properties above define the method publishers, this is seen primarily in 3rd party Vendor methods.-->
  <!-- For Microsoft EAP TLS the value of the above fields will always be 0 -->
 </EapMethod>
 <!-- Now that the EAP Method is Defined we will go into the Configuration -->
 <Config xmlns="http://www.microsoft.com/provisioning/EapHostConfig">
  <Eap xmlns="http://www.microsoft.com/provisioning/BaseEapConnectionPropertiesV1">
   <Type>13</Type>
   <EapType xmlns="http://www.microsoft.com/provisioning/EapTlsConnectionPropertiesV1">
    <CredentialsSource>
     <!-- Credential Source can be either CertificateStore or SmartCard -->
     <CertificateStore>
      <SimpleCertSelection>true</SimpleCertSelection>
      <!--SimpleCertSelection automatically selects a cert if there are mutiple identical (Same UPN, Issuer, etc.) certs.-->
      <!--It uses a combination of rules to select the right cert-->
     </CertificateStore>
    </CredentialsSource>
    <ServerValidation>
     <!-- ServerValidation fields allow for checks on whether the server being connected to and the server cert being used are trusted -->
     <DisableUserPromptForServerValidation>false</DisableUserPromptForServerValidation>
     <ServerNames/>
    </ServerValidation>
    <DifferentUsername>false</DifferentUsername>
    <PerformServerValidation xmlns="http://www.microsoft.com/provisioning/EapTlsConnectionPropertiesV2">false</PerformServerValidation>
    <AcceptServerName xmlns="http://www.microsoft.com/provisioning/EapTlsConnectionPropertiesV2">false</AcceptServerName>
    <TLSExtensions xmlns="http://www.microsoft.com/provisioning/EapTlsConnectionPropertiesV2">
     <!-- For filtering the relevant information is below -->
     <FilteringInfo xmlns="http://www.microsoft.com/provisioning/EapTlsConnectionPropertiesV3">
      <CAHashList Enabled="true">
       <!-- The above implies that you want to filter by Issuer Hash -->
       <IssuerHash>ff ff ff ff ff ff ff ff ff ff ff ff ff ff ff ff ff ff ff ff
        <!-- Issuing certs thumbprint goes here-->
       </IssuerHash>
       <!-- You can add multiple entries and it will find the list of certs that have at least one of these certs in its chain-->
      </CAHashList>
      <EKUMapping>
       <!-- This section defines Custom EKUs that you may be adding-->
       <!-- You do not need this section if you do not have custom EKUs -->
       <!-- You can have multiple EKUs defined here and then referenced below as shown -->
       <EKUMap>
        <EKUName>
         <!--Add a friendly Name for an EKU here for example -->ContostoITEKU</EKUName>
        <EKUOID>
         <!--Add the OID Value your CA adds to the certificate here, for example -->1.3.6.1.4.1.311.42.1.15</EKUOID>
       </EKUMap>
        <!-- All the EKU Names referenced in the example below must first be defined here
       <EKUMap>
        <EKUName>Example1</EKUName>
        <EKUOID>2.23.133.8.3</EKUOID>

       </EKUMap>
       <EKUMap>
        <EKUName>Example2</EKUName>
        <EKUOID>1.3.6.1.4.1.311.20.2.1</EKUOID>
       </EKUMap>
       -->
      </EKUMapping>
      <ClientAuthEKUList Enabled="true">
       <!-- The above implies that you want certs with Client Authentication EKU to be used for authentication -->
       <EKUMapInList>
        <!-- This section implies that the certificate should have the following custom EKUs in addition to the Client Authentication EKU -->
        <EKUName>
         <!--Use the name from the EKUMap Field above-->ContostoITEKU</EKUName>
       </EKUMapInList>
       <!-- You can have multiple Custom EKUs mapped here, Each additional EKU will be processed with an AND operand -->
       <!-- For example, Client Auth EKU AND ContosoITEKU AND Example1 etc. -->
       <EKUMapInList>
        <EKUName>Example1</EKUName>
       </EKUMapInList>
      </ClientAuthEKUList>
      <AllPurposeEnabled>true</AllPurposeEnabled>
      <!-- Implies that a certificate with the EKU field = 0 will be selected -->
      <AnyPurposeEKUList Enabled="true"/>
      <!-- Implies that a certificate with the EKU oid Value of 1.3.6.1.4.1.311.10.12.1 will be selected -->
      <!-- Like for Client Auth you can also add Custom EKU properties with AnyPurposeEKUList (but not with AllPurposeEnabled) -->
      <!-- So here is what the above policy implies.
      The certificate selected will have
      Issuer Thumbprint = ff ff ff ff ff ff ff ff ff ff ff ff ff ff ff ff ff ff ff ff
      AND
      ((Client Authentication EKU AND ContosoITEKU) OR (AnyPurposeEKU) OR AllPurpose Certificate)

      Any certificate(s) that match these criteria will be utilised for authentication
      -->
     </FilteringInfo>
    </TLSExtensions>
   </EapType>
  </Eap>
 </Config>
</EapHostConfig>
Note
The EAP TLS XSD is located at %systemdrive%\Windows\schemas\EAPMethods\eaptlsconnectionpropertiesv3.xsd.
Alternatively, you can use the following procedure to create an EAP configuration XML:
Follow steps 1 through 7 in the EAP configuration article.
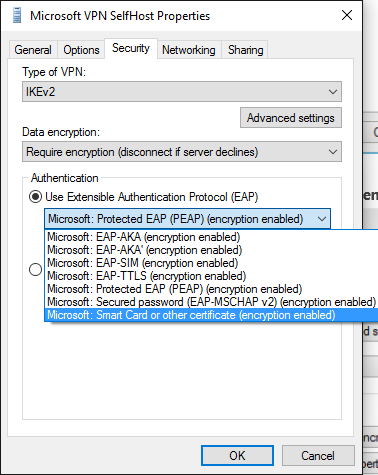
In the Microsoft VPN SelfHost Properties dialog box, select Microsoft: Smart Card or other Certificate from the drop-down menu (this value selects EAP TLS).
Note
For PEAP or TTLS, select the appropriate method and continue following this procedure.
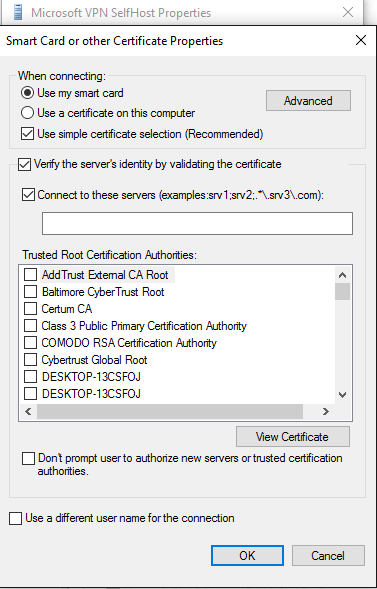
Select the Properties button underneath the drop-down menu.
On the Smart Card or other Certificate Properties menu, select the Advanced button.
On the Configure Certificate Selection menu, adjust the filters as needed.
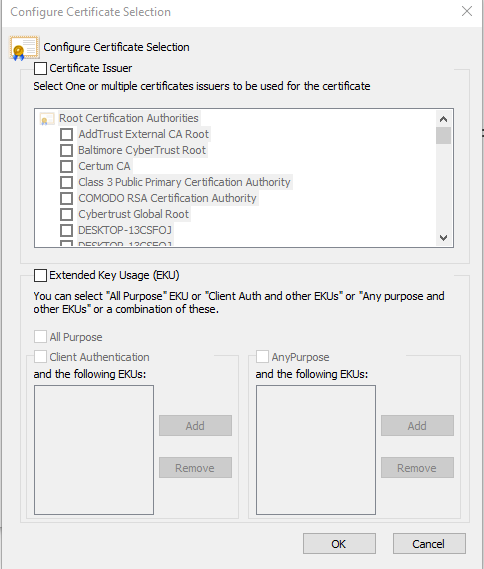
Select OK to close the windows and get back to the main rasphone.exe dialog box.
Close the rasphone dialog box.
Continue following the procedure in the EAP configuration article from step 9 to get an EAP TLS profile with appropriate filtering.
Note
You can also set all the other applicable EAP Properties through this UI as well. A guide for what these properties mean can be found in the Extensible Authentication Protocol (EAP) for network access article.