Create a Rule to Send an Authentication Method Claim
You can use either the Send Group Membership as Claims rule template or the Transform an Incoming Claim rule template to send an authentication method claim. The relying party can use an authentication method claim to determine the logon mechanism that the user uses to authenticate and obtain claims from Active Directory Federation Services (AD FS). You can also use the Authentication Mechanism Assurance feature of Active Directory Federation Services (AD FS) in Windows Server 2012 R2 as input to generate authentication method claims for situations in which the relying party wants to determine the level of access that is based on smart card logons. For example, a developer can assign different levels of access to federated users of the relying party application. The levels of access are based on whether the users log on with their user name and password credentials, as opposed to their smart cards.
Depending on the requirements of your organization, use one of the following procedures:
Create this rule by using the Send Group Membership as Claims rule template - You can use this rule template when you want the group that you specify in this template to ultimately determine what authentication method claim to issue.
Create this rule by using the Transform an Incoming Claim rule template - You can use this rule template when you want to change the existing authentication method to a new authentication method that works with a product that does not recognize standard AD FS authentication method claims.
To create by using the Send Group Membership as Claims rule template on a Relying Party Trust in Windows Server 2016
In Server Manager, click Tools, and then select AD FS Management.
In the console tree, under AD FS, click Relying Party Trusts.

Right-click the selected trust, and then click Edit Claim Issuance Policy.

In the Edit Claim Issuance Policy dialog box, under Issuance Transform Rules click Add Rule to start the rule wizard.

On the Select Rule Template page, under Claim rule template, select Send Group Membership as Claim from the list, and then click Next.
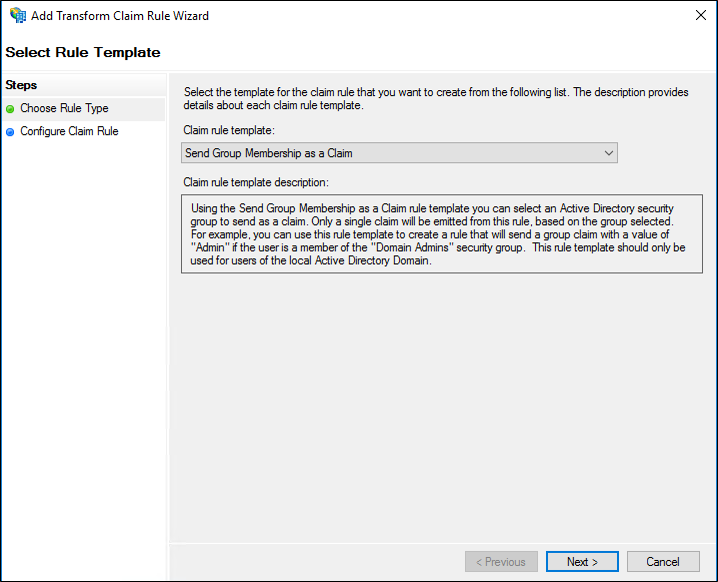
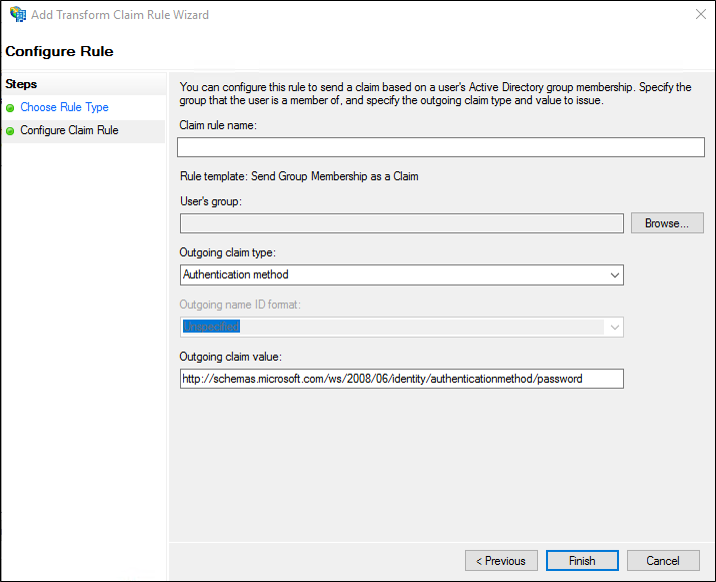
On the Configure Rule page, type a claim rule name.
Click Browse, select the group whose members should receive this authentication method claim, and then click OK.
In Outgoing claim type, select Authentication method in the list.
In Outgoing claim value, type one of the default uniform resource identifier (URI) values in the following table, depending on your preferred authentication method, click Finish, and then click OK to save the rule.
| Actual Authentication method | Corresponding URI |
|---|---|
| User name and password authentication | https://schemas.microsoft.com/ws/2008/06/identity/authenticationmethod/password |
| Windows authentication | https://schemas.microsoft.com/ws/2008/06/identity/authenticationmethod/windows |
| Transport Layer Security (TLS) Mutual authentication that uses X.509 certificates | https://schemas.microsoft.com/ws/2008/06/identity/authenticationmethod/tlsclient |
| X.509-based authentication that does not use TLS | https://schemas.microsoft.com/ws/2008/06/identity/authenticationmethod/x509 |
To create by using the Send Group Membership as Claims rule template on a Claims Provider Trust in Windows Server 2016
In Server Manager, click Tools, and then select AD FS Management.
In the console tree, under AD FS, click Claims Provider Trusts.

Right-click the selected trust, and then click Edit Claim Rules.

In the Edit Claim Rules dialog box, under Acceptance Transform Rules click Add Rule to start the rule wizard.

On the Select Rule Template page, under Claim rule template, select Send Group Membership as Claim from the list, and then click Next.

On the Configure Rule page, type a claim rule name.
Click Browse, select the group whose members should receive this authentication method claim, and then click OK.
In Outgoing claim type, select Authentication method in the list.
In Outgoing claim value, type one of the default uniform resource identifier (URI) values in the following table, depending on your preferred authentication method, click Finish, and then click OK to save the rule.
| Actual Authentication method | Corresponding URI |
|---|---|
| User name and password authentication | https://schemas.microsoft.com/ws/2008/06/identity/authenticationmethod/password |
| Windows authentication | https://schemas.microsoft.com/ws/2008/06/identity/authenticationmethod/windows |
| Transport Layer Security (TLS) Mutual authentication that uses X.509 certificates | https://schemas.microsoft.com/ws/2008/06/identity/authenticationmethod/tlsclient |
| X.509-based authentication that does not use TLS | https://schemas.microsoft.com/ws/2008/06/identity/authenticationmethod/x509 |

To create this rule by using the transform an incoming claim rule template on a Relying Party Trust in Windows Server 2016
In Server Manager, click Tools, and then select AD FS Management.
In the console tree, under AD FS, click Relying Party Trusts.

Right-click the selected trust, and then click Edit Claim Issuance Policy.

In the Edit Claim Issuance Policy dialog box, under Issuance Transform Rules click Add Rule to start the rule wizard.

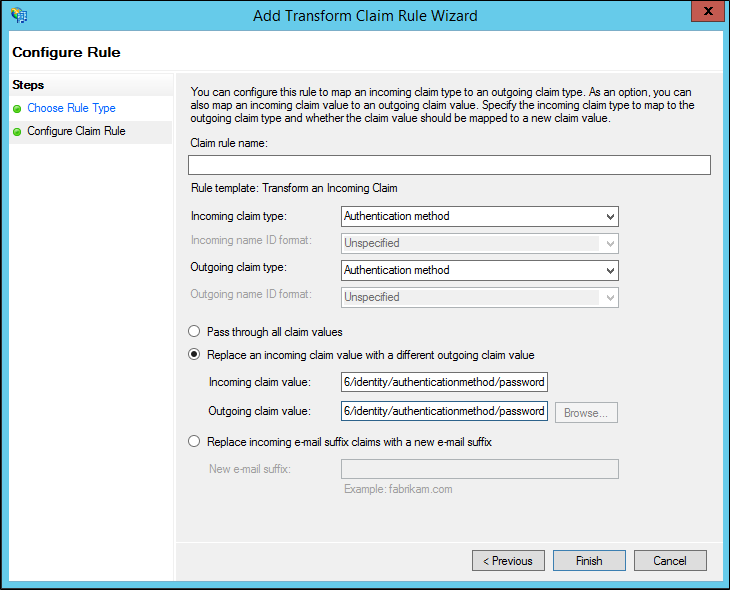
On the Select Rule Template page, under Claim rule template, select Transform an Incoming Claim from the list, and then click Next.
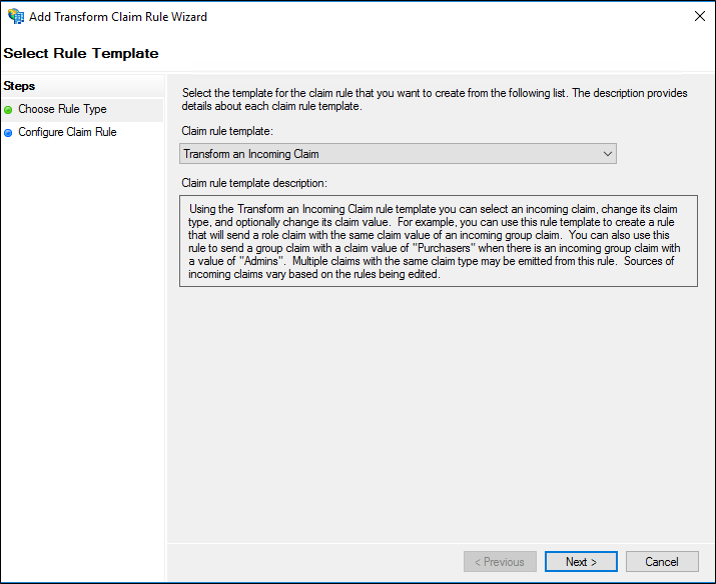
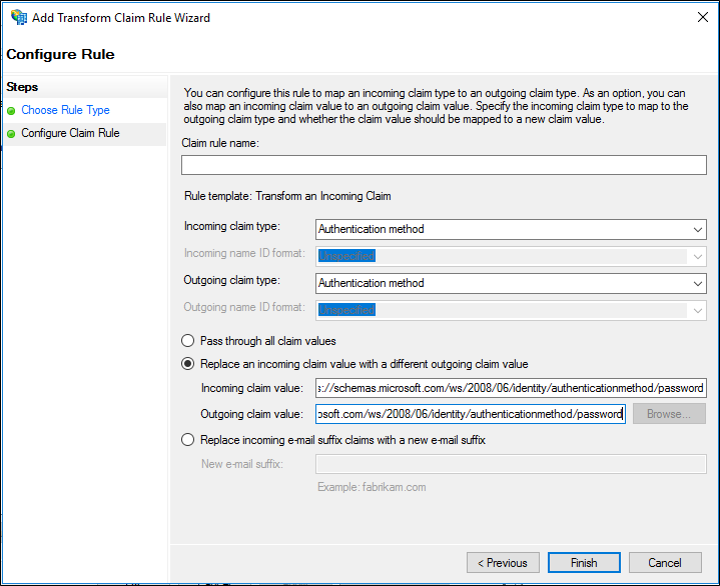
On the Configure Rule page, type a claim rule name.
In Incoming claim type, select Authentication method in the list.
In Outgoing claim type, select Authentication method in the list.
Select Replace an incoming claim value with a different outgoing claim value, and then do the following:
In Incoming claim value, type one of the following URI values that are based on the actual authentication method URI that was used originally, click Finish, and then click OK to save the rule.
In Outgoing claim value, type one of the default URI values in the following table, which depends on your new preferred authentication method choice, click Finish, and then click OK to save the rule.
| Actual authentication method | Corresponding URI |
|---|---|
| User name and password authentication | https://schemas.microsoft.com/ws/2008/06/identity/authenticationmethod/password |
| Windows authentication | https://schemas.microsoft.com/ws/2008/06/identity/authenticationmethod/windows |
| TLS mutual authentication that uses X.509 certificates | https://schemas.microsoft.com/ws/2008/06/identity/authenticationmethod/tlsclient |
| X.509-based authentication that does not use TLS | https://schemas.microsoft.com/ws/2008/06/identity/authenticationmethod/x509 |
Note
Other URI values can be used in addition to the values in the table. The URI values that are shown ion the previous table reflect the URIs that the relying party accepts by default.
To create this rule by using the transform an incoming claim rule template on a Claims Provider Trust in Windows Server 2016
In Server Manager, click Tools, and then select AD FS Management.
In the console tree, under AD FS, click Claims Provider Trusts.

Right-click the selected trust, and then click Edit Claim Rules.

In the Edit Claim Rules dialog box, under Acceptance Transform Rules click Add Rule to start the rule wizard.

On the Select Rule Template page, under Claim rule template, select Transform an Incoming Claim from the list, and then click Next.

On the Configure Rule page, type a claim rule name.
In Incoming claim type, select Authentication method in the list.
In Outgoing claim type, select Authentication method in the list.
Select Replace an incoming claim value with a different outgoing claim value, and then do the following:
In Incoming claim value, type one of the following URI values that are based on the actual authentication method URI that was used originally, click Finish, and then click OK to save the rule.
In Outgoing claim value, type one of the default URI values in the following table, which depends on your new preferred authentication method choice, click Finish, and then click OK to save the rule.
| Actual authentication method | Corresponding URI |
|---|---|
| User name and password authentication | https://schemas.microsoft.com/ws/2008/06/identity/authenticationmethod/password |
| Windows authentication | https://schemas.microsoft.com/ws/2008/06/identity/authenticationmethod/windows |
| TLS mutual authentication that uses X.509 certificates | https://schemas.microsoft.com/ws/2008/06/identity/authenticationmethod/tlsclient |
| X.509-based authentication that does not use TLS | https://schemas.microsoft.com/ws/2008/06/identity/authenticationmethod/x509 |

To create this rule by using the Send Group Membership as Claims rule template in Windows Server 2012 R2
In Server Manager, click Tools, and then select AD FS Management.
In the console tree, under AD FS\Trust Relationships, click either Claims Provider Trusts or Relying Party Trusts, and then click a specific trust in the list where you want to create this rule.
Right-click the selected trust, and then click Edit Claim Rules.

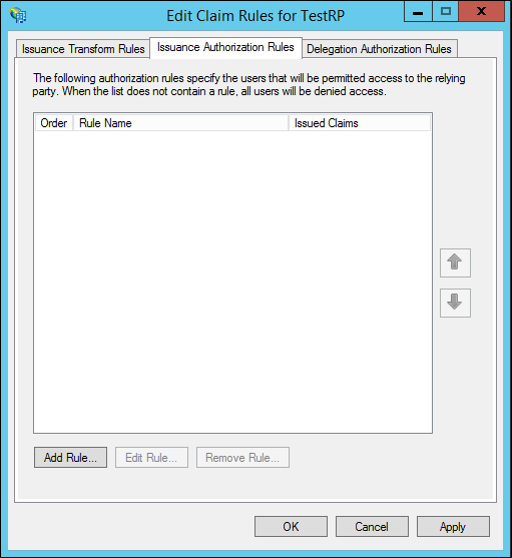
In the Edit Claim Rules dialog box, select one the following tabs, depending on the trust that you are editing and which rule set you want to create this rule in, and then click Add Rule to start the rule wizard that is associated with that rule set:
Acceptance Transform Rules
Issuance Transform Rules
Issuance Authorization Rules
Delegation Authorization Rules
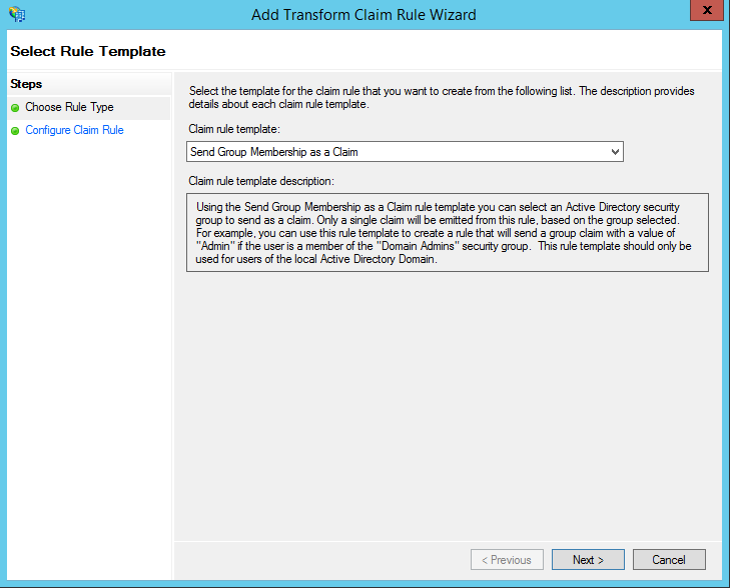
On the Select Rule Template page, under Claim rule template, select Send Group Membership as a Claim from the list, and then click Next.
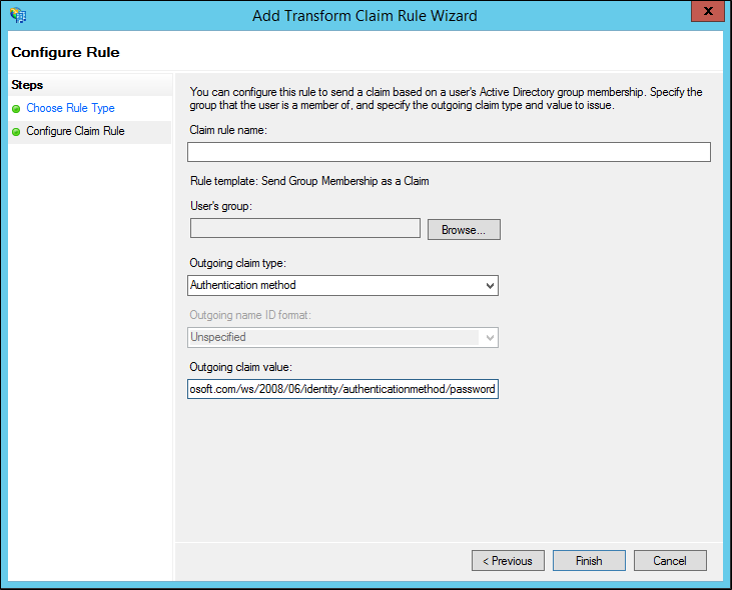
On the Configure Rule page, type a claim rule name.
Click Browse, select the group whose members should receive this authentication method claim, and then click OK.
In Outgoing claim type, select Authentication method in the list.
In Outgoing claim value, type one of the default uniform resource identifier (URI) values in the following table, depending on your preferred authentication method, click Finish, and then click OK to save the rule.
| Actual Authentication Method | Corresponding URI |
|---|---|
| User name and password authentication | https://schemas.microsoft.com/ws/2008/06/identity/authenticationmethod/password |
| Windows authentication | https://schemas.microsoft.com/ws/2008/06/identity/authenticationmethod/windows |
| Transport Layer Security (TLS) Mutual authentication that uses X.509 certificates | https://schemas.microsoft.com/ws/2008/06/identity/authenticationmethod/tlsclient |
| X.509-based authentication that does not use TLS | https://schemas.microsoft.com/ws/2008/06/identity/authenticationmethod/x509 |
Note
Other URI values can be used in addition to the values in the table. The URI values that are shown in the previous table reflect the URIs that the relying party accepts by default.
To create this rule by using the Transform an Incoming Claim rule template in Windows Server 2012 R2
In Server Manager, click Tools, and then click AD FS Management.
In the console tree, under AD FS\Trust Relationships, click either Claims Provider Trusts or Relying Party Trusts, and then click a specific trust in the list where you want to create this rule.
Right-click the selected trust, and then click Edit Claim Rules.

In the Edit Claim Rules dialog box, select one the following tabs, which depends on the trust that you are editing and in which rule set you want to create this rule, and then click Add Rule to start the rule wizard that is associated with that rule set:
Acceptance Transform Rules
Issuance Transform Rules
Issuance Authorization Rules
Delegation Authorization Rules

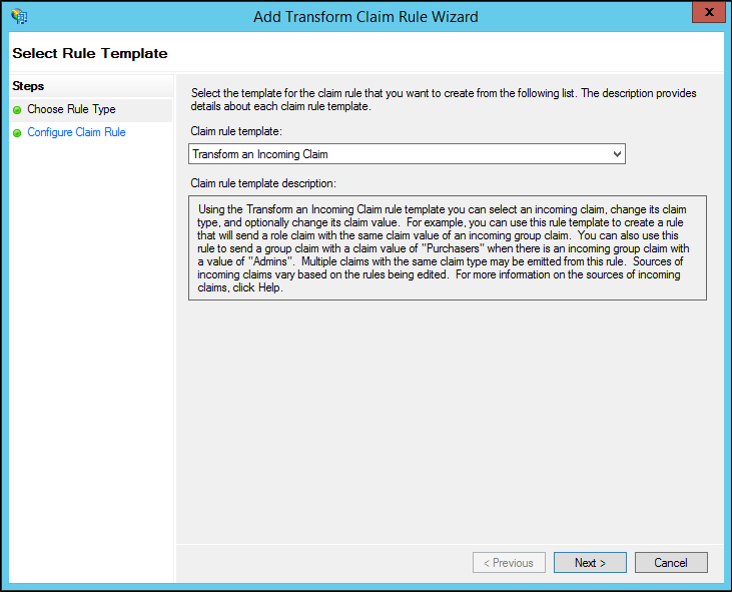
On the Select Rule Template page, under Claim rule template, select Transform an Incoming Claim from the list, and then click Next.
On the Configure Rule page, type a claim rule name.
In Incoming claim type, select Authentication method in the list.
In Outgoing claim type, select Authentication method in the list.
Select Replace an incoming claim value with a different outgoing claim value, and then do the following:
In Incoming claim value, type one of the following URI values that are based on the actual authentication method URI that was used originally, click Finish, and then click OK to save the rule.
In Outgoing claim value, type one of the default URI values in the following table, which depends on your new preferred authentication method choice, click Finish, and then click OK to save the rule.
| Actual authentication method | Corresponding URI |
|---|---|
| User name and password authentication | https://schemas.microsoft.com/ws/2008/06/identity/authenticationmethod/password |
| Windows authentication | https://schemas.microsoft.com/ws/2008/06/identity/authenticationmethod/windows |
| TLS mutual authentication that uses X.509 certificates | https://schemas.microsoft.com/ws/2008/06/identity/authenticationmethod/tlsclient |
| X.509-based authentication that does not use TLS | https://schemas.microsoft.com/ws/2008/06/identity/authenticationmethod/x509 |
Note
Other URI values can be used in addition to the values in the table. The URI values that are shown ion the previous table reflect the URIs that the relying party accepts by default.
Additional references
Checklist: Creating Claim Rules for a Relying Party Trust
Checklist: Creating Claim Rules for a Claims Provider Trust