SSH connection to Azure Linux virtual machines fails due to SELinux misconfiguration
Applies to: ✔️ Linux VMs
Note
CentOS referenced in this article is a Linux distribution and will reach End Of Life (EOL). Consider your use and plan accordingly. For more information, see CentOS End Of Life guidance.
This article provides a solution to an issue where the Secure Shell (SSH) connection to an Azure virtual machine (VM) fails because of SELinux misconfiguration.
Background
The Unix security model is based on Discretionary Access Control (DAC). Security-Enhanced Linux (SELinux) implements Mandatory Access Control (MAC) for Linux by using kernel modules and user space tools. MAC provides a more controlled environment for resource access and removes the ability of the root user to access all resources on the operating system (OS) without restrictions. It also mitigates multiple kinds of security risks by utilizing the traditional Unix security model.
Different distributions include SELinux out of the box or provide a straightforward way to activate kernel support and install user space tools. For more information, see the following SELinux articles from some of the major Linux providers:
Red Hat-based images on Azure come with SELinux enabled; other distributions don't. When you use SELinux in Ubuntu, there's a warning about its unmaintained state on this distribution. Ubuntu implements a different solution for MAC, called AppArmor.
Prerequisites
Make sure the serial console is enabled and functional in the Linux VM.
Symptoms
A SELinux misconfiguration may result in the OS being unable to load the SELinux policy, which stops the OS from completing the boot.
Check the serial console from the Azure portal or through the Azure CLI. The following message appears near the end of the output:

The SELinux configuration is managed by the system administrator. The system administrator can resolve this issue by using one of the following methods.
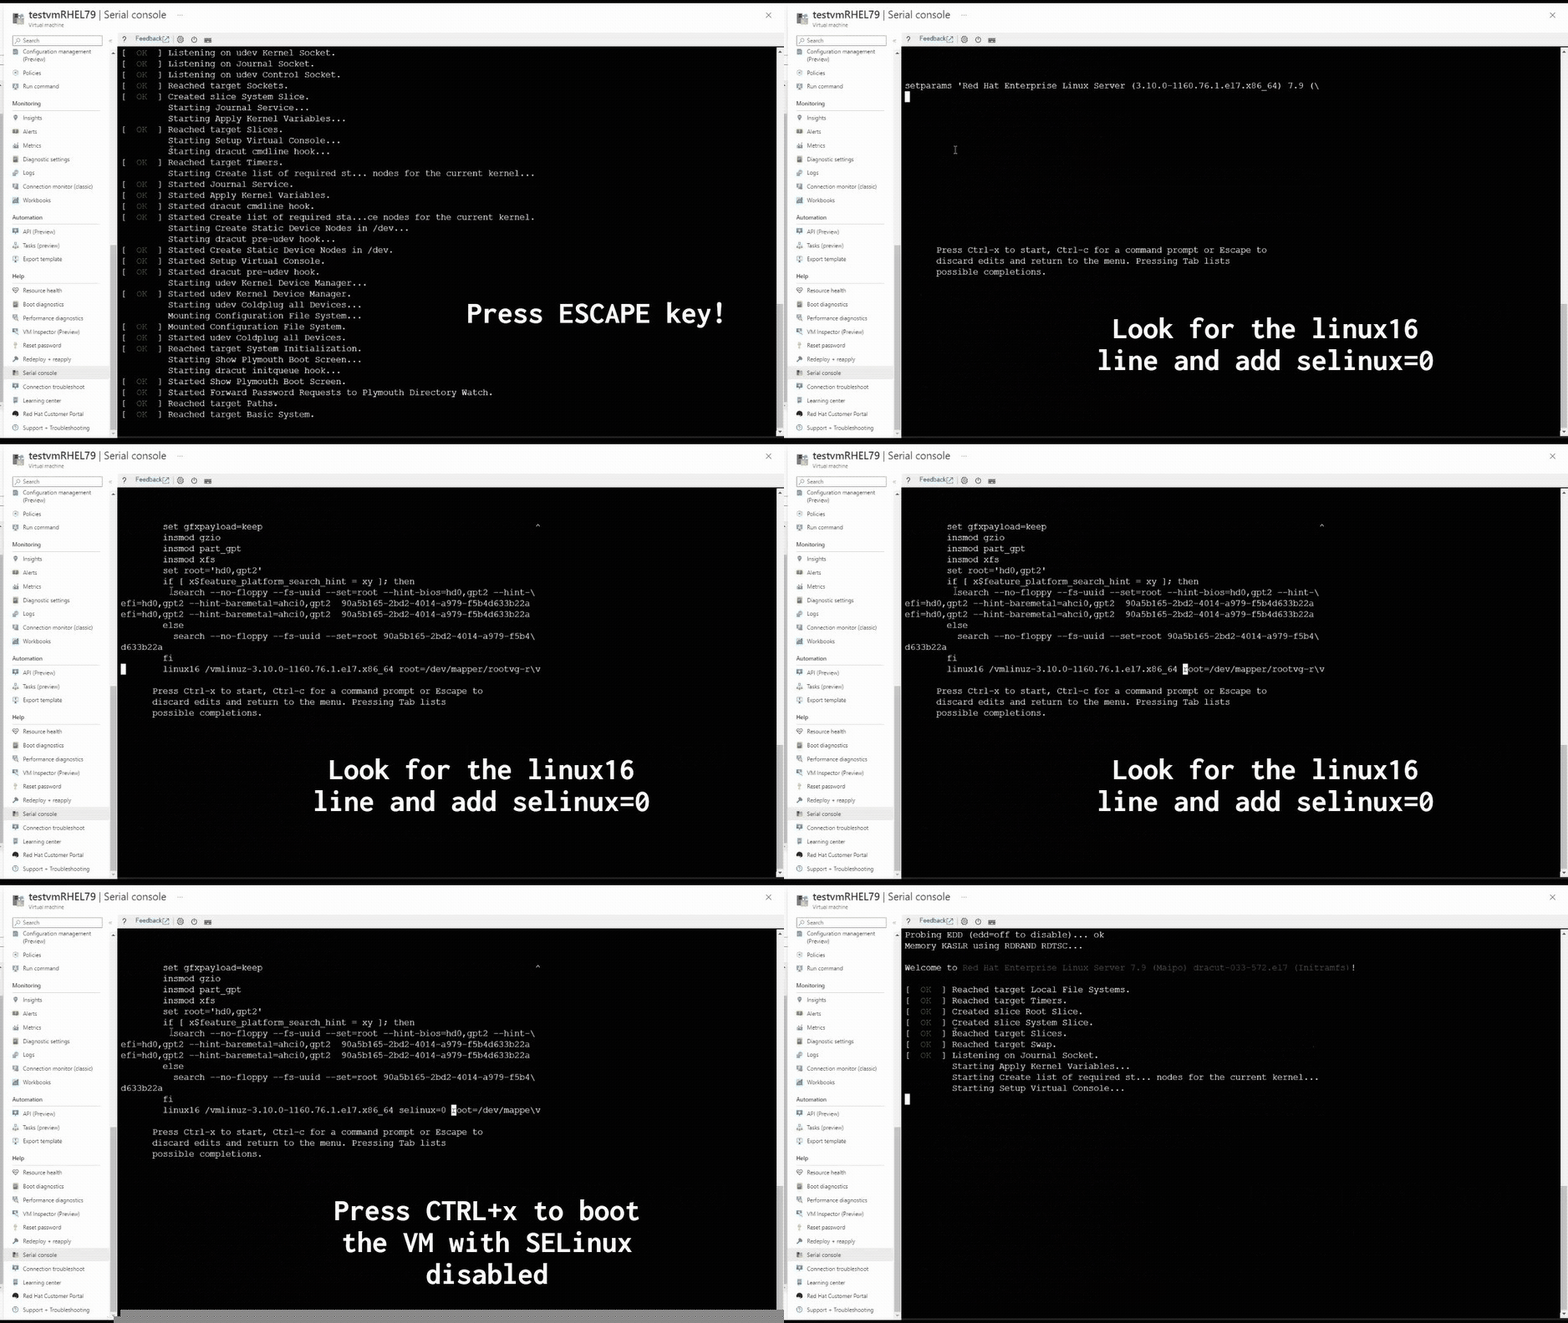
Solution 1: Start VM with SELinux turned off by using serial console
Trigger Restart VM (Hard) from the Azure serial console.
Interrupt your VM at the GRUB menu with the ESC key.
Select E to modify the first kernel entry in the GRUB menu.
Go to the
linux16line and addselinux=0to disable SELinux temporarily.
Validate and correct the SELinux configuration in
/etc/selinux/config.For example, one common mistake is setting the
SELINUXTYPEkey to one of the values used for theSELINUXkey. See the following screenshot as an example:
Notice the last line,
SELINUXTYPE=disabled. TheSELINUXTYPEkey should be set totargeted,minimum, ormlsrather thandisabled. The following screenshot shows the correct configuration:
Solution 2: Repair SELinux misconfiguration by using a rescue VM
Tip
If you have a recent backup of the VM, restore the VM from the backup to fix the configuration issue.
In case the Azure serial console doesn't work in the specific VM or isn't an option in your subscription, troubleshoot this issue by using a rescue/repair VM. Use vm repair commands to create a repair VM that has a copy of the affected VM's OS disk attached. Mount the copy of the OS file systems in the repair VM by using chroot.
Note
Alternatively, you can create a rescue VM manually by using the Azure portal. For more information, see Troubleshoot a Linux VM by attaching the OS disk to a recovery VM using the Azure portal.
Validate and correct the SELinux configuration in
/etc/selinux/config. To do this, follow step 5 in Solution 1: Start VM with SELinux turned off from serial console.After the SELinux configuration is corrected, perform the following actions:
- Exit chroot.
- Unmount the copy of the file systems from the rescue/repair VM.
- Run the
az vm repair restorecommand to swap the repaired OS disk with the original OS disk of the VM. For more information, see step 5 in Repair a Linux VM by using the Azure Virtual Machine repair commands. - Validate if the VM is able to boot up by taking a look at the Azure serial console or by trying to connect to the VM.
Next steps
In case the issue isn't due to SELinux misconfiguration, see Troubleshoot Azure Linux Virtual Machines boot errors for further troubleshooting options.
Contact us for help
If you have questions or need help, create a support request, or ask Azure community support. You can also submit product feedback to Azure feedback community.