Prerequisites to deploy Manufacturing data solutions in Fabric
Important
Some or all of this functionality is available as part of a preview release. The content and the functionality are subject to change.
Note
All prior versions to 1.0 of Manufacturing data solutions are deprecated. Any deployments prior to version 0.8 can't upgrade to the latest 1.0 version. A redeployment to the latest version is required.
This section provides information on preparing for the deployment of Manufacturing data solutions in the designated tenant. The prerequisites are as follows:
- Check Azure subscription requirements
- Register the preview feature and resource provider
- Install PowerShell locally with AZ module
- Register necessary Azure resource providers
- Check quota availability
- Validate Virtual Machine availability
- Check Microsoft Fabric requirements
- Set up Azure Key Vault
- Set up User Assigned Managed Identity
- Check required access for Manufacturing data solutions
- Access and interact with API endpoints
Caution
All the prerequisite steps must be completed before deploying Manufacturing data solutions to the designated tenant. Failing to do so leads to deployment failure.
Check Azure subscription requirements
An Azure subscription is a fundamental component of Microsoft Azure, serving as a logical container for provisioning and managing Azure resources and services.
Sign in to Azure. To proceed, ensure that your subscription has access to Azure OpenAI, is allowlisted with Manufacturing data solutions, and the Microsoft.ManufacturingPlatform namespace and necessary Azure resource providers are registered.
Ensure you have the following to deploy and test Manufacturing data solutions:
- An Azure subscription
- Enabled access to Azure OpenAI
- On the subscription, user should have Contributor role for Deployment and User Access Administrator role for Role Assignment
- Quotas availability according to model and region:
GPT-4, 0125-Preview (Turbo)GPT-4-32k, 0613GPT-4o, 2024-05-13
Register the preview feature and resource provider
After the request is successfully completed, you can register the preview feature.
Registration can be done through the Azure portal UI or by running an Azure command.
Note
Azure OpenAI and allowlisting are mandatory to execute these commands.
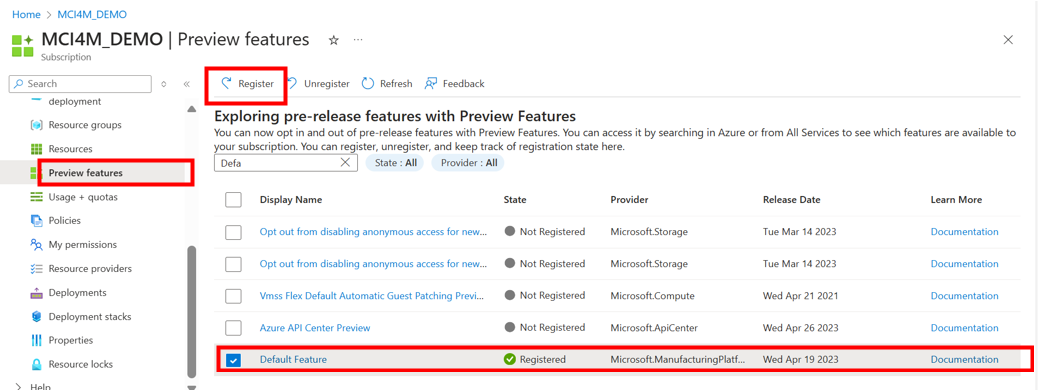
- In the Azure portal UI, go to the Preview features in your subscription. Search for Default Feature and then select Register.
Azure command:
az feature register --subscription YOUR_SUBSCRIPTION_NAME_OR_ID --namespace Microsoft.ManufacturingPlatform --name DefaultFeatureTip
You can check if the state of the Azure feature is registered by using the following command:
az feature show --subscription YOUR_SUBSCRIPTION_NAME_OR_ID --namespace Microsoft.ManufacturingPlatform --name DefaultFeatureNote
Azure resources are categorized under namespaces (for example, Microsoft.Compute, Microsoft.Storage). In this case, 'Microsoft.ManufacturingPlatform' is the namespace under which the resource type is there.
You can execute the registration of the resource provider.
az provider register --subscription YOUR_SUBSCRIPTION_NAME_OR_ID --namespace Microsoft.ManufacturingPlatformTip
You can check if the state of the Resource Provider is registered by using the following command:
az provider show --subscription YOUR_SUBSCRIPTION_NAME_OR_ID --namespace Microsoft.ManufacturingPlatformFor NRG lockdown, run the following command.
az feature register --namespace "Microsoft.ContainerService" --name "NRGLockdownPreview"
Install PowerShell locally with AZ module
The Az PowerShell module is a rollup module. Installing the Az PowerShell module downloads the generally available modules and makes their cmdlets available for use. These Az modules are required to run the deployment scripts.
For detailed steps for installation, refer to Azmodule.
Register necessary Azure resource providers
An Azure resource provider is a collection of REST operations that provide functionality for an Azure service. Manufacturing data solutions uses common Azure resources such as AKS and Azure monitoring. Resource providers define the Azure resources available for your subscription to deploy.
You can register Azure resource providers via Azure portal, PowerShell, or Azure CLI. You can find all the needed Azure resource providers that Manufacturing data solutions needs during the deployment in the given table.
Required resource providers
| Azure Resource name | Azure Resource provider |
|---|---|
| Azure Data Explorer | Microsoft.Kusto |
| Azure Resource Manager | Microsoft.Resources |
| Microsoft.Authorization | |
| Azure Monitor | Microsoft.OperationsManagement |
| Microsoft.Insights | |
| Microsoft.OperationalInsights | |
| Storage | Microsoft.Storage |
| Azure Kubernetes Service | Microsoft.Compute |
| Microsoft.ContainerService | |
| Microsoft.ContainerRegistry | |
| Microsoft.ContainerInstance | |
| Microsoft.Kubernetes | |
| Azure Cosmos DB | Microsoft.DocumentDB |
| Azure Networking | Microsoft.Network |
| Azure Managed Identity | Microsoft.ManagedIdentity |
| Azure Policy | Microsoft.GuestConfiguration |
| Azure Cache for Redis | Microsoft.Cache |
| Azure Event Hubs | Microsoft.EventHub |
| Cognitive Services | Microsoft.CognitiveServices |
| Azure Function App | Microsoft.Web |
| Azure App Configuration | Microsoft.AppConfiguration |
| Azure Alerts Management | Microsoft.AlertsManagement |
PowerShell example to show registration state of required resource providers
Connect to Azure with an authenticated account.
Connect-AzAccount -Tenant YOUR_TENANT_ID -Subscription YOUR_SUBSCRIPTION_ID
List registration state of required resource providers.
    $providerNamespaces = "Microsoft.Kusto", "Microsoft.Resources", "Microsoft.Authorization", "Microsoft.OperationsManagement", "Microsoft.Insights", "Microsoft.OperationalInsights", "Microsoft.Storage", "Microsoft.Compute", "Microsoft.ContainerService", "Microsoft.ContainerRegistry", "Microsoft.ContainerInstance", "Microsoft.Kubernetes", "Microsoft.DocumentDB", "Microsoft.Network", "Microsoft.ManagedIdentity", "Microsoft.GuestConfiguration", "Microsoft.Cache", "Microsoft.EventHub", "Microsoft.CognitiveServices", "Microsoft.Web", "Microsoft.AppConfiguration", "Microsoft.AlertsManagement"
    foreach ($providerNamespace in $providerNamespaces) {
        $registrationStates = @((Get-AzResourceProvider -ProviderNamespace $providerNamespace).RegistrationState | Select-Object -Unique)
        Write-Host "Provider Namespace: $providerNamespace, Registration States: [ " -NoNewline
        foreach ($registrationState in $registrationStates) {
            $color = if ($registrationState -eq "Registered") { "Green" } else { "Red" }
            Write-Host $registrationState -ForegroundColor $color -NoNewline
            if ($registrationState -ne $registrationStates[-1]) {
                Write-Host ", " -NoNewline
            }
        }
        Write-Host " ]"
    }
PowerShell example to register required resource providers
Connect to Azure with an authenticated account.
Connect-AzAccount -Tenant YOUR_TENANT_ID -Subscription YOUR_SUBSCRIPTION_ID
Register required resource providers.
$providerNamespaces = "Microsoft.Kusto", "Microsoft.Resources", "Microsoft.Authorization", "Microsoft.OperationsManagement", "Microsoft.Insights", "Microsoft.OperationalInsights", "Microsoft.Storage", "Microsoft.Compute", "Microsoft.ContainerService", "Microsoft.ContainerRegistry", "Microsoft.ContainerInstance", "Microsoft.Kubernetes", "Microsoft.DocumentDB", "Microsoft.Network", "Microsoft.ManagedIdentity", "Microsoft.GuestConfiguration", "Microsoft.Cache", "Microsoft.EventHub", "Microsoft.CognitiveServices", "Microsoft.Web", "Microsoft.AppConfiguration", "Microsoft.AlertsManagement"
    foreach ($providerNamespace in $providerNamespaces) {
        Register-AzResourceProvider -ProviderNamespace $providerNamespace
    }
Check Quota Azure Resources
Azure Kubernetes Services
Check whether the VM sizes Standard_DS2_V2 and Standard_DS3_V2 are available in your subscription for all zones 1,2,3 via Azure portal. Alternatively, you can run below commands to validate.
az vm list-skus --location eastus2 --size Standard_DS2_v2 --all --output table
az vm list-skus --location eastus2 --size Standard_DS3_v2 --all --output table
If the output shows "None" for restrictions, it means you have the quota enabled in all three zones. Otherwise, you need to raise a support ticket to request Compute VMs with zone redundancy enabled for the East US 2 region.
Cosmos DB with No SQL
To check if Cosmos with No SQL with Availability zones is enabled for you in East US 2 region, perform the following steps:
Go to Azure portal and search for Cosmos DB with No SQL.
Fill in Resource name and Resource group name.
Select Availability Zones as
true.Select location as
East US 2.
If East US 2 is enabled in the location list, you need to raise a support ticket to request for Cosmos DB with zone redundancy enabled
Function App SKU
To check if Function app is available with Zone redundancy or not, perform the following steps:
Go to portal > Create resource > Deploy custom template.
Build custom template in editor.
Custom Template
{

  "$schema": "https://schema.management.azure.com/schemas/2019-04-01/deploymentTemplate.json#",

  "contentVersion": "1.0.0.0",

  "metadata": {

    "_generator": {

      "name": "bicep",

      "version": "0.22.6.54827",

      "templateHash": "6106345051491090809"

    }

  },

  "parameters": {

    "fnName": {

      "type": "string"

    },

    "location": {

      "type": "string"

    },

    "kind": {

      "type": "string",

      "defaultValue": "app"

    },

    "functionSku": {

      "type": "object",

      "defaultValue": {

        "name": "EP1",

        "size": "EP1",

        "tier": "ElasticPremium",

        "capacity": 8

      }

    },

    "maximumElasticWorkerCount": {

      "type": "int",

      "defaultValue": 8

    }

  },

  "variables": {

    "servicePlanName": "[toLower(format('plan-{0}', parameters('fnName')))]"

  },

  "resources": [

    {

      "type": "Microsoft.Web/serverfarms",

      "apiVersion": "2021-02-01",

      "name": "[variables('servicePlanName')]",

      "location": "[parameters('location')]",

      "kind": "[parameters('kind')]",

      "sku": "[parameters('functionSku')]",

      "properties": {

        "reserved": true,

        "maximumElasticWorkerCount": "[parameters('maximumElasticWorkerCount')]",

        "zoneRedundant": true,

        "elasticScaleEnabled": true

      }

    }

  ]

}
Paste the json content.
Update the parameters such as subscription, resource group, function name, and the location where the Function app is deployed. You can change the location to the one you want to test against, for example, East US 2.
Select Next/Review+Create, it throws error if the capacity isn't available.
Validate Virtual Machine availability
After the deployment is completed, the AKS Clusters are created. The AKS cluster is using virtual machines of the Standard_DS family. Both Standard_DS2_v2 and Standard_DS3_v2 are used. Make sure these clusters are available in all availability zones for your subscription and region.
Check Standard_DS2_v2 SKU size:
az vm list-skus --subscription YOUR_SUBSCRIPTION_NAME_OR_ID --location YOUR_REGION --size Standard_DS2_v2 --all --output table
Check Standard_DS3_v2 SKU size:
az vm list-skus --subscription YOUR_SUBSCRIPTION_NAME_OR_ID --location YOUR_REGION --size Standard_DS3_v2 --all --output table
The restrictions should mention None.
A negative result can look like the following example.
    virtualMachines  eastus2      Standard_DS2_v2         1,2,3    NotAvailableForSubscription, type: Zone, locations: eastus2, zones: 3
    virtualMachines  eastus2      Standard_DS3_v2         1,2,3    NotAvailableForSubscription, type: Zone, locations: eastus2, zones: 3
If the virtual machines aren't available, file an Azure Support ticket for your subscription and region.
Check Microsoft Fabric requirements
Microsoft Fabric is a comprehensive data platform for managing and analyzing data seamlessly. It includes services like Fabric Lakehouse and event streams for large-scale data processing and analysis. Configuration for Fabric resources for Manufacturing data solutions is for authentication and data ingestion.
Note
Fabric workspace should be in the same tenant with the Manufacturing data solutions deployment.
For more information, see Enable Microsoft Fabric for your organization - Microsoft Fabric | Microsoft Learn, and to use Microsoft Fabric, see Microsoft Fabric Enabled. After Fabric is enabled, create a One lake workspace, Create a workspace - Microsoft Fabric | Microsoft Learn.
Set up source of batch data ingestion for Manufacturing data solutions in Fabric Lakehouse
A lakehouse is a unified data architecture allowing for efficient storage, management, and analysis of structured and unstructured data. You can use Fabric lakehouse to store the batch data received from Manufacturing Industry.
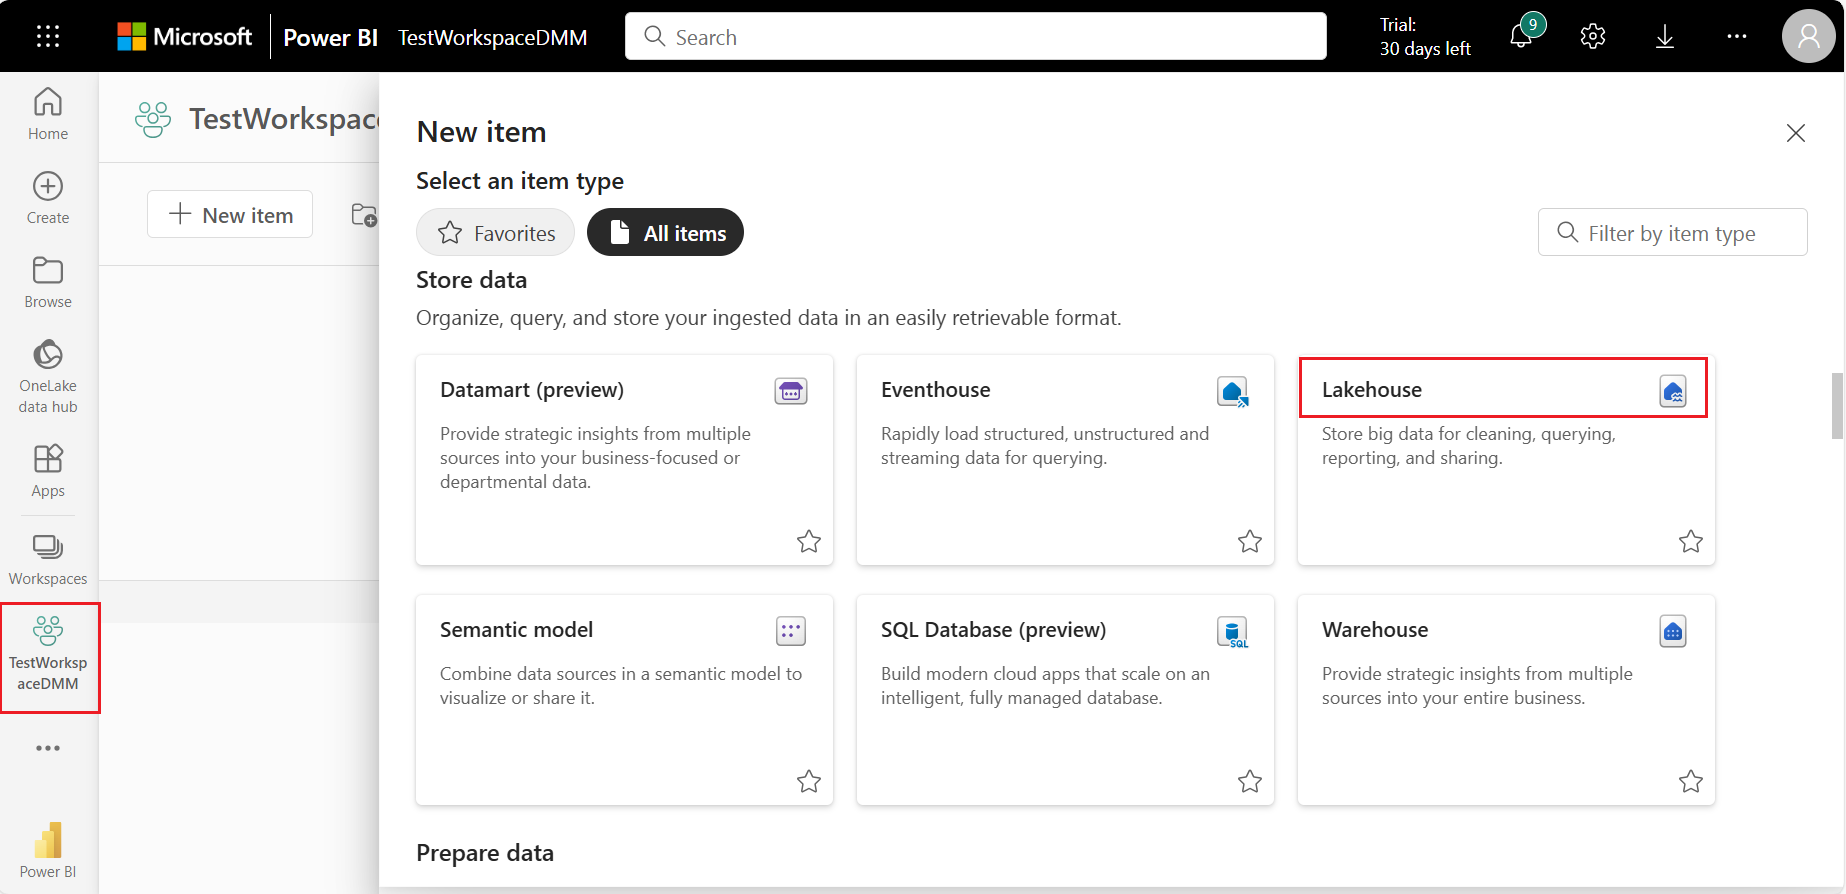
Create a Fabric Lakehouse inside the workspace you created. If you don’t have one or would like to create a new instance, you can follow the instructions here - Create a Lakehouse with OneLake -Microsoft Fabric | Microsoft Learn
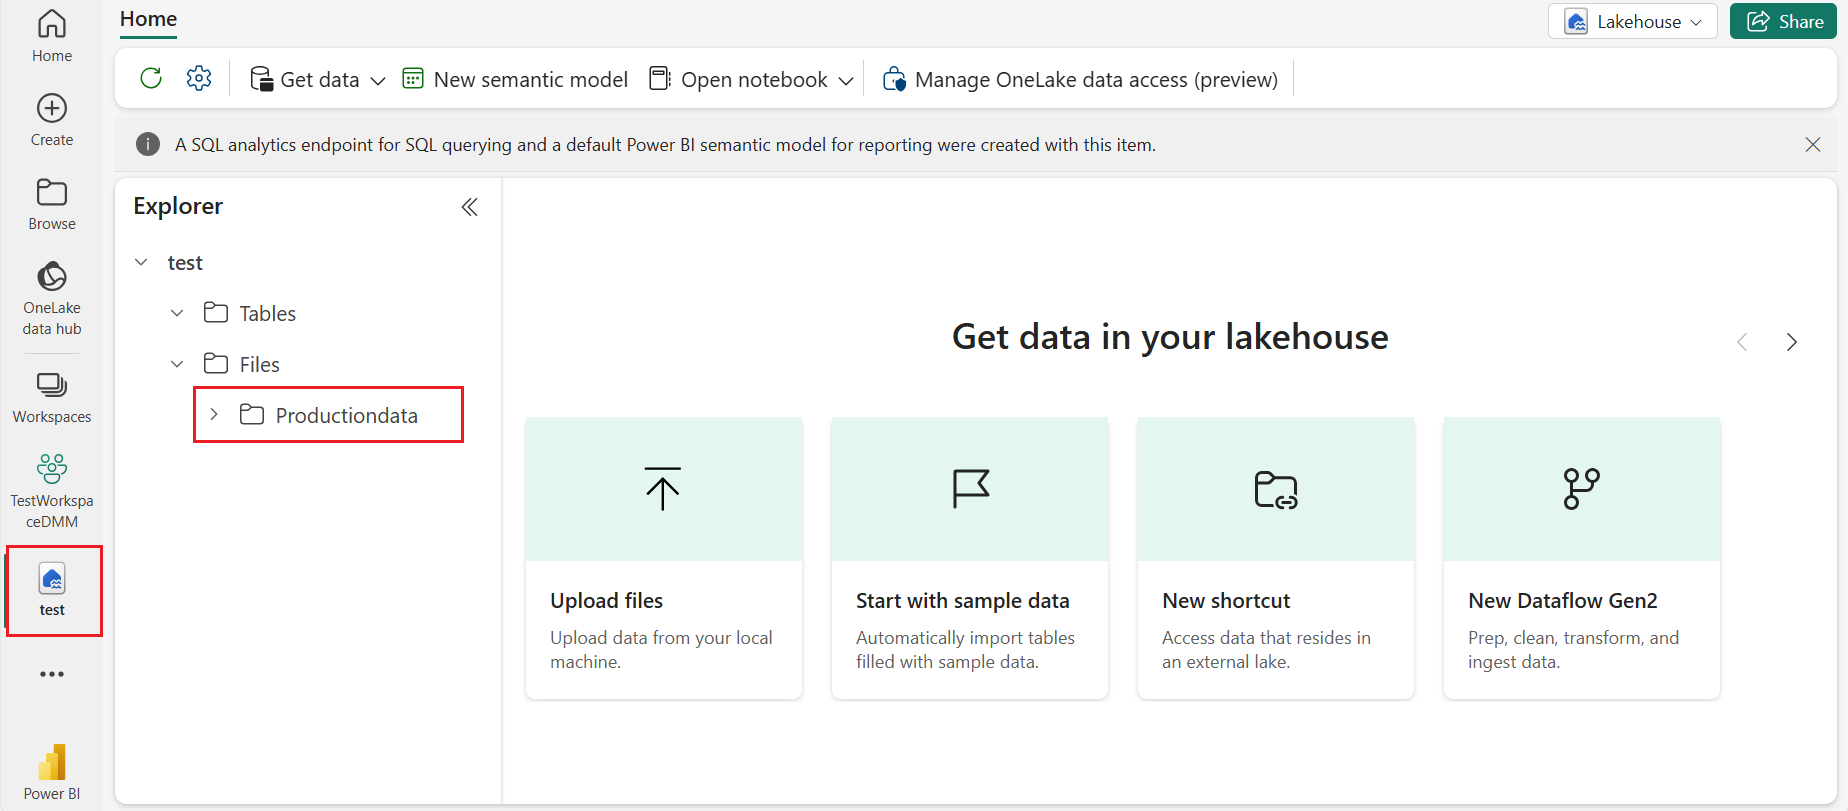
Create a subfolder for the batch data to be ingested. For example, you can create a folder called Production Data inside which you can later upload your data related to Production.
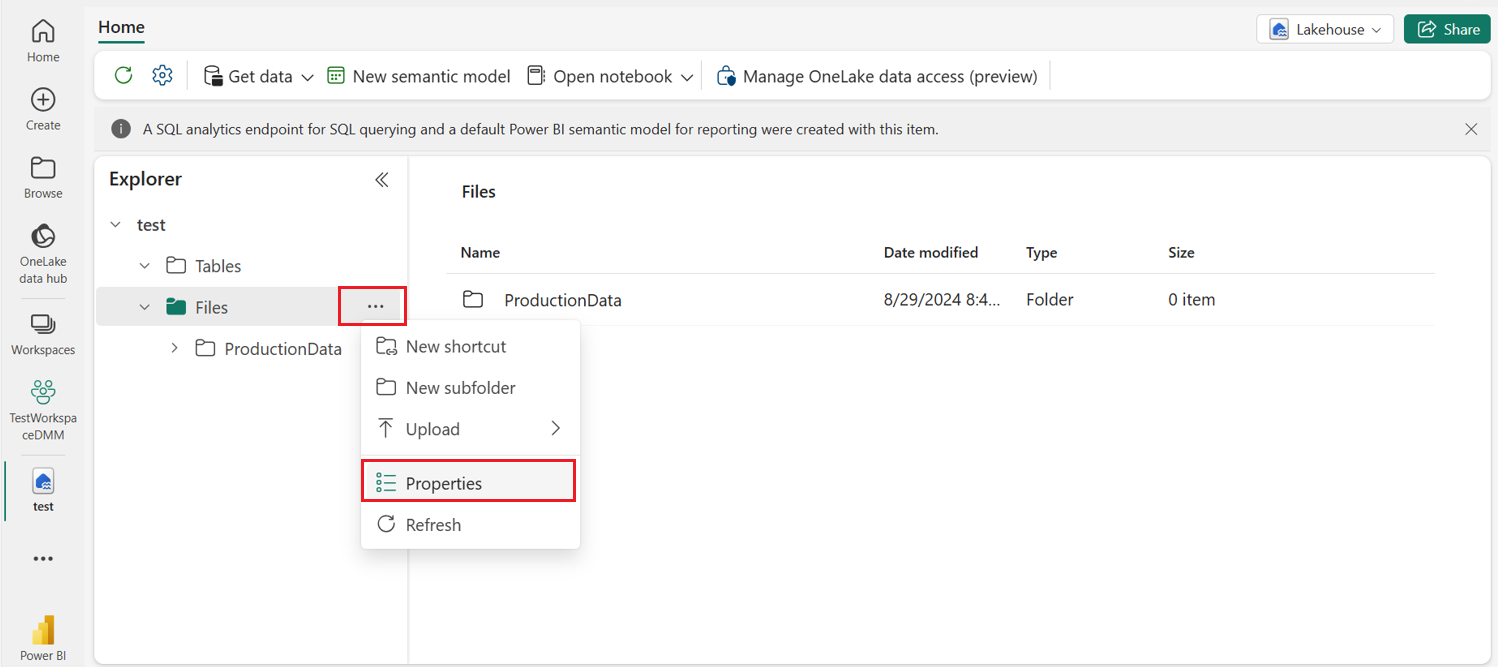
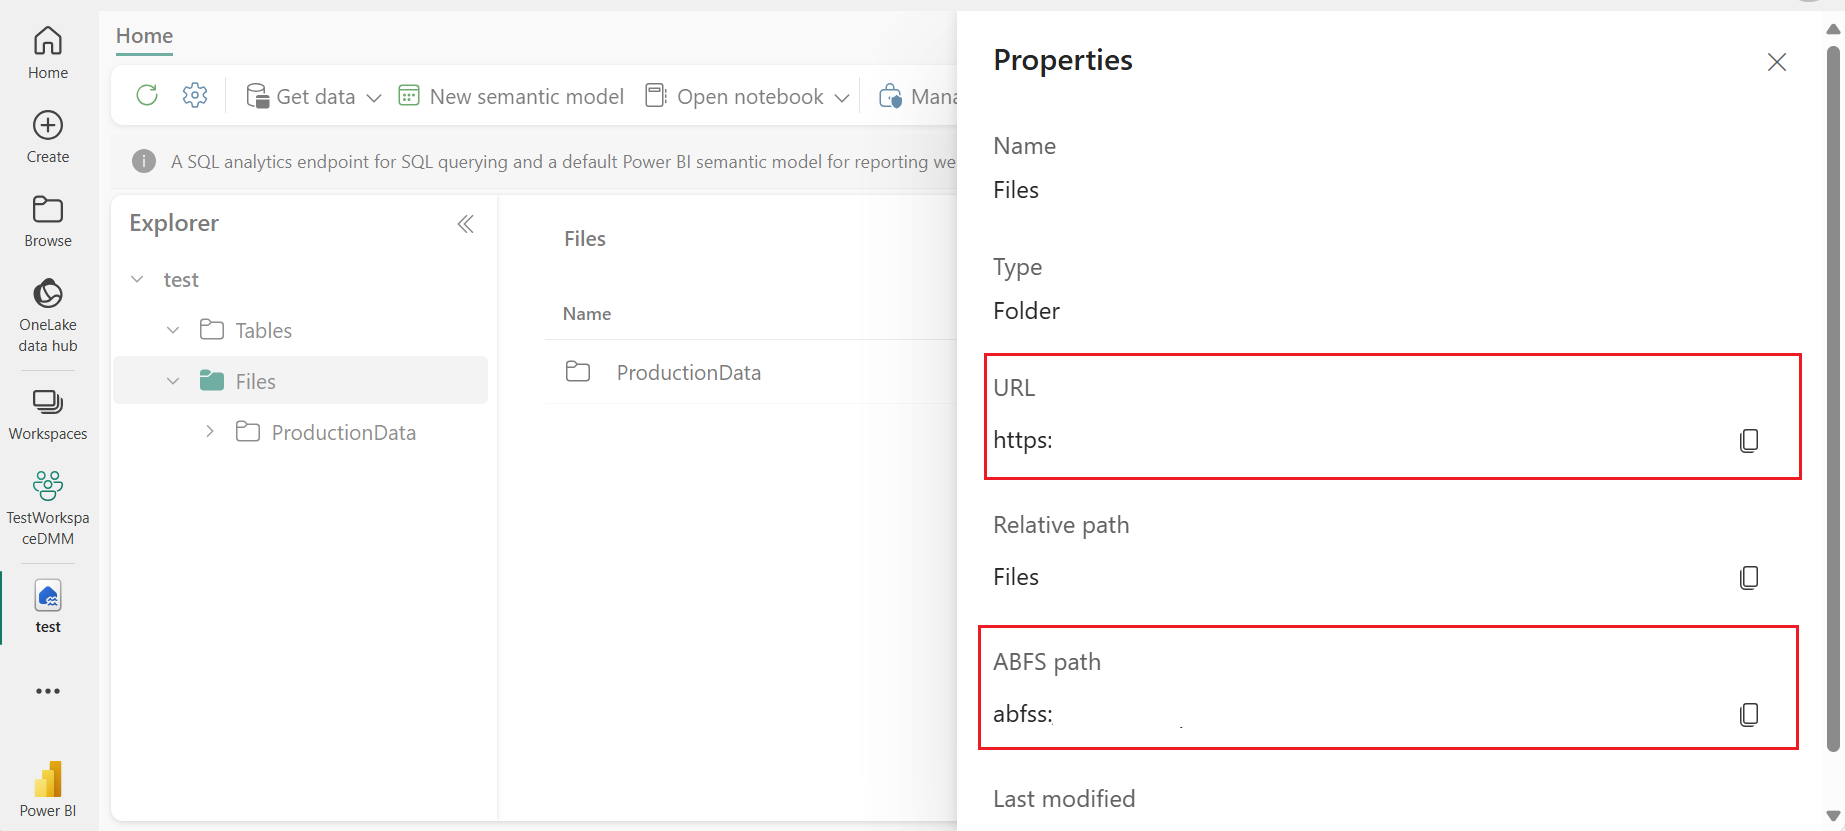
Make a note of the OneLake URL (for example:
https://onelake.dfs.fabric.contoso.com) and Path (for example: workspace_name/lakehouse_name.lakehouse/Files/Productiondata). You can find the full URI by selecting on your Fabric Lakehouse, Select ... to the right of Files, and select Properties.You're asked to enter these values as parameters during deployment time. Copy one lake URL and ABFS path, these values are added as input in Deployment time.
Set up source of stream data ingestion for Manufacturing data solutions in Fabric event streams
An event stream is a continuous flow of data representing events or changes, often used in real-time processing and analytics to track and react to occurrences.
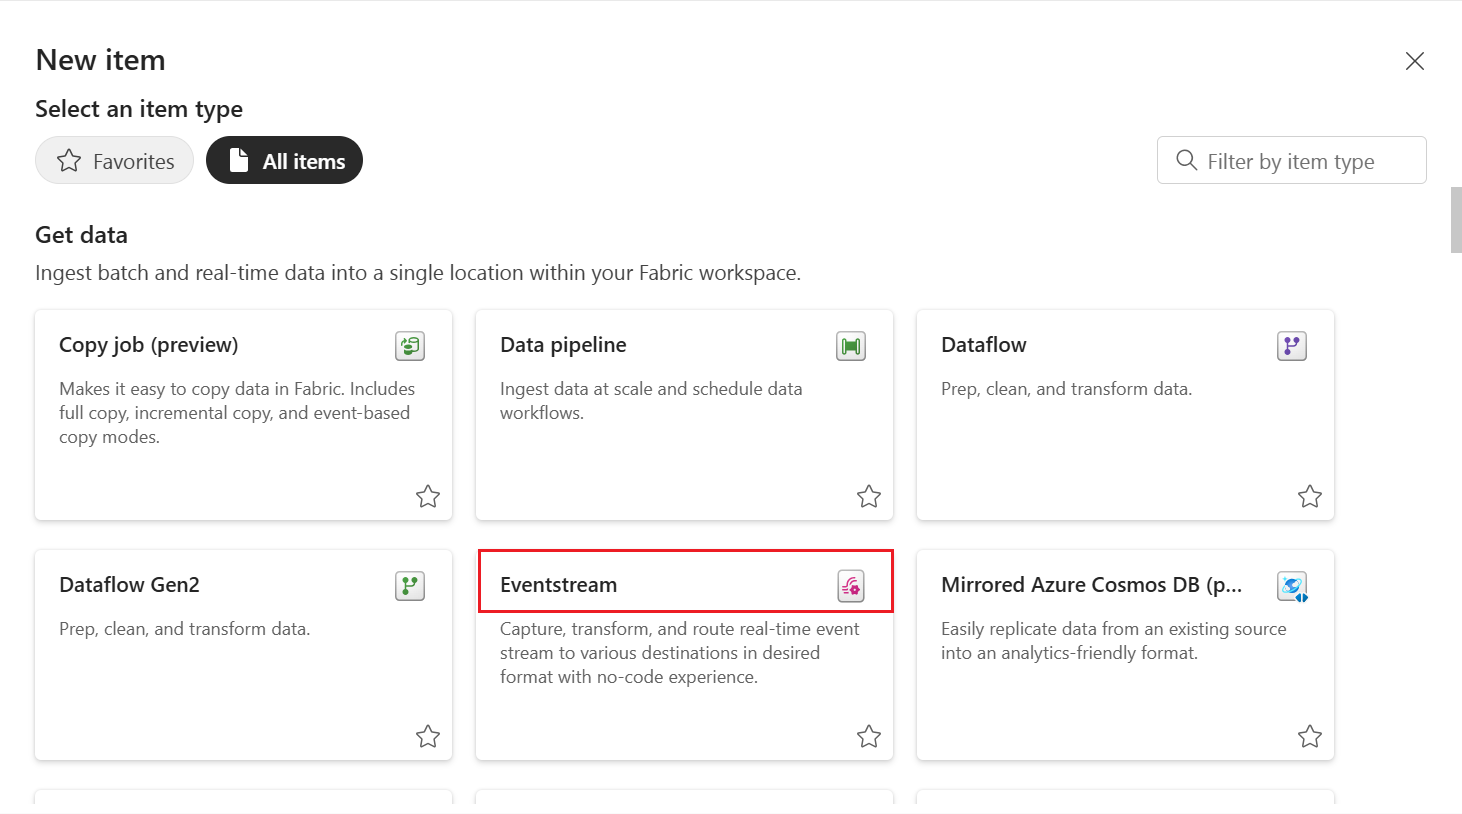
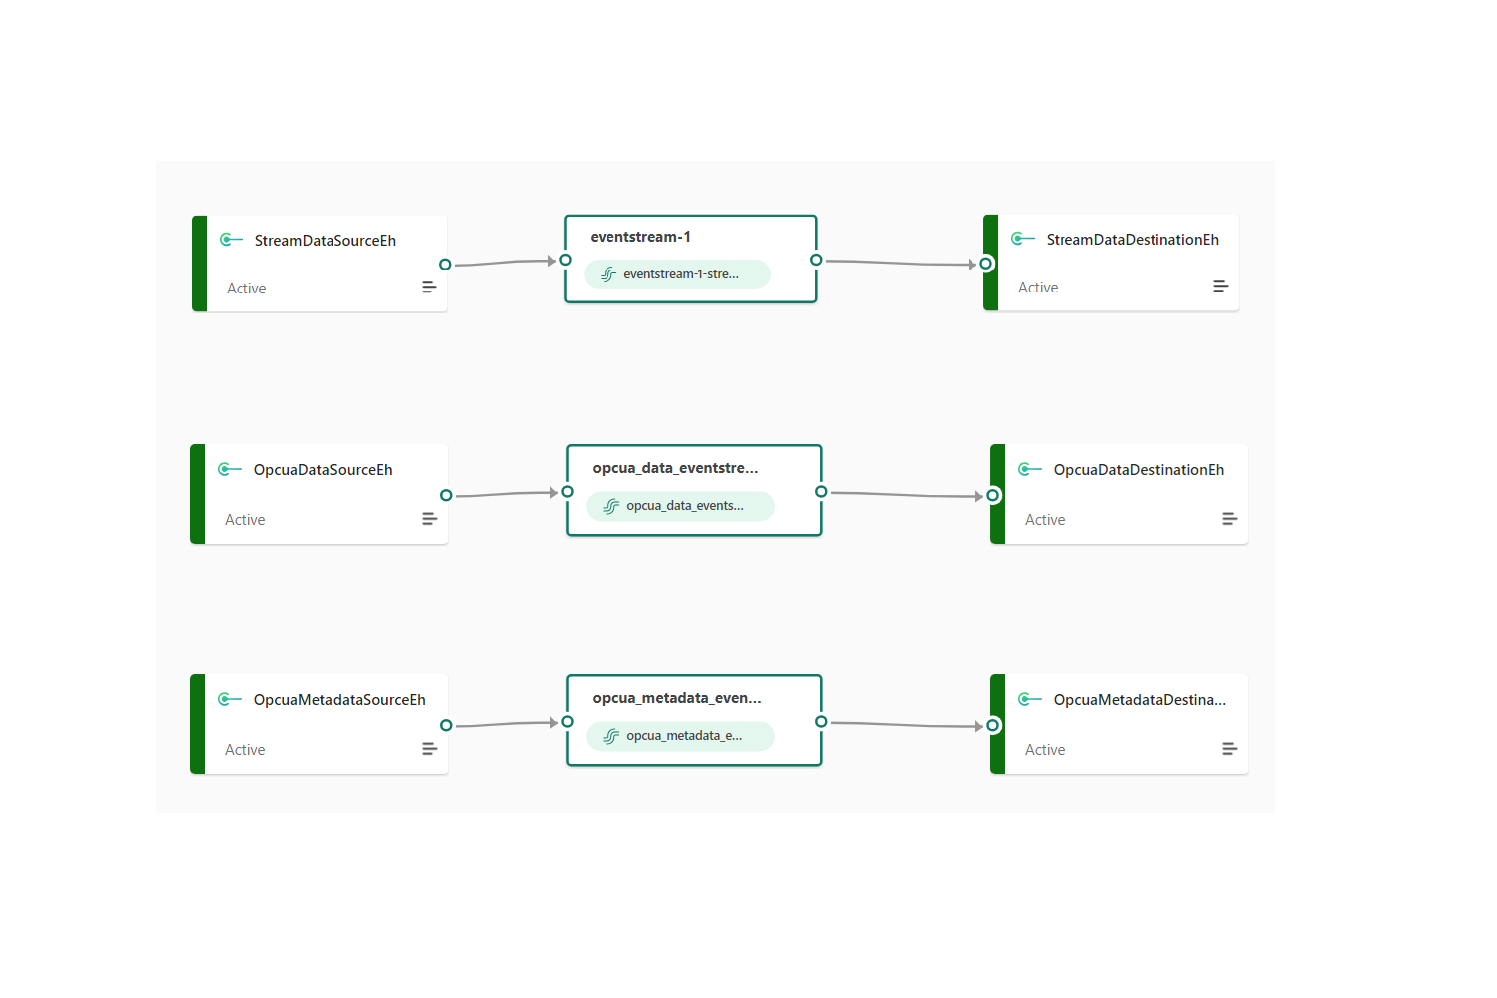
Create three Fabric event streams, one for ISA 95 Data, one for OPC UA Metadata, and one for OPC UA Data ingestion. For more information about the ISA 95 data, see Overview of manufacturing industry data model (preview). For creating an event stream, refer to Create and manage an event streams in Microsoft Fabric - Microsoft Fabric|Microsoft Learn.
Edit the event streams created during deployment as follows:
- For each event stream, configure the source as the existing Azure Event Hubs (select "External Source") or a new custom endpoint from your data system.
Note
Prefer to select Custom Endpoint as it automatically creates event hub and the best practice is to use Custom Endpoint.
For each event stream, modify the destination as a new Custom Endpoint.
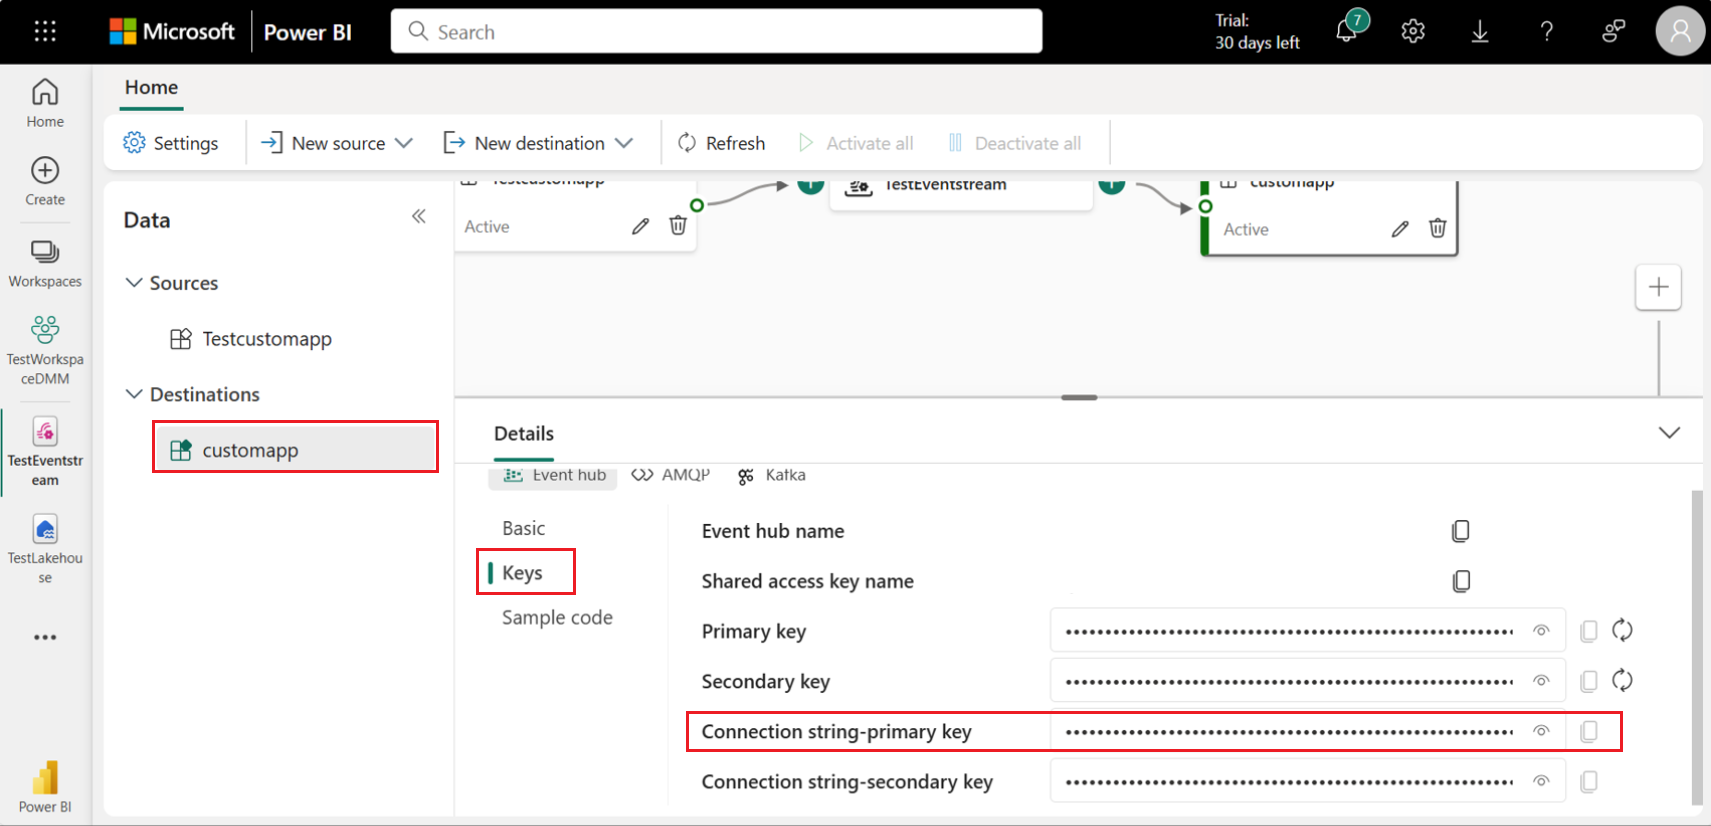
Go to the details tab of each Custom Endpoint created in destination and note the Primary Connection String information for the three event streams.
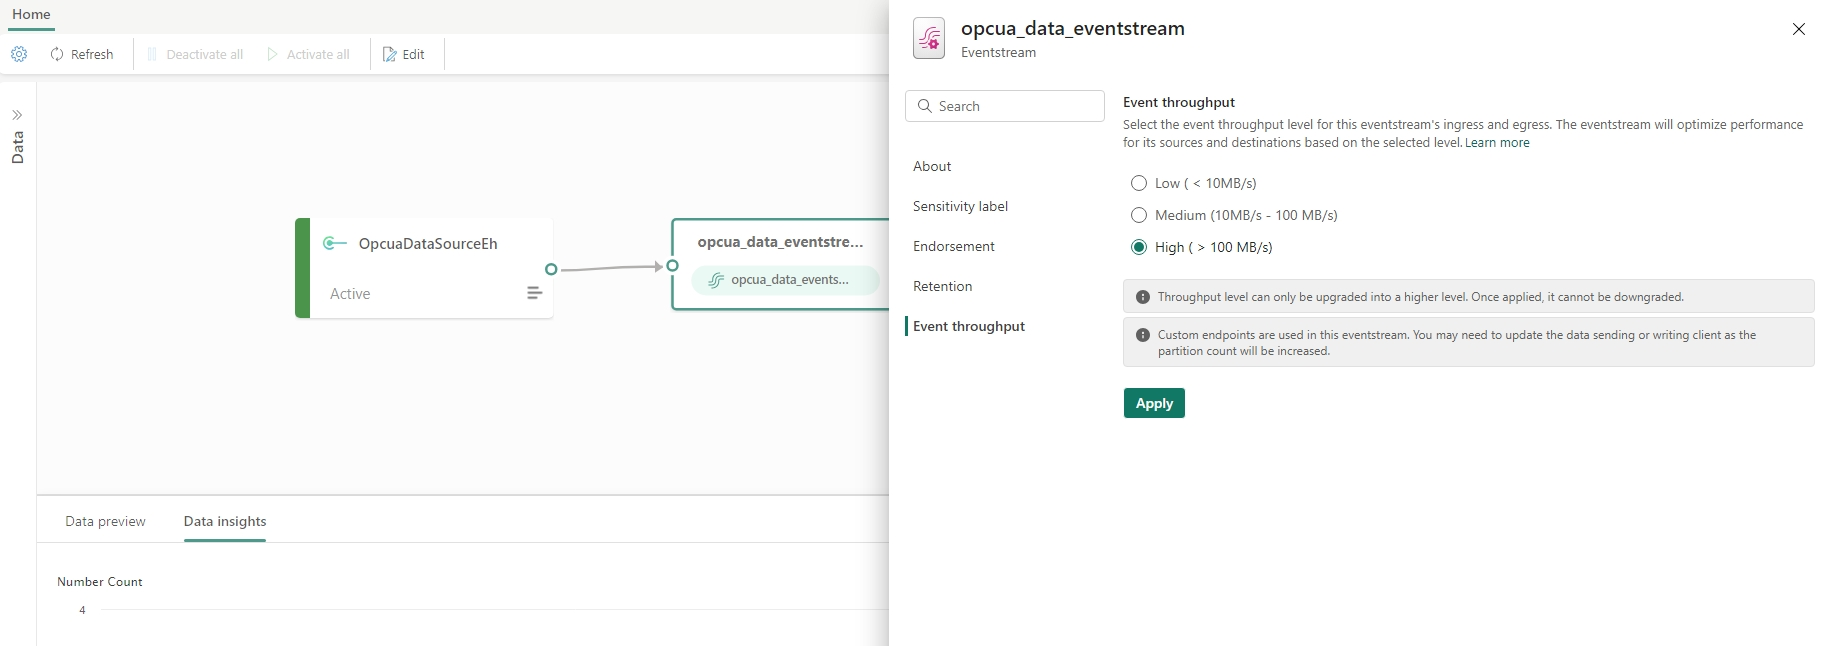
- If data streaming rate is more than 10k events or tags per second, then configure Event throughput as High for that eventstream.
Set up Azure Key Vault
Azure Key Vault is a service that securely stores and manages secrets. You can use Key Vault to store the primary connection-string keys for Fabric event streams. Managed Identity enables secure, automated identity management, allowing applications to access Azure resources without needing explicit credentials. With Managed Identity, you grant users secure access to Key Vault, simplifying the management of access permissions.
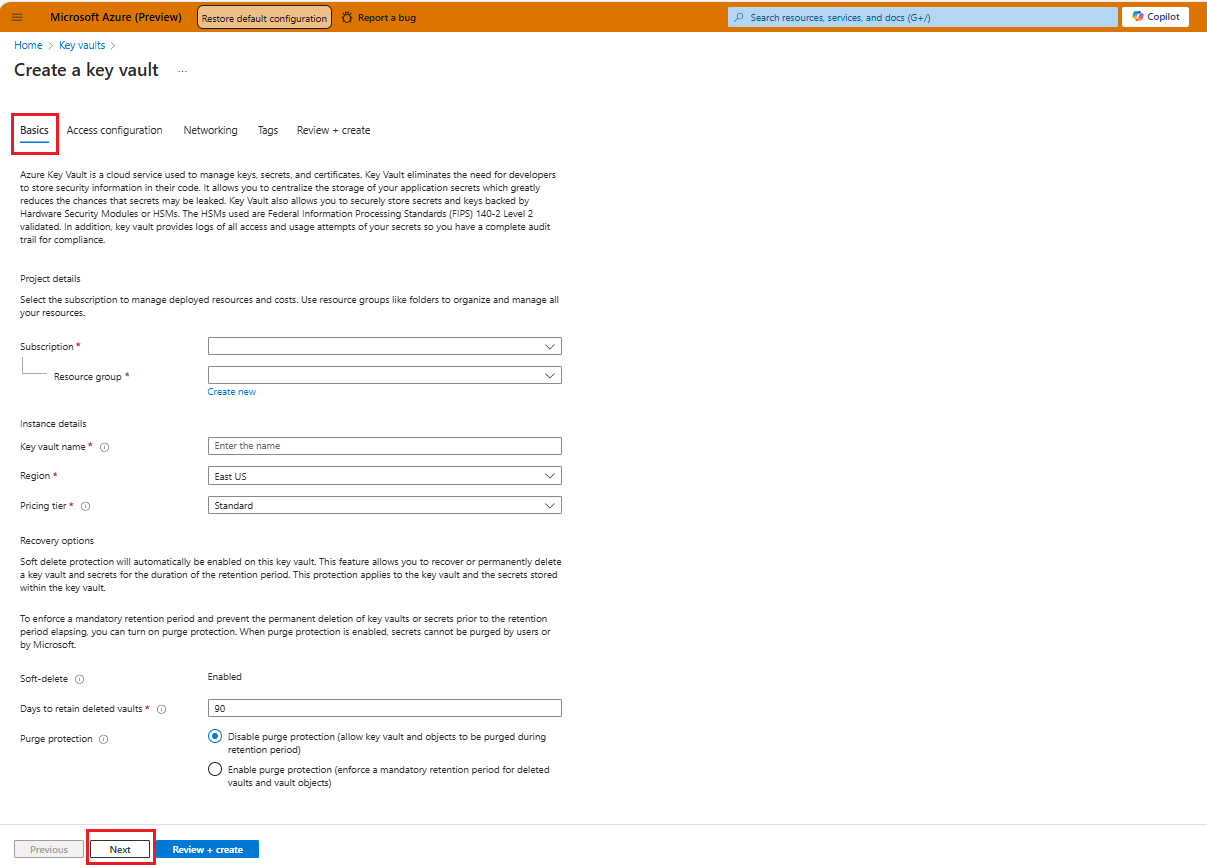
To create an Azure Key Vault, follow these steps:
Fill the values in the Basics tab.
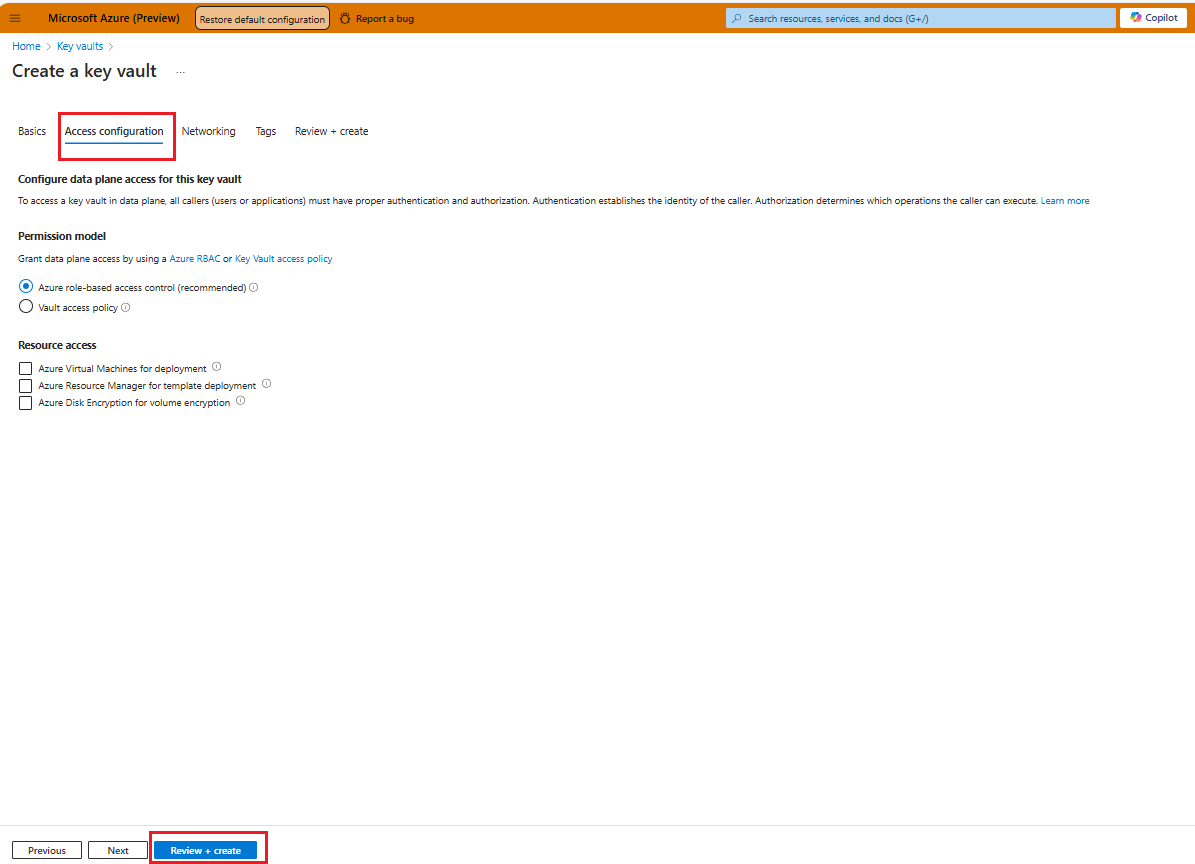
Configuration Item Description Subscription Name Name of the Subscription Resource Group Create or choose the resource group where you want to create Key Vault Name Name of Key Vault Region Select Desired Region Pricing Tier Select the required pricing tier Soft Delete Enabled Days to Retain Deleted Vaults 90 (default) Purge Protection Choose Disable/Enable (default is Disable) Fill the values in the Access Configuration tab.
All other tabs can be left with default values. Select Review and Create.
Note
While creating the resource, ensure that in the access configuration tab, none of the checkboxes are selected under Resource access section. this practice ensures that access to the Key Vault is strictly controlled and only granted intentionally and explicitly.
Note
Assigning the Key Vault Secrets Officer grants the Contributor role, while the Key Vault Secrets User role allows listing and reading secrets without the ability to create or modify them.
Grant yourself Key Vault Secrets Officer role on the Key Vault.
Make a note of the Key Vault URI (for example, "https://your_keyvault_name.vault.azure.net"). You're asked to enter this URI during deployment time.
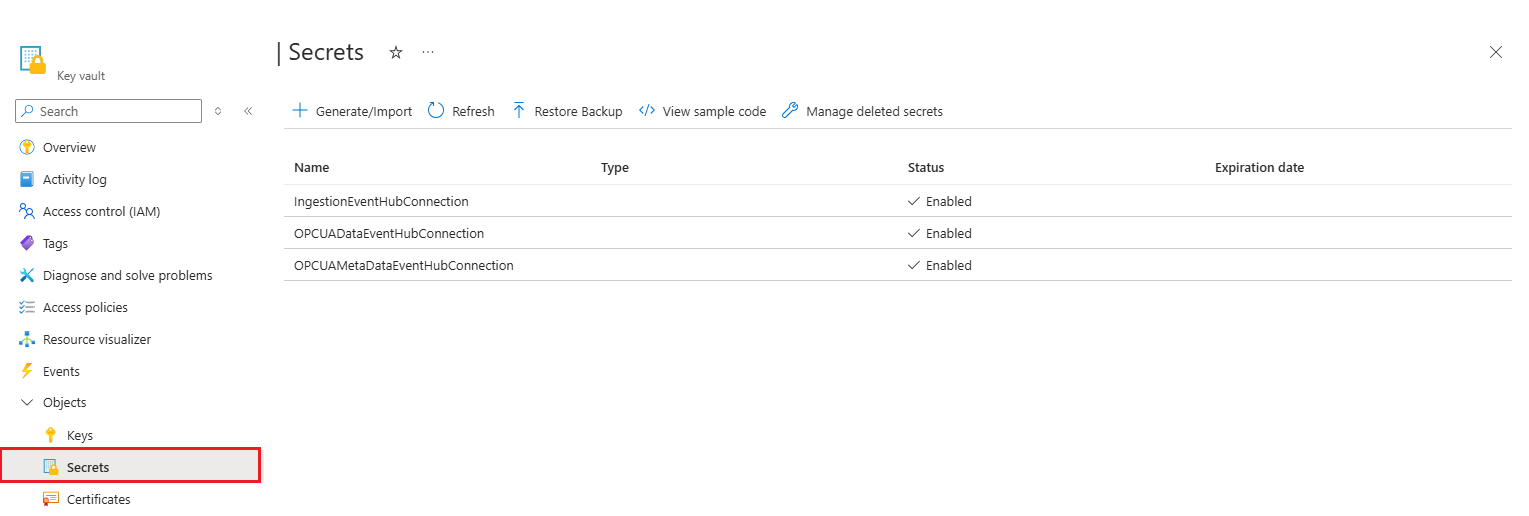
Create three secrets in the Key Vault
To create three secrets in the Key Vault, follow these steps:
Note
The Secret Names must remain unchanged. You're required to adhere to the established naming convention.
| Secret Name | Value |
|---|---|
| IngestionEventHubConnection | Connection string - primary key of the Fabric ISA 95 Data eventstream destination custom app destination. For more information about the ISA 95 data, see Overview of manufacturing industry data model (preview) |
| OPCUAMetaDataEventHubConnection | Connection string - primary key of the Fabric OPC UA Metadata eventstream destination custom app |
| OPCUADataEventHubConnection | Connection string - primary key of the Fabric OPC UA Data eventstream destination custom app |
Set up User Assigned Managed Identity
- Create a User Assigned Managed Identity. For creating a User Assigned Managed Identity, see Managed Identities
Note
An Azure user assigned managed identity used to provide access to the Key Vault.
Grant the Key Vault Secret User role to the User Assigned Managed Identity within the Key Vault.
Grant Owner role to the User Assigned Managed Identity to itself. Every UMI is associated with a Service Principal with the same name. This service principal should have Owner role on the same UMI resource. For more information, see Manage Access.
In case you want to bring your own Azure OpenAI resource, the User Managed Identity should have
Cognitive Services Data Contributorrole for data plane service to access the models and eitherContributororOwnerrole for control plane service to access the resource.
Check required access for Manufacturing data solutions
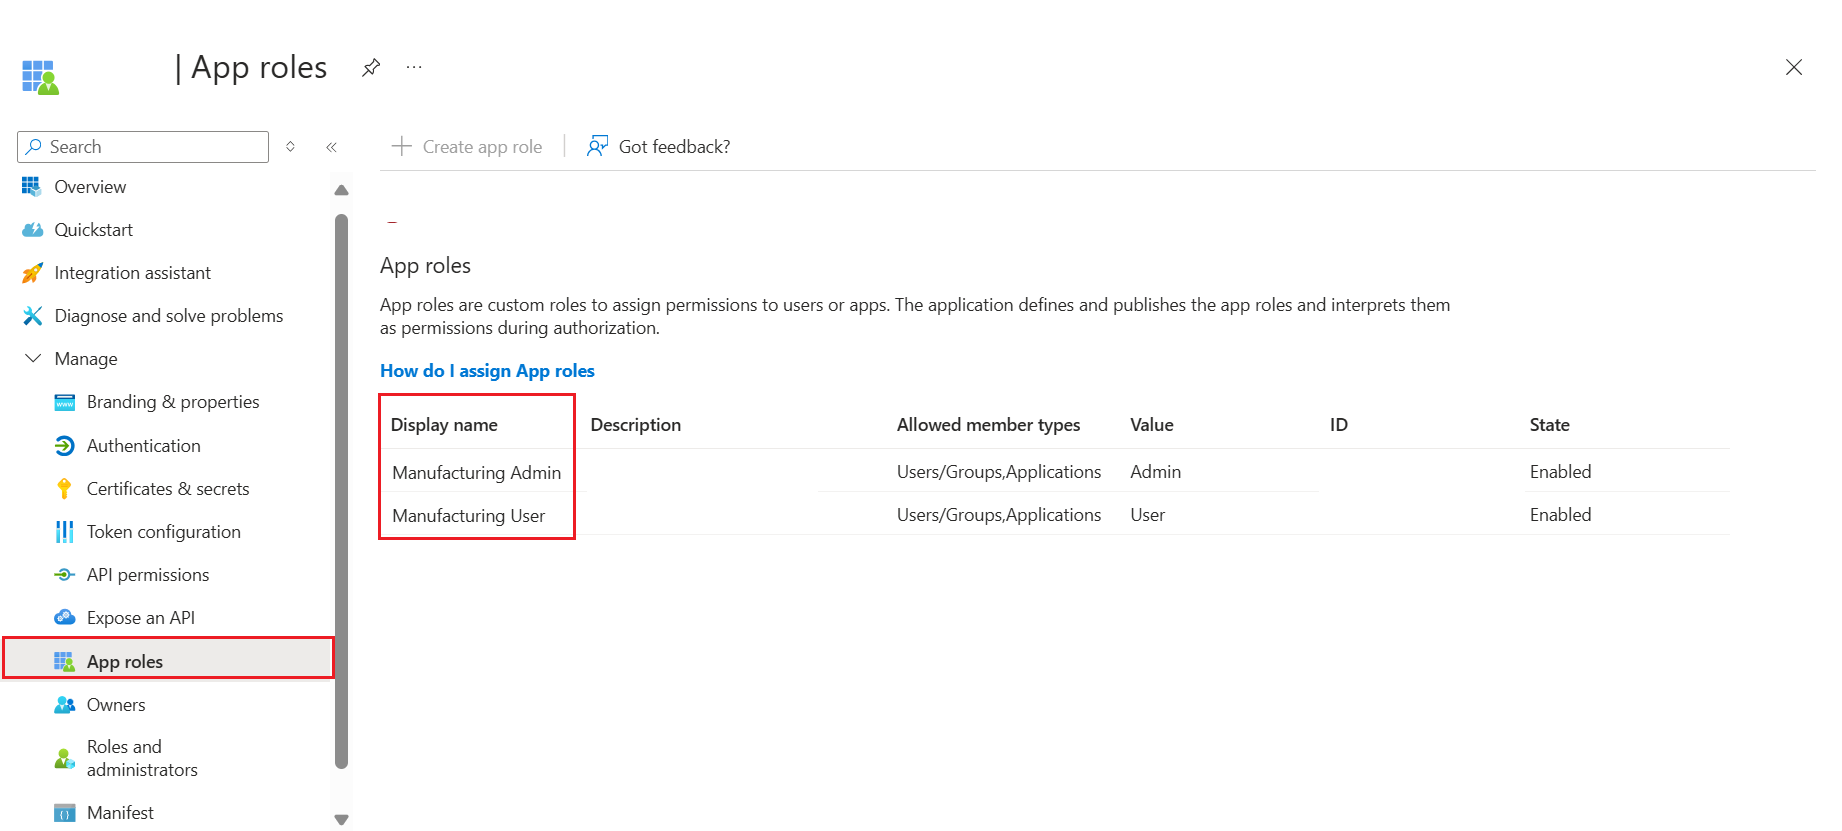
These steps guide you in creating a new app registration to control user access and a Microsoft Entra security group. The app registration script creates a new app with the required app roles. Microsoft Entra security group is created to give access to users and owners to the underlying AKS created after deployment of Manufacturing data solutions.
Create a new app registration
Download the
AppRegistration.ps1to your local system.Start PowerShell as an administrator.
Run the command
Set-ExecutionPolicy -Scope Process -ExecutionPolicy BypassThis ensures the script can be run in this process only.Sign-in to your Azure account using the command:
Connect-AzAccount -Tenant YOUR_TENANT_IDNavigate to the folder where the downloaded file is located.
Invoke the script, ensuring you pass in the name you want to use for your app. For example:
.\AppRegistration.ps1 "app_name"Make a note of the returned value for ApplicationID, referred to as Entra Application Id during the deployment.
Create Microsoft Entra group
Microsoft Entra Group is an identity and access management tool for controlling and managing access to resources within Azure environments.
You need a Microsoft Entra group with a list of owners and members who are given admin access to the underlying AKS. The group can be either a security group or a Microsoft 365 group. For more information on how to create a new group, see How to manage groups. Make a note of the Object ID, referred to as AKS Admin Group ID during the deployment.
These steps are crucial for the successful deployment and operation of Manufacturing data solutions.
Access and interact with API endpoints
To access the Manufacturing data solutions and copilot API endpoints, we recommend using Insomnia with the Dataverse Web API. However, you can also use other tools based on your needs and preferences.
