Vendor electronic invoice import in Chile
This article explains how to configure and use vendor electronic invoice import for Chile from the country-specific XML format in Microsoft Dynamics 365 Finance.
Prerequisites
Before you complete the tasks in this article, the following prerequisites must be met:
The primary address of the legal entity must be in Chile.
Ensure that the settings for the Chilean legal entity are in place. For more information, see Set up legal entity and tax information for Chile.
Gain familiarity with and understanding of Electronic invoicing as it's described in Electronic invoicing overview.
Do the common part of Electronic Invoicing service configuration as it's described in Electronic invoicing configuration.
The Enable application response for vendor invoices feature must be enabled in Feature management.
Ensure that the following Electronic reporting (ER) format configurations are imported:
- Customer invoice context model
- Inventory e-invoice (CL) XML Import
- Vendor Invoice Mapping to Destination LATAM
- Application response (CL)
- Pending vendor invoice model mapping
Note
The ER format is based on the Invoice model LATAM configuration and uses the Vendor Invoice Mapping to Destination LATAM configuration. All additional configurations that are required are automatically imported.
Configure the Electronic invoicing feature
Important
The inbound flow of the Electronic invoicing Globalization feature for Chile requires that you run Finance version 10.0.41 or later. It can be configured only in the new Globalization Studio. It isn't supported in Regulatory Configuration Service (RCS).
Import channel
To enable an inbound flow, you must create a feature setup of the Import channel type for the Chilean electronic invoice (CL) "E-Invoicing for Chile: ISV last-mile connector with Edicom" Globalization feature.
Select the Setups tab of the derived feature.
Select Add, and then select Custom setup.
Enter a name and description for the feature setup.
Select Import channel as the setup type and Edicom service as the data channel.
Select Create.
Select the feature setup that is created for vendor invoice import.
Select Edit.
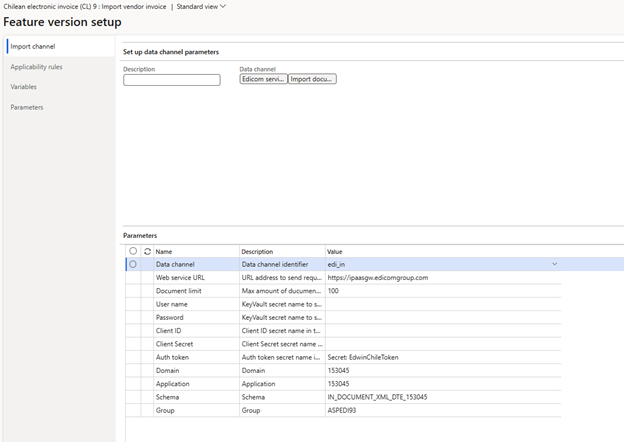
On the Import channel tab, set the import channel parameters.
The following illustration shows the parameters for the feature setup set to the values that Edicom provided to Microsoft for testing purposes. The values that you enter will differ. Edicom provides these values to you when you're onboarded.

Applicability rules
Applicability rules must be correctly configured to provide context, so that the exact Electronic invoicing Globalization feature that must run in the Electronic Invoicing service can be found. Create a new applicability rule for the same channel name that you specified for the import channel configuration in the previous section. For example, add an applicability rule that has an And clause for the Channel field when its value equals the "edi_in" string.
Variables
Out of the box, variables are provided with the specific feature setup to support the EdicomId, Response, and ResponseXML variables, as shown in the following illustration.

Note
After the feature setup is completed, save, complete, and deploy the version.
Configure ER
Go to the Electronic reporting workspace, and open Reporting configurations.
Derive a configuration from Customer Invoice Context Model.
In the new configuration, go to Designer > Map model to datasource > Data channel > Designer.
Point to the Data model source type under the Mapping tab on the left.
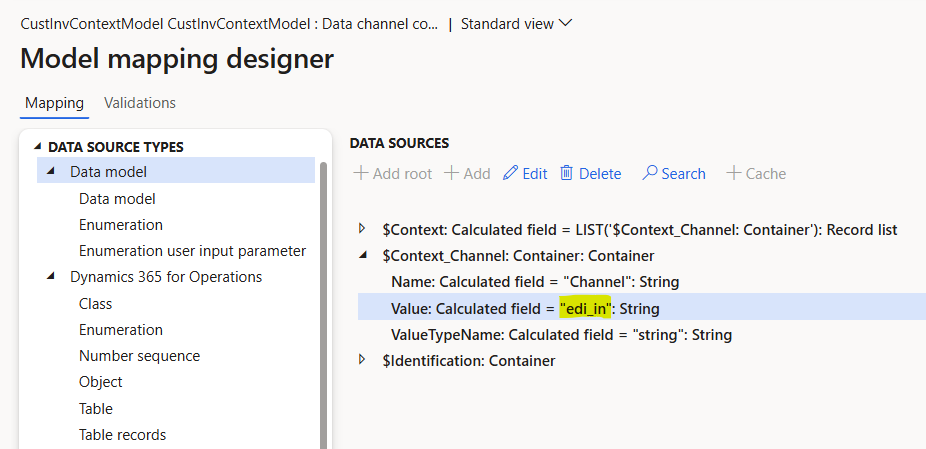
To set up the data channel context, expand the $Context_Channel container and update the Value calculated field with your channel name.
Save your change.
The following illustration shows an example of the change.

Return to Reporting configurations.
Select the Vendor invoice Mapping to destination LATAM configuration.
Set the Default for model mapping option to Yes.
Configure parameters
Configure electronic document parameters
Make sure that the country/region-specific ER configurations for the document context and electronic document model mapping that are required for Chile are imported. For more information, see Set up Electronic document parameters.
Go to Organization administration > Setup > Electronic document parameters.
On the Electronic document tab, add a record, and set the following values for it:
- Table name: Application response
- Document context: Customer invoice context model - Application response context
- Electronic document model mapping: Pending vendor invoice model mapping - Application response

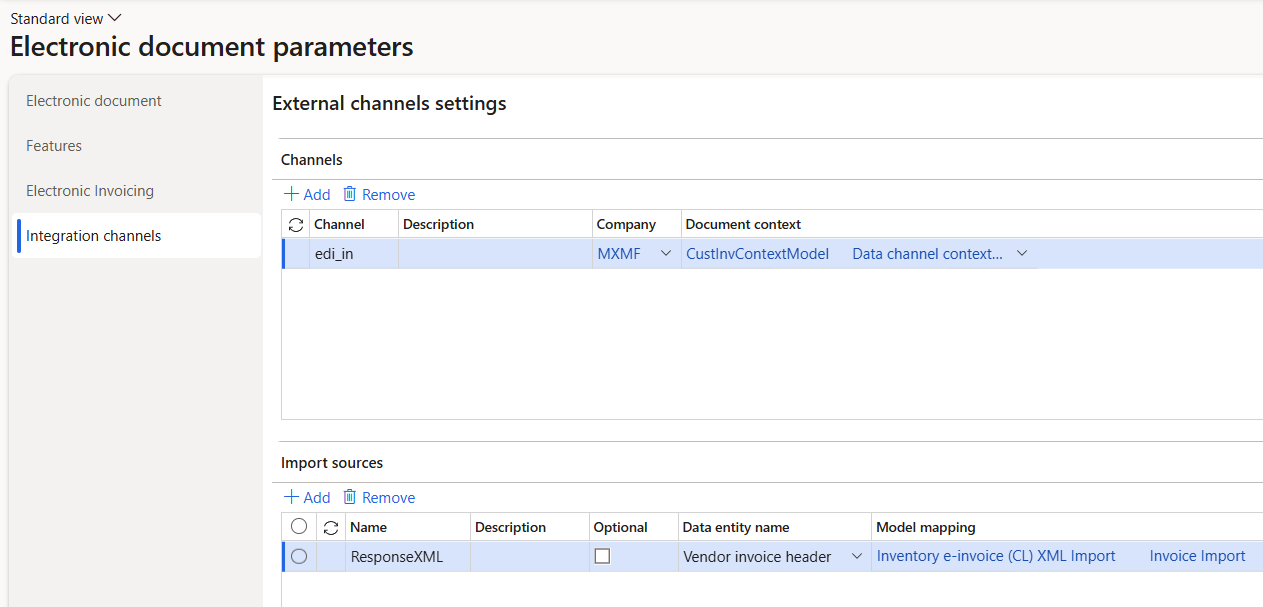
On the Integration channels tab, create records. Specify a channel name of the Import type, and specify the document context configuration for every required company.
For each channel, add an import source, and set the following values for it:
- Name: Enter the response format.
- Data entity name: Select Vendor invoice header.
- Model mapping: Specify the model mapping for the invoice import.

Save your changes, and close the page.
Configure vendor data
During the import process, vendors are identified by their tax exempt number. To enable correct vendor identification, follow these steps.
- Go to Accounts payable > Vendors > All vendors, and select a vendor.
- On the LATAM FastTab, in the Country identification number field, enter a valid identification number of the country for the vendor. This number is used to identify the vendor during import, by matching it to the value of the DTE\Documento\Encabezado\RUTEmisor element in the import XML file.
Configure products
During the import process, products are identified by their external descriptions. These descriptions are usually vendor-specific. To enable correct product identification, follow these steps.
- Go to Product information management > Products > Released products.
- Select a product, and then, on the Purchase menu, in the Related information section, select External item description.
- Create a new external description for the selected product.
- In the Account code column, select Table to define an external product description for a specific vendor.
- In the Vendor relation column, select a vendor.
- In the External item number column, enter an external product code. This code is used to identify the product during import, by matching the code to the value of the DTE\Documento\Detalle\NmbItem element in the import XML file.
Note
If there must be non-stocked items, the system expects that these products belong to an item model group where the Stocked product checkbox is cleared on the Inventory policy page.
If no related Non-stock products exist, the system tries to import invoice lines by referring to a default item. The default item must be configured in the system as a released product where the code is defined exactly as DEFAULT_ITEM, and the product must belong to an item model group where the Stocked product checkbox is cleared on the Inventory policy page.
Import vendor electronic invoices and send application responses
To run the import vendor electronic invoices, follow these steps.
- Go to Organization administration > Periodic > Electronic documents > Receive electronic documents.
- In the Receive electronic documents dialog box, specify the parameters as required.
- Select OK to immediately start the import process or to schedule the import to run in the background.
Import process description
Here is an overview of the steps in the import process and the order that they occur in.
- Vendors are identified by using the country identification number that is defined in the vendor record. If no vendor matches the data that is being searched, the import process fails, and a related error message is shown.
- Products that are used on invoice lines are identified by using an external item number, which might be vendor-specific. If no product matches the external description, the import process fails, and a related error message is shown.
- If an incoming import file contains the information about purchase orders and its lines in the DTE\Documento\Referencia\FolioRef elements, the numbers are used for invoice matching with purchase orders and lines that are entered in the system.
- If no order or line references are defined in an incoming file, the system tries to automatically match incoming vendor invoices with existing purchase orders.
- If no purchase order is found, the system raises a warning but continues the import. It now considers products on invoice lines Non-stock items. The system expects that these products belong to an item model group where the Stocked product checkbox is cleared on the Inventory policy page.
- If no related Non-stock products exist, the system tries to import invoice lines by referring to a default item. The default item must be configured in the system as a released product where the code is defined exactly as DEFAULT_ITEM, and the product must belong to an item model group where the Stocked product checkbox is cleared on the Inventory policy page. If no default item is configured in the system, the import process fails, and a related error message is shown.
Successfully imported vendor electronic invoices are shown in the system as pending invoices. To review imported invoices, go to Accounts payable > Invoices > Pending vendor invoices.
Application response
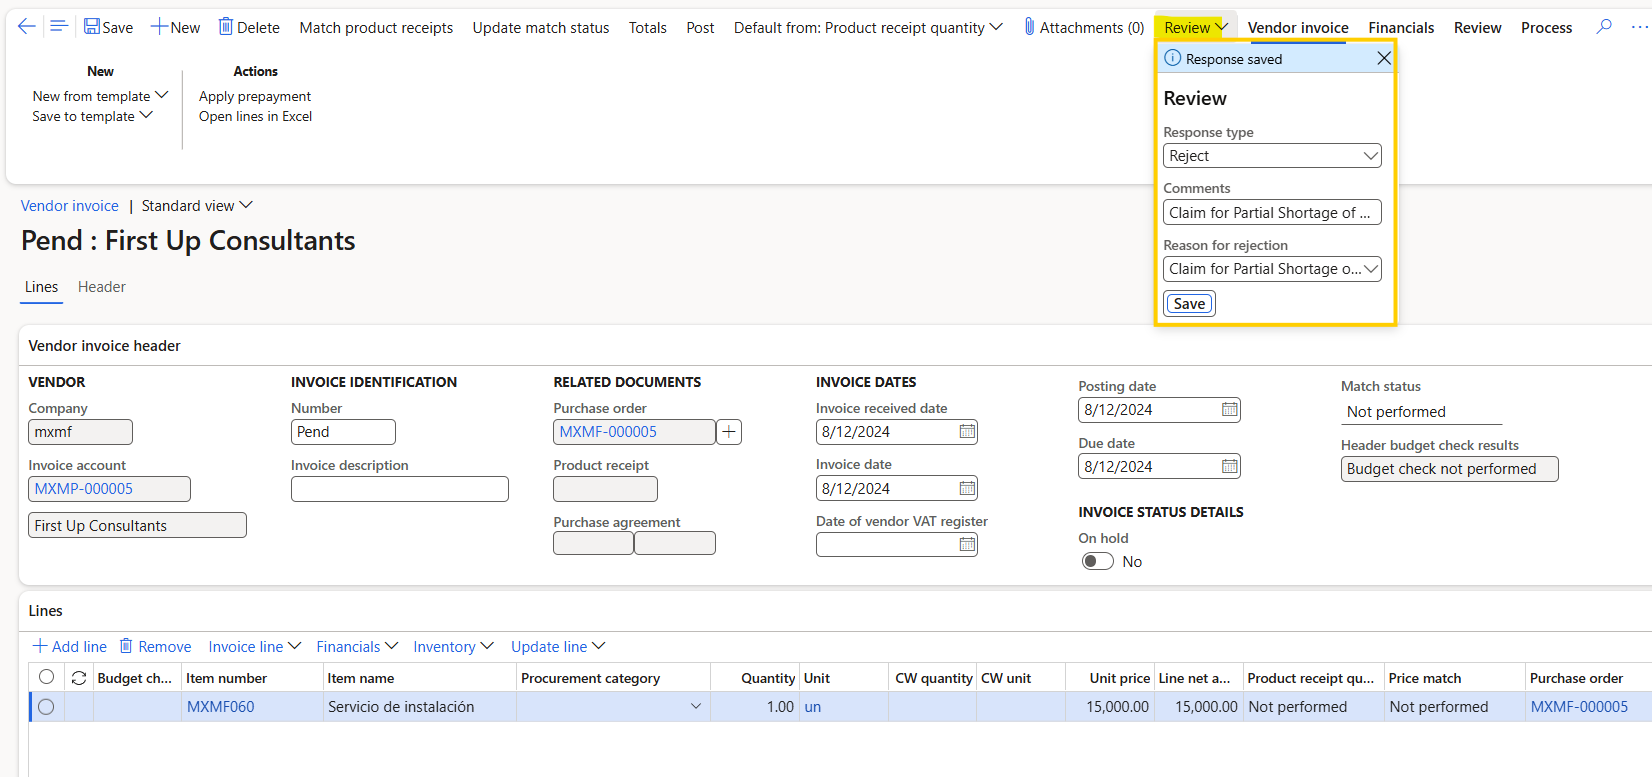
After the imported vendor electronic invoice is reviewed on the Pending vendor invoices page (Accounts payable > Invoices > Pending vendor invoices), an application response can be saved and submitted. The application response indicates either acceptance or rejection of the invoice. If the invoice is either accepted with discrepancies or rejected, the response includes comments. If the invoice is rejected, the response also includes the reason for the rejection.
To fill in the application response, follow these steps.
Open the Pending vendor invoices page in edit mode for the desired invoice.
On the Action Pane, select Review.
In the dropdown dialog box, in the Response type field, select one of the following values, as required:
- Accept
- Accept with discrepancies
- Reject
If you selected either Accept with discrepancies or Reject as the response type, enter comments in the Comments field.
If you selected Reject as the response type, select one of the following values in the Reason for rejection field:
- Claim to the content of the document
- Claim for Partial Shortage of Goods
- Claim for Total Shortage of Goods
Select Save.

Go to Organization administration > Periodic > Electronic documents > Submit electronic documents.
On the Records to include FastTab, select Filter.
On the Joins tab, add vendor invoices to the join for the application response.
On the Range tab, add a criterion for the invoice number to the Vendor invoices table.
Submit the application response.
Important
After the application response is submitted, it can't be modified.
Application responses must be sent before the pending vendor invoices are posted. The application response capability isn't available for posted invoices.