Creating a VSIX Deployable Project (or Item) Template with Custom Wizard Support
Every now and then, I get an interesting question or problem from a customer (thanks Uma) that highlights a need for some additional documentation, or at the least a sample or walkthrough to illustrate how to get from A to Z. In this instance, the question was "How do you localize a project (or item) template, to support multiple languages?". Better yet, what if that template uses a custom wizard assembly, and you want to deploy it with a VSIX package?
Given all the moving pieces involved, I've opted to break this down into a couple of different blog entries. The first being this one, which will walk you through creating the initial project. And then a follow up blog entry, that will detail the steps to localized the template, wizard assembly, and VSIX package.
Prerequisites
To follow this walkthrough, you will need to install the Visual Studio SDK that matches the version of Visual Studio you are using. If you aren't sure where to find it, there is a list of useful links on the very first entry of this blog that I keep up to date with links to various downloads and resources. Note, while I used VS 2013 Ultimate to create this project, this same technique can be used for VS 2012 and VS 2010 (Pro or better SKUs).
Getting Started
Upon installing the Visual Studio SDK, the following project templates are added to assist you in developing new project and item templates.
- C# Item Template
- C# Project Template
- Visual Basic Item Template
- Visual Basic Project Template
These Project templates create a baseline project or item template, that when built, produces a .zip file that you can manually copy into your ...\Documents\Visual Studio 20xx\Templates directory, and then used to create a new project, or add a new item to an existing project.
The Visual Studio SDK, also includes a stand-alone "VSIX Project" template, which can be used to deploy a template (in addition to other assets).
These VSIX projects do not generate an assembly by default. But if you manually edit a few properties in the .csproj, you can use the VSIX project to build an assembly and have it included as a part of the .VSIX payload.
So instead of creating a solution with a structure similar to the following:
Solution - MyTemplateWithWizard
- MyProjectTemplate (produces the template as a .zip file)
- MyTemplateWizard (produces an assembly with an IWizard implementation)
- MyTemplateWithWizardVSIX (packages the template and assembly into a .VSIX)
You can actually implement the wizard assembly with the VSIX project, simplifying the solution structure such that there are only two projects required. For example:
Solution - MyTemplateWithWizard
- MyProjectTemplate (produces the template as a .zip file)
- MyProjectWizard (builds the wizard assembly, packaging it and the template into a .VSIX)
The following is a walkthrough that will show you how to create a VSIX deployable project template with custom wizard support, using just the two projects as described above.
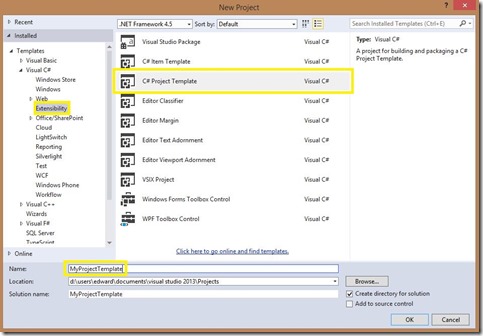
Create a new "C# Project Template" project
Select the File.New.Project... menu item, to invoke the "Add New Project" dialog
Select the "C# Project Template" template and enter a project name as shown below
Click the "OK" button to create the initial template project
Add a new "VSIX Project" to the solution
Right click the "Solution" node in the Solution Explorer, and select the Add.New Project... menu item, to invoke the "Add New Project" dialog
Select the "VSIX Project" template and enter a project name as shown below
Click the "OK" button to create and add the VSIX project to the solution
Add the template as an asset of the VSIX project.
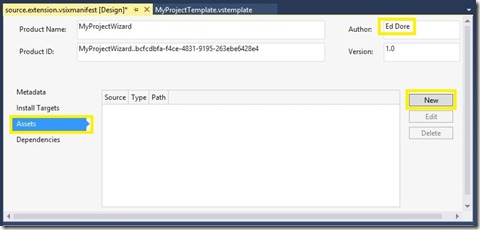
Open the project's source.extension.vsixmanifest file
In the manifest designer, add a name or company to the "Author:" field
Select the "Assets" tab, then click the "New" button as highlighted below
In the "Add New Asset" dialog, select the Type, Source, and Project fields as shown below
Build and Verify
Build the Solution
Launch the VS Experimental Instance with CTRL+F5
Select the File.New.Project... menu item, to invoke the "Add New Project" dialog
Select the "MyProjectTemplate" and create a new project as shown below
Modify the template.
- Change some of the elements displayed in the New Project dialog, by editing the .vstemplate file
Open the .vstemplate file
Change the Name, Description, and DefaultName elements as highlighted below
<?xmlversion="1.0"encoding="utf-8"?>
<VSTemplateVersion="3.0.0"Type="Project"
xmlns=https://schemas.microsoft.com/developer/vstemplate/2005xmlns:sdk="https://schemas.microsoft.com/developer/vstemplate-sdkextension/2010">
<TemplateData>
<Name>My Project</Name>
<Description>My Custom Project Template</Description>
<Icon>MyProjectTemplate.ico</Icon>
<ProjectType>CSharp</ProjectType>
<RequiredFrameworkVersion>2.0</RequiredFrameworkVersion>
<SortOrder>1000</SortOrder>
<TemplateID>0504f2de-af7a-4065-a542-f65ca8c61790</TemplateID>
<CreateNewFolder>true</CreateNewFolder>
<DefaultName>MyProject</DefaultName>
<ProvideDefaultName>true</ProvideDefaultName>
</TemplateData>
<TemplateContent>
<ProjectFile="ProjectTemplate.csproj"ReplaceParameters="true">
<ProjectItemReplaceParameters="true"TargetFileName="Properties\AssemblyInfo.cs">AssemblyInfo.cs</ProjectItem>
<ProjectItemReplaceParameters="true"OpenInEditor="true">Class1.cs</ProjectItem>
</Project>
</TemplateContent>
</VSTemplate>
- Rename Class1.cs to something more appropriate.
- Right click "Class1.cs" in the Solution Explorer, and select the "Rename" menu item
- Rename Class1.cs to MyProject.cs
- Open MyProject.cs, and change the classname from Class1 to MyProject, and add a simple comment as shown below
- Fixup the .vstemplate and .csproj
- Open the .vstemplate file, find and rename "Class1.cs" to "MyProject.cs"
- Open the template's .csproj file, find and rename "Class1.cs" to "MyProject.cs"
- (Optional) Build and Test in the Experimental Instance again
Modify the .VSIX project to build a custom wizard implementation.
Modify the project's properties to build an assembly.
Right click the VISX Project node in the Solution Explorer, and select "Unload Project"
Right click the VISX Project node in the Solution Explorer, and select "Edit MyProjectWizard.cs"
Change the following properties from "false" to "true"
<IncludeAssemblyInVSIXContainer>true</IncludeAssemblyInVSIXContainer>
<IncludeDebugSymbolsInVSIXContainer>true</IncludeDebugSymbolsInVSIXContainer>
<IncludeDebugSymbolsInLocalVSIXDeployment>true</IncludeDebugSymbolsInLocalVSIXDeployment>Save MyProjectWizard.csproj
Right click the VSIX Project node in Solution Explorer, and select "Reload Project"
Add a reference to EnvDTE.dll. Select the envdte node in Solution Explorer, and in the Properties toolwindow, change the "Embed Interop Types" property to "False", to ensure a clean build
Add a reference to the Microsoft.VisualStudio.TemplateWizardInterface.dll
Right click the VSIX Project node in Solution Explorer, and select Add.Class... menu item
Add a new class called MyProjectWizard.cs
Replace the contents of MyProjectWizard.cs with the following
using System;
using System.Collections.Generic;
using EnvDTE;
using Microsoft.VisualStudio.TemplateWizard;namespace MyProjectWizard
{
public class MyProjectWizard : IWizard
{
private DTE _dte;public void BeforeOpeningFile(ProjectItem projectItem) { }
public void ProjectFinishedGenerating(Project project) { }
public void ProjectItemFinishedGenerating(ProjectItem projectItem) { }
public void RunFinished() { }public void RunStarted(object automationObject, Dictionary<string, string> replacementsDictionary, WizardRunKind runKind, object[] customParams)
{
_dte = (DTE)automationObject;// add an entry to the dictionary to specify the string used for the $greeting$ token
replacementsDictionary.Add("$greeting$", "Hello Custom Library");
}public bool ShouldAddProjectItem(string filePath) { return true; }
}
}Open the source.extension.vsixmanifest, select the Assets tab, and click the "New" button
In the "Add New Asset" dialog, select the Type, Source, and Project fields as shown below
Select File.Save All to ensure all the above changes are saved
Strong Name the Assembly (Wizard assemblies need to be strong named)
Right Click the VSIX Project node in Solution Explorer, and select the Properties menu item
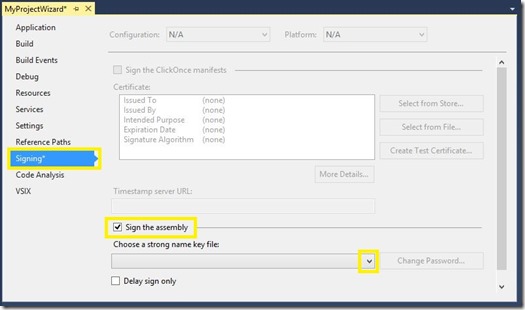
In the Project Designer, select the "Signing" tab
Check the "Sign the Assembly" checkbox as shown below
Select "<New...> in the "Choose a strong name key file"
In the "Create Strong Name Key" dialog, enter "key.snk" for the Key filename
Uncheck the "Protect my key file with a password" checkbox, and click the OK button
Associate the Wizard with the project template
Run SN.EXE -T on the wizard assembly to retrieve the public token key
Tip: Create an external tool entry on the Tools menu, as described in Jeremiah Clark's blog Visual Studio Tip: Get Public Key Token for a Strong Named Assembly
Open the template's .vstemplate file and add the following <WizardExtension> section
<WizardExtension>
<Assembly>MyProjectWizard, Version=1.0.0.0, Culture=neutral, PublicKeyToken=22c2a1a5fa7b6905</Assembly>
<FullClassName>MyProjectWizard.MyProjectWizard</FullClassName>
</WizardExtension>Open the template project's MyProject.cs file, and replace the comment line with the following
using System;
using System.Collections.Generic;
$if$ ($targetframeworkversion$ >= 3.5)using System.Linq;
$endif$using System.Text;namespace $safeprojectname$
{
// $greeting$
public class MyProject
{
}
}
Build and Test the Solution
- Build the Solution
- Set a breakpoint on the MyProjectWizard.RunStarted method
- Launch the Experimental Instance with the debugger (F5)
- Select the File.New.Project... menu item, to invoke the "Add New Project" dialog
- Select the "My Project Template", and click the OK button
- When the breakpoint is hit, select Debug.Continue (or F5) and let the wizard run to completion
- Note the new comment added to the resulting MyProject.cs file
Summary
And there you have it, a VSIX deployable template with a custom wizard support. When finished, use the resulting .VSIX file to deploy the template to your production environment. And if you think others will find your template useful, consider uploading it to the VS Extension Gallery.
The resulting code from the above walkthrough can be downloaded from here.
Comments
Anonymous
October 08, 2014
Hello, this is one of the best tutorials I found for creating Project Template with Wizard. I had an error when trying to get the public token key- I have created the external tool and it gives me this error - MyProjectWizard.dll does not represent a strongly named assembly. Could you please help me . Furthermore, is it possible to create the project template and the wizard in VS PackageAnonymous
November 03, 2014
Hi Vladimir, Chances are, you didn't configure the wizard assembly to be strong named. You have to create a new key.snk file in the "Signing" tab of the project properties. Then retrieve the public token and add it to the .vstemplate in the template project. I would recommend keeping the template and wizard projects separate from your VSPackage assembly. These are loaded differently and at different times. While it's theoretically possible to add your IWizard implementation to a VSPackage assembly, it's not something I've seen done by the VS team.Anonymous
January 15, 2015
Awesome post. Thanx! Could you maybe tell me how to add multiple projects to a template?Anonymous
February 11, 2015
Two options Hein. 1. Use a Multi-proj template ( msdn.microsoft.com/.../ms185308.aspx ). 2. Implement a custom wizard that adds an additional project after the 1st one is generated. Stay tuned for a new blog entry covering that 2nd option.Anonymous
March 05, 2015
Hello; Thanks for all. One question please: Is necessary to registry the dll wizard in GAC? Regards.Anonymous
March 12, 2015
Hi ARROCAL, wizard DLLs do not need to be in the GAC. Note in the walkthrough above, we never place the wizard assembly in the GAC.Anonymous
April 06, 2015
Very Much Thank You Sir, Such helpful article. It solve my GAC assembly issue. Previously I was adding Wizard dll in gac, such a hectic task. Now using this solution, It avoid these steps.Anonymous
April 20, 2015
The comment has been removedAnonymous
April 21, 2015
Guessing you may have missed something Bablu. You could try using the VSX Template Wizard per my latest blog, to automate all these steps : blogs.msdn.com/.../the-vsx-template-wizard.aspx.Anonymous
April 30, 2015
Thanks Ed Dore. I got rid of the problem by installing the DLL into GAC initially. But I did not want to have all the people who use the template to have this overhead. I overcame the GACing problem by following the post here. oncoding.blogspot.com/.../visual-studio-template-wizards-without.htmlAnonymous
July 30, 2015
I have the same issue as Bablu, the assembly needs registering in the GAC for it to work. has anyone built this without having to do this?Anonymous
August 17, 2015
Bablu and Andrew. I managed to bypass the error by NOT signing the Wizard assembly. Also then put PublicKeyToken=null to vstemplate-fileAnonymous
October 06, 2015
Thank you so much !!! I almost gave up on the Wizard but this solution works like a charm :DAnonymous
December 20, 2015
The comment has been removedAnonymous
March 07, 2016
Very useful post. Helped me a lot in creating a custom project template. I am in the process of creating a starter kit kind of custom project , where the user selects a new project and then a new window will open collecting user's choices and then proceed to generate the code according to the selection. The project will create dummy API calls and the user can include his logic. I am not able to find anything useful to acheive this use case. Could you please help me or give me some suggestions?


