Get the new Federated Authentication for Office 365 in Azure Deployment Kit
To assist you in creating the Azure infrastructure and configuring the servers for high-availability federated authentication for Office 365 in this configuration:
Use the Federated Authentication for Office 365 in Azure Deployment Kit, a ZIP file in the TechNet Gallery that contains the following files:
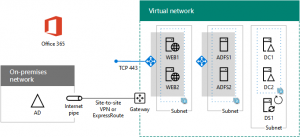
- O365FedAuthInAzure_Figures.vsdx and O365FedAuthInAzure_Figures.pptx - Microsoft Visio and Microsoft PowerPoint files that contain the figures from Deploy high availability federated authentication for Office 365 in Azure and Federated identity for your Office 365 dev/test environment.
- O365FedAuthInAzure_PowerShell.txt - The set of all the PowerShell commands to create and configure the high availability federated authentication infrastructure in Azure.
- O365FedAuthInAzure_Config.xlsx - Microsoft Excel configuration workbook that generates the PowerShell commands to create the high availability federated authentication infrastructure in Azure based on your custom settings.
- O365FedAuthInAzure_Config_Example.xlsx - An example of the Microsoft Excel configuration workbook that generates PowerShell commands to create a high availability federated authentication infrastructure in Azure.
The Excel configuration workbook makes the configuration of the Azure infrastructure and the servers much easier.
Step 1. You fill in the cells with the blue background on the set of sheets for the various elements of the Azure configuration (Resource Groups, Storage Accounts, etc.). Here is an example:
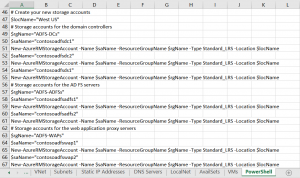
The PowerShell sheet in the workbook takes your settings and generates the customized PowerShell commands to build out the Azure elements and infrastructure and configure the servers. Here is an example:
Step 2. To execute the PowerShell commands, copy the Column A text into Notepad and then copy and paste the needed blocks one at a time into the Azure PowerShell or Windows PowerShell command prompts.
Please let us know you think of this deployment kit:
- Will you use its contents?
- Does it help you deploy faster or more successfully?
- What is missing from the kit?
Thank you in advance for your feedback.
To join the CAAB, become a member of the CAAB space in the Microsoft Tech Community and send a quick email to CAAB@microsoft.com to introduce yourself. Please feel free to include any information about your experience in creating cloud-based solutions with Microsoft products or areas of interest. Join now and add your voice to the cloud adoption discussion that is happening across Microsoft and the industry.
Comments
- Anonymous
June 08, 2017
Really? First off, you have several errors in the resulting script. I understand, MS keeps changing the cmdlets and now there's resource manager versus classic, etc. but this one's pretty hard to forgive:$disk=Get-Disk | where {$_.PartitionStyle -eq "RAW"}$diskNumber=$disk.NumberInitialize-Disk -Number $diskNumberNew-Partition -DiskNumber $diskNumber -UseMaximumSize -DriveLetter FFormat-Volume -DriveLetter Fall your disk commands need lun numbers, but this particular sequence will format some unsuspecting soul's f drive on their local machine. nice.- Anonymous
June 13, 2017
Hi Stephen, Thanks for your feedback. You have a good point. I have replaced the cited PowerShell command block in the article and deployment kit materials with the following: Get-Disk | Where PartitionStyle -eq "RAW" | Initialize-Disk -PartitionStyle MBR -PassThru | New-Partition -AssignDriveLetter -UseMaximumSize | Format-Volume -FileSystem NTFS -NewFileSystemLabel "WSAD Data" Please let me know if there are other issues that need correction. Thanks. Joe Davies
- Anonymous


