ARM concepts in Azure Stack for the WAP Administrator – In-guest configuration with ARM, and technologies such as Virtual Machines Extensions, including PowerShell Desired State Configuration (DSC)
Hello Readers! This is part 7 of the blog post series “ARM concepts in Azure Stack for the WAP Administrator.” In this post we’ll focus on the VM configuration itself, leveraging Azure Resource Manager (ARM), VM Extensions and PowerShell DSC.
Note
Some information relates to pre-released product which may be substantially modified before it’s commercially released. Microsoft makes no warranties, express or implied, with respect to the information provided here.
Here is the table of contents for the series of post so that you’ll find it easier to navigate across the series:
Table of contents
- Introductory post, and some first information on the Azure Stack POC architecture and ARM’s role
- Cloud Service Delivery
- Plans, offers, and subscriptions
- Resource Deployment
- Packaging and publishing templates on Azure Stack
- Multi-tier applications with ARM
- In-guest configuration with ARM, and technologies such as Virtual Machines Extensions, including PowerShell Desired State Configuration (DSC) – this post
- Troubleshooting IaaS deployments in Azure Stack—this maps to an understanding of how the different Resource Providers (RPs) work together in an Azure Stack installation
Introduction
Victor Arzate has done a great job in laying down the foundation for this blog post by describing how to deploy resources and multi-tier applications. In this blog post we will dive deeper in how to configure a VM, also known as in-guest configuration. We will briefly revisit the options you have in Windows Azure Pack (WAP), look at Azure Stack and discover the similarities between the two.
VM deployment and configuration in Windows Azure Pack
Let’s revisit the options in WAP to deploy a VM:
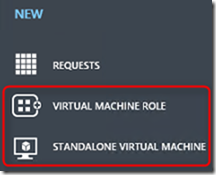
- VM Standalone - mapped to a VM template in System Center Virtual Machine Manager (SCVMM)
- VM Role – allows integration of application installation during deployment
And as mentioned in the previous posts, Service Management Automation (SMA) can be used to automate and orchestrate a VM deployment and configuration (and much more) in WAP.
Desired State Configuration (DSC) can be used to declare the end state of your deployment which can be applied during or after a deployment. With stand-alone virtual machines, you usually deploy a VM with only the operating system installed, but what about if you need more than this? Let’s say, for example, you want to deploy a VM with SQL server? Then you need a technology that allows you to configure the VM itself, once it has been deployed with an OS. VM Roles allow you to perform this as it will deploy the VM with the OS desired and second, it will allow you to perform in-guest configuration via PowerShell DSC. For our example with SQL Server, PowerShell DSC allows you to install the required OS features (for example, .Net Framework) and also it allows you to install the application and configure it as required (in this case, SQL Server). How to create VM roles and use PowerShell DSC is out of scope of this blog, but this has been extensively documented. Two great blog posts which talk about VM role deployment and DSC are:
If you are looking for a DSC jump start, then please check out this great video and if you are wondering where you can find DSC resources, please check the PowerShell Gallery.
Let’s now look at Azure Stack.
VM deployment and configuration in Azure Stack
One of the biggest differences between WAP and Azure Stack is Azure Resource Manager (ARM). If you are looking for a primer on ARM I would encourage you to check out Ryan Jones’ presentation on ARM.
Since ARM is the consistent management layer between Azure and Azure Stack and consumes JSON based templates for VM deployment and configuration, it’s the first obvious step to explore. As pointed out a couple of times already during the blog post series, please do check out and try the available Azure Stack templates here. Notice the green button in the picture below; in a couple of clicks you can download a zip file and explore all sample templates on your local machine or test them in your Azure Stack environment:
So with an ARM template you can deploy and configure your VM’s, right? Correct! Let’s look at the options:
For new VM’s deploy an ARM template leveraging the:
a) Custom Script extension, see this template as an example
b) DSC extension, see this template as an example
c) DSC extension and Azure Automation DSC for pull server functionality, see this template as an example
For existing VM’s:
d) Push a DSC configuration using PowerShell Remoting
e) Enable the DSC VM extension and assign a configuration
f) Enable the DSC VM extensionand assign a DSC configuration, leveraging Azure Automation for pull server functionality
In this blog post will focus on options d and f.
Note: Before we move on, it is good to emphasize that DSC investments you have made - or are going to make - in WAP, Azure or Azure Stack - can be reused in all these areas. Write once, run everywhere!
Let’s look at the relevant VM extensions in an ARM template.
VM extension skeleton. Please note the highlighted section in red, these are different in each VM extension as depicted below.
   {
  "type": "Microsoft.Compute/virtualMachines/extensions",
  "name": "MyExtension",
  "apiVersion": "2015-05-01-preview",
  "location": "[parameters('location')]",
  "dependsOn": ["[concat('Microsoft.Compute/virtualMachines/',parameters('vmName'))]"],
  "properties":
  {
  "publisher": "Publisher Namespace",
  "type": "extension Name",
  "typeHandlerVersion": "extension version",
  "autoUpgradeMinorVersion":true,
  "settings": {
  // Extension specific configuration goes in here.
  }
  }
  }
Custom Script Extension:
     {
        "publisher": "Microsoft.Compute",
        "type": "CustomScriptExtension",
        "typeHandlerVersion": "1.7",
        "settings": {
            "fileUris": [
                "http: //Yourstorageaccount.blob.core.windows.net/customscriptfiles/YourScriptGoesHere.ps1"
            ],
            "commandToExecute": "powershell.exe-ExecutionPolicyUnrestricted -YourScriptGoesHere.ps1"
        },
        "protectedSettings": {
          "commandToExecute": "powershell.exe-ExecutionPolicyUnrestricted -YourScriptGoesHere.ps1",
          "storageAccountName": "yourStorageAccountName",
          "storageAccountKey": "yourStorageAccountKey"
        }
    }
You can refer to this sample from the Azure Stack Quick Start GitHub repository for a complete template using the custom script extension.
The Custom Script Extension can be used to invoke a script after deployment to do some post configuration work. For example, we could invoke an Azure Automation runbook leveraging this extension, like a webhook enabled runbook.
DSC Extension:
   {
      "publisher": "Microsoft.Powershell",
      "type": "DSC",
      "typeHandlerVersion": "2.1",
      "settings": {
          "ModulesUrl": "https://UrlToZipContainingConfigurationScript.ps1.zip",
          "SasToken": "Optional : SAS Token if ModulesUrl points to Azure Blob Storage",
          "ConfigurationFunction": "ConfigurationScript.ps1\\ConfigurationFunction",
          "Properties": {
              "ParameterToConfigurationFunction1": "Value1",
              "ParameterToConfigurationFunction2": "Value2",
              "ParameterOfTypePSCredential1": {
                  "UserName": "UsernameValue1",
                  "Password": "PrivateSettingsRef:Key1(Value is a reference to a member of the Items object in the protected settings)"
              },
              "ParameterOfTypePSCredential2": {
                  "UserName": "UsernameValue2",
                  "Password": "PrivateSettingsRef:Key2"
              }
          }
      },
      "protectedSettings": {
          "Items": {
              "Key1": "PasswordValue1",
              "Key2": "PasswordValue2"
          },
          "DataBlobUri": "optional : https: //UrlToConfigurationData.psd1"
      }
  }
If you want to make sure that you are using the latest version of the Windows Management Framework (WMF) you can add "wmfVersion": "latest" , see the ARM DSC Extension Settings for more information.
If you want to use the latest DSC extension version, you can add "autoUpgradeMinorVersion": true right under the line "typeHandlerVersion": "2.1", see this link for an example. Note: autoUpgradeMinorVersion works for any VM extension.
Note: it is in the Azure Automation backlog to support invoking an Azure Automation runbook based on a webhook in an ARM template. If you want to provide feedback on this specific topic then please navigate to this link.
Examples of Azure Stack templates which use the DSC extension can be found here.
Creating and deploying your own DSC Configuration
In the previous posts we showed you how to deploy a new VM leveraging an ARM template which included the DSC extension to complete the in-guest configuration, so we already have covered that.
You can leverage DSC in two different ways: in Push or Pull mode. As you can guess based on the names, in push mode we push the DSC configuration to a node whereas in a pull mode, the node pulls the configuration from a so called DSC Pull Server. Luckily for us, there’s a DSC Pull Server up in the cloud called Azure Automation DSC which takes a way a lot of complexity in setting up a local pull server. A local pull server is a very valid option in a fully disconnected environment, but out of scope for this blog post. Go here if you want to read up how to install a pull server. Using the Azure Automation DSC Pull Server assumes that your nodes have Internet access, but this is by far the easiest way to manage DSC configurations because your configurations are located and managed in a central place.
Let’s look at the following for this blog post:
- Create your own DSC configuration
- Push the configuration to a node and apply
- Upload your DSC configuration to Azure Automation and compile
- This will generate a MOF file which will get consumed by the DSC Local Configuration Manager (LCM) - the DSC engine if you will
- Assign the DSC configuration to an existing VM
- Look at the compliancy state in Azure Automation
Create your own DSC configuration
A DSC configuration is like a function in PowerShell and we will use it to declare our end state.
Perform the following steps on a machine which has Internet access since we will upload the DSC configuration to Azure Automation.
1. Open PowerShell ISE and let’s create this simple website configuration:
| 001002003004005006007008009010011012013014015016017018019020021022023024025026 | Configuration MyCorpWebsite { param ( $NodeName ) Node $NodeName { WindowsFeature IIS { Name = 'Web-Server' Ensure = 'Present' } WindowsFeature ASP { Ensure = “Present” Name = “Web-Asp-Net45” } Service 'W3svc' { Name='w3svc' StartupType = 'Automatic' State = 'Running' DependsOn = '[windowsfeature]iis' } }} |
2. Save your DSC configuration locally in a folder, I’ve saved mine to C:\DSC as MyCorpWebsite.ps1
3. Load your DSC configuration into memory so that we can call it (just run the PowerScript in step 1)
4. Let’s generate the MOF file which will be consumed by the Local Configuration Manager, notice that I’m passing a parameter called –NodeName which will generate a MOF file for specifically that node:
MyCorpWebsite -NodeName HRB1 -OutputPath c:\DSC\configurations 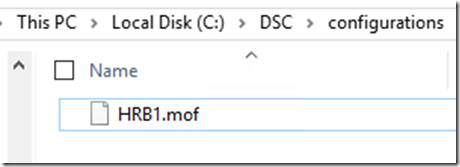
Push the DSC configuration to a node and apply
Now that you have created a DSC configuration and compiled it into a MOF file, we can push it to a node. Before you can push a DSC configuration to a node, you need to make sure that either WinRM listeners or PowerShell Remoting has been setup on your target machine. Enable-PSRemoting is an easy way to create the required WinRM listeners. A lot already has been written about how to setup PowerShell Remoting and creating WinRM listeners, if you are looking for information on just setting up the required WinRM listeners you can explore this article.
Assuming that you have the prerequisites in place, we can now push the configuration to our node (in my example my host is called HRB1):
Start-DscConfiguration –path C:\dsc\configurations –Verbose -Wait -Force –Credential (Get-Credential) –Computername HRB1
Notice that we didn’t have to use PowerShell Remoting because of the WinRM listener being configured through Enable-PSRemoting.
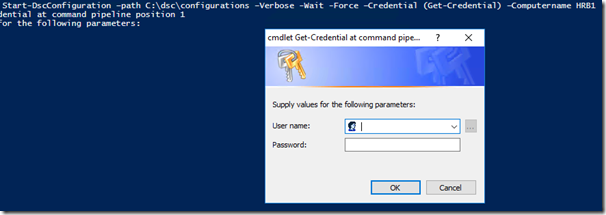
It will first prompt us for our credentials:
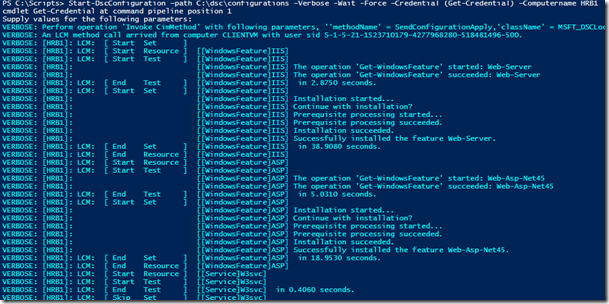
After we’ve authenticated, we will see this is our output:
Let’s check with PowerShell Remoting if our configuration got applied:
Cool stuff!
Upload your DSC configuration to Azure Automation and compile
The remainder of this blog post will focus on option f (Enable the DSC VM extension and assign a DSC configuration, leveraging Azure Automation for pull server functionality ) – as previously discussed in this blog post. It is assumed that you are familiar with Azure Automation and that you’ve created an Azure Automation account in your subscription. If you are new to Azure Automation, please go here to start.
We will now upload a DSC configuration to Azure Automation and compile it. Let’s use the same configuration as we’ve used previously with the exception that we are going to take out the node section since Azure Automation is going to assign the configuration to the node:
| 001002003004005006007008009010011012013014015016017018019020021 | Configuration MyCorpWebsite { WindowsFeature IIS { Name = 'Web-Server' Ensure = 'Present' } WindowsFeature ASP{ Ensure = “Present”Name = “Web-Asp-Net45” } Service 'W3svc' { Name='w3svc' StartupType = 'Automatic' State = 'Running' DependsOn = '[windowsfeature]iis' }} |
1. Use the following PowerShell script to upload your DSC configuration to Azure Automation and compile it:
| 001002003004005006007008009010011012013 | Add-AzureRmAccount#Get your Azure Automation account where you want to upload your DSC config to$AAaccount = Get-AzureRmAutomationAccount -Name DscAzStack -ResourceGroupName DscAzStack#Import DSC configuration$AAaccount | Import-AzureRmAutomationDscConfiguration -SourcePath 'C:\DSC\MyCorpWebsite.ps1' -Published -Force$AAaccount | Get-AzureRmAutomationDscConfiguration -Name MyCorpWebsite#Compile the DSC configuration$job = $AAaccount | Get-AzureRmAutomationDscConfiguration -Name MyCorpWebsite | Start-AzureRmAutomationDscCompilationJob#Get the status of the compilation job$job | Get-AzureRmAutomationDscCompilationJob |
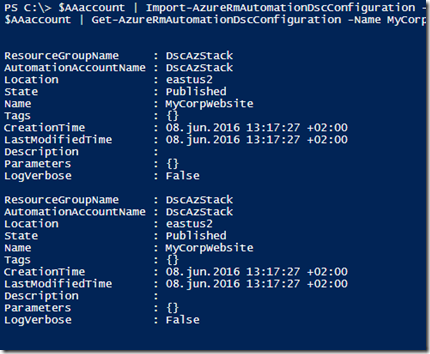
That will give you this output:
Starting the compilation job:
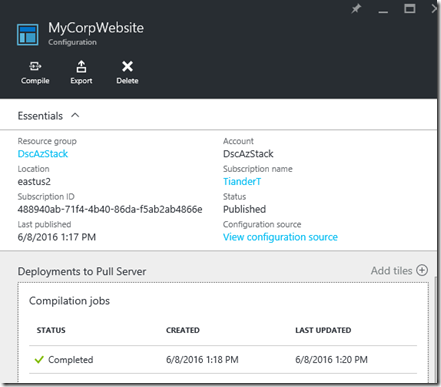
After a short while we see the completion in the Azure Automation portal:
Now that we have uploaded and compiled a DSC configuration into Azure Automation we can assign this configuration to a VM. There are two options for assigning a configuration to a VM:
1. Through the Azure Automation portal. This is currently limited to Azure VM’s only within the same subscription
2. Through PowerShell, for VM’s residing outside Azure, like on-premises VM’s or in different clouds like AWS
Since this blog post is focused on Azure Stack, PowerShell is going to be our option of choice.
Assign the DSC configuration to an existing VM
In the previous post Victor talked already about leveraging this Github template which you can use to onboard a non Azure VM. Let’s drill down a bit on that template.
The Github template leverages what is called a DSC metaconfiguration file to onboard the nodes and to configure the Local Configuration Manager (LCM). The DSC metaconfiguration file is stored here. Let’s download, extract and examine the file the PowerShell way:
001002003004005006007008009 $MetaConfigFileURL = 'https://github.com/Azure/azure-quickstart-templates/raw/master/dsc-extension-azure-automation-pullserver/UpdateLCMforAAPull.zip'$MetaConfigFile = 'UpdateLCMforAAPull'$OutFolder = 'C:\DSC'Invoke-WebRequest -Uri $MetaConfigFileURL `-OutFile ($OutFolder + '\' + $MetaConfigFile + '.zip')Expand-Archive ($OutFolder + '\' + $MetaConfigFile + '.zip') -DestinationPath $OutFolderpsedit ($OutFolder + '\' + $MetaConfigFile + '.ps1')
The last line in the above PowerShell script will open up the metaconfiguration file:
| 001002003004005006007008009010011012013014015016017018019020021022023024025026027028029030031032033034035036037038039040041042043044045046047048049050051052053054055056057058059060061062063064065066067068069070071072073074075076077078079080081082083084085086087 | [DscLocalConfigurationManager()]Configuration ConfigureLCMforAAPull{ param ( [Parameter(Mandatory=$True)] $RegistrationUrl, [Parameter(Mandatory=$True)] [PSCredential]$RegistrationKey, [Int]$RefreshFrequencyMins = 30, [Int]$ConfigurationModeFrequencyMins = 15, [String]$ConfigurationMode = "ApplyAndMonitor", [String]$NodeConfigurationName, [Boolean]$RebootNodeIfNeeded= $False, [String]$ActionAfterReboot = "ContinueConfiguration", [Boolean]$AllowModuleOverwrite = $False, [String]$Timestamp = "" ) if(!$RefreshFrequencyMins -or $RefreshFrequencyMins -eq "") { $RefreshFrequencyMins = 30 } if(!$ConfigurationModeFrequencyMins -or $ConfigurationModeFrequencyMins -eq "") { $ConfigurationModeFrequencyMins = 15 } if(!$ConfigurationMode -or $ConfigurationMode -eq "") { $ConfigurationMode = "ApplyAndMonitor" } if(!$ActionAfterReboot -or $ActionAfterReboot -eq "") { $ActionAfterReboot = "ContinueConfiguration" } if(!$NodeConfigurationName -or $NodeConfigurationName -eq "") { $ConfigurationNames = $null } else { $ConfigurationNames = @($NodeConfigurationName) } Settings { RefreshFrequencyMins = $RefreshFrequencyMins RefreshMode = "PULL" ConfigurationMode = $ConfigurationMode AllowModuleOverwrite = $AllowModuleOverwrite RebootNodeIfNeeded = $RebootNodeIfNeeded ActionAfterReboot = $ActionAfterReboot ConfigurationModeFrequencyMins = $ConfigurationModeFrequencyMins } ConfigurationRepositoryWeb AzureAutomationDSC { ServerUrl = $RegistrationUrl RegistrationKey = $RegistrationKey.GetNetworkCredential().Password ConfigurationNames = $ConfigurationNames } ResourceRepositoryWeb AzureAutomationDSC { ServerUrl = $RegistrationUrl RegistrationKey = $RegistrationKey.GetNetworkCredential().Password } ReportServerWeb AzureAutomationDSC { ServerUrl = $RegistrationUrl RegistrationKey = $RegistrationKey.GetNetworkCredential().Password }} |
These settings can all be modified and you can call these from within your own Github repository or a storage container from within Azure or Azure Stack. For example if you want to change the refresh cycle or the reboot behavior. You can find more information how to do so right here.
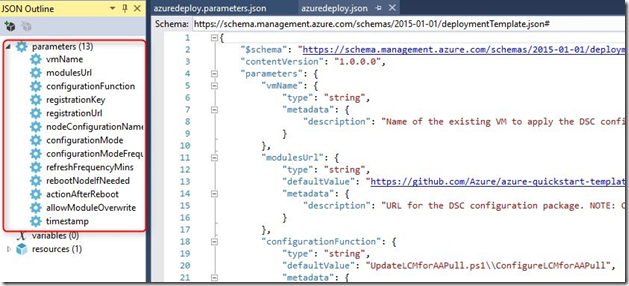
Since the azuredeploy.json file contains parameters, we can also pass them through PowerShell instead of editing the azuredeploy.parameters.json file.
We can start the onboarding process to Azure Automation DSC in the following way and passing parameters to the New-AzureRmResourceGroupDeployment cmdlet. Notice that I’m passing also our DSC configuration MyCorpWebsite which we’ve created earlier, uploaded and compiled to Azure Automation DSC. You can find the variable below specified as nodeConfigurationName. If you have worked before with DSC, you probably have noticed that I have not specified an AllNodes section in the DSC configuration. This is because – in my example – Azure Automation acts as a pull server and assigns the configuration to the node, hence the MyCorpWebsite.localhost value. Please explore this link if you want to know more about AllNodes configuration and how to separate configuration and environment data.
| 001002003004005006007008009010011012013014015016017 | $AAaccount = Get-AzureRmAutomationAccount -Name DscAzStack -ResourceGroupName DscAzStack$keys = $AAaccount | Get-AzureRmAutomationRegistrationInfo$RgDeployParams =@{ TemplateUri = "https://raw.githubusercontent.com/Azure/azure-quickstart-templates/master/dsc-extension-azure-automation-pullserver/azuredeploy.json" Mode = 'Incremental' ResourceGroupName = 'DSCRG' TemplateParameterObject = @{ vmName = 'DSCVM2' registrationKey = $keys.PrimaryKey registrationUrl = $Keys.Endpoint nodeConfigurationName = 'MyCorpWebsite.localhost' timestamp = [datetime]::Now.ToString() }}New-AzureRmResourceGroupDeployment @$RgDeployParams -Force -Verbose |
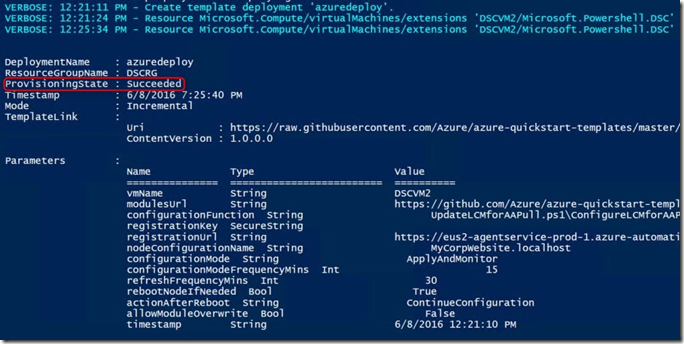
In the screenshot below you can see that the onboarding went successful:
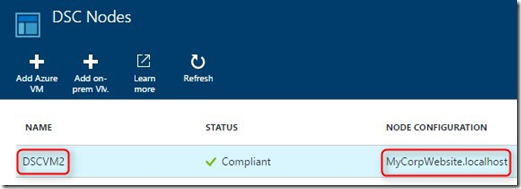
We can see in Azure Automation that the node has successfully on-boarded and it’s status:
Let’s RDP into the VM and check the configuration on the VM itself:
Cool!
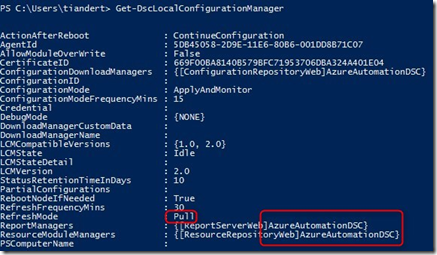
If we check the LCM on the machine, we can see that the VM is configured in Pull mode and being managed by Azure Automation DSC:
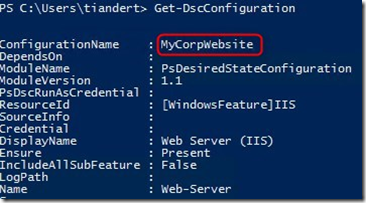
And if we run Get-DscConfiguration we can see our configuration:
Installing applications/software with DSC
Recently I got questions if you can also leverage DSC in a DevOps scenario where you need to configure the VM with packages. Yes absolutely! Let me first emphasize that DSC is not a replacement for System Center Configuration Manager (SCCM), which is a change & configuration management solution where software distribution is an important component. SCCM is build for software distribution in a potentially connected/disconnected environment where technologies like BITS, checkpoint restarting, bandwidth throttling, etc. combined with hard and software inventory has its own place. Now back to DSC, how can I get dependency software (packages) on the VM? Well you can leverage the DSC package resource to start with:
001002003004005006007008 Package PackageExample{Ensure = "Present" # You can also set Ensure to "Absent"Path = "$Env:SystemDrive\TestFolder\TestProject.msi"Name = "TestPackage"ProductId = "ACDDCDAF-80C6-41E6-A1B9-8ABD8A05027E" }
You can define a GUID (in the above example ProductId) which will make sure that only a specific package will get installed and not a rogue MSI. This example shows how to install 7Zip.
Another option is to use an open source package manager like Chocolatey. Out of scope for this blog post, but if you want to get started with Azure Automation and Chocolately, please check out this blog post. It will talk about continuous deployment to Virtual Machines using Automation DSC and Chocolatey in great detail.
Azure Automation Hybrid Runbook Worker
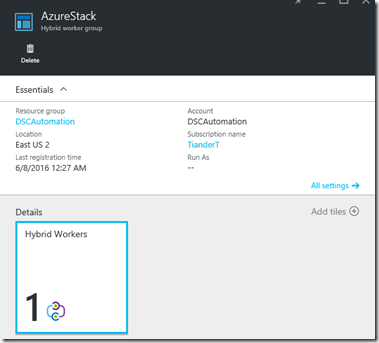
Azure Automation runbooks are by default executed by Azure runbook workers. As the name says, those runbook worker reside in Azure. This would become a challenge if you want to execute runbooks in your Azure Stack environment. Well not completely, since the Hybrid Runbook Worker (HRB) is designed to execute runbooks on a machine/VM where the HRB role is enabled. This could be a VM within your Azure Stack environment. Why does this makes a difference? Well by running it in your Azure Stack environment you can access local resources (like local accounts), leverage local PowerShell modules and DLL’s and you can access your Azure Stack VM’s. This scenario also allows you to push DSC configurations to your VM’s if you don’t want to onboard them to Azure Automation DSC, but obviously you can run any PowerShell script against your Azure Stack VM’s. Read this if you want to install the HRB role in your Azure Stack environment. The image below shows an Azure Stack VM where the HRB role is enabled:
Using a HRB, you can potentially investigate which Service Management Automation (SMA) runbooks you can leverage using a HBR. Remember that SMA uses PowerShell which is being used in Azure Automation as well. So if you have SMA runbooks like these or from the SMA gallery these can most likely just be copied and re-used in Azure Automation.
Summary
The most important takeaway from this post is that you should be able to reuse your Windows Azure Pack investments in Desired State Configuration (DSC) in Azure Stack. Your runbooks in Service Management Automation (SMA) can be potentially re-used in Azure Automation, the Hybrid Runbook Worker role might resolve challenges around executing remote runbooks versus executing them locally.
In this post we have talked about:
- Perform in-guest configurations in WAP and Azure Stack VM’s through DSC
- Create your own DSC configuration
- Upload your configuration to Azure Automation DSC and compile it
- Onboard an existing on-premises VM to Azure Automation DSC and apply a DSC configuration
- Install packages with DSC and links to integrate package managers like Chocolately
- Leverage the Azure Automation Hybrid Runbook Worker to execute runbooks locally against your Azure Stack environment
Happy automating!
Tiander.
