TreeView and HierarchicalDataTemplate, Step-by-Step
I’ve never found TreeView to be terribly confusing by itself. But usually I want to data bind a TreeView to a collection with some hierarchy, which leads me to HierarchicalDataTemplate, which didn’t always just write itself for me. If you look at it in steps, though, there really is a pretty nice progression from ListBox to TreeView. Like a lot of my posts, this goes way too deep if you just want to create a quick TreeView. But it’s useful to look at it if you want the HierarchicalDataTemplate to just write itself …
First, start with the example of a simple ListBox:
<ListBox> <sys:String>Western Conference</sys:String> <sys:String>Eastern Conference</sys:String> </ListBox> |
We can add a trivial ItemTemplate to it:
<ListBox> <ListBox.ItemTemplate> <DataTemplate> <TextBlock Foreground="Red" Text="{Binding}" /> </DataTemplate> </ListBox.ItemTemplate> <sys:String>Western Conference</sys:String> <sys:String>Eastern Conference</sys:String> </ListBox> |
… and now the list box items are red.
A ListBox is an ItemsControl, and what ItemsControls like to do is wrap their items in a container (more on that here). So the above essentially becomes:
<ListBox>
<ListBoxItem Content="Eastern Conference"> <ListBoxItem.ContentTemplate> <DataTemplate x:Name="_template1"> <TextBlock Foreground="Red" Text="{Binding}" /> </DataTemplate> </ListBoxItem.ContentTemplate> </ListBoxItem> <ListBoxItem Content="Western Conference" ContentTemplate="{Binding ElementName=_template1}" /> </ListBox> |
That is, for each item in the ListBox, a ListBoxItem is created. The ListBoxItem’s Content property is bound to the item, and the ListBoxItem’s ContentTemplate property is bound to the ListBox’s ItemTemplate.
On to TreeView …
A TreeView is also an ItemsControl; it generates TreeViewItem controls for its items. And actually, if you just take the original example and change “ListBox” to “TreeView”, it looks almost the same:
<TreeView> <sys:String>Eastern Conference</sys:String> <sys:String>Western Conference</sys:String> </TreeView> |
You can similarly set an explicit item template:
<TreeView> <TreeView.ItemTemplate> <DataTemplate> <TextBlock Foreground='Red' Text='{Binding}' /> </DataTemplate> </TreeView.ItemTemplate>
<sys:String>Western Conference</sys:String> <sys:String>Eastern Conference</sys:String> </TreeView> |
The next step here caught be by surprise when I first saw it. The TreeView is going to create a TreeViewItem for each of its items (the two strings). A TreeViewItem is a HeaderedItemsControl, which is an ItemsControl (just like ListBox and TreeView), but also has a Header (and HeaderTemplate) property. (The Header is the part of the tree view item that you always see, right next to the expand/collapse button.) The Header/HeaderTemplate of a HeaderedItemsControl is analogous to the Content/ContentTemplate of a ContentControl. So, whereas the ListBox items were bound to each ListBoxItem’s Content property, in the TreeView case the items are bound to the TreeViewItem’s Header property. Similarly, the TreeView’s ItemTemplate property is bound to the TreeViewItem’s HeaderTemplate property. And in the end we essentially have:
<TreeView>
<TreeViewItem Header='Western Conference'>
<TreeViewItem.HeaderTemplate> <DataTemplate x:Name='_template2'> <TextBlock Foreground='Red' Text='{Binding}' /> </DataTemplate> </TreeViewItem.HeaderTemplate>
</TreeViewItem>
<TreeViewItem Header='Eastern Conference' HeaderTemplate='{Binding ElementName=_template2}' /> </TreeView> |
Now what we need is some hierarchy. Those items are the MLS conferences, and there’s supposed to be teams in those conferences. Here’s the full data:
var western = new Conference("Western")
{
Teams =
{
new Team("Club Deportivo Chivas USA"),
new Team("Colorado Rapids"),
new Team("FC Dallas"),
new Team("Houston Dynamo"),
new Team("Los Angeles Galaxy"),
new Team("Real Salt Lake"),
new Team("San Jose Earthquakes"),
new Team("Seattle Sounders FC"),
new Team("Portland 2011"),
new Team("Vancouver 2011")
}
};
var eastern = new Conference("Eastern")
{
Teams =
{
new Team("Chicago Fire"),
new Team("Columbus Crew"),
new Team("D.C. United"),
new Team("Kansas City Wizards"),
new Team("New York Red Bulls"),
new Team("New England Revolution"),
new Team("Toronto FC"),
new Team("Philadelphia Union 2010")
}
};
var league = new Collection<Conference>() { western, eastern };
DataContext = new
{
WesternConference = western,
EasternConference = eastern,
League = league
};
(Note that the DataContext now has this sample data.)
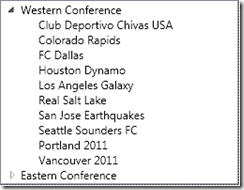
And now we can show all the teams with some explicit hierarchy:
<TreeView> <TreeViewItem Header='Western Conference' ItemsSource="{Binding WesternConference.Teams}"> <TreeViewItem.ItemTemplate> <DataTemplate> <!-- Team name --> <TextBlock Text="{Binding Name}" /> </DataTemplate> </TreeViewItem.ItemTemplate> </TreeViewItem>
<TreeViewItem Header='Eastern Conference' ItemsSource="{Binding EasternConference.Teams}"> <TreeViewItem.ItemTemplate> <DataTemplate> <!-- Team name --> <TextBlock Text="{Binding Name}" /> </DataTemplate> </TreeViewItem.ItemTemplate> </TreeViewItem> </TreeView>
|
Of course, what you really want to do is bind the TreeView itself to the hierarchical collection (the League of the DataContext). I.e.:
<TreeView ItemsSource="{Binding League}" /> |
As you can see, there’s two items, as you’d expect, just like a ListBox. Also just like a ListBox, it doesn’t show anything except for the ToString() of the Conference object. So we need to give it an ItemTemplate to show the conference Name:
<TreeView ItemsSource="{Binding League}"> <TreeView.ItemTemplate> <DataTemplate> <TextBlock Foreground="Red" Text="{Binding Name}" /> </DataTemplate> </TreeView.ItemTemplate> </TreeView> |
Now, recall that the TreeView here is creating two TreeViewItems, binding the TreeViewItem’s Header to the Conference object, and setting the TreeViewItem’s HeaderTemplate to the TreeView’s ItemTemplate. Next question is, how do we get the TreeViewItem’s ItemsSource bound to Conference.Teams? That’s where the HierarchicalDataTemplate comes in.
A HierarchicalDataTemplate is a DataTemplate with some extra properties. But if you don’t use the extra properties, it’s no different than DataTemplate. For example, change the last markup from DataTemplate to HierarchicalDataTemplate, and nothing changes:
<TreeView ItemsSource="{Binding League}"> <TreeView.ItemTemplate> <HierarchicalDataTemplate > <TextBlock Foreground="Red" Text="{Binding Name}" /> </HierarchicalDataTemplate> </TreeView.ItemTemplate> </TreeView> |
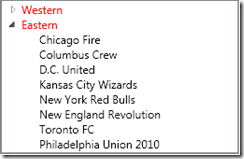
But HierarchicalDataTemplate adds two key properties: ItemsSource and ItemTemplate. The ItemsSource gets mapped to the TreeViewItem.ItemsSource, and the ItemTemplate gets mapped to the TreeViewItem.ItemTemplate. So now we can show the conferences and the teams:
<TreeView ItemsSource="{Binding League}">
<!-- Conference teamplate --> <TreeView.ItemTemplate> <HierarchicalDataTemplate ItemsSource="{Binding Teams}"> <TextBlock Foreground="Red" Text="{Binding Name}" />
<!-- Team template --> <HierarchicalDataTemplate.ItemTemplate> <DataTemplate> <TextBlock Text="{Binding Name}" /> </DataTemplate> </HierarchicalDataTemplate.ItemTemplate>
</HierarchicalDataTemplate> </TreeView.ItemTemplate>
</TreeView> |
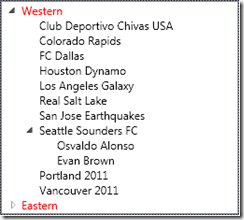
And if you want to show one level deeper in the hierarchy, you can change that team DataTemplate to a HierarchicalDataTemplate:
<TreeView ItemsSource="{Binding League}">
<!-- Conference template --> <TreeView.ItemTemplate> <HierarchicalDataTemplate ItemsSource="{Binding Teams}"> <TextBlock Foreground="Red" Text="{Binding Name}" />
<!-- Team template --> <HierarchicalDataTemplate.ItemTemplate> <HierarchicalDataTemplate ItemsSource="{Binding Players}"> <TextBlock Text="{Binding Name}" />
<!-- Player template --> <HierarchicalDataTemplate.ItemTemplate> <DataTemplate> <TextBlock Text="{Binding}" /> </DataTemplate> </HierarchicalDataTemplate.ItemTemplate>
</HierarchicalDataTemplate> </HierarchicalDataTemplate.ItemTemplate>
</HierarchicalDataTemplate> </TreeView.ItemTemplate>
</TreeView>
|
In the end, the bottom line that I keep in mind when I’m writing a HierarchicalDataTemplate, is that it’s the template for the TreeViewItem.Header, and it lets me set the TreeViewItem’s ItemsSource and ItemTemplate properties.
Comments
Anonymous
June 19, 2011
This is was awesome help for me when I could not see the elements second level deep!! I though hierarchical data template just reapplies itself if the nesting (of whatever level) is on the same property. Thanks a lot for the tutorial! :)Anonymous
February 01, 2012
Excellent tutorial. It helped me too. Thanks.Anonymous
January 17, 2013
What should we do if we don't know the number of levels (depth of the hierarchy). Your examples above suggests that we know the level (1 or 2, so you used this level of the nesting)? Thank you, AlexanderAnonymous
April 16, 2013
Great tutorial !! Very well covered from basic to the complex level. Keep up the good work :)Anonymous
April 16, 2013
Awesome.Just what I was struggling with - to go a level deeper in the hierarchy. thanks so much for sharing your knowledge.Anonymous
July 03, 2013
I think you should expand this article to add a HierarchicalDataTemplate with datatype, so TreeView automatically selects the tempate depending on the type of teh object. That way it can go n Levels (the question which Alexander asked)Anonymous
October 31, 2013
Great one! ThanksAnonymous
December 10, 2013
Wow....What a nice explanation! Love it. Thank you Mike. Do you author any WPF books?Anonymous
January 31, 2014
Amazing one. Many thanks for this guide!Anonymous
March 12, 2014
Very nice article indeed. Helped me with my current project. Just as an aside, if your collection object is itself hierarchical (as an example categories and sub-categories) then just setting the ItemsSource to the children (subcategories) will create the whole tree to N level deep for you until it encounters a null. In my example case: <TreeView ItemsSource="{Binding Categories}"> <TreeView.ItemTemplate> <HierarchicalDataTemplate ItemsSource="{Binding Subcategories}"> <TextBlock Text="{Binding Path=categorynamey}" /> </HierarchicalDataTemplate> </TreeView.ItemTemplate> </TreeView> Thanks for the article.Anonymous
July 16, 2014
The best example I've found on the web. I especially like the evolutionary process of developing the tree view. I almost missed the "DataContext" setting. That was key.Anonymous
August 20, 2014
I'd add that often we will have unknown depth, but you almost always have that depth built on known types. Here is where we need to rely on a template selector, which luckily is built into WPF (You may have to extend this for Silverlight, WindowsStore to provide a DataTemplateSelector). (Code written on-the fly, no compiler handy, so might be some minor issues) <TreeView ItemsSource="{Binding Children}"> <TreeView.Resources> <DataTemplate DataType="MyFileType"> <TextBlock Text="{Binding Name}"/> </DataTemplate/> <HierarchicalDataTemplate DataType="MyFolderType" ItemsSource="{Binding Children}"> <TextBlock Text="{Binding Name}"/> </HierarchicalDataTemplate> </TreeView.Resources> </TreeView>Anonymous
September 18, 2014
awesome explanation, thanks a lot, you're a life saver, an angel, can't thank you enough. cheersAnonymous
October 21, 2014
Thanks, was EXACTLY what I needed though I needed to work through the steps to understand it. Wonderful.Anonymous
December 02, 2014
Useful, but it's so hard to read the code when it's in such small tables. Good code. Terrible design.Anonymous
February 24, 2015
Wow, I finally get that Binding thing. Thank you, thank you, thank you!Anonymous
March 31, 2015
You have saved many hours~ :) ThanksAnonymous
April 27, 2015
The comment has been removedAnonymous
June 22, 2015
Thank you a lot! You should write a book about such things. "Some step-by-step explanations about WPF with examples". You will surely proceed up to 5th edition! Don't hide your talent in blogs.Anonymous
August 31, 2015
Great article, definitely cleared up some confusion with using HDT. Thank you.Anonymous
September 09, 2015
This explanation was more clear than anything I had come across. Thanks for taking the time! I had been struggling for more than a day trying to get the second level to display.Anonymous
September 09, 2015
What if we add new objects (Conference or Team for instance) to our Collection, and want the treeview to be updated? Should we reassign our DataContext every time, or is there more elegant solution?Anonymous
September 16, 2015
@ Thomas, you can use nested observable collections which work like lists but when items are added or removed, the changes are automatically reflected in your view.Anonymous
November 20, 2015
Thanks for the article. Helpful and easy to understand. And with a "MLS league" header holding the 'Eastern' and 'Western' conferences. <TreeView > <TreeViewItem Header="MLS league" ItemsSource="{Binding League}"> <!-- Conference template --> <TreeViewItem.ItemTemplate> <HierarchicalDataTemplate ItemsSource="{Binding Teams}"> <TextBlock Foreground="Red" Text="{Binding Name}" /> <!-- Team template --> <HierarchicalDataTemplate.ItemTemplate> <HierarchicalDataTemplate ItemsSource="{Binding Players}"> <TextBlock Text="{Binding Name}" /> <!-- Player template --> <HierarchicalDataTemplate.ItemTemplate> <DataTemplate> <TextBlock Text="{Binding}" /> </DataTemplate> </HierarchicalDataTemplate.ItemTemplate> </HierarchicalDataTemplate> </HierarchicalDataTemplate.ItemTemplate> </HierarchicalDataTemplate> </TreeViewItem.ItemTemplate> </TreeViewItem> </TreeView>Anonymous
January 12, 2016
I am trying to display a legend on my map (ArcGIS Runtime) using this treeview example. The problem I am running into is this, my map has 3 layers in it. Each layer may then have one or more layers. I can successfully display the first level of layers, but I can't get the sub-layers to display. Does anyone have any advice/suggestions. Thanks.Anonymous
February 04, 2016
Great stuff! Just what I needed to quickly understand how to implement a fully binded TreeView in WPF. Thanks!!!Anonymous
February 22, 2016
Finally - an easy to follow example. Cheers


