Windows Azure Web Sites: File upload limit for PHP sites hosted on WAWS
In my previous post I discussed about .user.ini file and how it is useful in WAWS.
In today’s post I will address the issue of increasing the limit of the file size to a PHP site hosted on WAWS using the .user.ini file.
As mentioned in my previous post, we cannot edit the contents of the php.ini file as it is not permitted in WAWS. However we can add a .user.ini file and override certain settings.
One of the most common scenarios seen for PHP sites hosted on WAWS is to increase the limit of the file size that is permitted. The default setting defined in the PHP runtime (php.ini) is 2 MB. Since we cannot edit the php.ini we need to override this in .user.ini.
BACKGROUND:
There are 2 PHP directive that govern the limit for the File Upload. They are upload_max_filesize & post_max_size. Both have the mode PHP_INI_PERDIR as per List of php.ini directives. The default valie for upload_max_filesize 2 MB and for post_max_size it is 8 MB. Below is a snapshot from PHP’s online documentation (List of php.ini directives).
So we know that we can override this setting in .user.ini file as it is allowed as per PHP documentation. So this is how we do it.
NOTE: If you are using custom PHP runtime as described here, then you have complete control over php.ini and can edit the corresponding sections and ignore this blog post.
Pre-requisites:
Download and install FileZilla, Click here to download FileZilla. If the download link fails then please visit the FileZilla site to download the file: https://filezilla-project.org/download.php
Add a sample php page to your WAWS site with the following one line of code:
 <?php
     phpinfo();
 ?>
Steps to update the .user.ini file via FTP using FileZilla:
-
- Go to the Windows Azure Management Portal.
- Click on Web Sites.
- Go to the Site (Running PHP) for which you want to increase the upload file size limit.
- Go to the DASHBOARD page and click on “Download the publish profile”
- Save the file and open it in notepad.exe.
- The file contains 2 <publishProfile> sections, one for Web Deploy and another for FTP.
- You can use either method to add a .user.ini file, in this post I will be using FTP.
- Under the <publishProfile> section for FTP make a not of the following values:
- publishUrl
- userName
- userPWD
-
- Launch FileZilla.
- Go to File Menu —>Site Manager.
- Under Site Manager window click on New Site button and give it a descriptive name.
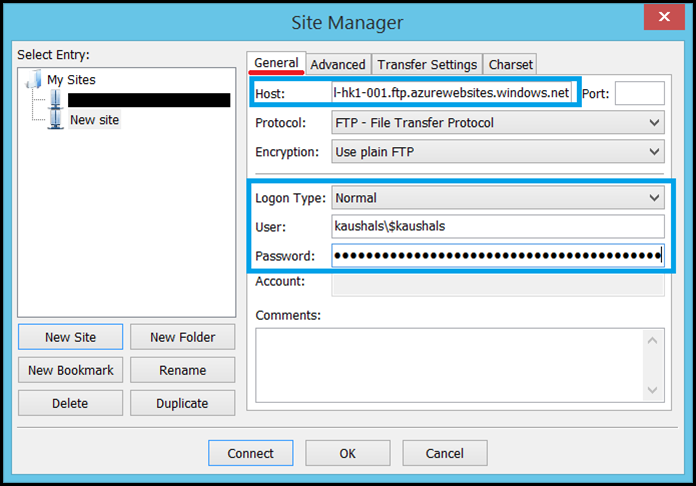
- Under the General tab set the values for the following accordingly
- Host: Paste the hostname from publishUrl obtained from the publishsettings file above.
-
-
- Logon Type: set this to Normal.
- User: Paste the userName obtained from the publishsettings file above.
- Password: Paste the userPWD obtained from the publishsettings file above.
Click on Connect to connect to the site over FTP.
Under Remote site: expand ” / ” and then expand the site node.
Click on wwwroot
Right click and select “Create new file”. enter the name of the file as “ .user.ini” (remove quotes).
Right click the .user.ini and select “View/Edit” to edit the file in notepad.
Add these lines to the file:
-
;Maximum size of the files that can be uploaded ;value of post_max_size must be larger than upload_max_filesize upload_max_filesize = 16M post_max_size = 22M
-
- Save it and close the file.
- You will receive a prompt notifying the file content has been changed.
- Select the check box “Finish editing and delete local file” and click on Yes.
- Start and stop the website to force the settings to be read immediately.
- Browse the phpinfo page you created earlier.
- search for the upload_max_filesize/post_max_size.
- You will find this under the Core section.
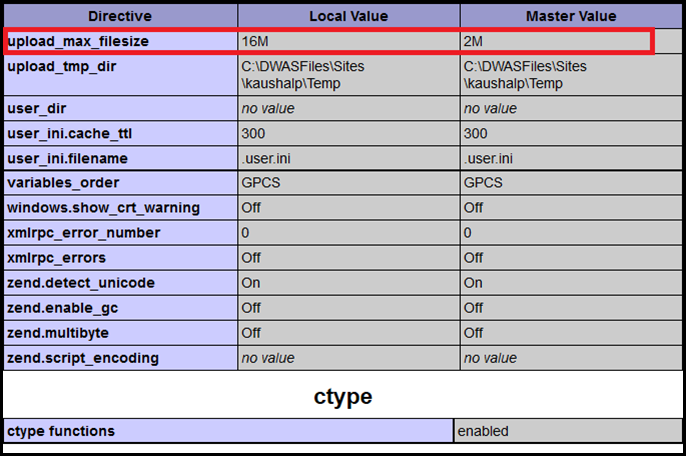
As seen in the above snippet, the upload_max_filesize directive is reading the values from the .user.ini file.
Thus, we have successfully overridden the PHP runtime settings.
HTH. Until then CIAO! ![]()
Comments
Anonymous
March 10, 2014
Thanks for the help. One thing that I noticed is that sometimes you have to override the post_max_size too.Anonymous
March 27, 2014
Nice catch Jose. I updated my blog to include that.Anonymous
May 18, 2014
Great Help...Anonymous
May 24, 2014
i did the changes you mntioned in the user.ini and restarted the site.. still i have the upload file size limit as 2MBAnonymous
May 25, 2014
@arpith. could you please respond back with following details:
- the contents of user.ini file
- path where you have placed the user.ini file
- The URL for which you expect the file upload limit to be changed
Anonymous
July 09, 2014
Did as you mentioned,, didnt work...Anonymous
July 15, 2014
I asked you to share the details. I don't know what have you done?Anonymous
July 23, 2014
Thanks for the help, worked perfectly!Anonymous
July 28, 2014
I've done all of this but the upload size still shows as 2M. I'm on a free trial at the moment considering using Azure for business purposes, is the trial interfering in some way perhaps?Anonymous
July 29, 2014
Sam, this has nothing to do with the subscription. Could you start and stop the site once for the changes to take effect? and could you confirm to me if the user.ini resides in the same folder where the file uploads are being done?Anonymous
August 03, 2014
Afraid this is not working for me either. My phpinfo file still shows 2M. I tried putting the user.ini with the settings exactly as you show them in the root as well as /wp-admin (which is where the upload page for the themes resides). My azure side is 'shared' and PHP 5.5. I've restarted the website multiple times... Any ideas?Anonymous
September 01, 2014
could you share the contents of your user.ini file here and provide me the link to the phpinfo page?Anonymous
December 29, 2014
Hello. You post help me a lot. I think the filename must be ".user.ini" (dot at beggining) according "user_ini.filename" variable listed in phpinfo. Worked like a charm here. Thanks.Anonymous
December 29, 2014
Hi Suemar, Glad that it helped you.. Yes the filename has to be .user.ini. I have used the same naming convention in the entire post..Anonymous
February 20, 2015
Hi..,, Im back again at your post after a while.. you can see my posts in the above comments.. I need some serious help with respect to wordpress.. Pls mail me at arpithpmuddi@gmail.com I'll reply back with my problm..and details,, its too longAnonymous
February 22, 2015
@arpithpm I'm not a wordpress expert. This is just a educational blogpost on a specific scenario. For assistance on WordPress you would have to contact WordPress support fort this. If it is WordPress on Azure Websites, then please create a support ticket and the support team will help you furtherAnonymous
January 14, 2016
Hi, I missed that leading . on the .user.ini filename too like others. Worked much better when the file was named properly ;) thanks.Anonymous
March 19, 2016
Thanks you for your help. I am currently using the free plan (pay-as-you-go) on Azure with mySQL hosted by ClearDB. As another user previously mentioned, the name of the file should include the leading period (.user.ini).Anonymous
April 09, 2016
Thank you so much! This helped me when moving my WP site over to Azure! Thanks!!! :)Anonymous
April 07, 2017
Hi, my WordPress is running on Linux VM, and this didn't work for me. Can anyone help me here?Anonymous
July 03, 2017
This works! awesome. Thank you.


