Poznámka
Přístup k této stránce vyžaduje autorizaci. Můžete se zkusit přihlásit nebo změnit adresáře.
Přístup k této stránce vyžaduje autorizaci. Můžete zkusit změnit adresáře.
1. Introduction
1.1. Overview
As I explained in a previous blog post, I delivered a presentation this week as part of the Microsoft TechEd 2011 event. The presentation was titled “Windows Server 2008 R2 File Services Consolidation - Technology Update”. It included two demos that showed several Windows Server 2008 R2 features and also a little SQL Server 2008 R2. You can listen to a recording of this presentation at https://channel9.msdn.com/Events/TechEd/NorthAmerica/2011/WSV317
In this post, I am sharing the steps I used to create the demo, so you can reproduce the environment used there demo and experience with the technologies yourself. Since I wanted you to be able to do this on your own even if you’re not already running the latest version of Windows Server or SQL Server, I used evaluation versions that you can download from the web at no cost (the links are provided below). You also only need to have a single computer (the specs are provided below).
The demo setup includes 5 virtual machines: one domain controller, one iSCSI target, two file servers and a SQL server. You need the iSCSI target and two file servers because we’re using Failover Clustering to showcase high availability. We’ll also use multiple Hyper-V virtual networks (called Internal 1, Internal 2 and Internal 3), so we can simulate some of the advanced network configurations mentioned in the presentation. Here’s what it should look like:
This will require a few hours of work to complete from start to finish, but it is a great way to experiment with a fairly large set of Microsoft technologies, including:
- Windows Server 2008 R2
- Hyper-V
- Networking
- Domain Name Services (DNS)
- Active Directory Domain Services (AD-DS)
- iSCSI Software Target 3.3
- iSCSI Initiator
- File Server (SMB2)
- Failover Clustering (WSFC)
- SQL Server 2008 R2
Follow the steps and let me know how it goes in the comment section. If you run into any issues or found anything particularly interesting, don’t forget to mention the number of the step.
1.2. Hardware
You will need the following hardware to install the demo:
- One computer capable of running Windows Server 2008 R2 and Hyper-V (64-bit, virtualization technology)
- At least 8 GB of RAM - In my case, I am using a Lenovo W500 with 8GB of RAM, Intel Core2 Duo, P9600 @ 2.67 GHz
- Internet connection for downloading software and updates
- A USB stick, if you’re installing Windows Server from USB and copying downloaded software around (you can also burn the software to a DVD)
1.3. Downloadable software
You will need to download the following sofware to install the demo:
- Windows Server 2008 R2 with SP1 Evaluation
https://technet.microsoft.com/en-us/evalcenter/dd459137.aspx - SQL Server 2008 R2 Evaluation
https://technet.microsoft.com/en-us/evalcenter/ee315247.aspx
The links above take you to the evaluation versions of the software. If you are an MSDN or TechNet subscriber, you can download from there instead.
You will also use the Microsoft iSCSI Software Target for Windows Server 2008 R2. This is now a public download. Find details at
https://blogs.technet.com/b/josebda/archive/2011/04/04/microsoft-iscsi-software-target-3-3-for-windows-server-2008-r2-available-for-public-download.aspx
1.4. Notes and disclaimers
- This post does not include a screenshot for every single step in the process. I focused the screenshots on specific decision points where defaults are not used or the course of action is not clear.
- The text for each step also focuses on the specific actions that deviate from the default or where a clear default is not provided. If you are asked a question or required to perform an action that you do not see described in these steps, go with the default option.
- Obviously, a single-computer solution cannot be tolerant to the failure of that computer. So, the configuration described here is not really fault-tolerant. It is adequate only for demonstrations, testing or learning. You will definitely need a different configuration for a production deployment.
- A certain familiarity with Windows Server administration and configuration is assumed. If you're new to Windows Server, this post is not for you. Sorry...
- There are usually several ways to perform a specific Windows Server configuration or administration task. What I describe here is one of those many ways. It's not necessarily the best way, just the one of them.
2. Install the Windows Server 2008 R2 with SP1 and Hyper-V
2.1. Format a USB disk using Windows 7 or Windows Server 2008 R2, copy the contents of the ISO to a USB stick (I used an 8 GB). If you don't have a tool to open an ISO file, you can simply burn to a DVD and copy from there.
2.2. Make sure your BIOS is configured for Virtualization:
2.3. Use the boot menu to boot from the USB drive (you can also boot from a DVD, if you burned the ISO to a DVD):
2.4. Select Datacenter edition
2.5. Select the partition to use for the install the OS
2.6. Choose an administrator password
2.7. Use Windows Update to get all the available updates
2.8. Optionally, rename the computer to CONTOSO-H0.
3. Add Hyper-V and configure Virtual Networks
3.1. From Server Manager, select Add Roles
3.2. Select Hyper-V
3.4. In the "Create Virtual Networks" page, select the physical network interface connected to the Internet:
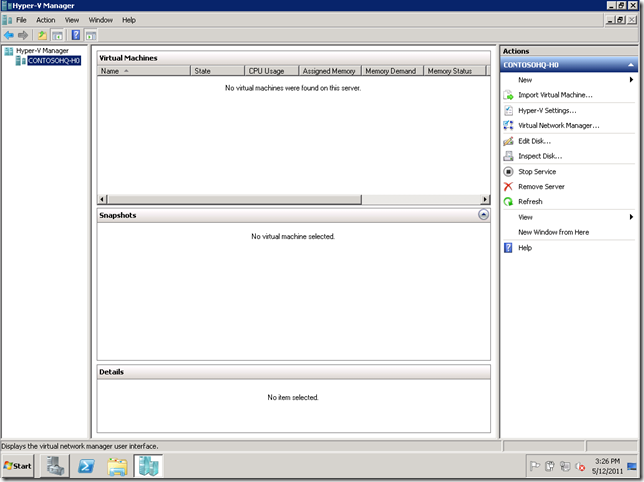
3.5. After Hyper-V is installed, use Hyper-V manager and open the Virtual Network Manager
3.6. Configure 3 internal networks for communication between the VMs, in addition to the external one.
4. Create the Base VM
4.1. Create a folder for your ISO files at C:\ISO and a folder for your VMs at C:\VMS
4.2. Copy the Windows Server 2008 R2 SP1 ISO file to C:\ISO. 9.2. Since you are both connected to the External network, you can use SMB2 to copy to the VM simply using a UNC path to a VM drive: \\CONTOSO-H0\C$. Or you can use the USB stick.
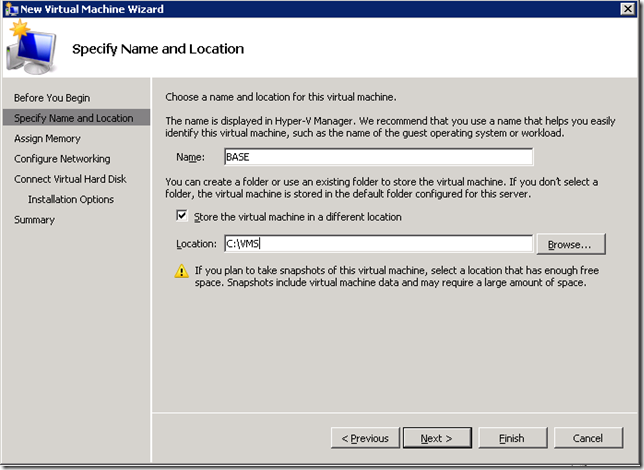
4.3. Create a new VM called BASE using C:\VMS as a location:
4.4. Select 1024MB for the amount of RAM and use the External network for Networking
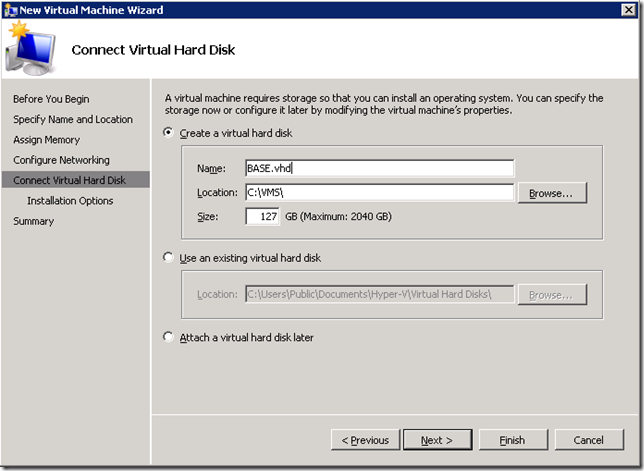
4.5. Create the new VHD at C:\VMS\BASE.VHD
4.6. Start the VM, point the DVD to the Windows Server 2008 R2 SP1 ISO file at C:\ISO, and perform a regular install like you did before for the physical machine.
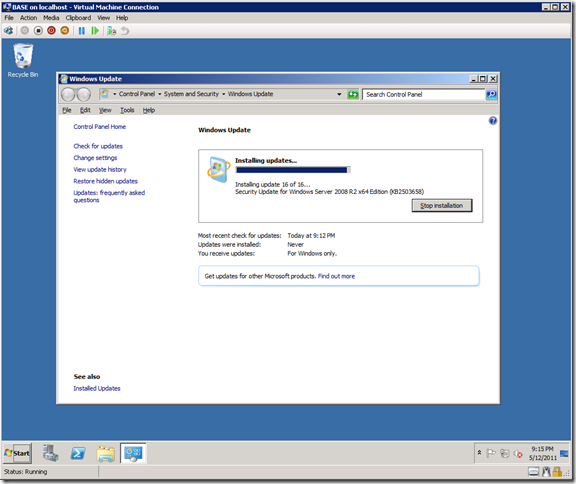
4.7. Set a password and, install Windows Updates, like you did for the parent partition, but don’t install any roles. Don’t bother renaming it.
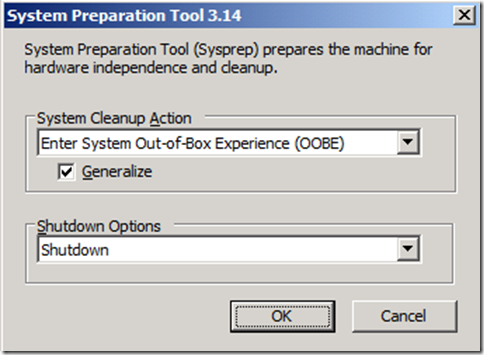
4.8. After you have the fully configured VM, run C:\Windows\System32\Sysprep\Sysprep.exe
4.9. Select the options to run the OOBE, generalize and shutdown:
4.10. After that, you have a new base VHD ready to use at C:\VMS\BASE.VHD which should be a little less than 8GB in size.
4.11. You should now remove the BASE VM using Hyper-V Manager. The BASE.VHD file will not be deleted.
5. Create 5 differencing VHDs
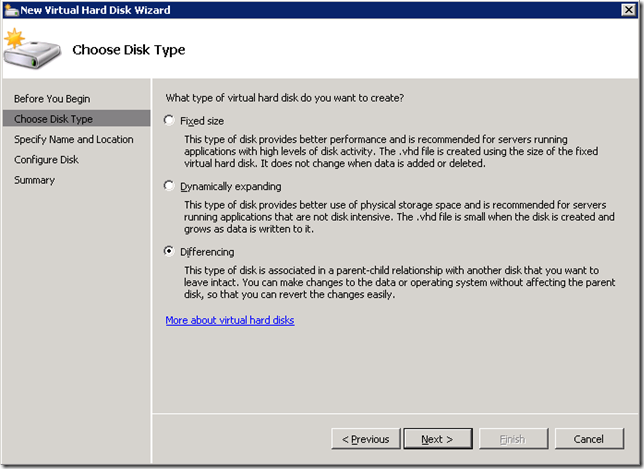
5.1. Use the “New…”, “Hard Disk…” option in Hyper-V Manager to create a differencing VHD using the base VHD you created
5.2. After this, you will have a new differencing VHD at VM1.VHD that’s less than 400KB in size
5.3. Since we’re creating 5 VMS, copy that file into VM2.VHD, VM3.VHD, VM4.VHD and VM5.VHD
5.4. You can now create five similarly configured VMs
5.5. Make sure to select to use the External network. We will manually add additional network interfaces later
5.6. When creating the VMs, make sure to select to use one of the five VHD files created previously:
5.7. After creating each VM, select the VM “Settings” and use the “Add Hardware” option to add more network adapters
5.8. For VM1 (domain controller) and VM2 (iSCSI Target), add one more network adapter (connected to the Internal 1 network)
5.9. The end result for VM1 and VM2 will be a VM with 2 network adapters, 1 external and 1 internal:
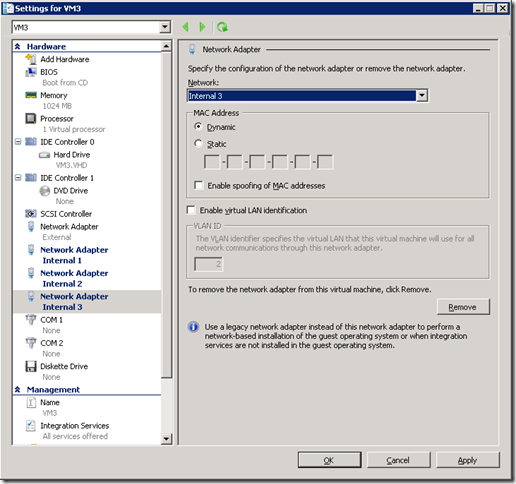
5.10. For VM3, VM4 and VM5, add 3 more network adapters (connected to the 3 internal networks)
5.11. For those VMs, the end result will be a 4 network adapters, 1 external and 3 internal:
6. Configure the 5 VMs’ names and IP addresses
6.1. You can now start all 5 VMs
6.2. Connect to each of the 5 VMs from the Hyper-V Manager, let the mini-setup complete, and set the passwords for all five
6.3. Configure the IP addresses for each network interface as shown on the table below
| VM | Role | Computer Name | External | Internal 1 | Internal 2 | Internal 3 |
| VM1 | DNS, Domain Controller | Contoso-DC.contoso.local | DHCP | 192.168.1.1 | N/A | N/A |
| VM2 | iSCSI Target | Contoso-IT.contoso.local | DHCP | 192.168.1.2 | N/A | N/A |
| VM3 | File Server 1 | Contoso-F1.contoso.local | DHCP | 192.168.1.3 | 192.168.2.3 | 192.168.3.3 |
| VM4 | File Server 2 | Contoso-F2.contoso.local | DHCP | 192.168.1.4 | 192.168.2.4 | 192.168.3.4 |
| VM5 | SQL Server | Contoso-DB.contoso.local | DHCP | 192.168.1.5 | 192.168.2.5 | 192.168.3.5 |
6.4. Rename the Network Connections in each guest for easy identification.
6.5. If you can’t tell which network is which inside the VM, temporarily set one of the adapters to “Not Connected” in the VM Settings and see which one shows as “Network cable unplugged”:
6.6. The Internal 1 network is the main network used by the DNS and Domain Controller and the iSCSI Target.
6.7. Make sure to set the subnet mask to 255.255.255.0 and the DNS to 192.168.1.1 for all 3 internal networks on all 5 computers. This will instruct them to register their names and IPs with the DNS VM.
6.8. The External network is useful only for downloading from the Internet or remotely connecting to the 5 VMs, but is not required for the demo.
6.9. To make things easier to review and demo, I disabled IPv6 on all interfaces. Everything works fine with IPv6, so you don’t need to do this.
6.10 You could configure a DHCP server for the internal interfaces. However, due to the risk of accidentally creating a rogue DHCP server in my corporate network, I used fixed IPs.
6.11. Rename each computer according to the table in step 6.3.
6.12. Make sure to set the Primary DNS suffix to “contoso.local”. You will need to click the “More…” button to set this.
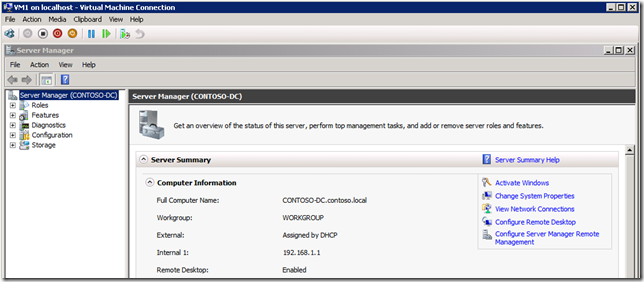
6.13. Your “Full computer name” should show with the DNS suffix in the "Computer Name" tab of the "System Properties" window, as highlighted below:
6.14. After renaming the computer, renaming the network and configuring IP addresses, you VM should look like this (two examples below):
7. Configure DNS
7.1. Now, on VM1 (CONTOSO-DC), you should configure the DNS role
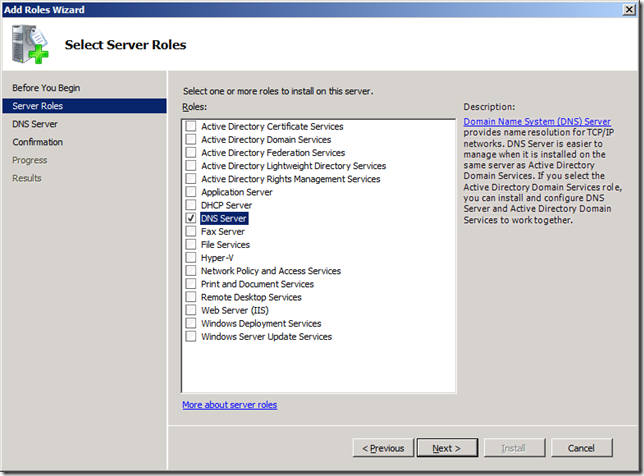
7.2. You will start by adding the DNS role in Server Manager:
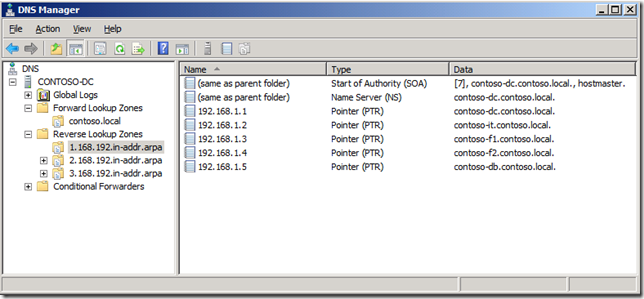
7.3. Then you need to create a primary, forward lookup zone for the CONTOSO.LOCAL domain and 3 primary, reverse lookup zones for 192.168.1.x, 192.168.2.x and 192.168.3.x.
7.4. Allow both non-secure and secure dynamic updates (you can change to secure updates after the domain is fully configured).
7.5. After that, from all 5 VMs, open a command prompt and run “IPCONFIG /REGISTERDNS”
7.6. Then verify in DNS if all addresses are showing up in the forward and reverse zones. If not, go troubleshoot!
8. Configure the Domain Controller
8.1. Using Server Manager, select Add Role to add the Domain Controller role to CONTOSO-DC
8.2. Run DCPROMO.EXE to create a new domain called CONTOSO.LOCAL
8.3. Select the option to create a new domain in a new forest
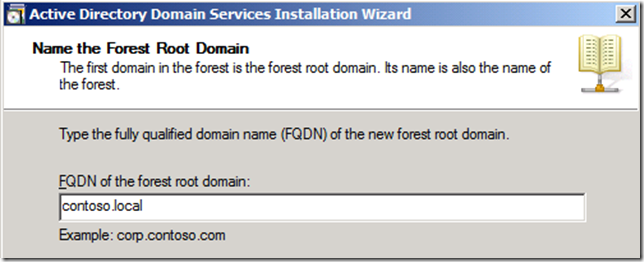
8.4. Use CONTOSO.LOCAL as the FQDN for the forest root domain
8.5. Select the “Windows Server 2008 R2” forest functional level
8.6. Say “Yes” to the dialog about having DHCP-assigned addresses on this computer (that address in the External interface is used only for internet access)
8.7. Select the “Do not create the DNS Delegation” option
8.8. Accept the default location for the database, log files and SYSVOL.
8.9. Set a restore mode administrator password
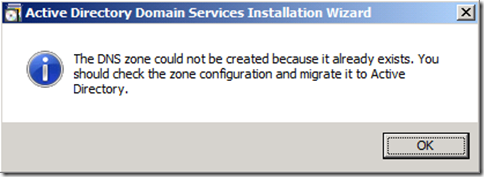
8.10. Click OK the dialog about already having a DNS zone
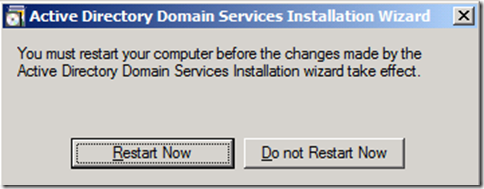
8.11. Finish the Active Directory install and reboot the server
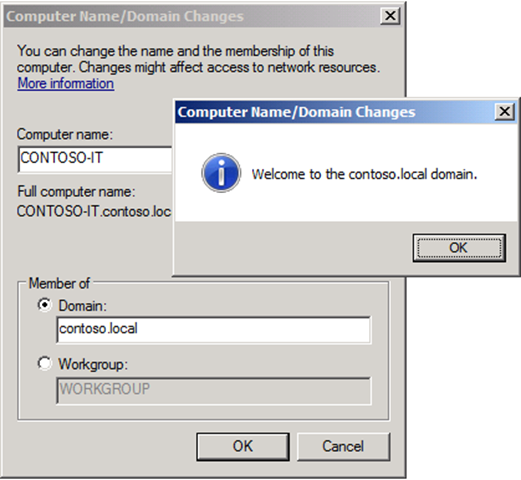
8.12. After the Domain Controller reboots, for every one of the other 4 VMs, join the domain
8.13. You will need to provide the domain name (CONTOSO.LOCAL) and the Administrator credentials
8.14. From now on, always log on to any of the VMs using the domain administrator credentials CONTOSO\Administrator
8.15. In the Domain Controller, use Active Directory Users and Computers to create a new Active Directory user account called SQLService. We’ll use that later when configuring SQL Server:
8.16. Set a password for the SQLService account and make sure to uncheck “User must change password at next logon”.
9. Configure the iSCSI Target
9.1. Copy the MSI file with the downloaded iSCSI Target file to VM2 (CONTOSO-IT)
9.2. Since you are both connected to the External network, you can use SMB2 to copy from the parent to the VM simply using a UNC path to a VM drive: \\CONTOSO-IT\C$.
9.3. Make sure to log on to CONTOSO-IT using the domain administrator credentials CONTOSO\Administrator, not the local Administrator credentials CONTOSO-IT\Administrator
9.4. Run the install file iSCSITarget_Public.MSI, using the default settings
9.5. For this demo, we’ll create a single Target with 3 Devices (LUNs or VHD files) and used by 2 initiators (CONTOSO-F1 and CONTOSO-F2)
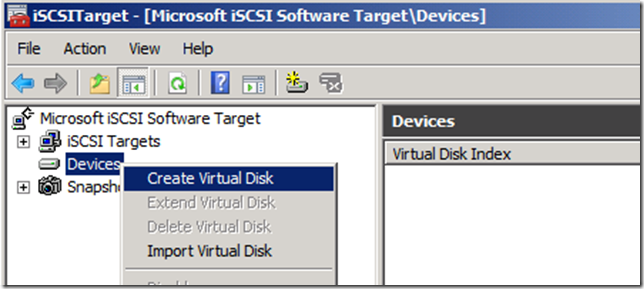
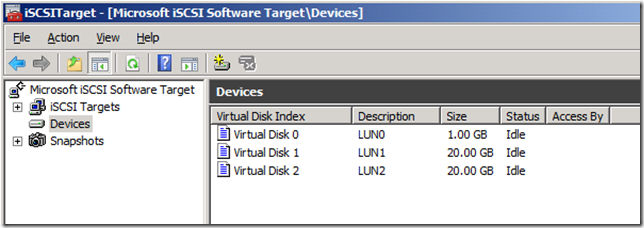
9.6. Start by creating the 3 devices. One VHD with 1GB in size for the Cluster Witness volume and two VHDs with 20GB for the data volumes.
9.7. Create the first device with the file at C:\LUN0.VHD, 1024MB in size, description “LUN0” and no target access.
9.8. Create the second and third devices at C:\LUN1.VHD and C:\LUN2.VHD, both with 20480MB in size and no taget acess.
9.9. After that, you will have 3 devices
9.10. Next, create a single target, exposed to two initiators (the two file servers that will become the cluster nodes) by IP address (192.168.1.3 and 192.168.1.4) and using the 3 devices
9.11. Specify a target name and description
9.12. In the page for iSCSI Initiators Identifiers, click on advanced and add two initiators by IP address
9.13. Confirm the fact that you’re exposing the same target to multiple initators. That is OK if those initiators are Windows Servers running Failover Clustering.
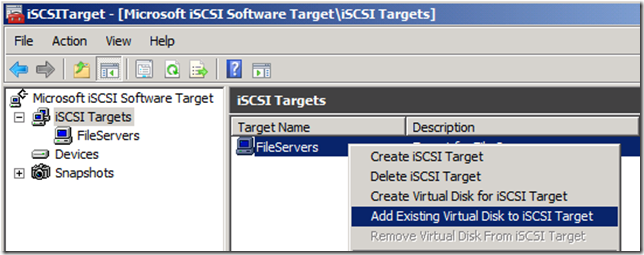
9.14. After the target is created, use the option to add existing virtual disks to the iSCSI Target
9.15. Select all three disks created previously.
10. Configure the iSCSI Initiators
10.1. Now we shift to the two File Servers, which will run the iSCSI Initiator. We’ll do this on VM3 and VM4 (or CONTOSO-F1 and CONTOSO-F2)
10.2. Again, Make sure to log on to CONTOSO-F1 and CONTOSO-F2 using the domain administrator credentials CONTOSO\Administrator, not the local Administrator credentials
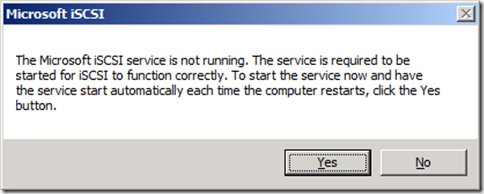
10.3. Start the iSCSI Initiator. On the first run, confirm that you want to configure the service to start automatically
10.4. Specify the IP address of your iSCSI Target (in this case, 192.168.1.2) and click on “Quick Connect…”
10.5. The configured target will be recognized and you only have to click “Done”. You initiator is configured.
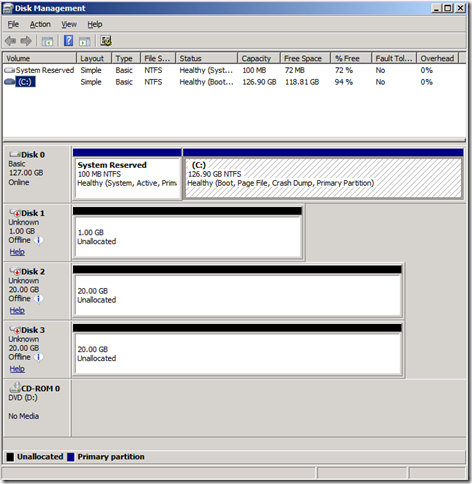
10.6. After configuring the iSCSI Initiator on both nodes, in only one of the two nodes, open the Disk Management tool
10.7. Online all three offline disks (the iSCSI LUNs), then initialize them (you can use MBR partitions, since they are small)
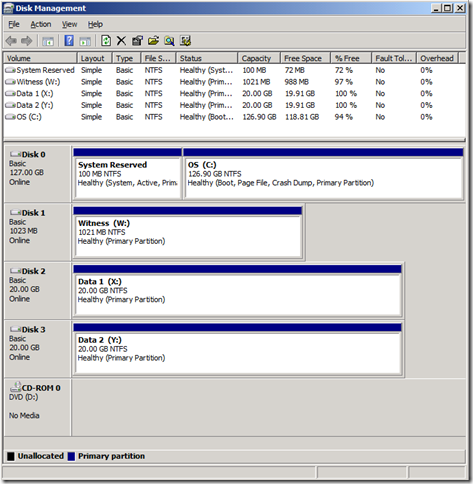
10.8. Then create a new Simple Volume on each one using all the disk space on the LUN and quick-format them with NTFS.
10.9. Assign each one a drive letter (W:, X: and Y:) and a proper volume label (Witness, Data 1 and Data 2)
11. Configure the Roles/Services/Features of the File Servers
11.1. Now we need to configure VM3 and VM4 as file servers and cluster nodes
11.2. For both CONTOSO-F1 and CONTOSO-F2, from Server Manager, select Add Role and check File Services.
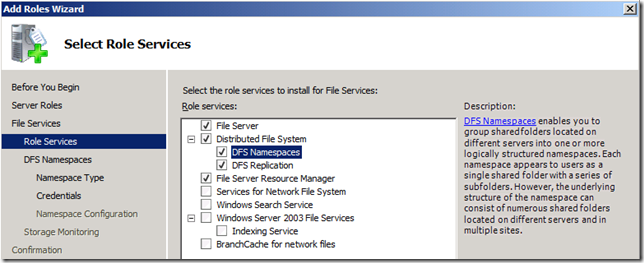
11.3. Add DFS-N and DFS-R as role services, which are covered in part of the demo (no need to create namespace or select a volume for monitoring)
11.4. Next, select Add Feature and check Failover Clustering
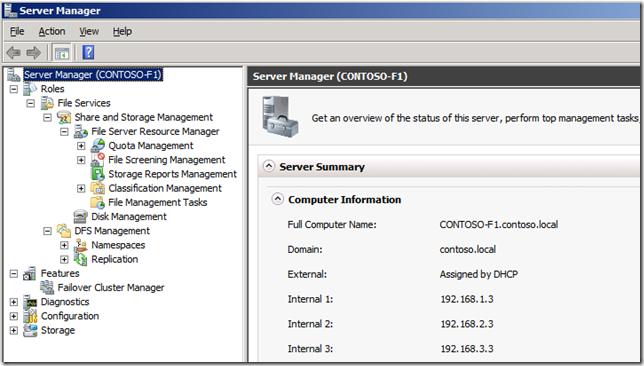
11.5. This is what Server Manager should look like after you install the role, role services and feature
12. Configure the Failover Cluster
12.1. On VM3 (CONTOSO-F1), open the Failover Cluster Manager and click on the option to “Validate a Configuration…”
12.2. Enter the name of each of the two file servers
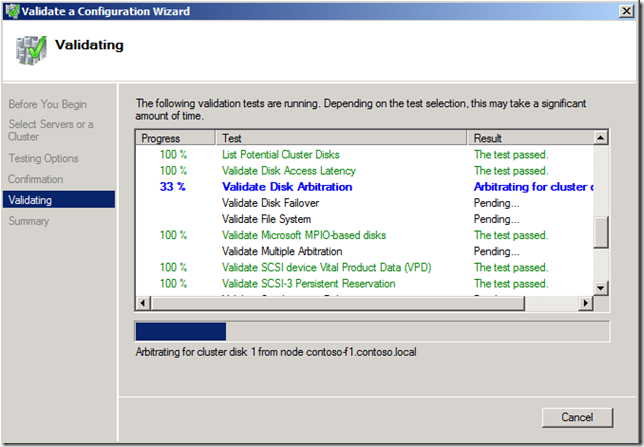
12.3. Select to “Run all tests”. Let the validation process run. It will take a few minutes to complete.
12.4. Validation should not return any errors. If it does, review the previous steps and make sure to address any issues listed in the validation report.
12.5. Next you should select the option to “Create a cluster”. Here you also specify the two nodes to use.
12.6. Give the cluster a name (CONTOSO-FC).
12.7. Select only the Internal 2 and Internal 3 networks and use the IP addresses 192.168.2.10 and 192.168.3.10
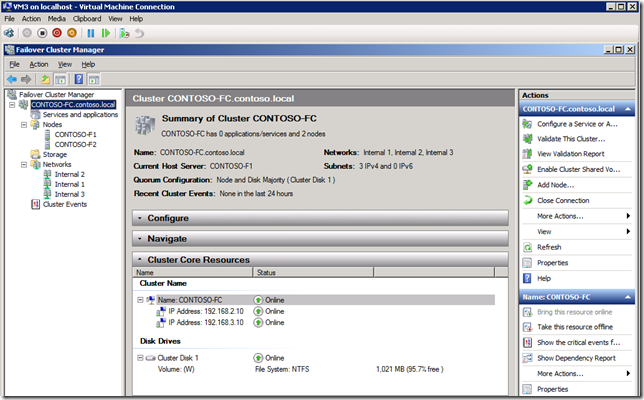
12.8. After the cluster is created, you will get a confirmation:
12.9. For consistency, you should rename the Cluster networks to match the names used previously.
13. Create the Clustered File Service
13.1. You can now create a clustered file service. On the Failover Cluster Manager, right click on “Configure a Service or Application…”
13.2. On the wizard, select the “File Server” option
13.3. Specify the name of the service (CONTOSO-FS) and the IP addresses to use (192.168.2.11 and 192.168.3.11)
13.4. Select one of the Cluster Disks available (X:)
13.5. For the next step, make sure the File Service is running on the node you are connected to, or else you won’t be able to see the X: drive. If not, move the File Service to that node
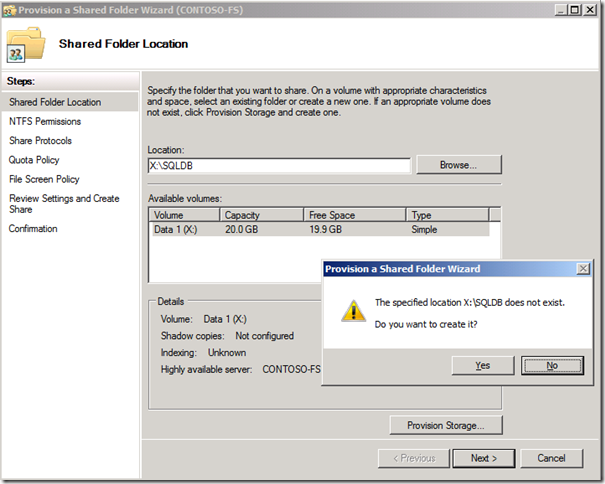
13.6. After the File Service is created, create a folder X:\SQLDB and create a cluster share called SQLDB (Use the “Add a shared folder” option)
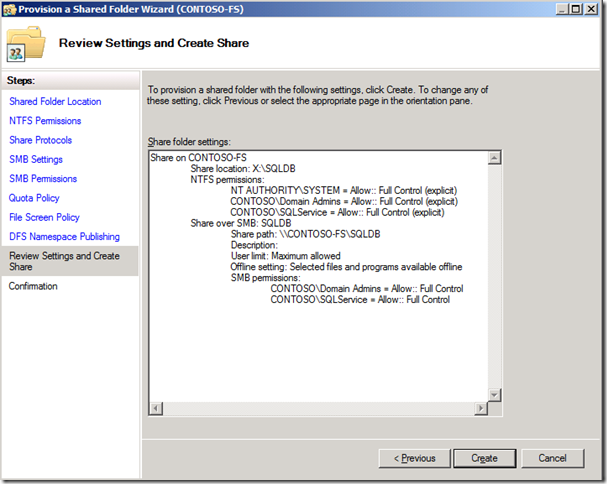
13.7. There are a number of options to configure when creating a share. For this demo, just make sure you grant the Administrator and SQLService accounts Full control for both NTFS permissions and SMB share permissions:
13.8. After creating the share, you have a fully configured Clustered File Service
14. Configure the SQL Server
14.1. Extract the SQL Server evaluation download to a folder. Copy that SQL install folder to VM5 placing it on a folder under the \\CONTOSO-DB\C$ path
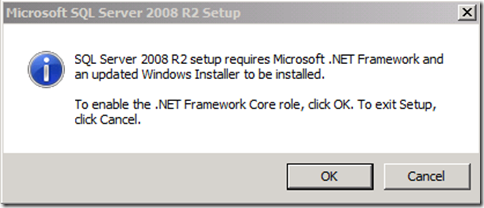
14.2. Run Setup. Click OK on the dialog to install the .NET Framework.
14.3. On the SQL Server Installation Center, select the “Installation” section on the left, then select “New installation or add features to an existing installation”
14.4. In SQL Server Setup, let it verify the SQL Server Setup Support Rules pass and click OK
14.5. Select the “Evaluation” version, review the licensing terms, and click “Install” install the Setup Support files
14.6. In SQL Server Setup, let it verify the second set of SQL Server Setup Support Rules pass and click Next
14.7. In Setup Role, select SQL Server Feature Installation
14.8. On the “Feature Selection” page, select only the Database Engine and the basic Management Tools. Use the default locations.
14.9. In SQL Server Setup, let it verify the Installation Rules pass and click Next
14.10. On the “Instance Configuration” page, Select the Default instance, instance ID and root directory
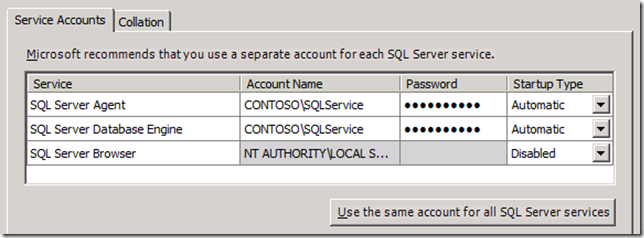
14.11. On the “Server Configuration” page, Specify CONTOSO\SQLService as the service account for the SQL instance (both Agent and Database Engine)
14.12. On the “Database Engine Configuration” page, specify CONTOSO\Administrator as the SQL Server Administrator (you can use the option to “Add current user”)
14.13. Use defaults for all the rest and perform the install. This will take a while:
15. Create a database using the clustered file share
15.1. On the SQL Server VM, open SQL Server Management Studio. When connecting, use a period as the Server Name to indicate the local server
15.2. Right click the main node, select Properties and use the Database Settings page to set the database default location to the UNC path to the clustered file share: \\CONTOSO-FS\SQLDB
15.3. Expand to find the Databases node and right-click to create a new database
15.4. Use Orders as the database name and note the path pointing to the clustered file share:
16. Shut down, startup and install final notes
16.1. Keep in mind that there are dependencies between the services running on each VM
16.2. To shut them down, start with VM5 and end with VM1, waiting for each one to go down completely before moving to the next one
16.3. To bring the VMs up, go from VM1 to VM5, waiting for the previous one to be fully up (with low to no CPU usage) before starting the next one
16.4. As a last note, the total size of the VHD files (base plus 5 diffs), after all the steps were performed, was around 22 GB
16.5. You might want to also take a snapshot of the VMs after you shut them down, just in case you want to bring them back to the original state after experimenting with them for a while. If you do, you should always snapshot all of them, again due to dependencies between them. Just right-click the VM and select the “Snapshot” option
17. Conclusion
I hope you enjoyed these step-by-step instructions. I strongly encourage you to try them out and perform the entire installation yourself. It’s a good learning experience.
After you perform the steps, you have a good setup to try the demos I showed during the presentation. You can find details at these additional blog posts:
- The overall SQL Server over SMB2 scenario is described at
https://blogs.technet.com/b/josebda/archive/2011/02/24/sql-over-smb2-one-of-the-top-10-hidden-gems-in-sql-server-2008-r2.aspx - The script used to generate some activity on the server is shown at
https://blogs.technet.com/b/josebda/archive/2011/02/16/simple-sql-server-script-to-create-a-database-and-generate-activity-for-a-demo.aspx - The multiple network configuration and durability demo are described at
https://blogs.technet.com/b/josebda/archive/2010/09/03/using-the-multiple-nics-of-your-file-server-running-windows-server-2008-and-2008-r2.aspx - The many options for name consolidation (including DFS-N and Clustering) are described at
https://blogs.technet.com/b/josebda/archive/2010/06/04/multiple-names-for-one-computer-consolidate-your-smb-file-servers-without-breaking-unc-paths.aspx
Comments
- Anonymous
January 01, 2003
@Brad: Yes, the Microsoft iSCSI Software target 3.3 is now a free download for anyone using Windows Server 2008 R2 and it's not only for Windows Storage Server anymore.For details, see blogs.technet.com/.../microsoft-iscsi-software-target-3-3-for-windows-server-2008-r2-available-for-public-download.aspx - Anonymous
May 21, 2011
We have a new blog post out that explains the demo setup used in the TechEd 2011 presentation about Windows Server 2008 R2 File Services Consolidation... - Anonymous
May 22, 2011
HiCan you uses the Microsoft iSCSI Software Target without Microsoft Storage Server?From my understanding Microsoft Storage server is reserved for Hardware vendors who provide Microsoft Storage server with certified hardware. If I can uses Microsoft iSCSI Software Target as a standalone product in a production envioment it would give me more options for our clients - Anonymous
May 23, 2011
Dear Jose,You are great man. You have always new gift for Microsoft IT Pro (Articles).Thanks Sirregards


