Working with Row Actions in Xamarin.iOS
This guide demonstrates how to create custom swipe actions for table rows with UISwipeActionsConfiguration or UITableViewRowAction

iOS provides two ways to perform actions on a table: UISwipeActionsConfiguration
and UITableViewRowAction.
UISwipeActionsConfiguration was introduced in iOS 11 and is used to define a set of actions that should take place when the user swipes in either direction on a row in a table view. This behavior is similar to that of the native Mail.app
The UITableViewRowAction class is used to define an action that will take
place when the user swipes left horizontally on a row in a table view.
For example, when editing a table, swiping left on a row displays a Delete
button by default. By attaching multiple instances of the UITableViewRowAction
class to a UITableView, multiple custom actions can be defined, each with its
own text, formatting and behavior.
UISwipeActionsConfiguration
There are a three steps required to implement swipe actions with UISwipeActionsConfiguration:
- Override
GetLeadingSwipeActionsConfigurationand/orGetTrailingSwipeActionsConfigurationmethods. These methods return aUISwipeActionsConfiguration. - Instantiate the
UISwipeActionsConfigurationto be returned. This class takes an array ofUIContextualAction. - Create a
UIContextualAction.
These are explained in greater detail in the following sections.
1. Implementing the SwipeActionsConfigurations methods
UITableViewController (and also UITableViewSource and UITableViewDelegate) contain two methods: GetLeadingSwipeActionsConfiguration and GetTrailingSwipeActionsConfiguration, that are used to implement a set of swipe actions on a table view row. The leading swipe action refers to a swipe from the left hand side of the screen in a left-to-right language and from the right hand side of the screen in a right-to-left language.
The following example demonstrates implementing the leading swipe configuration. Two actions are created from the contextual actions, which are explained below. These actions are then passed in to a newly initialized UISwipeActionsConfiguration, which is used as the return value.
public override UISwipeActionsConfiguration GetLeadingSwipeActionsConfiguration(UITableView tableView, NSIndexPath indexPath)
{
    //UIContextualActions
    var definitionAction = ContextualDefinitionAction(indexPath.Row);
    var flagAction = ContextualFlagAction(indexPath.Row);

    //UISwipeActionsConfiguration
    var leadingSwipe = UISwipeActionsConfiguration.FromActions(new UIContextualAction[] { flagAction, definitionAction });

    leadingSwipe.PerformsFirstActionWithFullSwipe = false;

    return leadingSwipe;
}
2. Instantiate a UISwipeActionsConfiguration
Instantiate a UISwipeActionsConfiguration by using the FromActions method to add a new array of UIContextualActions, as shown in the following code snippet:
var leadingSwipe = UISwipeActionsConfiguration.FromActions(new UIContextualAction[] { flagAction, definitionAction })

leadingSwipe.PerformsFirstActionWithFullSwipe = false;
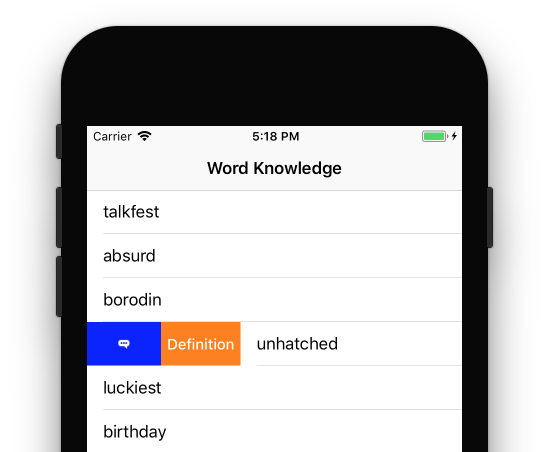
It's important to note that the order in which your actions display is dependent on how they are passed into your array. For example, the code above for leading swipes displays the actions as so:

For trailing swipes, the actions will be displayed as illustrated in the following image:

This code snippet also makes use of the new PerformsFirstActionWithFullSwipe property. By default, this property is set to true, meaning that the first action in the array will happen when a user swipes fully on a row. If you have an action that is not destructive (for example "Delete", this might not be ideal behavior and you should therefore set it to false.
Create a UIContextualAction
The contextual action is where you actually create the action that will be displayed when the user swipes a table row.
To initialize an action you must provide a UIContextualActionStyle, a title, and a UIContextualActionHandler. The UIContextualActionHandler takes three parameters: an action, the view that the action was displayed in, and a completion handler:
public UIContextualAction ContextualFlagAction(int row)
{
    var action = UIContextualAction.FromContextualActionStyle
                    (UIContextualActionStyle.Normal,
                        "Flag",
                        (FlagAction, view, success) => {
                            var alertController = UIAlertController.Create($"Report {words[row]}?", "", UIAlertControllerStyle.Alert);
                            alertController.AddAction(UIAlertAction.Create("Cancel", UIAlertActionStyle.Cancel, null));
                            alertController.AddAction(UIAlertAction.Create("Yes", UIAlertActionStyle.Destructive, null));
                            PresentViewController(alertController, true, null);

                            success(true);
                        });

    action.Image = UIImage.FromFile("feedback.png");
    action.BackgroundColor = UIColor.Blue;

    return action;
}
Various visual properties, such as the background color or image of the action can be edited. The code snippet above demonstrates adding an image to the action and setting its background color to blue.
Once the contextual actions have been created, they can use to initialize the UISwipeActionsConfiguration in the GetLeadingSwipeActionsConfiguration method.
UITableViewRowAction
To define one or more custom row actions for a UITableView, you will need to
create an instance of the UITableViewDelegate class and override the
EditActionsForRow method. For example:
using System;
using System.Collections.Generic;
using System.IO;
using Foundation;
using UIKit;

namespace BasicTable
{
    public class TableDelegate : UITableViewDelegate
    {
        #region Constructors
        public TableDelegate ()
        {
        }

        public TableDelegate (IntPtr handle) : base (handle)
        {
        }

        public TableDelegate (NSObjectFlag t) : base (t)
        {
        }

        #endregion

        #region Override Methods
        public override UITableViewRowAction[] EditActionsForRow (UITableView tableView, NSIndexPath indexPath)
        {
            UITableViewRowAction hiButton = UITableViewRowAction.Create (
                UITableViewRowActionStyle.Default,
                "Hi",
                delegate {
                    Console.WriteLine ("Hello World!");
                });
            return new UITableViewRowAction[] { hiButton };
        }
        #endregion
    }
}
The static UITableViewRowAction.Create method is used to create a new
UITableViewRowAction that will display a Hi button when the user swipes
left horizontally on a row in the table. Later a new instance of the TableDelegate
is created and attached to the UITableView. For example:
TableDelegate tableDelegate;
...

// Replace the standard delete button with a "Hi" button
tableDelegate = new TableDelegate ();
table.Delegate = tableDelegate;
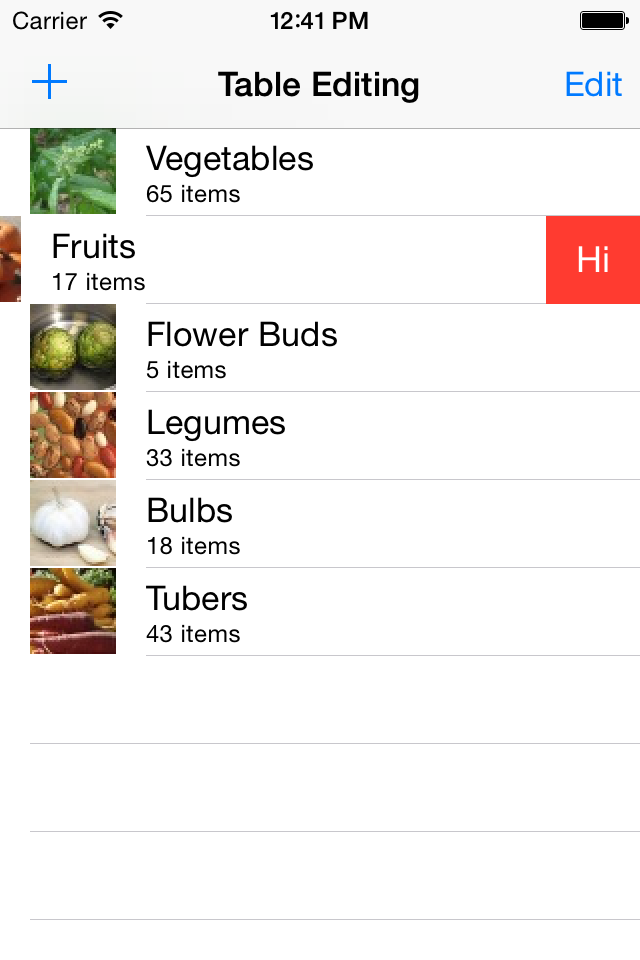
When the above code is run and the user swipes left on a table row, the Hi button will be displayed instead of the Delete button that is displayed by default:
If the user taps the Hi button, Hello World! will be written out to the
console in Visual Studio for Mac or Visual Studio when the application is run in the debug mode.
