AI skill example with the AdventureWorks dataset (preview)
This article describes how to set up an AI skill, using a lakehouse as a data source. To illustrate the process, we first create a lakehouse, and then add data to it. Then, we create an AI skill and configure the lakehouse as its data source. If you already have a Power BI semantic model (with the necessary read/write permissions), a warehouse, or a KQL database, you can follow the same steps after you create the AI skill to add your data sources. While the steps shown here focus on the lakehouse, the process is similar for other data sources—you just need to make adjustments based on your specific selection.
Important
This feature is in preview.
Prerequisites
- A paid F64 or higher Fabric capacity resource
- AI skill tenant switch is enabled.
- Copilot tenant switch is enabled.
- Cross-geo processing for AI is enabled.
- Cross-geo storing for AI is enabled.
- A warehouse, lakehouse, Power BI semantic models, and KQL databases with data.
- Power BI semantic models via XMLA endpoints tenant switch is enabled for Power BI semantic model data sources.
Create a lakehouse with AdventureWorksLH
First, create a lakehouse and populate it with the necessary data.
If you already have an instance of AdventureWorksLH in a lakehouse (or a warehouse), you can skip this step. If not, you can use the following instructions from a Fabric notebook to populate the lakehouse with the data.
Create a new notebook in the workspace where you want to create your AI skill.
On the left side of the Explorer pane, select + Data sources. This option allows you to add an existing lakehouse or creates a new lakehouse. For sake of clarity, create a new lakehouse and assign a name to it.
In the top cell, add the following code snippet:
import pandas as pd
from tqdm.auto import tqdm
base = "https://synapseaisolutionsa.blob.core.windows.net/public/AdventureWorks"

# load list of tables
df_tables = pd.read_csv(f"{base}/adventureworks.csv", names=["table"])

for table in (pbar := tqdm(df_tables['table'].values)):
    pbar.set_description(f"Uploading {table} to lakehouse")

    # download
    df = pd.read_parquet(f"{base}/{table}.parquet")

    # save as lakehouse table
    spark.createDataFrame(df).write.mode('overwrite').saveAsTable(table)
Select Run all.
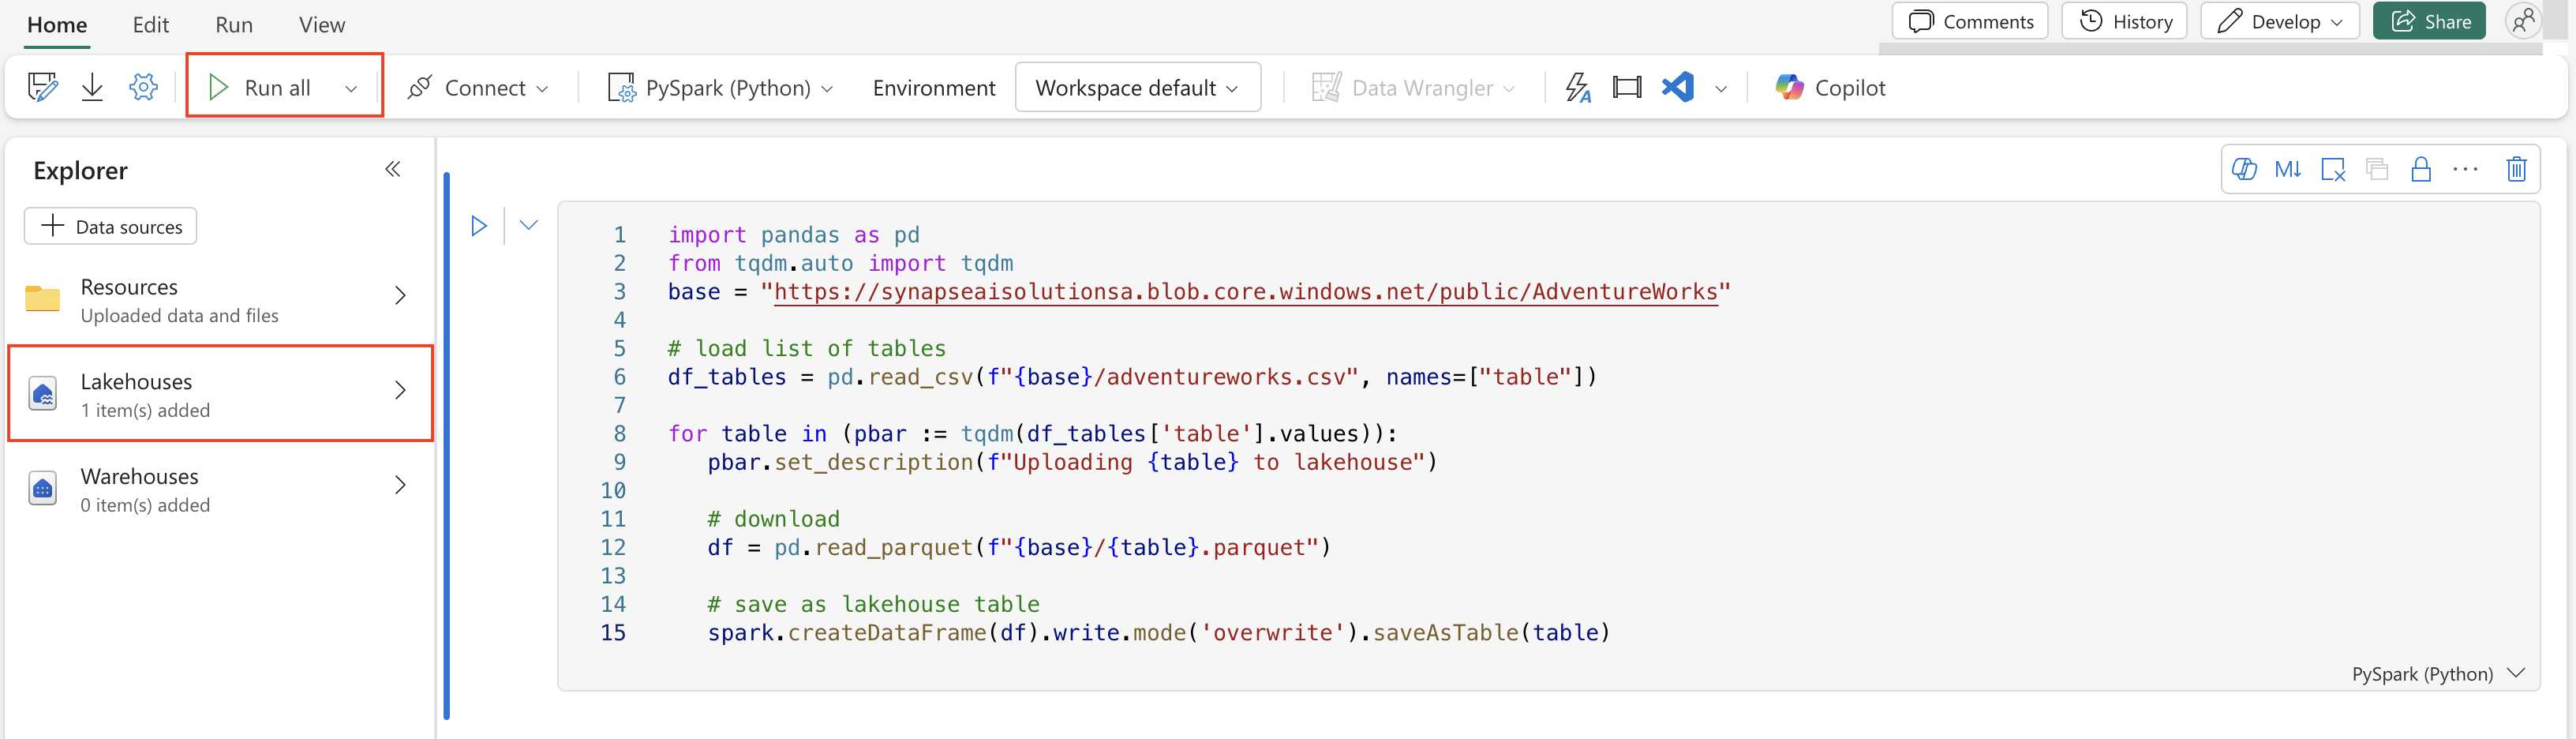

After a few minutes, the lakehouse populates with the necessary data.
Create an AI skill
To create a new AI skill, navigate to your workspace and select the + New Item button, as shown in this screenshot:

In the All items tab, search for AI skill to locate the appropriate option. Once selected, a prompt asks you to provide a name for your AI skill, as shown in this screenshot:

After you enter the name, proceed with the following steps to align the AI skill with your specific requirements.
Select the data
Select the lakehouse you created in the previous step, and then select Add. Once the lakehouse is added as a data source, the Explorer pane on the left side of the AI skill page shows the lakehouse name. Select the lakehouse to view all available tables. Use the checkboxes to select the tables you want to make available to the AI. For this scenario, select these tables:
dimcustomerdimdatedimgeographydimproductdimproductcategorydimpromotiondimresellerdimsalesterritoryfactinternetsalescactresellersales

Provide instructions
To add AI instructions, select the AI instructions button to open the AI instructions pane on the right. You can add the following instructions.
The AdventureWorksLH data source contains information from three tables:
dimcustomer, for detailed customer demographics and contact informationdimdate, for date-related data - for example, calendar and fiscal informationdimgeography, for geographical details including city names and country region codes.
Use this data source for queries and analyses that involve customer details, time-based events, and geographical locations.

Provide examples
To add example queries, select the Example queries button to open the example queries pane on the right. This pane provides options to add or edit example queries for all supported data sources. For each data source, you can select Add or Edit Example Queries to input the relevant examples, as shown in the following screenshot:

Here, you should add Example queries for the lakehouse data source that you created.
Question: Calculate the average percentage increase in sales amount for repeat purchases for every zipcode. Repeat purchase is a purchase subsequent to the first purchase (the average should always be computed relative to the first purchase)
SELECT AVG((s.SalesAmount - first_purchase.SalesAmount) / first_purchase.SalesAmount * 100) AS AvgPercentageIncrease
FROM factinternetsales s
INNER JOIN dimcustomer c ON s.CustomerKey = c.CustomerKey
INNER JOIN dimgeography g ON c.GeographyKey = g.GeographyKey
INNER JOIN (
	SELECT *
	FROM (
		SELECT
			CustomerKey,
			SalesAmount,
            OrderDate,
			ROW_NUMBER() OVER (PARTITION BY CustomerKey ORDER BY OrderDate) AS RowNumber
		FROM factinternetsales
	) AS t
	WHERE RowNumber = 1
) first_purchase ON s.CustomerKey = first_purchase.CustomerKey
WHERE s.OrderDate > first_purchase.OrderDate
GROUP BY g.PostalCode;
Question: Show the monthly total and year-to-date total sales. Order by year and month.
SELECT
    Year,
	Month,
	MonthlySales,
	SUM(MonthlySales) OVER (PARTITION BY Year ORDER BY Year, Month ROWS BETWEEN UNBOUNDED PRECEDING AND CURRENT ROW) AS CumulativeTotal
FROM (
	SELECT
	   YEAR(OrderDate) AS Year,
	   MONTH(OrderDate) AS Month,
	   SUM(SalesAmount) AS MonthlySales
	FROM factinternetsales
	GROUP BY YEAR(OrderDate), MONTH(OrderDate)
) AS t

Note
Adding sample query/question pairs isn't currently supported for Power BI semantic model data sources.
Test and revise the AI skill
Now that you configured the AI skill, added AI instructions, and provided example queries for the lakehouse, you can interact with it by asking questions and receiving answers. As you continue testing, you can add more examples, and refine the instructions, to further improve the performance of the AI skill. Collaborate with your colleagues to gather feedback, and based on their input, ensure the provided example queries and instructions align with the types of questions they want to ask.
Use the AI skill programmatically
You can use the AI skill programmatically within a Fabric notebook. To determine whether or not the AI skill has a published URL value, select Settings, as shown in this screenshot:

Before you publish the AI skill, it doesn't have a published URL value, as shown in this screenshot:

After you validate the performance of the AI skill, you might decide to publish it so you can then share it with your colleagues who want to do Q&A over data. In this case, select Publish, as shown in this screenshot:

The published URL for the AI skill appears, as shown in this screenshot:

You can then copy the published URL and use it in the Fabric notebook. This way, you can query the AI skill by making calls to the AI skill API in a Fabric notebook. Paste the copied URL in this code snippet. Then, replace the question with any query relevant to your AI skill. This example uses \<generic published URL value\> as the URL.
%pip install "openai==1.14.1"
%pip install httpx==0.27.2
import requests
import json
import pprint
import typing as t
import time
import uuid

from openai import OpenAI
from openai._exceptions import APIStatusError
from openai._models import FinalRequestOptions
from openai._types import Omit
from openai._utils import is_given
from synapse.ml.mlflow import get_mlflow_env_config
from sempy.fabric._token_provider import SynapseTokenProvider

base_url = "https://<generic published base URL value>"
question = "What datasources do you have access to?"

configs = get_mlflow_env_config()

# Create OpenAI Client
class FabricOpenAI(OpenAI):
    def __init__(
        self,
        api_version: str ="2024-05-01-preview",
        **kwargs: t.Any,
    ) -> None:
        self.api_version = api_version
        default_query = kwargs.pop("default_query", {})
        default_query["api-version"] = self.api_version
        super().__init__(
            api_key="",
            base_url=base_url,
            default_query=default_query,
            **kwargs,
        )

    def _prepare_options(self, options: FinalRequestOptions) -> None:
        headers: dict[str, str | Omit] = (
            {**options.headers} if is_given(options.headers) else {}
        )
        options.headers = headers
        headers["Authorization"] = f"Bearer {configs.driver_aad_token}"
        if "Accept" not in headers:
            headers["Accept"] = "application/json"
        if "ActivityId" not in headers:
            correlation_id = str(uuid.uuid4())
            headers["ActivityId"] = correlation_id

        return super()._prepare_options(options)

# Pretty printing helper
def pretty_print(messages):
    print("---Conversation---")
    for m in messages:
        print(f"{m.role}: {m.content[0].text.value}")
    print()

fabric_client = FabricOpenAI()
# Create assistant
assistant = fabric_client.beta.assistants.create(model="not used")
# Create thread
thread = fabric_client.beta.threads.create()
# Create message on thread
message = fabric_client.beta.threads.messages.create(thread_id=thread.id, role="user", content=question)
# Create run
run = fabric_client.beta.threads.runs.create(thread_id=thread.id, assistant_id=assistant.id)

# Wait for run to complete
while run.status == "queued" or run.status == "in_progress":
    run = fabric_client.beta.threads.runs.retrieve(
        thread_id=thread.id,
        run_id=run.id,
    )
    print(run.status)
    time.sleep(2)

# Print messages
response = fabric_client.beta.threads.messages.list(thread_id=thread.id, order="asc")
pretty_print(response)

# Delete thread
fabric_client.beta.threads.delete(thread_id=thread.id)