Configure data flows in Azure IoT Operations
Important
This page includes instructions for managing Azure IoT Operations components using Kubernetes deployment manifests, which is in preview. This feature is provided with several limitations, and shouldn't be used for production workloads.
See the Supplemental Terms of Use for Microsoft Azure Previews for legal terms that apply to Azure features that are in beta, preview, or otherwise not yet released into general availability.
A data flow is the path that data takes from the source to the destination with optional transformations. You can configure the data flow by creating a Data flow custom resource or using the Azure IoT Operations Studio portal. A data flow is made up of three parts: the source, the transformation, and the destination.
To define the source and destination, you need to configure the data flow endpoints. The transformation is optional and can include operations like enriching the data, filtering the data, and mapping the data to another field.
Important
Each data flow must have the Azure IoT Operations local MQTT broker default endpoint as either the source or destination.
You can use the operations experience in Azure IoT Operations to create a data flow. The operations experience provides a visual interface to configure the data flow. You can also use Bicep to create a data flow using a Bicep template file, or use Kubernetes to create a data flow using a YAML file.
Continue reading to learn how to configure the source, transformation, and destination.
Prerequisites
You can deploy data flows as soon as you have an instance of Azure IoT Operations using the default data flow profile and endpoint. However, you might want to configure data flow profiles and endpoints to customize the data flow.
Data flow profile
If you don't need different scaling settings for your data flows, use the default data flow profile provided by Azure IoT Operations. To learn how to configure a data flow profile, see Configure data flow profiles.
Data flow endpoints
Data flow endpoints are required to configure the source and destination for the data flow. To get started quickly, you can use the default data flow endpoint for the local MQTT broker. You can also create other types of data flow endpoints like Kafka, Event Hubs, or Azure Data Lake Storage. To learn how to configure each type of data flow endpoint, see Configure data flow endpoints.
Get started
Once you have the prerequisites, you can start to create a data flow.
To create a data flow in operations experience, select Data flow > Create data flow. Then, you see the page where you can configure the source, transformation, and destination for the data flow.
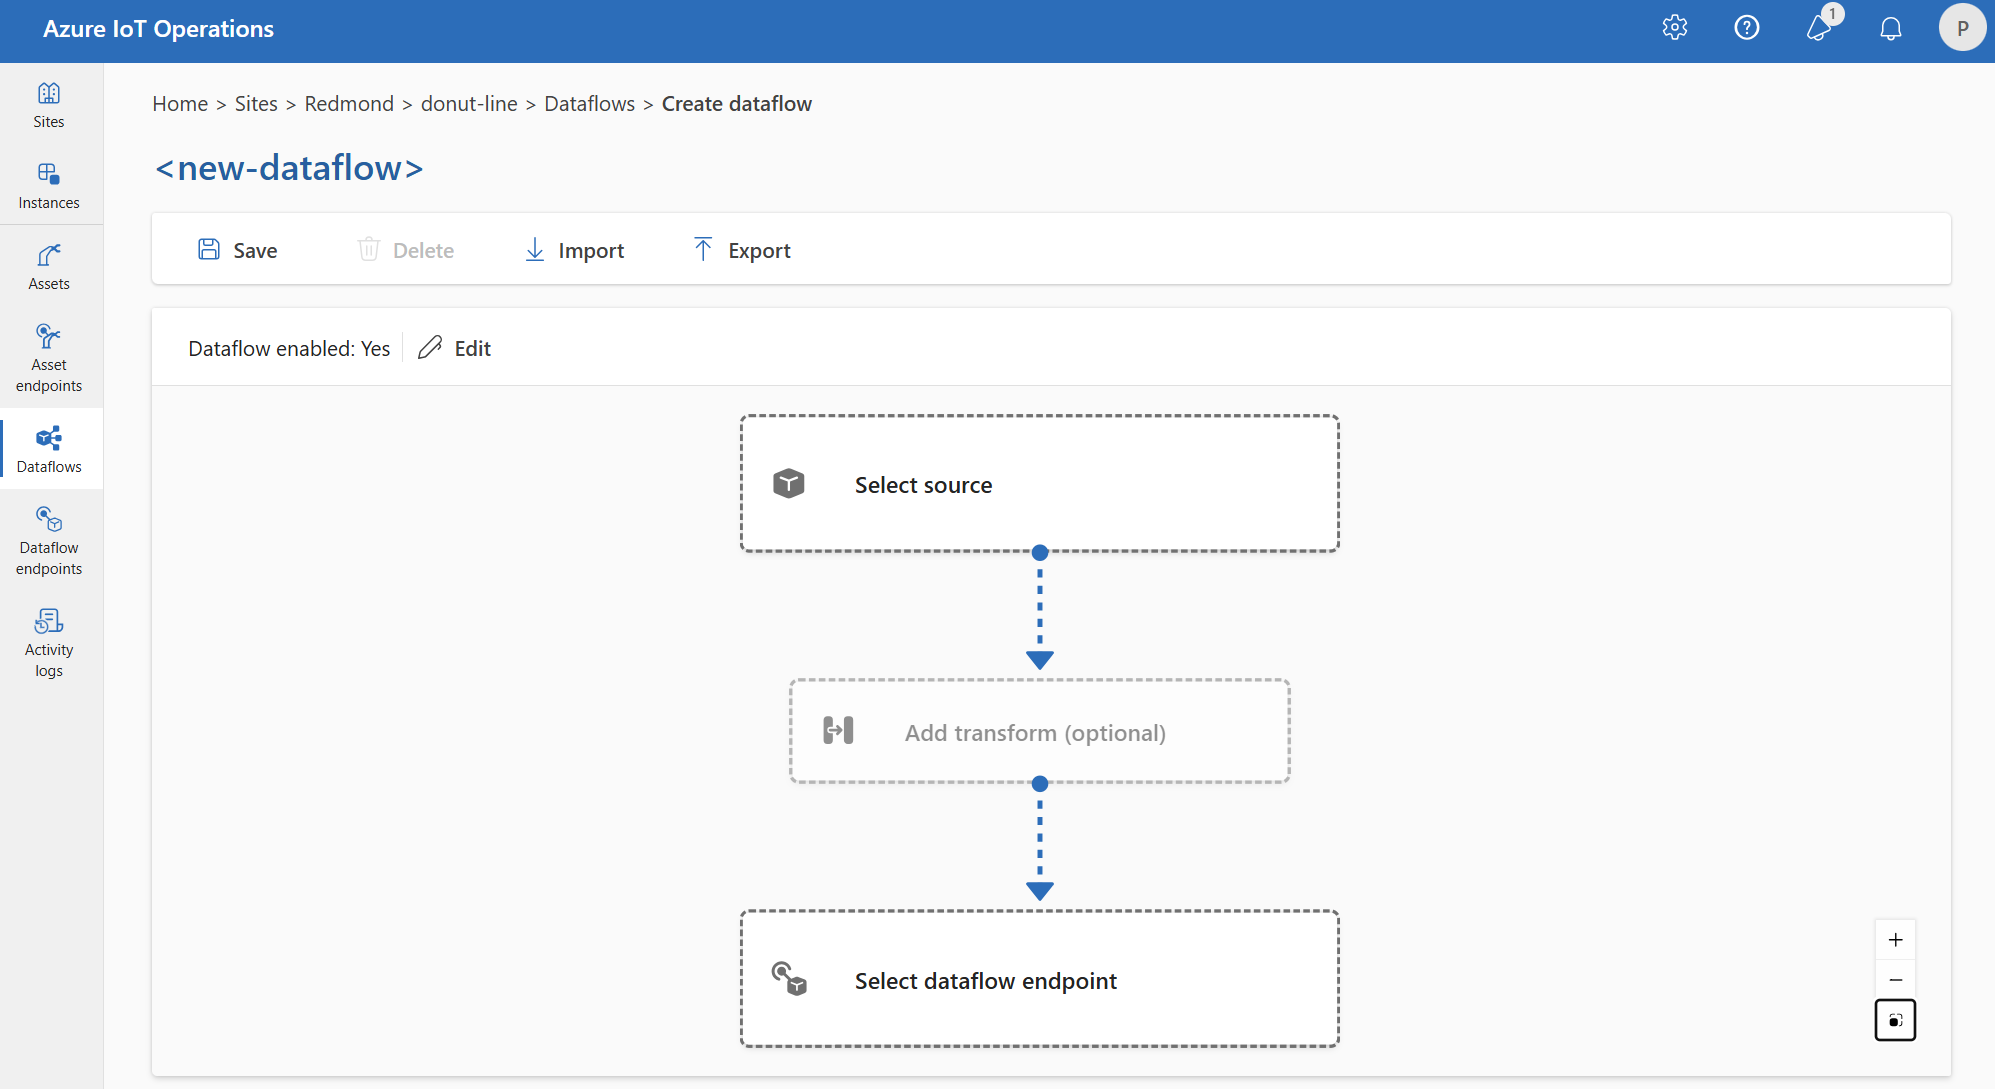
Review the following sections to learn how to configure the operation types of the data flow.
Source
To configure a source for the data flow, specify the endpoint reference and a list of data sources for the endpoint. Choose one of the following options as the source for the data flow.
If the default endpoint isn't used as the source, it must be used as the destination. To learn more about, see Data flows must use local MQTT broker endpoint.
Option 1: Use default message broker endpoint as source
Under Source details, select Message broker.
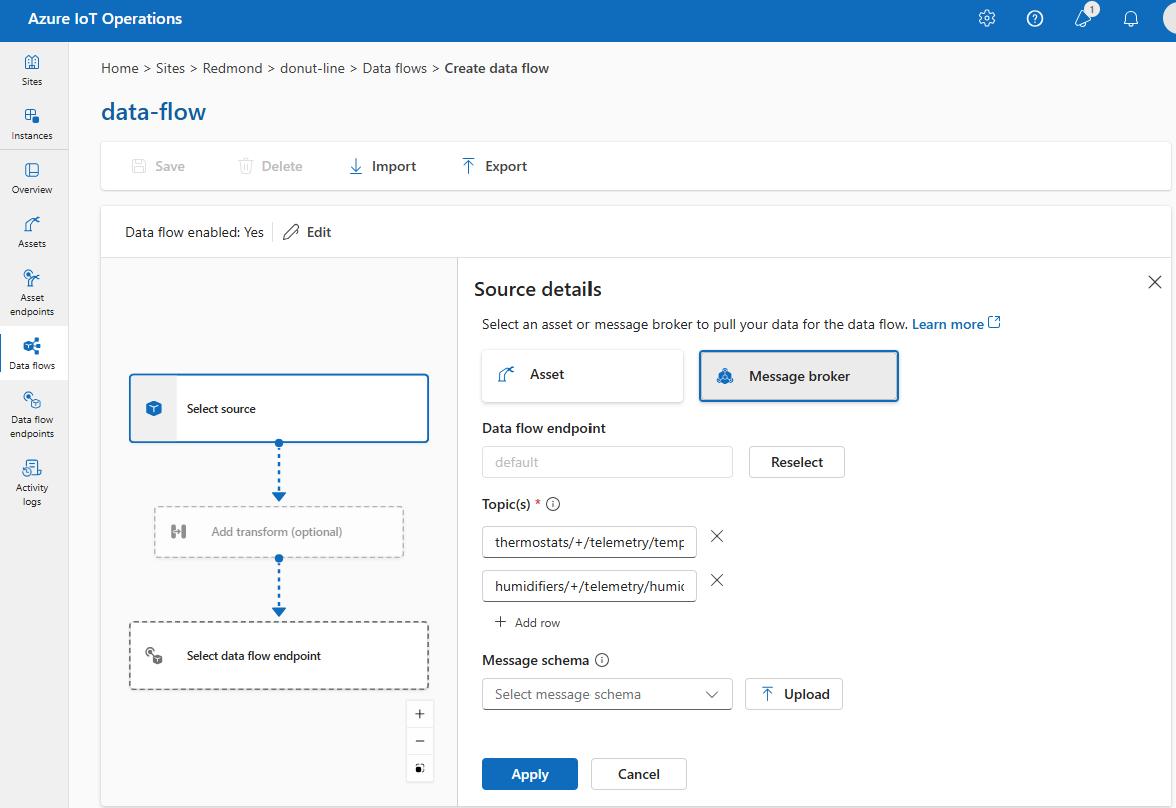
Enter the following settings for the message broker source:
Setting Description Data flow endpoint Select default to use the default MQTT message broker endpoint. Topic The topic filter to subscribe to for incoming messages. Use Topic(s) > Add row to add multiple topics. For more information on topics, see Configure MQTT or Kafka topics. Message schema The schema to use to deserialize the incoming messages. See Specify schema to deserialize data. Select Apply.
Option 2: Use asset as source
You can use an asset as the source for the data flow. Using an asset as a source is only available in the operations experience.
Under Source details, select Asset.
Select the asset you want to use as the source endpoint.
Select Proceed.
A list of datapoints for the selected asset is displayed.
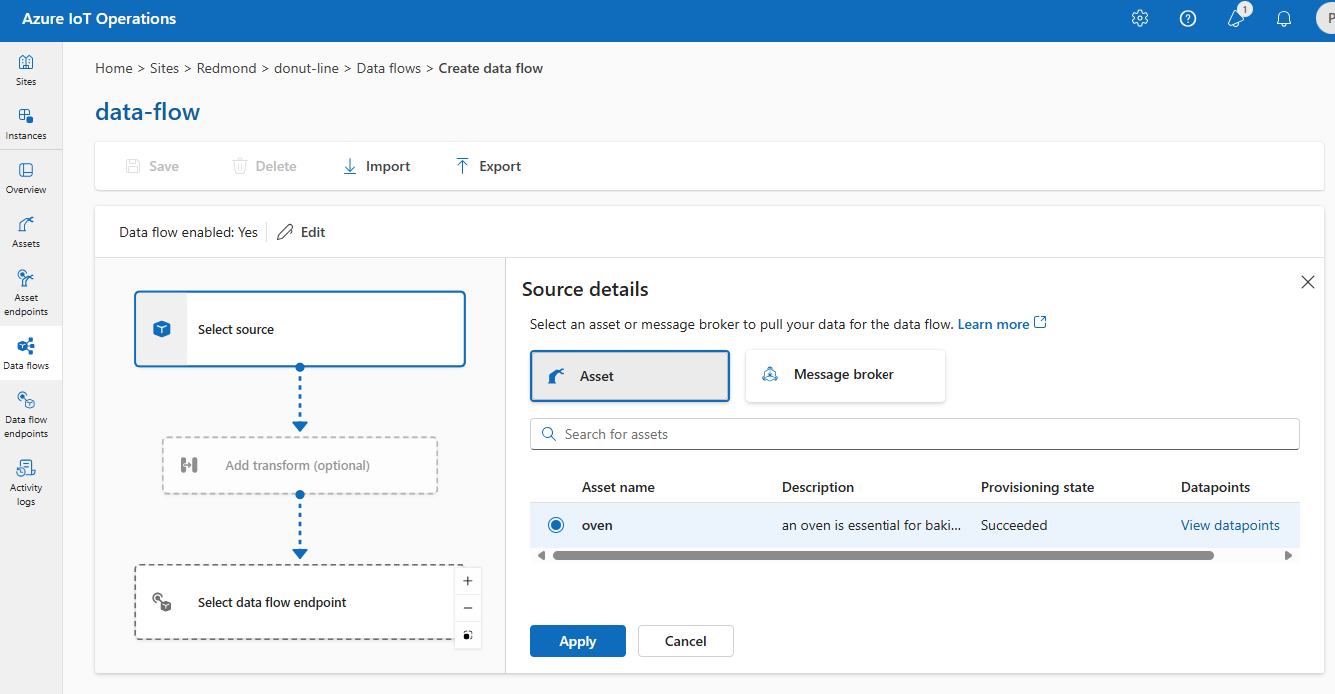
Select Apply to use the asset as the source endpoint.
When using an asset as the source, the asset definition is used to infer the schema for the data flow. The asset definition includes the schema for the asset's datapoints. To learn more, see Manage asset configurations remotely.
Once configured, the data from the asset reaches the data flow via the local MQTT broker. So, when using an asset as the source, the data flow uses the local MQTT broker default endpoint as the source in actuality.
Option 3: Use custom MQTT or Kafka data flow endpoint as source
If you created a custom MQTT or Kafka data flow endpoint (for example, to use with Event Grid or Event Hubs), you can use it as the source for the data flow. Remember that storage type endpoints, like Data Lake or Fabric OneLake, can't be used as source.
Under Source details, select Message broker.
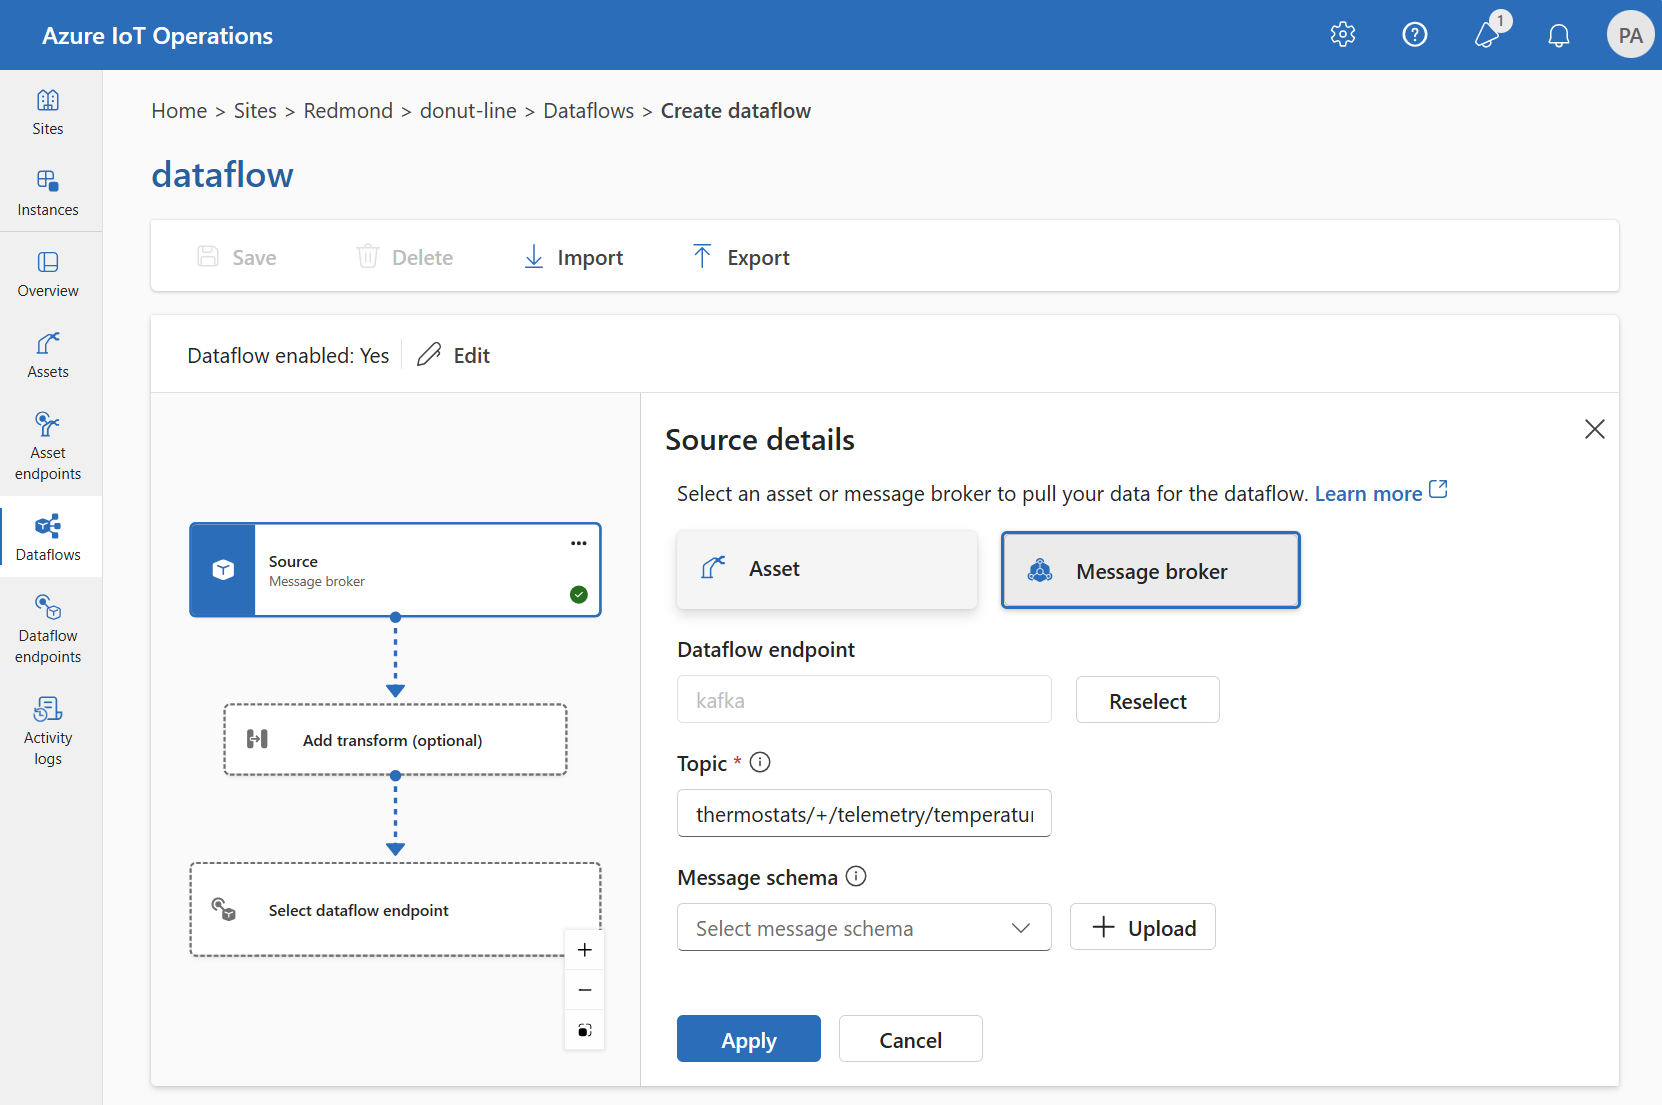
Enter the following settings for the message broker source:
Setting Description Data flow endpoint Use the Reselect button to select a custom MQTT or Kafka data flow endpoint. For more information, see Configure MQTT data flow endpoints or Configure Azure Event Hubs and Kafka data flow endpoints. Topic The topic filter to subscribe to for incoming messages. Use Topic(s) > Add row to add multiple topics. For more information on topics, see Configure MQTT or Kafka topics. Message schema The schema to use to deserialize the incoming messages. See Specify schema to deserialize data. Select Apply.
Configure data sources (MQTT or Kafka topics)
You can specify multiple MQTT or Kafka topics in a source without needing to modify the data flow endpoint configuration. This flexibility means the same endpoint can be reused across multiple data flows, even if the topics vary. For more information, see Reuse data flow endpoints.
MQTT topics
When the source is an MQTT (Event Grid included) endpoint, you can use the MQTT topic filter to subscribe to incoming messages. The topic filter can include wildcards to subscribe to multiple topics. For example, thermostats/+/telemetry/temperature/# subscribes to all temperature telemetry messages from thermostats. To configure the MQTT topic filters:
In the operations experience data flow Source details, select Message broker, then use the Topic(s) field to specify the MQTT topic filters to subscribe to for incoming messages. You can add multiple MQTT topics by selecting Add row and entering a new topic.
Shared subscriptions
To use shared subscriptions with message broker sources, you can specify the shared subscription topic in the form of $shared/<GROUP_NAME>/<TOPIC_FILTER>.
In operations experience data flow Source details, select Message broker and use the Topic field to specify the shared subscription group and topic.
If the instance count in the data flow profile is greater than one, shared subscription is automatically enabled for all data flows that use a message broker source. In this case, the $shared prefix is added and the shared subscription group name automatically generated. For example, if you have a data flow profile with an instance count of 3, and your data flow uses a message broker endpoint as source configured with topics topic1 and topic2, they are automatically converted to shared subscriptions as $shared/<GENERATED_GROUP_NAME>/topic1 and $shared/<GENERATED_GROUP_NAME>/topic2.
You can explicitly create a topic named $shared/mygroup/topic in your configuration. However, adding the $shared topic explicitly isn't recommended since the $shared prefix is automatically added when needed. Data flows can make optimizations with the group name if it isn't set. For example, $share isn't set and data flows only has to operate over the topic name.
Important
Data flows requiring shared subscription when instance count is greater than one is important when using Event Grid MQTT broker as a source since it doesn't support shared subscriptions. To avoid missing messages, set the data flow profile instance count to one when using Event Grid MQTT broker as the source. That is when the data flow is the subscriber and receiving messages from the cloud.
Kafka topics
When the source is a Kafka (Event Hubs included) endpoint, specify the individual Kafka topics to subscribe to for incoming messages. Wildcards are not supported, so you must specify each topic statically.
Note
When using Event Hubs via the Kafka endpoint, each individual event hub within the namespace is the Kafka topic. For example, if you have an Event Hubs namespace with two event hubs, thermostats and humidifiers, you can specify each event hub as a Kafka topic.
To configure the Kafka topics:
In the operations experience data flow Source details, select Message broker, then use the Topic field to specify the Kafka topic filter to subscribe to for incoming messages.
Note
Only one topic filter can be specified in the operations experience. To use multiple topic filters, use Bicep or Kubernetes.
Specify source schema
When using MQTT or Kafka as the source, you can specify a schema to display the list of data points in the operations experience portal. Using a schema to deserialize and validate incoming messages isn't currently supported.
If the source is an asset, the schema is automatically inferred from the asset definition.
Tip
To generate the schema from a sample data file, use the Schema Gen Helper.
To configure the schema used to deserialize the incoming messages from a source:
In operations experience data flow Source details, select Message broker and use the Message schema field to specify the schema. You can use the Upload button to upload a schema file first. To learn more, see Understand message schemas.
To learn more, see Understand message schemas.
Transformation
The transformation operation is where you can transform the data from the source before you send it to the destination. Transformations are optional. If you don't need to make changes to the data, don't include the transformation operation in the data flow configuration. Multiple transformations are chained together in stages regardless of the order in which they're specified in the configuration. The order of the stages is always:
- Enrich: Add additional data to the source data given a dataset and condition to match.
- Filter: Filter the data based on a condition.
- Map, Compute, Rename, or add a New property: Move data from one field to another with an optional conversion.
This section is an introduction to data flow transforms. For more detailed information, see Map data by using data flows, Convert data by using data flow conversions, and Enrich data by using data flows.
In the operations experience, select Data flow > Add transform (optional).
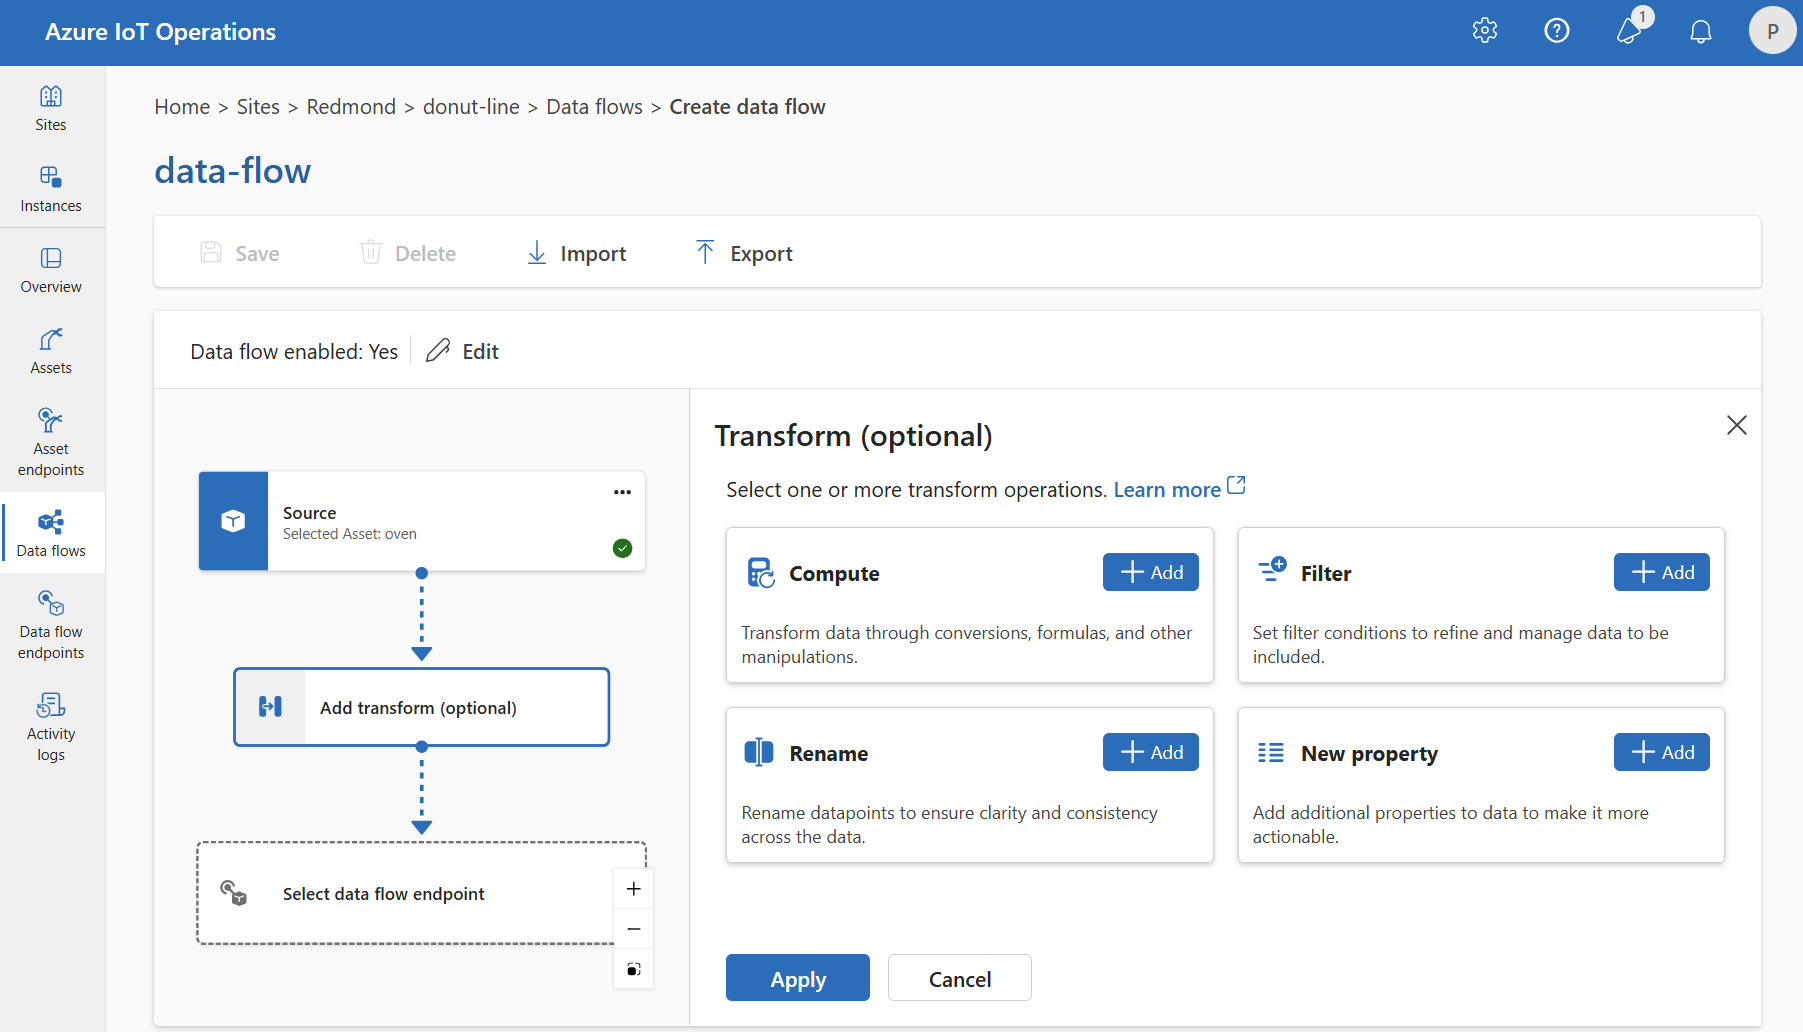
Enrich: Add reference data
To enrich the data, first add reference dataset in the Azure IoT Operations state store. The dataset is used to add extra data to the source data based on a condition. The condition is specified as a field in the source data that matches a field in the dataset.
You can load sample data into the state store by using the state store CLI. Key names in the state store correspond to a dataset in the data flow configuration.
Currently, the Enrich stage isn't supported in the operations experience.
If the dataset has a record with the asset field, similar to:
{
  "asset": "thermostat1",
  "location": "room1",
  "manufacturer": "Contoso"
}
The data from the source with the deviceId field matching thermostat1 has the location and manufacturer fields available in filter and map stages.
For more information about condition syntax, see Enrich data by using data flows and Convert data using data flows.
Filter: Filter data based on a condition
To filter the data on a condition, you can use the filter stage. The condition is specified as a field in the source data that matches a value.
Under Transform (optional), select Filter > Add.
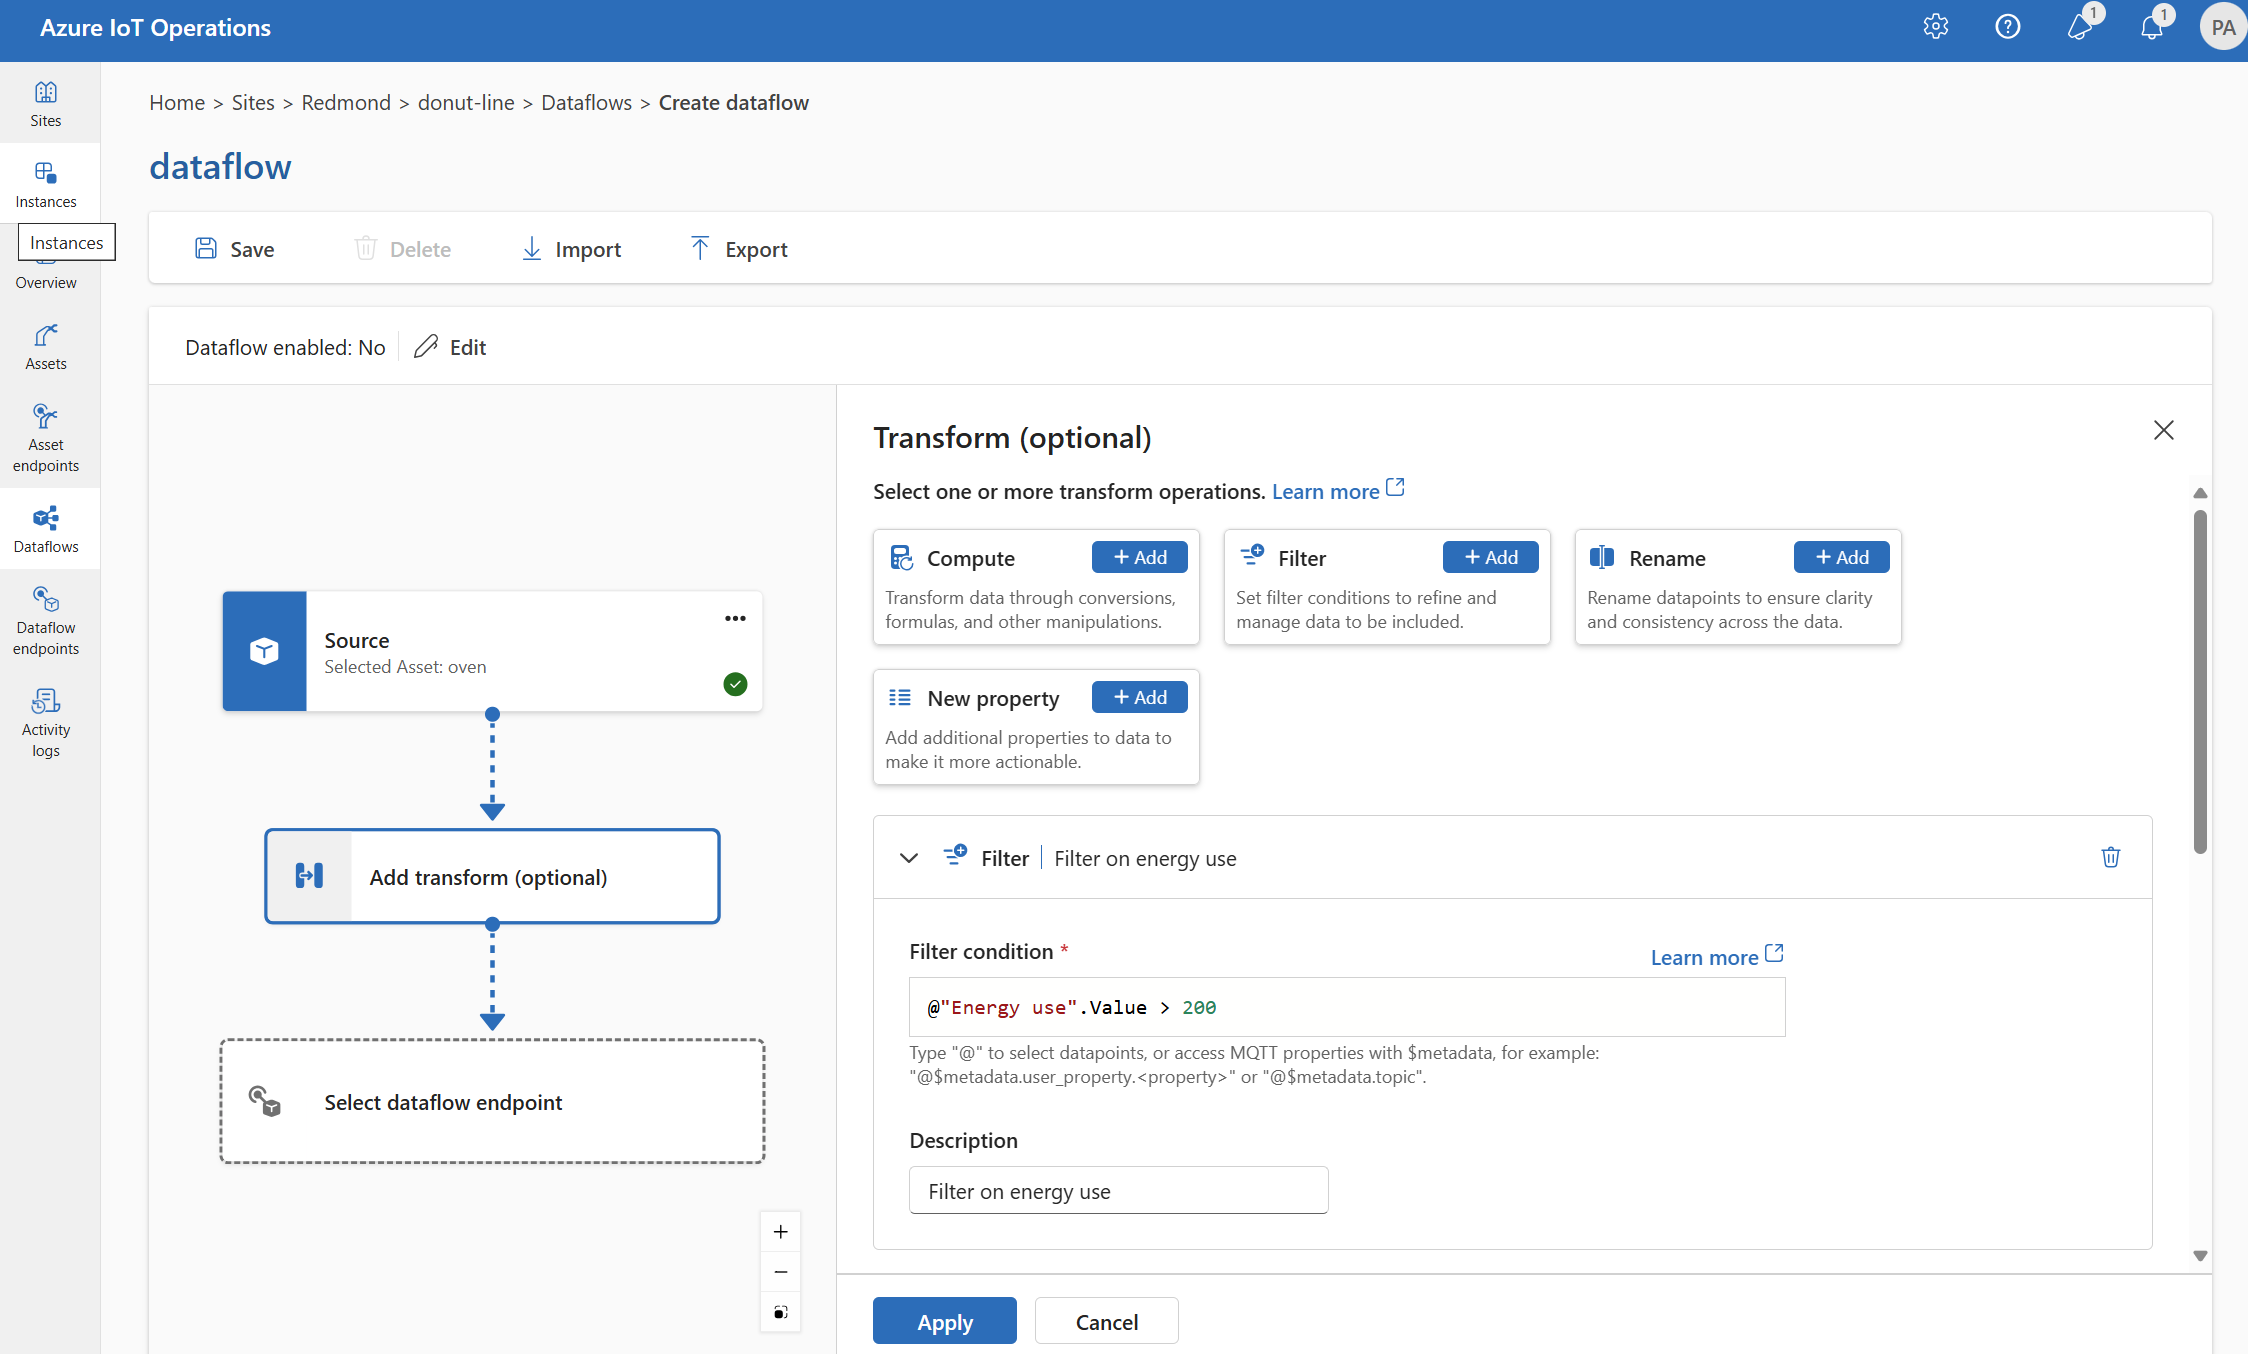
Enter the required settings.
Setting Description Filter condition The condition to filter the data based on a field in the source data. Description Provide a description for the filter condition. In the filter condition field, enter
@or select Ctrl + Space to choose datapoints from a dropdown.You can enter MQTT metadata properties using the format
@$metadata.user_properties.<property>or@$metadata.topic. You can also enter $metadata headers using the format@$metadata.<header>. The$metadatasyntax is only needed for MQTT properties that are part of the message header. For more information, see field references.The condition can use the fields in the source data. For example, you could use a filter condition like
@temperature > 20to filter data less than or equal to 20 based on the temperature field.Select Apply.
Map: Move data from one field to another
To map the data to another field with optional conversion, you can use the map operation. The conversion is specified as a formula that uses the fields in the source data.
In the operations experience, mapping is currently supported using Compute, Rename, and New property transforms.
Compute
You can use the Compute transform to apply a formula to the source data. This operation is used to apply a formula to the source data and store the result field.
Under Transform (optional), select Compute > Add.
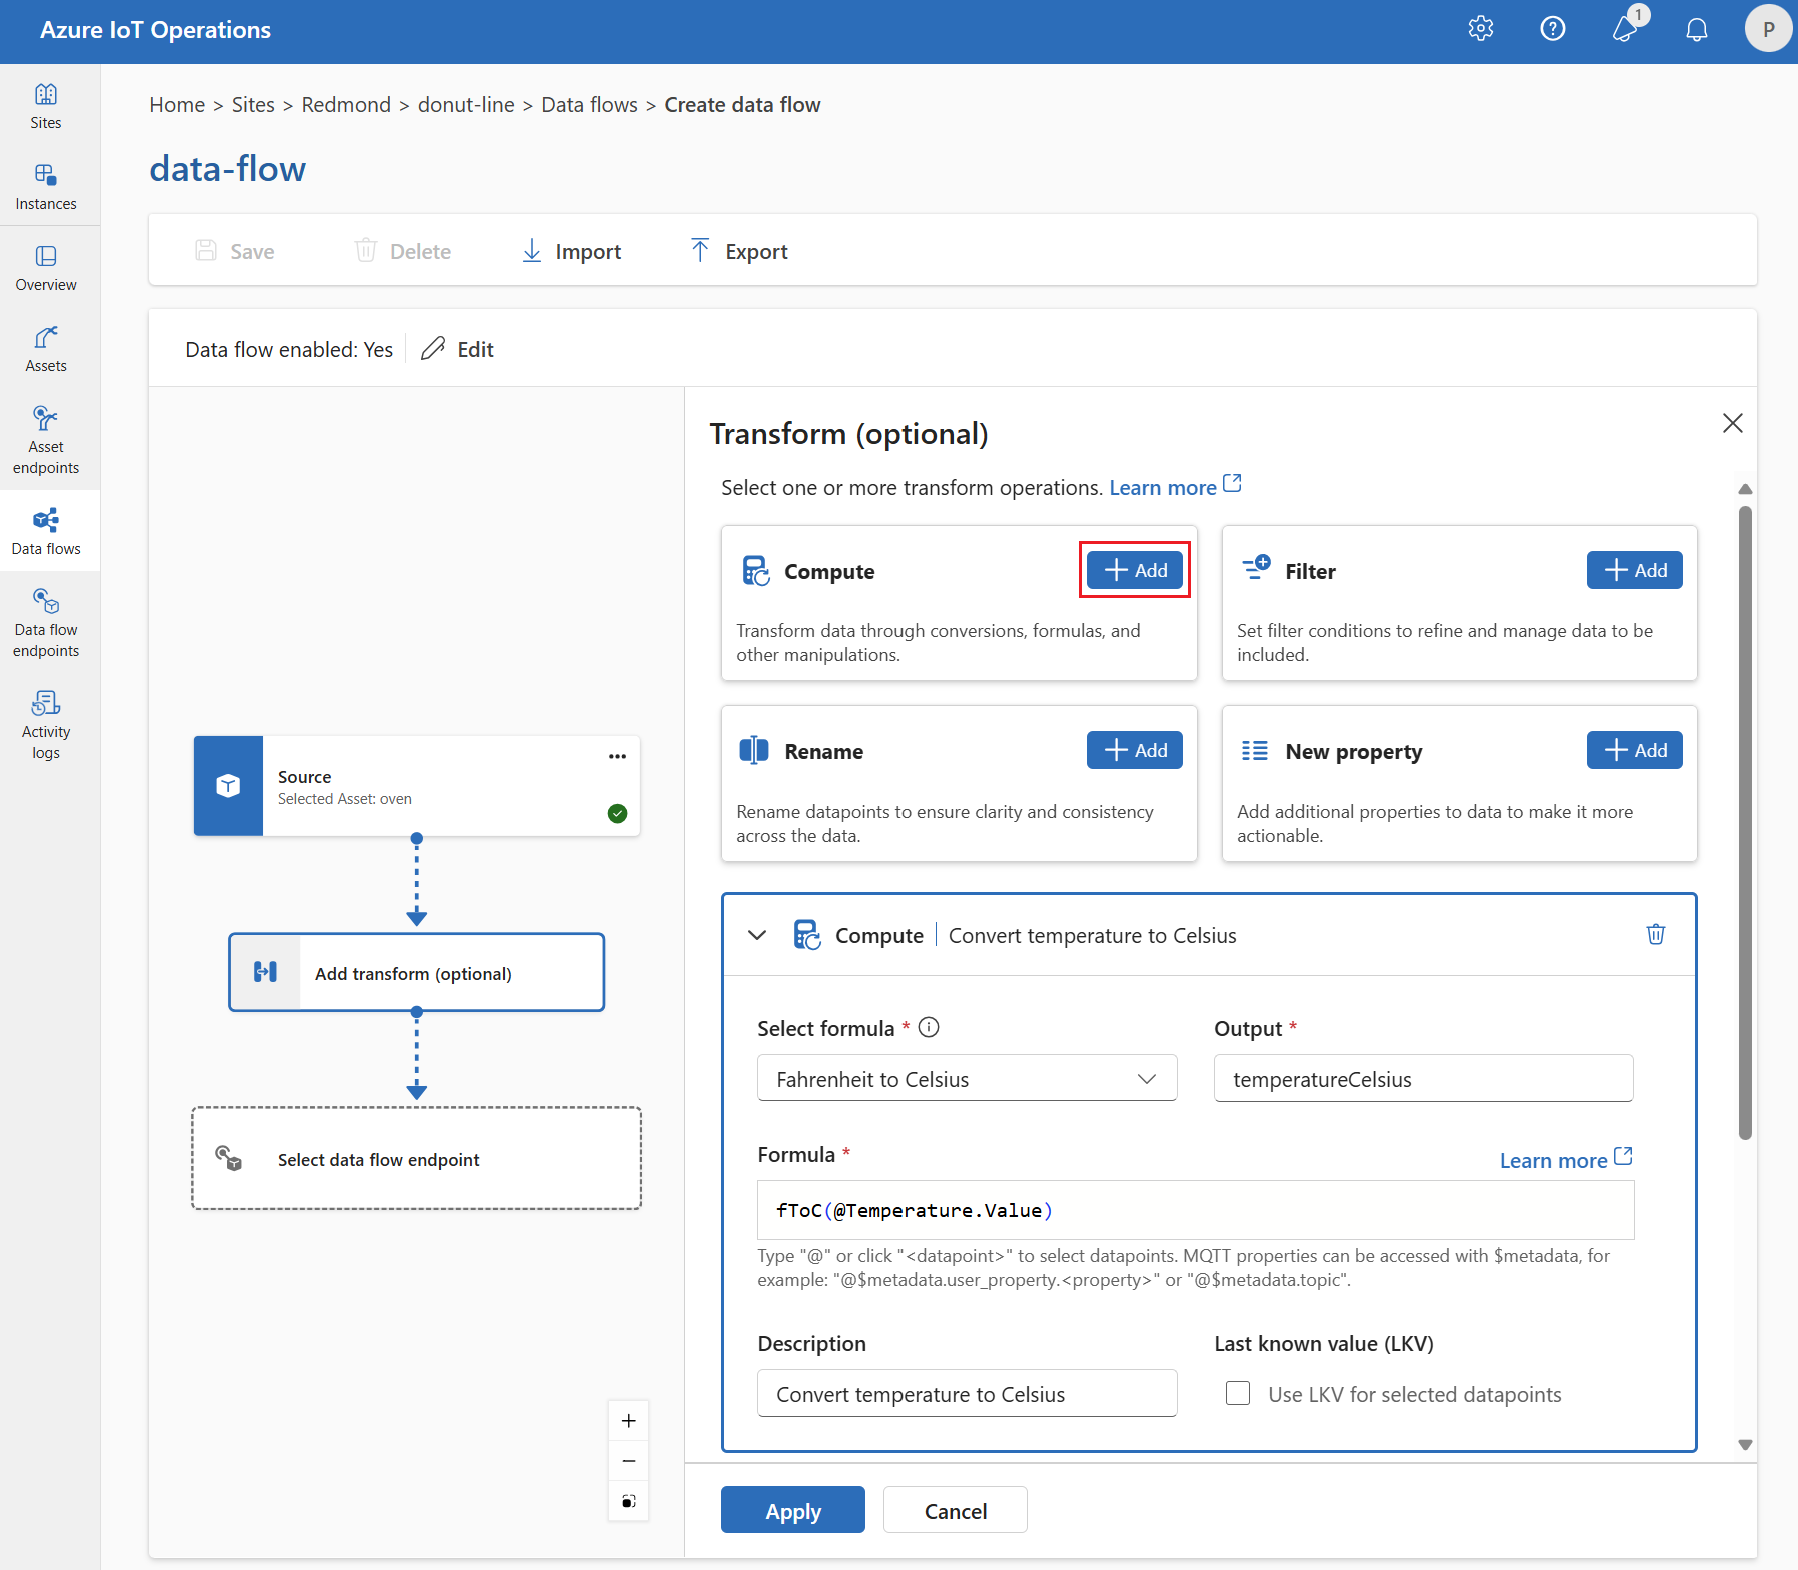
Enter the required settings.
Setting Description Select formula Choose an existing formula from the dropdown or select Custom to enter a formula manually. Output Specify the output display name for the result. Formula Enter the formula to be applied to the source data. Description Provide a description for the transformation. Last known value Optionally, use the last known value if the current value isn't available. You can enter or edit a formula in the Formula field. The formula can use the fields in the source data. Enter
@or select Ctrl + Space to choose datapoints from a dropdown. For built-in formulas, select the<dataflow>placeholder to see the list of available datapoints.You can enter MQTT metadata properties using the format
@$metadata.user_properties.<property>or@$metadata.topic. You can also enter $metadata headers using the format@$metadata.<header>. The$metadatasyntax is only needed for MQTT properties that are part of the message header. For more information, see field references.The formula can use the fields in the source data. For example, you could use the
temperaturefield in the source data to convert the temperature to Celsius and store it in thetemperatureCelsiusoutput field.Select Apply.
Rename
You can rename a datapoint using the Rename transform. This operation is used to rename a datapoint in the source data to a new name. The new name can be used in the subsequent stages of the data flow.
Under Transform (optional), select Rename > Add.
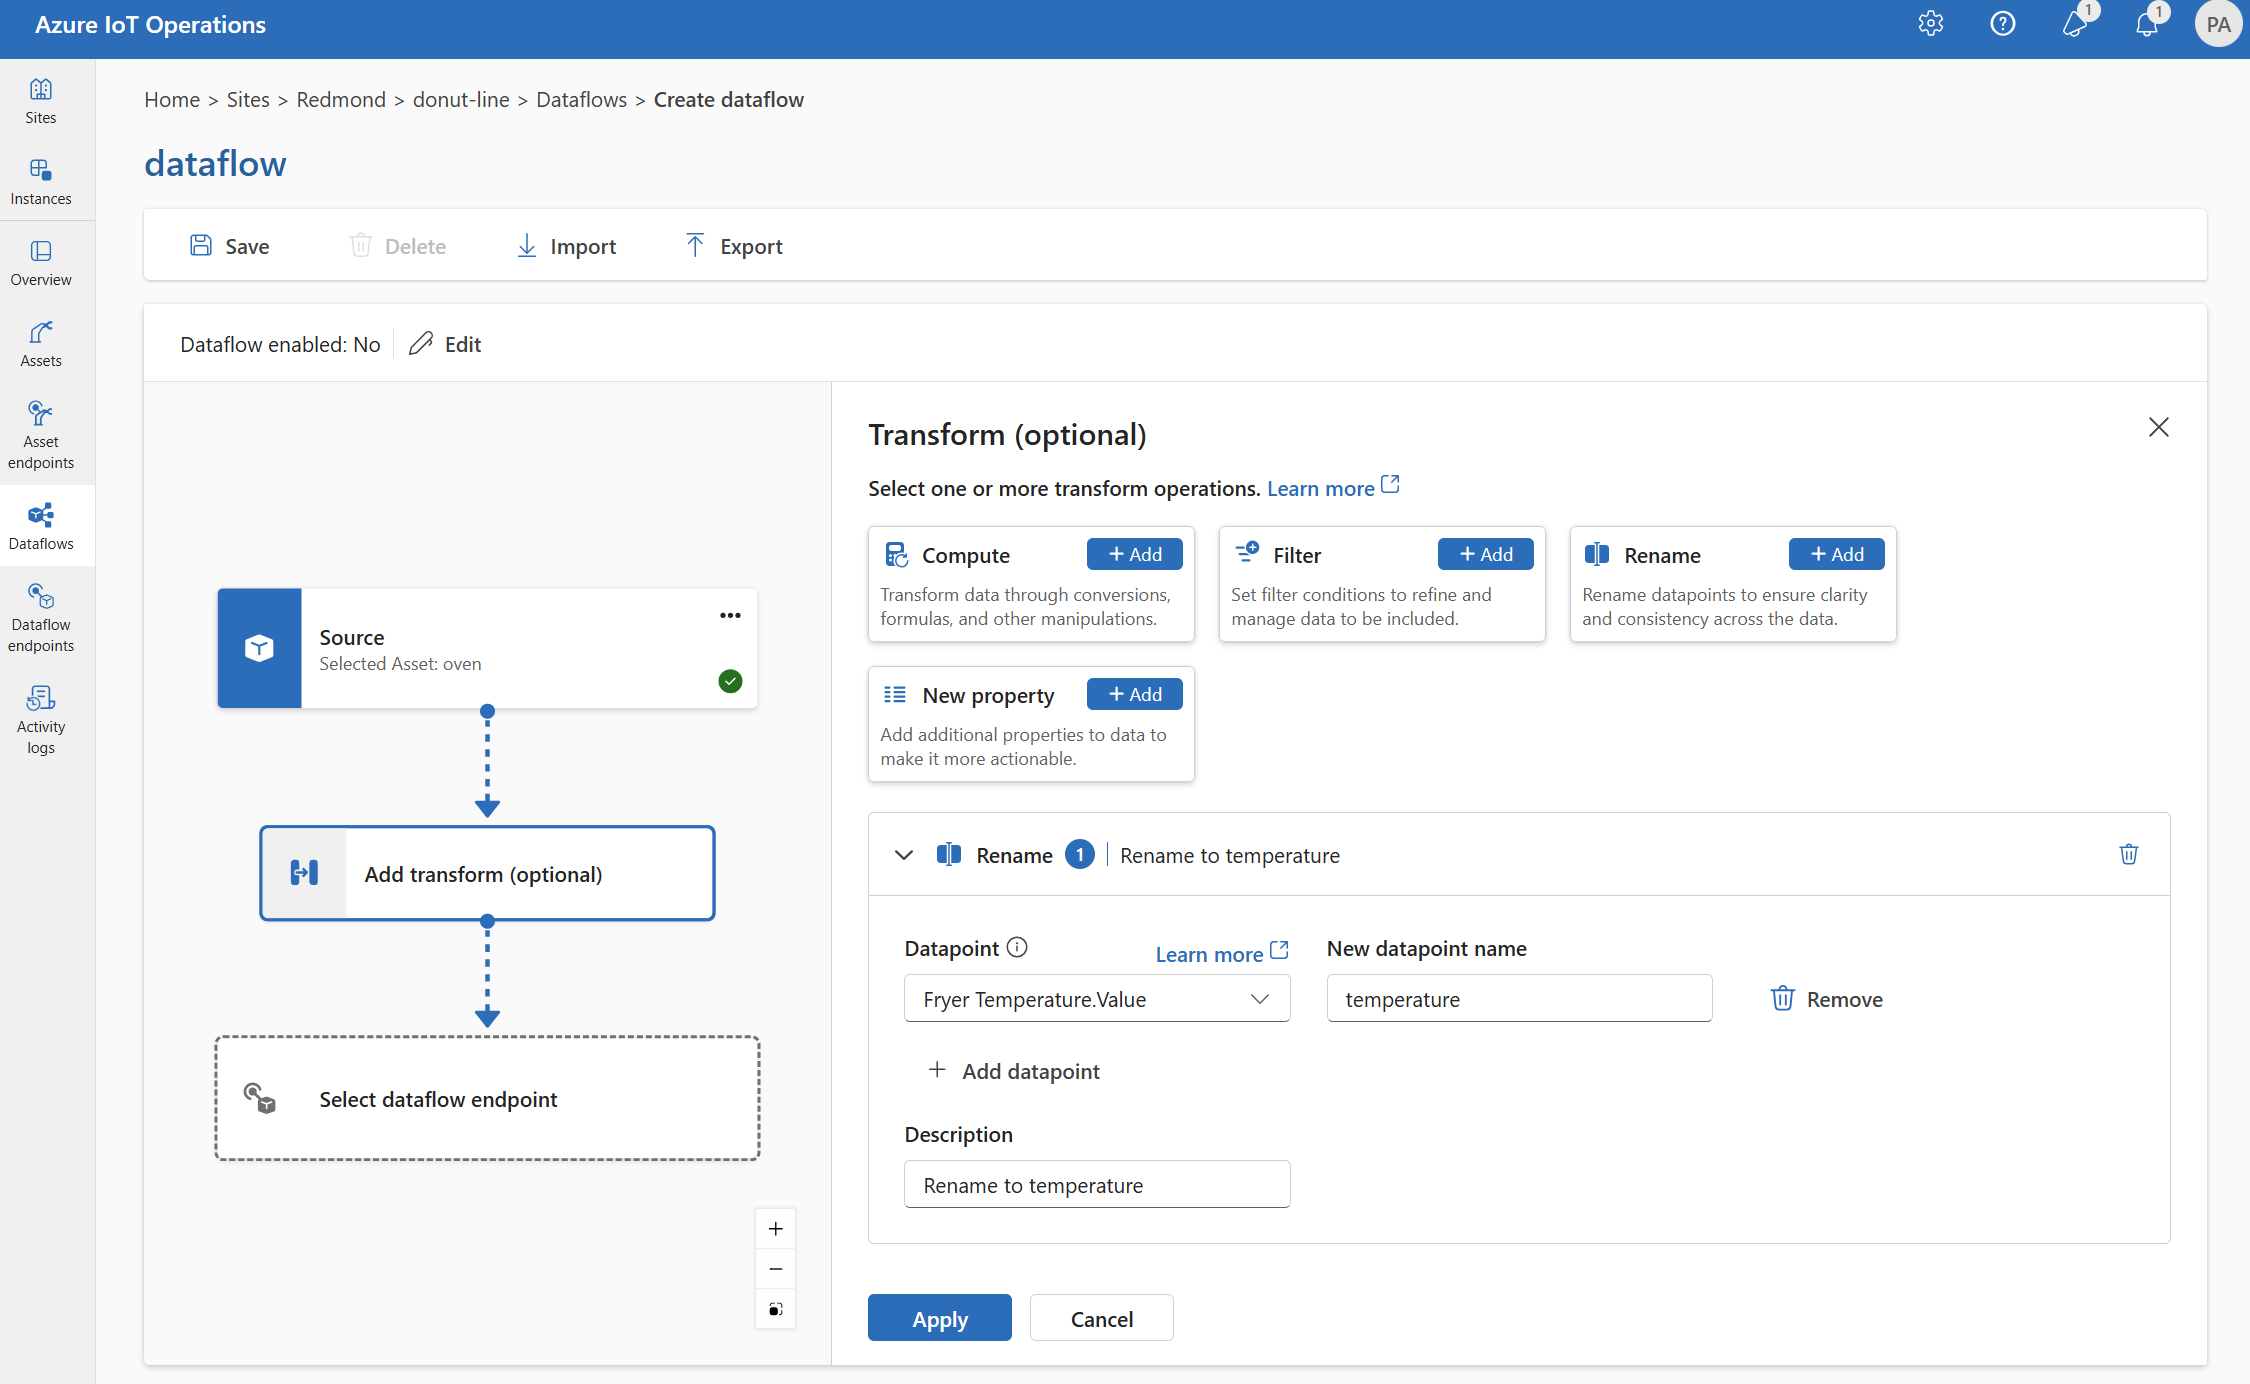
Enter the required settings.
Setting Description Datapoint Select a datapoint from the dropdown or enter a $metadata header. New datapoint name Enter the new name for the datapoint. Description Provide a description for the transformation. You can enter MQTT metadata properties using the format
@$metadata.user_properties.<property>or@$metadata.topic. You can also enter $metadata headers using the format@$metadata.<header>. The$metadatasyntax is only needed for MQTT properties that are part of the message header. For more information, see field references.Select Apply.
New property
You can add a new property to the source data using the New property transform. This operation is used to add a new property to the source data. The new property can be used in the subsequent stages of the data flow.
Under Transform (optional), select New property > Add.
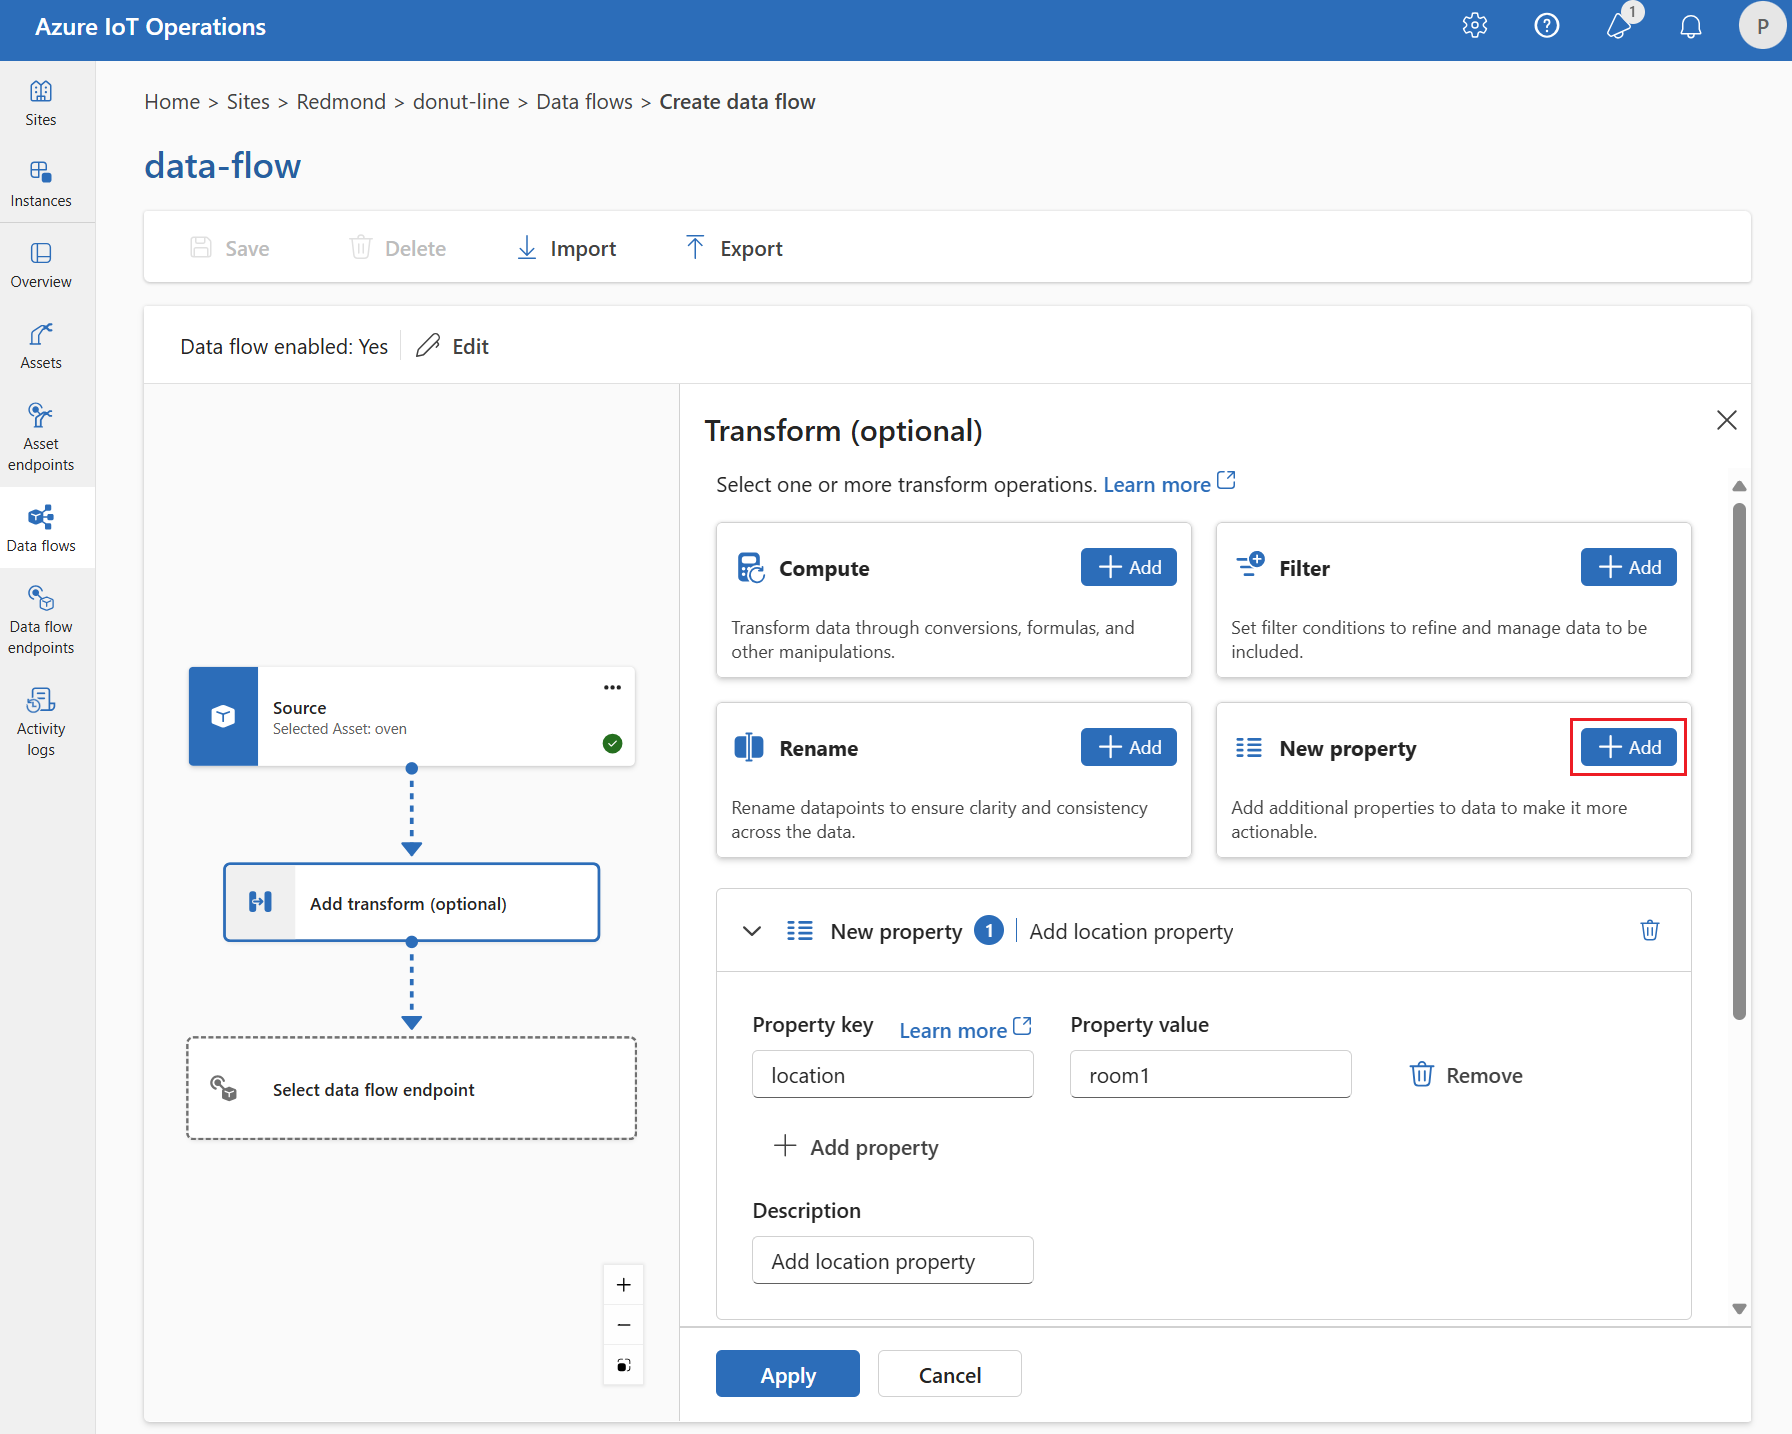
Enter the required settings.
Setting Description Property key Enter the key for the new property. Property value Enter the value for the new property. Description Provide a description for the new property. Select Apply.
To learn more, see Map data by using data flows and Convert data by using data flows.
Serialize data according to a schema
If you want to serialize the data before sending it to the destination, you need to specify a schema and serialization format. Otherwise, the data is serialized in JSON with the types inferred. Storage endpoints like Microsoft Fabric or Azure Data Lake require a schema to ensure data consistency. Supported serialization formats are Parquet and Delta.
Tip
To generate the schema from a sample data file, use the Schema Gen Helper.
For operations experience, you specify the schema and serialization format in the data flow endpoint details. The endpoints that support serialization formats are Microsoft Fabric OneLake, Azure Data Lake Storage Gen 2, Azure Data Explorer, and local storage. For example, to serialize the data in Delta format, you need to upload a schema to the schema registry and reference it in the data flow destination endpoint configuration.
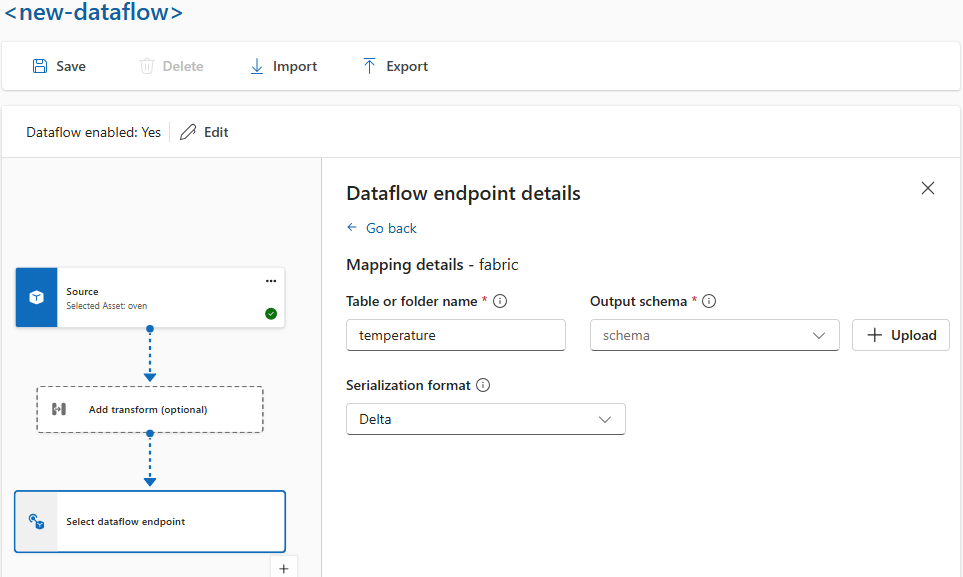
For more information about schema registry, see Understand message schemas.
Destination
To configure a destination for the data flow, specify the endpoint reference and data destination. You can specify a list of data destinations for the endpoint.
To send data to a destination other than the local MQTT broker, create a data flow endpoint. To learn how, see Configure data flow endpoints. If the destination isn't the local MQTT broker, it must be used as a source. To learn more about, see Data flows must use local MQTT broker endpoint.
Important
Storage endpoints require a schema for serialization. To use data flow with Microsoft Fabric OneLake, Azure Data Lake Storage, Azure Data Explorer, or Local Storage, you must specify a schema reference.
Select the data flow endpoint to use as the destination.
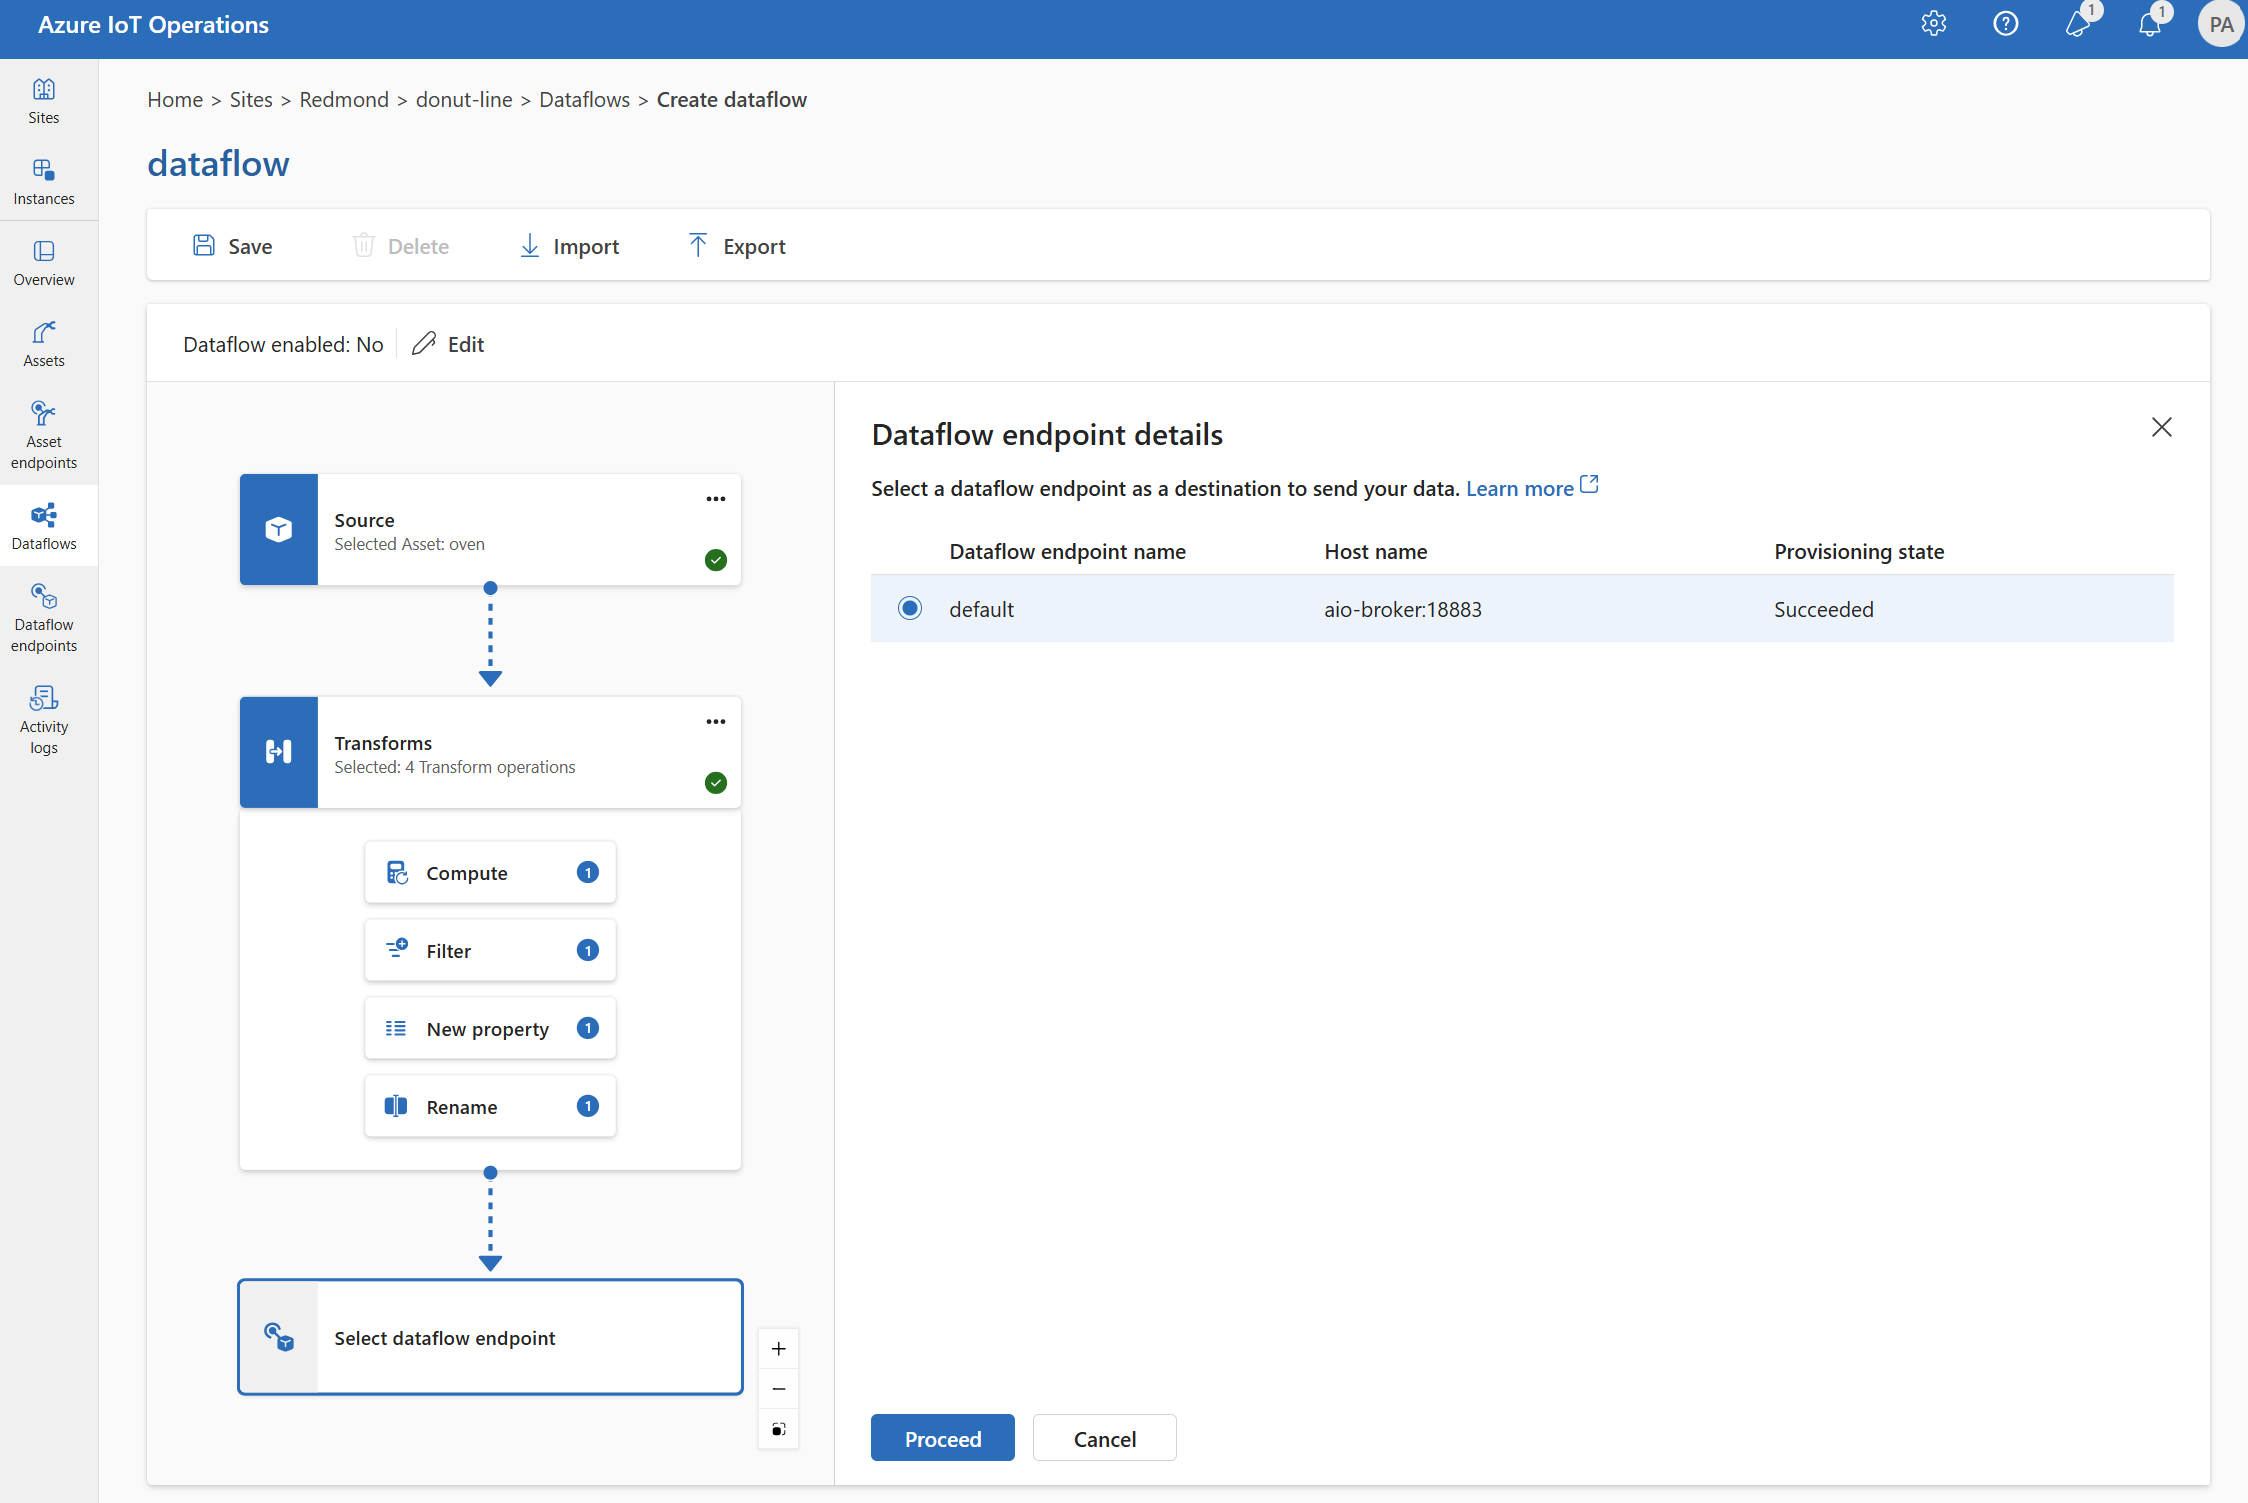
Storage endpoints require a schema for serialization. If you choose a Microsoft Fabric OneLake, Azure Data Lake Storage, Azure Data Explorer, or Local Storage destination endpoint, you must specify a schema reference. For example, to serialize the data to a Microsoft Fabric endpoint in Delta format, you need to upload a schema to the schema registry and reference it in the data flow destination endpoint configuration.
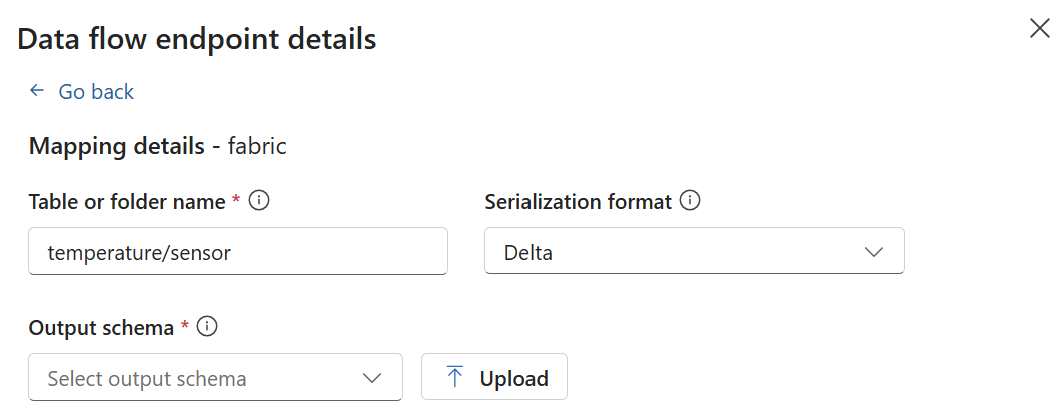
Select Proceed to configure the destination.
Enter the required settings for the destination, including the topic or table to send the data to. See Configure data destination (topic, container, or table) for more information.
Configure data destination (topic, container, or table)
Similar to data sources, data destination is a concept that is used to keep the data flow endpoints reusable across multiple data flows. Essentially, it represents the subdirectory in the data flow endpoint configuration. For example, if the data flow endpoint is a storage endpoint, the data destination is the table in the storage account. If the data flow endpoint is a Kafka endpoint, the data destination is the Kafka topic.
| Endpoint type | Data destination meaning | Description |
|---|---|---|
| MQTT (or Event Grid) | Topic | The MQTT topic where the data is sent. Only static topics are supported, no wildcards. |
| Kafka (or Event Hubs) | Topic | The Kafka topic where the data is sent. Only static topics are supported, no wildcards. If the endpoint is an Event Hubs namespace, the data destination is the individual event hub within the namespace. |
| Azure Data Lake Storage | Container | The container in the storage account. Not the table. |
| Microsoft Fabric OneLake | Table or Folder | Corresponds to the configured path type for the endpoint. |
| Azure Data Explorer | Table | The table in the Azure Data Explorer database. |
| Local Storage | Folder | The folder or directory name in the local storage persistent volume mount. When using Azure Container Storage enabled by Azure Arc Cloud Ingest Edge Volumes, this must match the spec.path parameter for the subvolume you created. |
To configure the data destination:
When using the operations experience, the data destination field is automatically interpreted based on the endpoint type. For example, if the data flow endpoint is a storage endpoint, the destination details page prompts you to enter the container name. If the data flow endpoint is an MQTT endpoint, the destination details page prompts you to enter the topic, and so on.
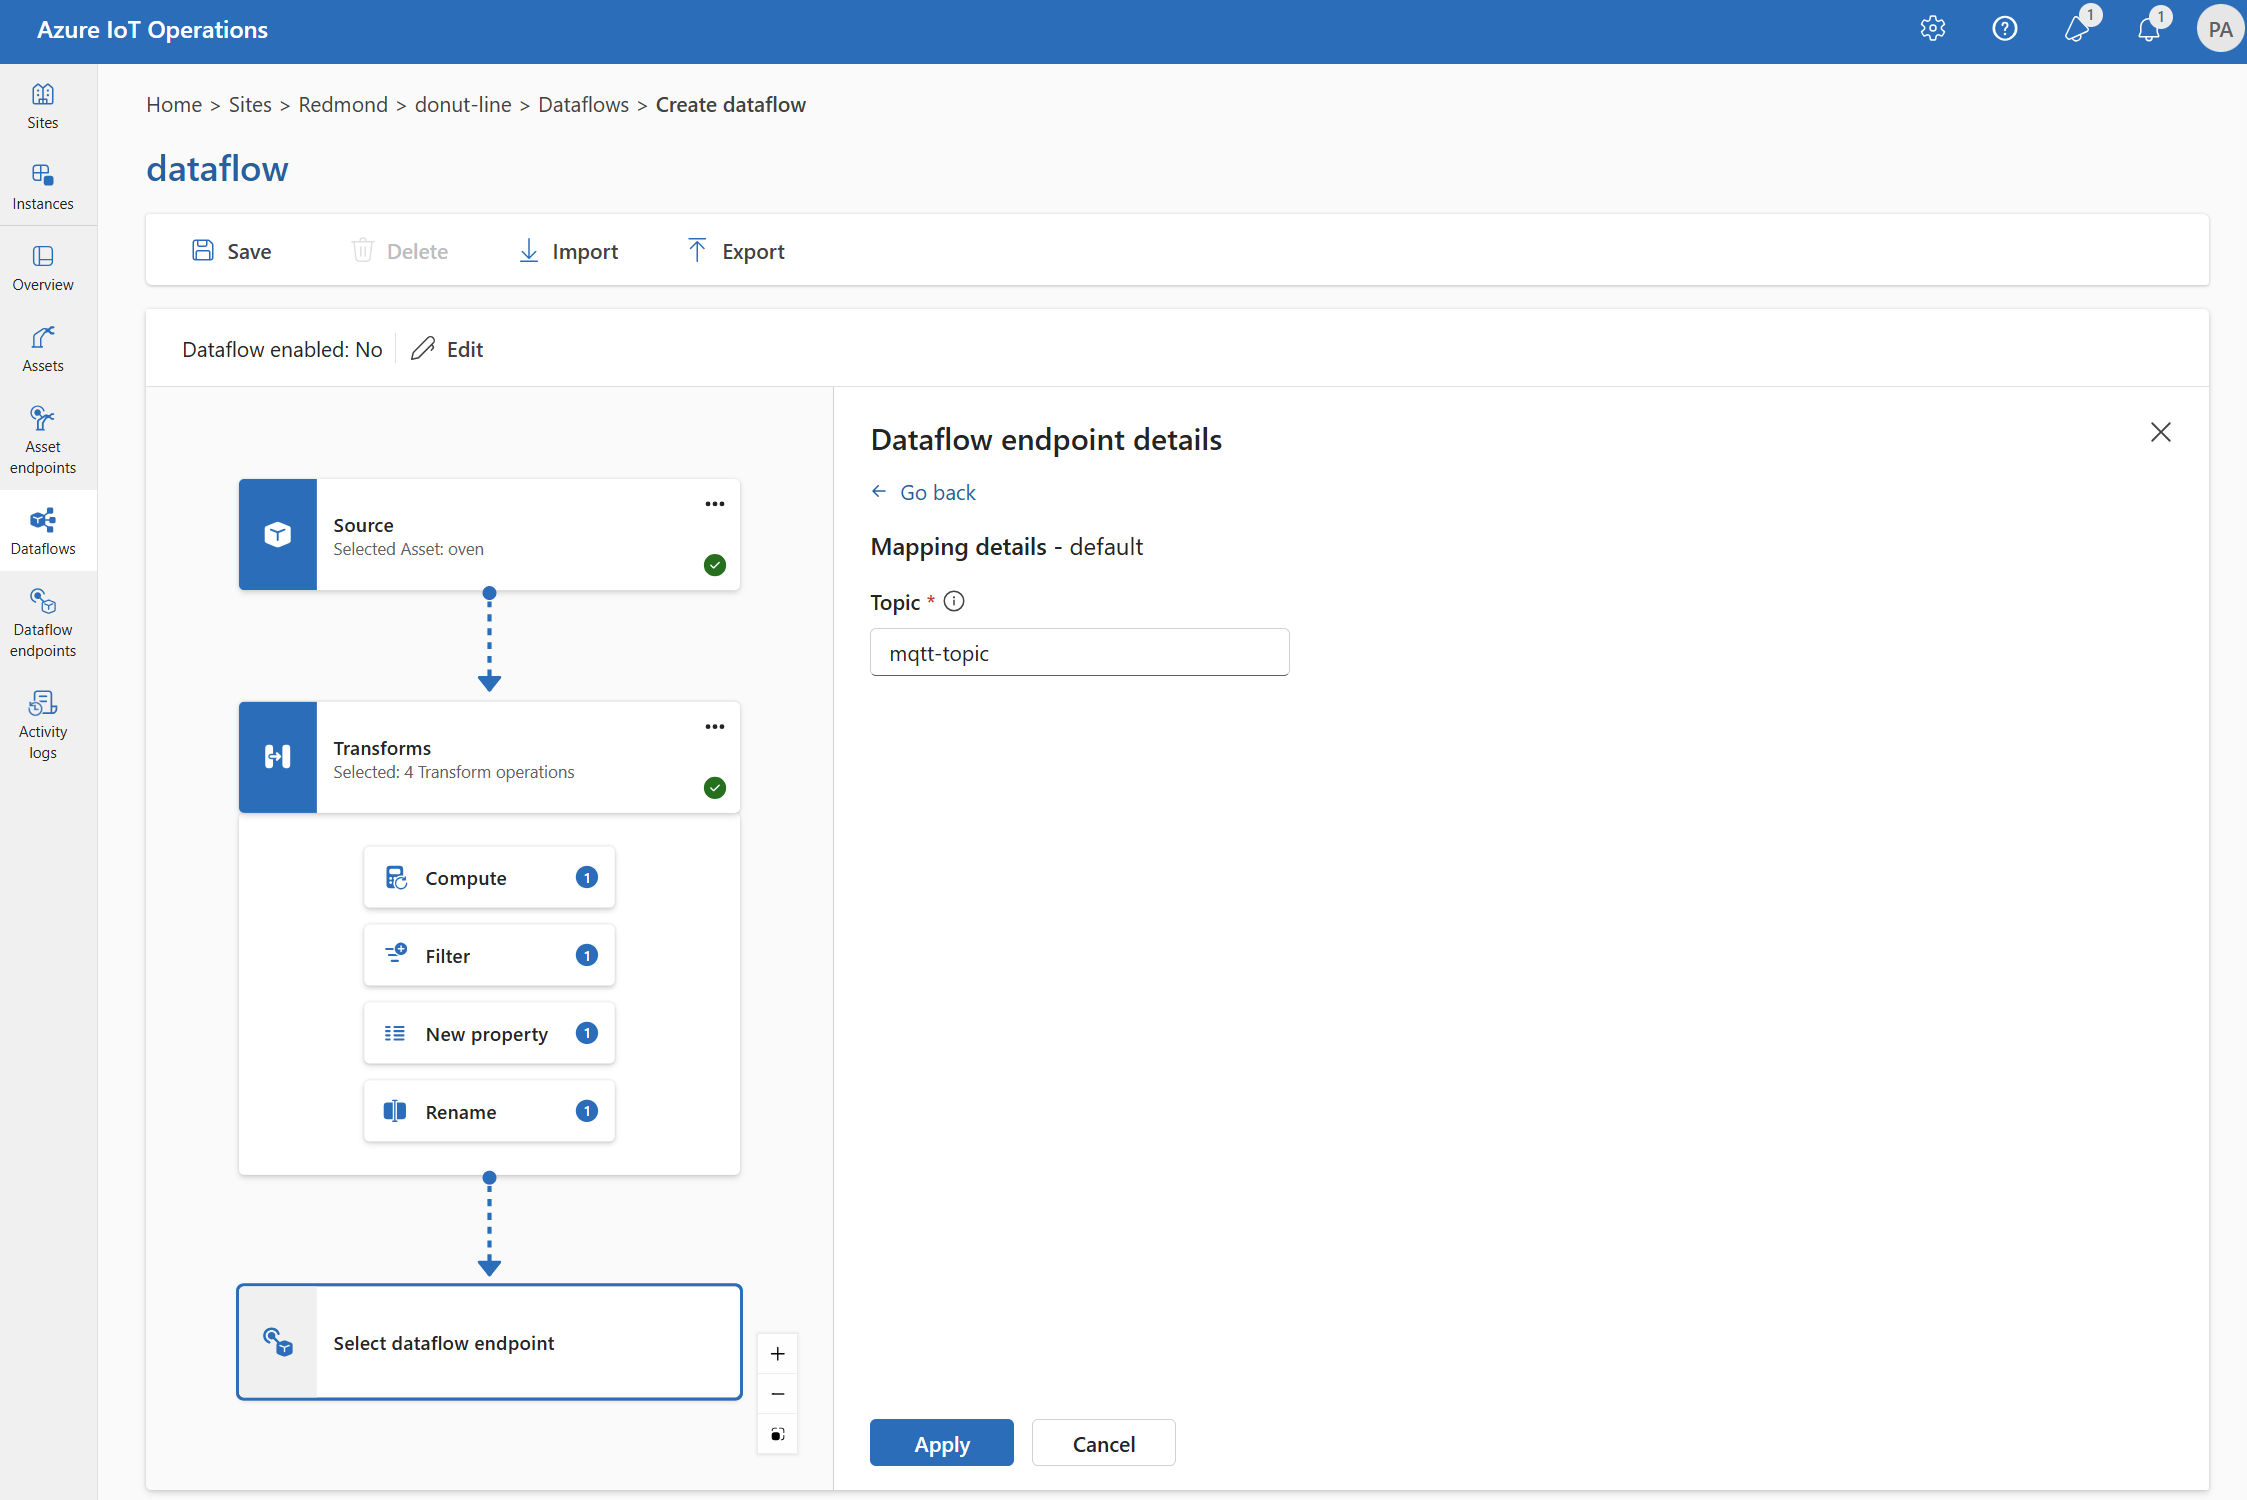
Example
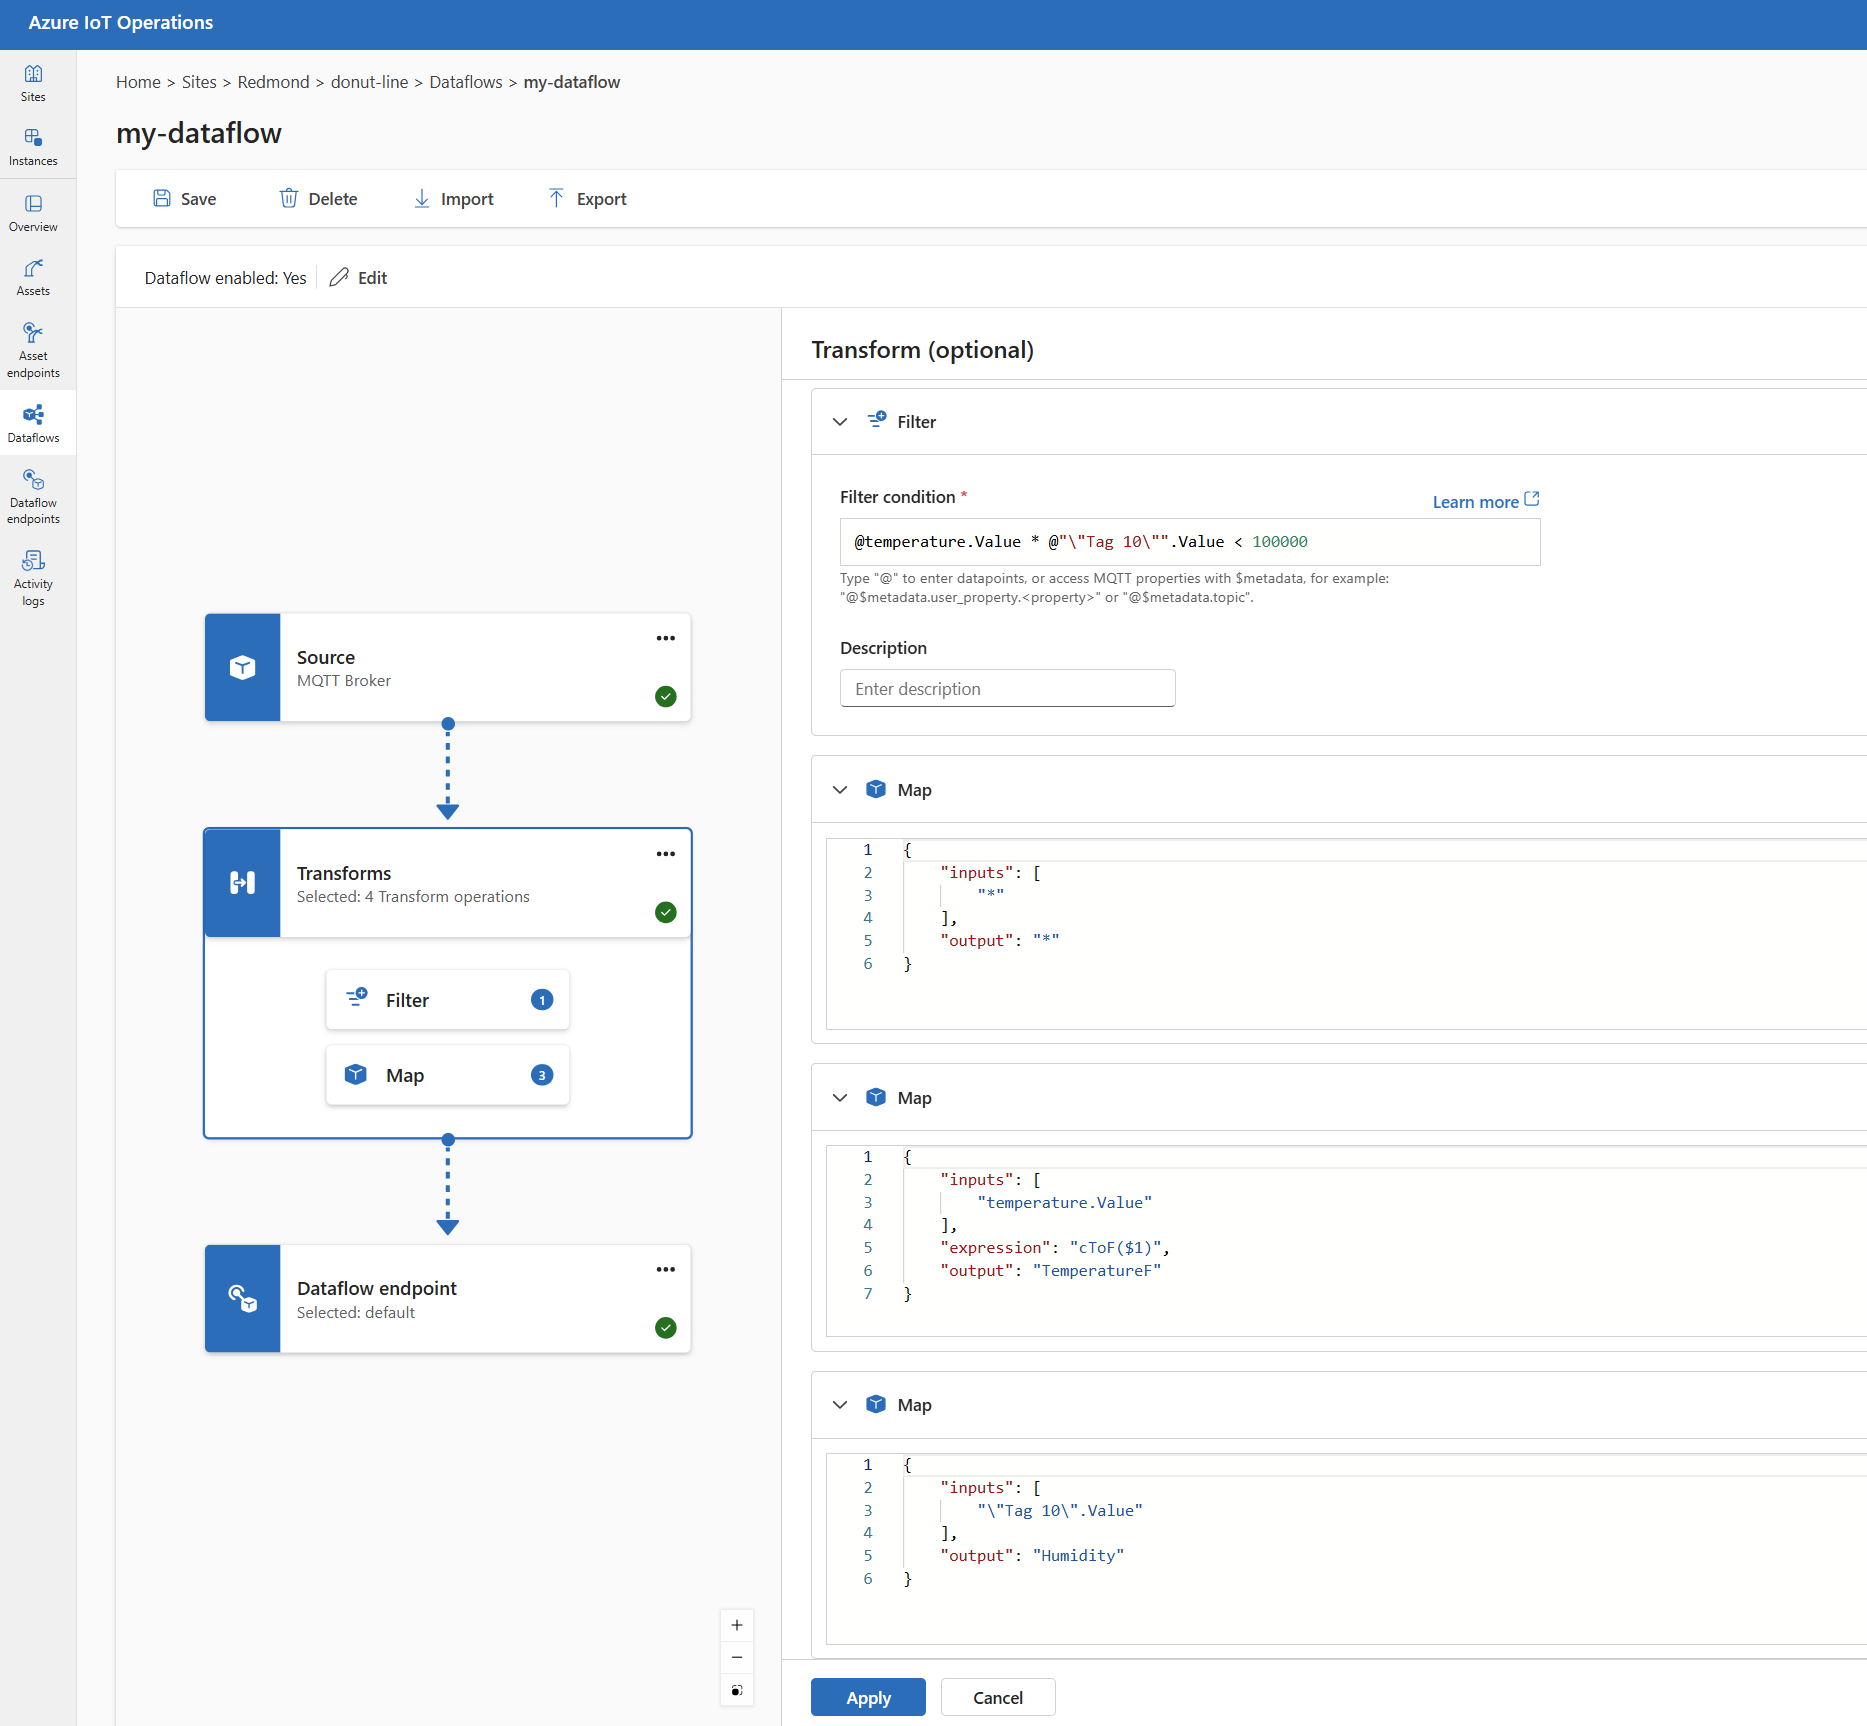
The following example is a data flow configuration that uses the MQTT endpoint for the source and destination. The source filters the data from the MQTT topic azure-iot-operations/data/thermostat. The transformation converts the temperature to Fahrenheit and filters the data where the temperature multiplied by the humidity is less than 100000. The destination sends the data to the MQTT topic factory.
To see more examples of data flow configurations, see Azure REST API - Data flow and the quickstart Bicep.
Verify a data flow is working
Follow Tutorial: Bi-directional MQTT bridge to Azure Event Grid to verify the data flow is working.
Export data flow configuration
To export the data flow configuration, you can use the operations experience or by exporting the Data flow custom resource.
Select the data flow you want to export and select Export from the toolbar.

Proper data flow configuration
To ensure the data flow is working as expected, verify the following:
- The default MQTT data flow endpoint must be used as either the source or destination.
- The data flow profile exists and is referenced in the data flow configuration.
- Source is either an MQTT endpoint, Kafka endpoint, or an asset. Storage type endpoints can't be used as a source.
- When using Event Grid as the source, the dataflow profile instance count is set to 1 because Event Grid MQTT broker doesn't support shared subscriptions.
- When using Event Hubs as the source, each event hub in the namespace is a separate Kafka topic and must be specified as the data source.
- Transformation, if used, is configured with proper syntax, including proper escaping of special characters.
- When using storage type endpoints as destination, a schema is specified.
