Use Visual Studio 2022 to develop and debug modules for Azure IoT Edge
Applies to: ![]() IoT Edge 1.5
IoT Edge 1.5
Important
IoT Edge 1.5 LTS is the supported release. IoT Edge 1.4 LTS is end of life as of November 12, 2024. If you are on an earlier release, see Update IoT Edge.
This article shows you how to use Visual Studio 2022 to develop, debug, and deploy custom Azure IoT Edge modules. Visual Studio 2022 provides templates for IoT Edge modules written in C and C#. The supported device architectures are Windows x64, Linux x64, ARM32, and ARM64 (preview). For more information about supported operating systems, languages, and architectures, see Language and architecture support.
This article includes steps for two IoT Edge development tools.
- Command line interface (CLI) is the preferred tool for development.
- Azure IoT Edge tools for Visual Studio extension. The extension is in maintenance mode.
Use the tool selector button at the beginning to choose your tool option for this article. Both tools provide the following benefits:
- Create, edit, build, run, and debug IoT Edge solutions and modules on your local development computer.
- Code your Azure IoT modules in C or C# with the benefits of Visual Studio development.
- Deploy your IoT Edge solution to an IoT Edge device via Azure IoT Hub.
Prerequisites
This article assumes that you use a machine running Windows as your development machine.
Install or modify Visual Studio 2022 on your development machine. Choose the Azure development and Desktop development with C++ workloads options.
Download and install Azure IoT Edge Tools from the Visual Studio Marketplace. You can use the Azure IoT Edge Tools extension to create and build your IoT Edge solution. The preferred development tool is the command-line (CLI) Azure IoT Edge Dev Tool. The extension includes the Azure IoT Edge project templates used create the Visual Studio project. Currently, you need the extension installed regardless of the development tool you use.
Important
The Azure IoT Edge Tools for VS 2022 extension is in maintenance mode. The preferred development tool is the command-line (CLI) Azure IoT Edge Dev Tool.
Tip
If you are using Visual Studio 2019, download and install Azure IoT Edge Tools for VS 2019 from the Visual Studio marketplace.
Install the Vcpkg library manager
git clone https://github.com/Microsoft/vcpkg
cd vcpkg
bootstrap-vcpkg.bat
Install the azure-iot-sdk-c package for Windows
vcpkg.exe install azure-iot-sdk-c:x64-windows
vcpkg.exe --triplet x64-windows integrate install
Download and install a Docker compatible container management system on your development machine to build and run your module images. For example, install Docker Community Edition.
To develop modules with Linux containers, use a Windows computer that meets the requirements for Docker Desktop.
Create an Azure Container Registry or Docker Hub to store your module images.
Tip
You can use a local Docker registry for prototype and testing purposes instead of a cloud registry.
Install the Azure CLI.
To test your module on a device, you need an active IoT Hub with at least one IoT Edge device. To create an IoT Edge device for testing, you can create one in the Azure portal or with the CLI:
Creating one in the Azure portal is the quickest. From the Azure portal, go to your IoT Hub resource. Select Devices under the Device management menu and then select Add Device.
In Create a device,name your device using Device ID, check IoT Edge Device, then select Save in the lower left.
Finally, confirm that your new device exists in your IoT Hub, from the Device management > Devices menu. For more information on creating an IoT Edge device through the Azure portal, read Create and provision an IoT Edge device on Linux using symmetric keys.
To create an IoT Edge device with the CLI, follow the steps in the quickstart for Linux or Windows. In the process of registering an IoT Edge device, you create an IoT Edge device.
If you're running the IoT Edge daemon on your development machine, you might need to stop EdgeHub and EdgeAgent before you start development in Visual Studio.
Create an Azure IoT Edge project
The IoT Edge project template in Visual Studio creates a solution to deploy to IoT Edge devices. First, you create an Azure IoT Edge solution. Then, you create a module in that solution. Each IoT Edge solution can contain more than one module.
Warning
The Azure IoT Edge tools for Visual Studio extension is missing the project templates for C and C# modules. We are working to resolve the issue. If you can't create IoT Edge modules using the extension, use the following workaround.
Download the following files and place them in the listed Visual Studio template directory:
| Template file | Add to directory |
|---|---|
| azureiotedgemodule-v0.0.4.zip | %userprofile%\Documents\Visual Studio 2022\Templates\ProjectTemplates\Visual C# |
| azureiotedgevcmodulevs17-v0.0.9.zip | %userprofile%\Documents\Visual Studio 2022\Templates\ProjectTemplates\Visual C++ Project |
In our solution, we're going to build three projects. The main module that contains EdgeAgent and EdgeHub, in addition to the temperature sensor module. Next, you add two more IoT Edge modules.
Important
The IoT Edge project structure created by Visual Studio isn't the same as the one in Visual Studio Code.
Currently, the Azure IoT Edge Dev Tool CLI doesn't support creating the Visual Studio project type. You need to use the Visual Studio IoT Edge extension to create the Visual Studio project.
In Visual Studio, create a new project.
In Create a new project, search for Azure IoT Edge. Select the project that matches the platform and architecture for your IoT Edge device, and select Next.
In Configure your new project, enter a name for your project, specify the location, and select Create.
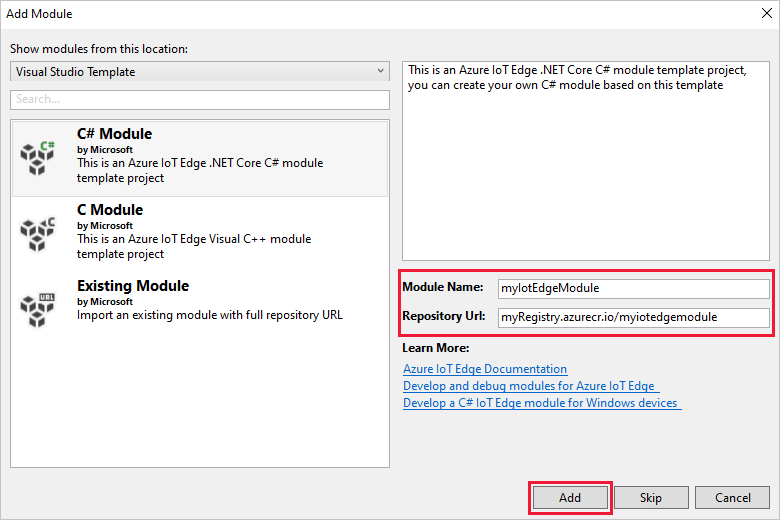
In Add Module, select the type of module you want to develop. If you have an existing module you want to add to your deployment, select Existing module.
In Module Name, enter a name for your module. Choose a name that's unique within your container registry.
In Repository Url, provide the name of the module's image repository. Visual Studio autopopulates the module name with localhost:5000/<your module name>. Replace it with your own registry information. Use localhost if you use a local Docker registry for testing. If you use Azure Container Registry, then use the login server from your registry's settings. The login server looks like <registry name>.azurecr.io. Only replace the localhost:5000 part of the string so that the final result looks like <registry name>.azurecr.io/<your module name>.
Select Add to add your module to the project.
Note
If you have an existing IoT Edge project, you can change the repository URL by opening the module.json file. The repository URL is located in the repository property of the JSON file.
Now, you have an IoT Edge project and an IoT Edge module in your Visual Studio solution.
Project structure
In your solution, there are two project level folders including a main project folder and a single module folder. For example, you may have a main project folder named AzureIotEdgeApp1 and a module folder named IotEdgeModule1. The main project folder contains your deployment manifest.
The module project folder contains a file for your module code named either Program.cs or main.c depending on the language you chose. This folder also contains a file named module.json that describes the metadata of your module. Various Docker files included here provide the information needed to build your module as a Windows or Linux container.
Deployment manifest of your project
The deployment manifest you edit is named deployment.debug.template.json. This file is a template of an IoT Edge deployment manifest that defines all the modules that run on a device along with how they communicate with each other. For more information about deployment manifests, see Learn how to deploy modules and establish routes.
If you open this deployment template, you see that the two runtime modules, edgeAgent and edgeHub are included, along with the custom module that you created in this Visual Studio project. A fourth module named SimulatedTemperatureSensor is also included. This default module generates simulated data that you can use to test your modules, or delete if it's not necessary. To see how the simulated temperature sensor works, view the SimulatedTemperatureSensor.csproj source code.
Set IoT Edge runtime version
Currently, the latest stable runtime version is 1.5. You should update the IoT Edge runtime version to the latest stable release or the version you want to target for your devices.
In the Solution Explorer, right-click the name of your main project and select Set IoT Edge runtime version.
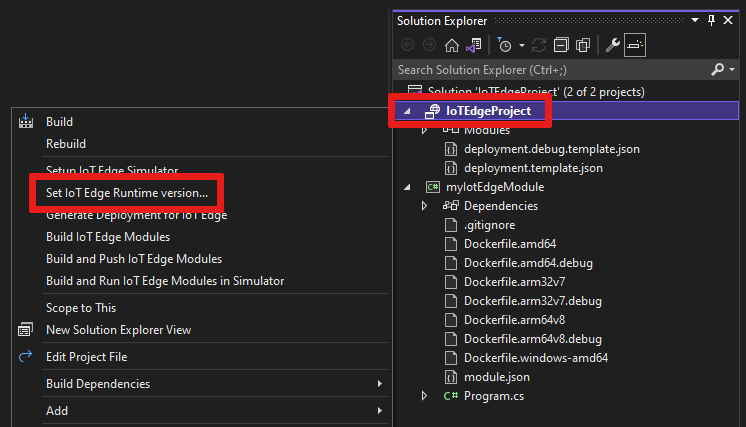
Use the drop-down menu to choose the runtime version that your IoT Edge devices are running, then select OK to save your changes. If no change was made, select Cancel to exit.
Currently, the extension doesn't include a selection for the latest runtime versions. If you want to set the runtime version higher than 1.2, open deployment.debug.template.json deployment manifest file. Change the runtime version for the system runtime module images edgeAgent and edgeHub. For example, if you want to use the IoT Edge runtime version 1.5, change the following lines in the deployment manifest file:
"systemModules": {
   "edgeAgent": {
    //...
      "image": "mcr.microsoft.com/azureiotedge-agent:1.5"
    //...
   "edgeHub": {
   //...
      "image": "mcr.microsoft.com/azureiotedge-hub:1.5",
   //...
If you changed the version, regenerate your deployment manifest by right-clicking the name of your project and select Generate deployment for IoT Edge. This generates a deployment manifest based on your deployment template and appears in the config folder of your Visual Studio project.
Open deployment.debug.template.json deployment manifest file. The deployment manifest is a JSON document that describes the modules to be configured on the targeted IoT Edge device.
Change the runtime version for the system runtime module images edgeAgent and edgeHub. For example, if you want to use the IoT Edge runtime version 1.5, change the following lines in the deployment manifest file:
"systemModules": {
    "edgeAgent": {
    //...
        "image": "mcr.microsoft.com/azureiotedge-agent:1.5",
    //...
    "edgeHub": {
    //...
        "image": "mcr.microsoft.com/azureiotedge-hub:1.5",
    //...
Module infrastructure & development options
When you add a new module, it comes with default code that is ready to be built and deployed to a device so that you can start testing without touching any code. The module code is located within the module folder in a file named Program.cs (for C#) or main.c (for C).
The default solution is built so that the simulated data from the SimulatedTemperatureSensor module is routed to your module, which takes the input and then sends it to IoT Hub.
When you're ready to customize the module template with your own code, use the Azure IoT Hub SDKs to build modules that address the key needs for IoT solutions such as security, device management, and reliability.
Debug using the simulator
The Azure IoT EdgeHub Dev Tool provides a local development and debug experience. The tool helps start IoT Edge modules without the IoT Edge runtime so that you can create, develop, test, run, and debug IoT Edge modules and solutions locally. You don't have to push images to a container registry and deploy them to a device for testing.
For more information, see Azure IoT EdgeHub Dev Tool.
To initialize the tool in Visual Studio:
Retrieve the connection string of your IoT Edge device (found in your IoT Hub) from the Azure portal or from the Azure CLI.
If using the CLI to retrieve your connection string, use this command, replacing "[device_id]" and "[hub_name]" with your own values:
az iot hub device-identity connection-string show --device-id [device_id] --hub-name [hub_name]From the Tools menu in Visual Studio, select Azure IoT Edge Tools > Setup IoT Edge Simulator.
Paste the connection string and select OK.
Note
You need to follow these steps only once on your development computer as the results are automatically applied to all subsequent Azure IoT Edge solutions. This procedure can be followed again if you need to change to a different connection string.
Build and debug a single module
Typically, you want to test and debug each module before running it within an entire solution with multiple modules. The IoT Edge simulator tool allows you to run a single module in isolation a send messages over port 53000.
In Solution Explorer, select and highlight the module project folder (for example, IotEdgeModule1). Set the custom module as the startup project. Select Project > Set as StartUp Project from the menu.
Press F5 or select the run toolbar button to start the IoT Edge simulator for a single module. It may take 10 to 20 seconds the initially.

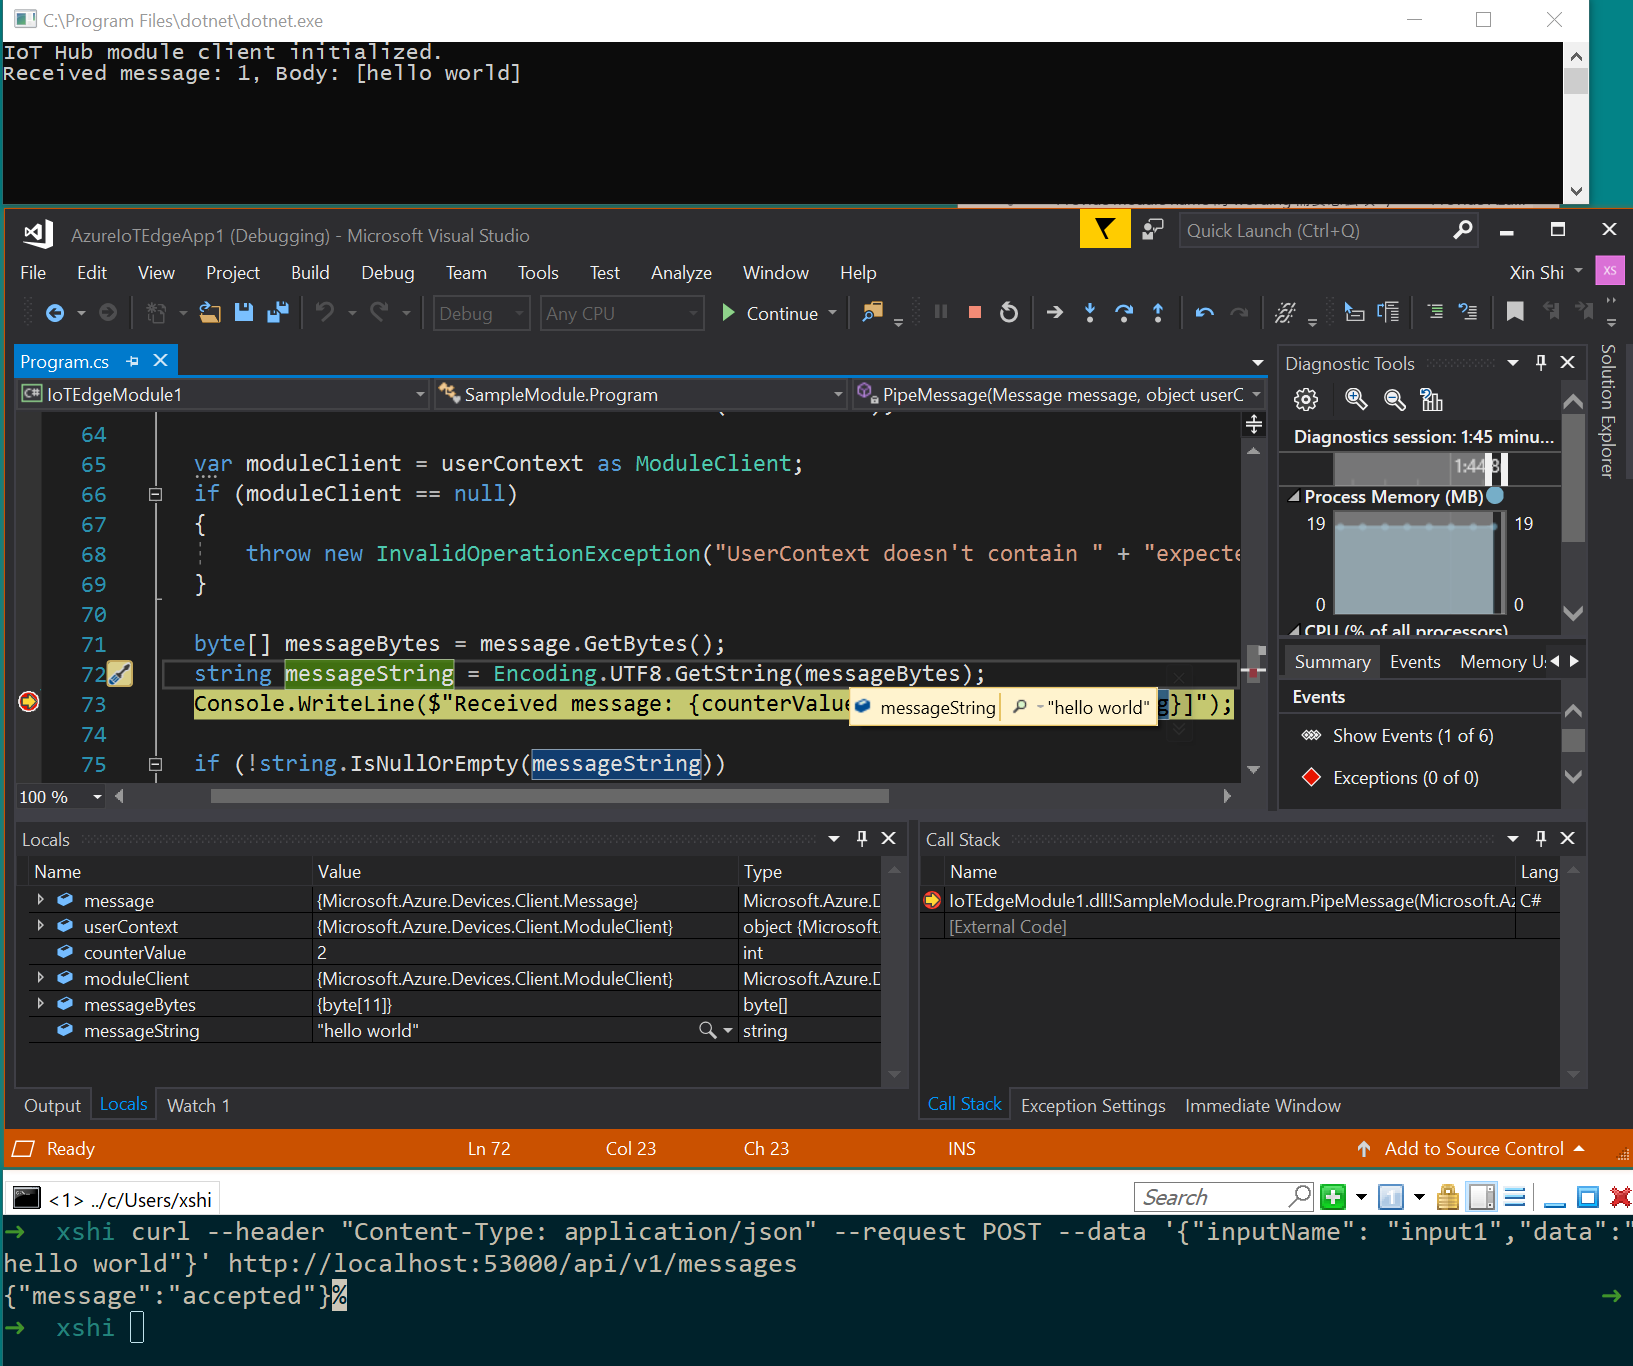
You should see a .NET Core console app window appear if the module has been initialized successfully.
Set a breakpoint to inspect the module.
- If developing in C#, set a breakpoint in the
PipeMessage()function in ModuleBackgroundService.cs. - If using C, set a breakpoint in the
InputQueue1Callback()function in main.c.
- If developing in C#, set a breakpoint in the
Test the module by sending a message. When you're debugging a single module, the simulator listens on the default port 53000 for messages. To send a message to your module, run the following curl command from a command shell like Git Bash or WSL Bash.
curl --header "Content-Type: application/json" --request POST --data '{"inputName": "input1","data":"hello world"}' http://localhost:53000/api/v1/messagesIf you get the error unmatched close brace/bracket in URL, try the following command instead:
curl --header "Content-Type: application/json" --request POST --data "{\"inputName\": \"input1\", \"data\", \"hello world\"}" http://localhost:53000/api/v1/messagesThe breakpoint should be triggered. You can watch variables in the Visual Studio Locals window, found when the debugger is running. Go to Debug > Windows > Locals.
In your Bash or shell, you should see a
{"message":"accepted"}confirmation.In your .NET console you should see:
IoT Hub module client initialized.
Received message: 1, Body: [hello world]
Press Ctrl + F5 or select the stop button to stop debugging.
Build and debug multiple modules
After you're done developing a single module, you might want to run and debug an entire solution with multiple modules. The IoT Edge simulator tool allows you to run all modules defined in the deployment manifest including a simulated edgeHub for message routing. In this example, you run two custom modules and the simulated temperature sensor module. Messages from the simulated temperature sensor module are routed to each custom module.
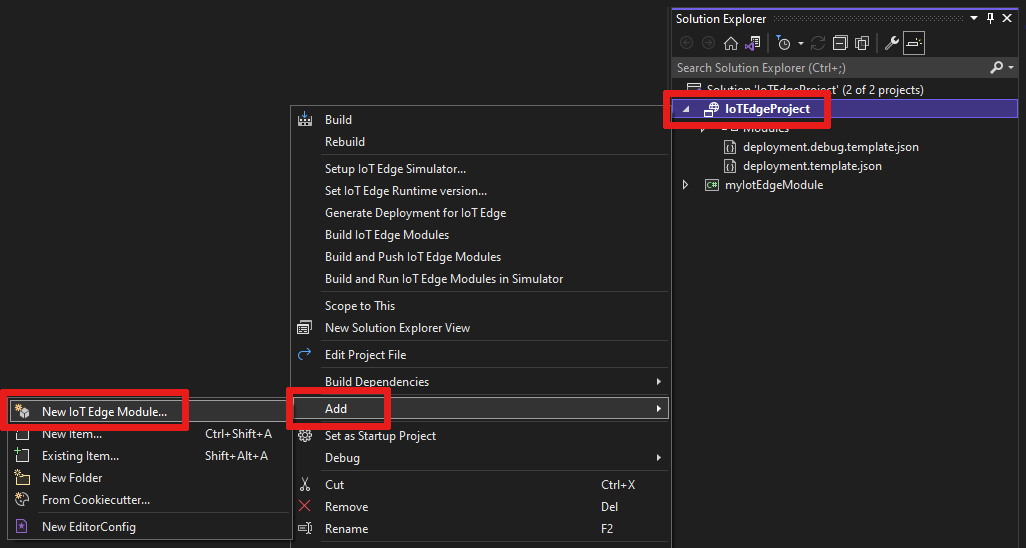
In Solution Explorer, add a second module to the solution by right-clicking the main project folder. On the menu, select Add > New IoT Edge Module.
In the
Add modulewindow give your new module a name and replace thelocalhost:5000portion of the repository URL with your Azure Container Registry login server, like you did before.Open the file
deployment.debug.template.jsonto see that the new module has been added in the modules section. A new route was also added to the routes section inEdgeHubto send messages from the new module to IoT Hub. To send data from the simulated temperature sensor to the new module, add another route with the following line ofJSON. Replace<NewModuleName>(in two places) with your own module name."sensorTo<NewModuleName>": "FROM /messages/modules/SimulatedTemperatureSensor/outputs/temperatureOutput INTO BrokeredEndpoint(\"/modules/<NewModuleName>/inputs/input1\")"Right-click the main project (for example, AzureIotEdgeApp1) and select Set as StartUp Project. By setting the main project as the startup project, all modules in the solution run. This includes both modules you added to the solution, the simulated temperature sensor module, and the simulated Edge hub.
Press F5 or select the run toolbar button to run the solution. It may take 10 to 20 seconds initially. Be sure you don't have other Docker containers running that might bind the port you need for this project.
You should see two .NET Core console app windows appear one for each module.
Set a breakpoint to inspect the modules.
- If developing in C#, set a breakpoint in the
PipeMessage()function in ModuleBackgroundService.cs. - If using C, set a breakpoint in the
InputQueue1Callback()function in main.c.
- If developing in C#, set a breakpoint in the
Create breakpoints in each module and then press F5 to run and debug multiple modules simultaneously. You should see multiple .NET Core console app windows, with each window representing a different module.
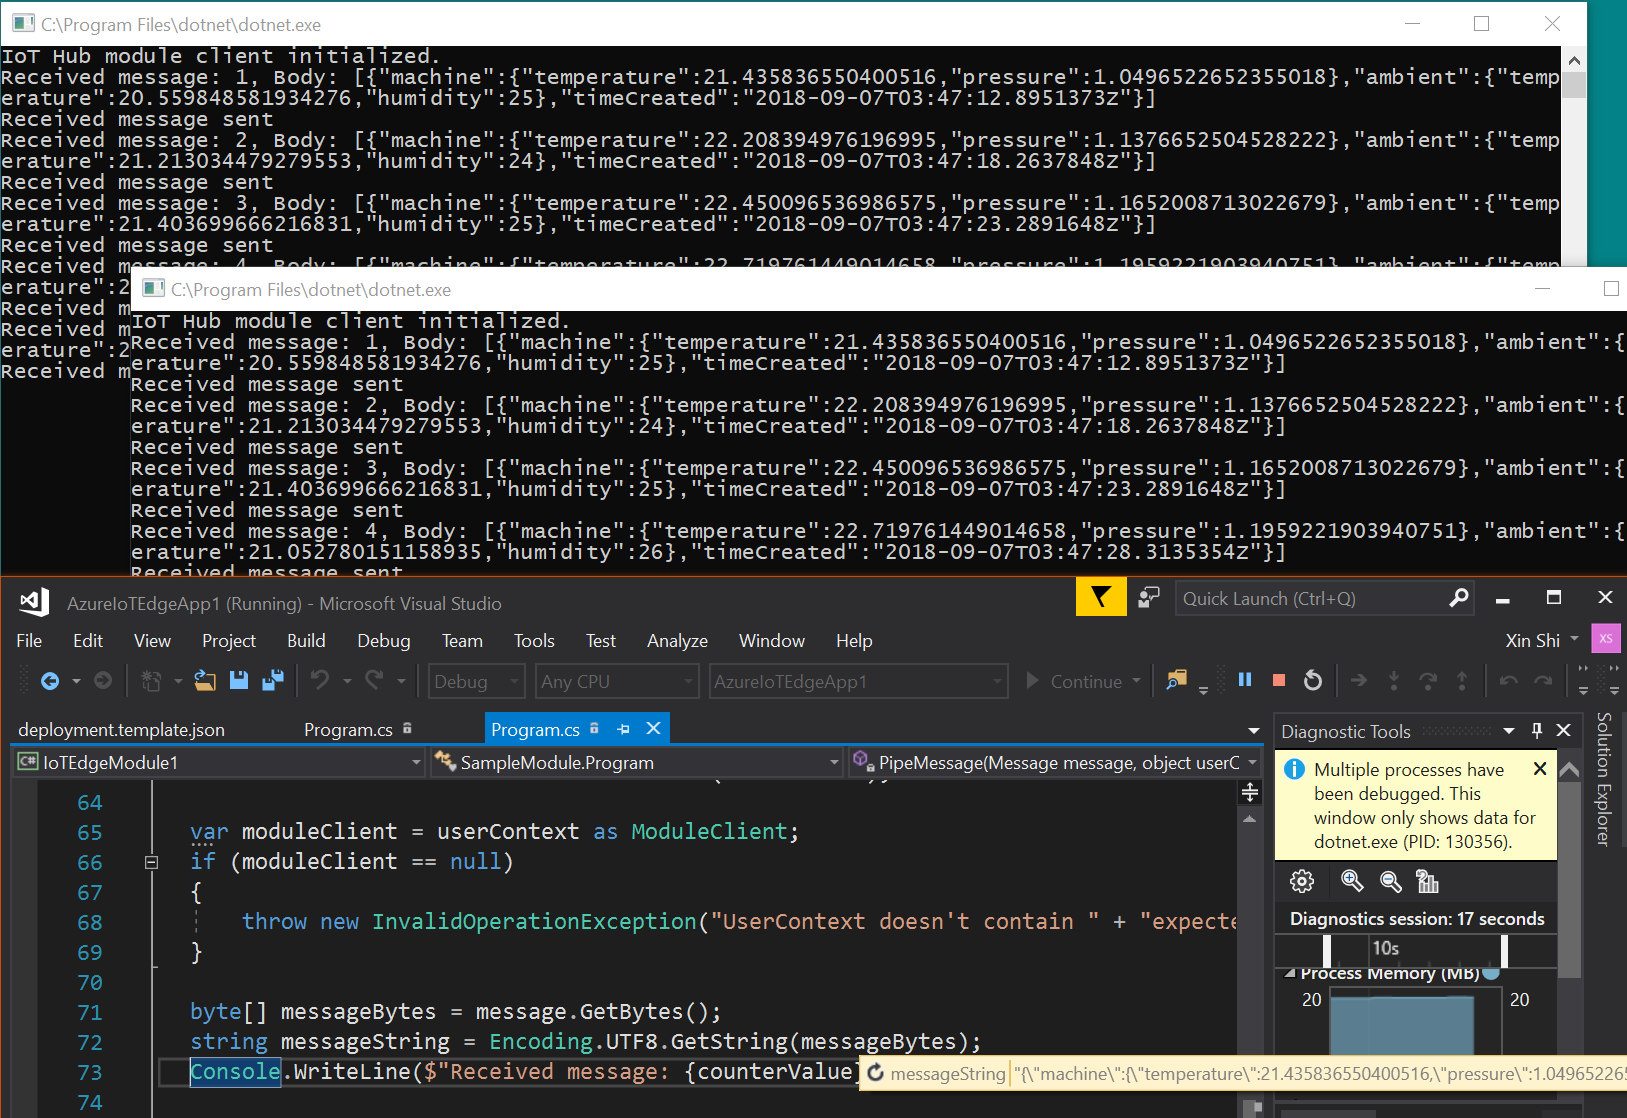
Press Ctrl + F5 or select the stop button to stop debugging.
Build and push images to registry
Once you've developed and debugged your module, you can build and push the module image to your Azure Container Registry. You can then deploy the module to your IoT Edge device.
Set the main IoT Edge project as the start-up project, not one of the individual modules.
Select either Debug or Release as the configuration to build for your module images.
Note
When choosing Debug, Visual Studio uses
Dockerfile.(amd64|windows-amd64).debugto build Docker images. This includes the .NET Core command-line debugger VSDBG in your container image while building it. For production-ready IoT Edge modules, we recommend that you use the Release configuration, which usesDockerfile.(amd64|windows-amd64)without VSDBG.If you're using a private registry like Azure Container Registry (ACR), use the following Docker command to sign in to it. You can get the username and password from the Access keys page of your registry in the Azure portal.
docker login <ACR login server>Let's add the Azure Container Registry login information to the runtime settings found in the file
deployment.debug.template.json. There are two ways to do this. You can either add your registry credentials to your.envfile (most secure) or add them directly to yourdeployment.debug.template.jsonfile.Add credentials to your
.envfile:In Solution Explorer, select the Show All Files toolbar button. The
.envfile appears. Add your Azure Container Registry username and password to your.envfile. These credentials can be found on the Access Keys page of your Azure Container Registry in the Azure portal.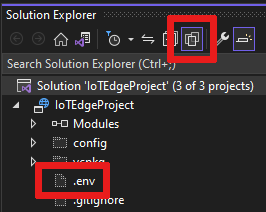
    DEFAULT_RT_IMAGE=1.2
    CONTAINER_REGISTRY_USERNAME_myregistry=<my-registry-name>
    CONTAINER_REGISTRY_PASSWORD_myregistry=<my-registry-password>
Add credentials directly to deployment.debug.template.json
If you'd rather add your credentials directly to your deployment template, replace the placeholders with your ACR admin username, password, and registry name.
      "settings": {
        "minDockerVersion": "v1.25",
        "loggingOptions": "",
        "registryCredentials": {
          "registry1": {
            "username": "<username>",
            "password": "<password>",
            "address": "<registry name>.azurecr.io"
          }
        }
      }
Note
This article uses admin login credentials for Azure Container Registry, which are convenient for development and test scenarios. When you're ready for production scenarios, we recommend a least-privilege authentication option like service principals. For more information, see Manage access to your container registry.
If you're using a local registry, you can run a local registry.
Finally, in the Solution Explorer, right-click the main project folder and select Build and Push IoT Edge Modules to build and push the Docker image for each module. This might take a minute. When you see
Finished Build and Push IoT Edge Modules.in your Output console of Visual Studio, you're done.
Deploy the solution
Now that you've built and pushed your module images to your Azure Container Registry, you can deploy the solution to your IoT Edge device. You already have a deployment manifest template you've been observing throughout this tutorial. Let's generate a deployment manifest from that, then use an Azure CLI command to deploy your modules to your IoT Edge device in Azure.
Right-click on your main project in Visual Studio Solution Explorer and choose Generate Deployment for IoT Edge.

Go to your local Visual Studio main project folder and look in the
configfolder. The file path might look like this:C:\Users\<YOUR-USER-NAME>\source\repos\<YOUR-IOT-EDGE-PROJECT-NAME>\config. Here you find the generated deployment manifest such asdeployment.amd64.debug.json.Check your
deployment.amd64.debug.jsonfile to confirm theedgeHubschema version is set to 1.2."$edgeHub": { "properties.desired": { "schemaVersion": "1.2", "routes": { "IotEdgeModule2022ToIoTHub": "FROM /messages/modules/IotEdgeModule2022/outputs/* INTO $upstream", "sensorToIotEdgeModule2022": "FROM /messages/modules/SimulatedTemperatureSensor/outputs/temperatureOutput INTO BrokeredEndpoint(\"/modules/IotEdgeModule2022/inputs/input1\")", "IotEdgeModule2022bToIoTHub": "FROM /messages/modules/IotEdgeModule2022b/outputs/* INTO $upstream" }, "storeAndForwardConfiguration": { "timeToLiveSecs": 7200 } } }Tip
The deployment template for Visual Studio 2022 requires the 1.2 schema version. If you need it to be 1.1 or 1.0, wait until after the deployment is generated (do not change it in
deployment.debug.template.json). Generating a deployment will create a 1.2 schema by default. However, you can manually changedeployment.amd64.debug.json, the generated manifest, if needed before deploying it to Azure.Important
Once your IoT Edge device is deployed, it currently won't display correctly in the Azure portal with schema version 1.2 (version 1.1 will be fine). This is a known bug and will be fixed soon. However, this won't affect your device, as it's still connected in IoT Hub and can be communicated with at any time using the Azure CLI.

Now let's deploy our manifest with an Azure CLI command. Open the Visual Studio Developer Command Prompt and change to the config directory.
cd configDeploy the manifest for your IoT Edge device to IoT Hub. The command configures the device to use modules developed in your solution. The deployment manifest was created in the previous step and stored in the config folder. From your config folder, execute the following deployment command. Replace the
[device id],[hub name], and[file path]with your values. If the IoT Edge device ID doesn't exist in the IoT Hub, it must be created.az iot edge set-modules --device-id [device id] --hub-name [hub name] --content [file path]For example, your command might look like this:
az iot edge set-modules --device-id my-device-name --hub-name my-iot-hub-name --content deployment.amd64.debug.jsonAfter running the command, you'll see a confirmation of deployment printed in
JSONin your command prompt.
Build module Docker image
Once you've developed your module, you can build the module image to store in a container registry for deployment to your IoT Edge device.
Use the module's Dockerfile to build the module Docker image.
docker build --rm -f "<DockerFilePath>" -t <ImageNameAndTag> "<ContextPath>"
For example, let's assume your command shell is in your project directory and your module name is IotEdgeModule1. To build the image for the local registry or an Azure container registry, use the following commands:
# Build the image for the local registry

docker build --rm -f "./IotEdgeModule1/Dockerfile.amd64.debug" -t localhost:5000/iotedgemodule1:0.0.1-amd64 "./IotEdgeModule1"

# Or build the image for an Azure Container Registry

docker build --rm -f "./IotEdgeModule1/Dockerfile.amd64.debug" -t myacr.azurecr.io/iotedgemodule1:0.0.1-amd64 "./IotEdgeModule1"
Push module Docker image
Push your module image to the local registry or a container registry.
docker push <ImageName>
For example:
# Push the Docker image to the local registry

docker push localhost:5000/iotedgemodule1:0.0.1-amd64

# Or push the Docker image to an Azure Container Registry
az acr login --name myacr
docker push myacr.azurecr.io/iotedgemodule1:0.0.1-amd64
Deploy the module to the IoT Edge device.
In Visual Studio, open deployment.debug.template.json deployment manifest file in the main project. The deployment manifest is a JSON document that describes the modules to be configured on the targeted IoT Edge device. Before deployment, you need to update your Azure Container Registry credentials, your module images, and the proper createOptions values. For more information about createOption values, see How to configure container create options for IoT Edge modules.
If you're using an Azure Container Registry to store your module image, you need to add your credentials to deployment.debug.template.json in the edgeAgent settings. For example,
"modulesContent": {
"$edgeAgent": {
  "properties.desired": {
    "schemaVersion": "1.1",
    "runtime": {
      "type": "docker",
      "settings": {
        "minDockerVersion": "v1.25",
        "loggingOptions": "",
        "registryCredentials": {
          "myacr": {
            "username": "myacr",
            "password": "<your_acr_password>",
            "address": "myacr.azurecr.io"
          }
        }
      }
    },
//...
Replace the image property value with the module image name you pushed to the registry. For example, if you pushed an image tagged
myacr.azurecr.io/iotedgemodule1:0.0.1-amd64for custom module IotEdgeModule1, replace the image property value with the tag value.Add or replace the createOptions value with stringified content for each system and custom module in the deployment template.
For example, the IotEdgeModule1's image and createOptions settings would be similar to the following:
"IotEdgeModule1": {
"version": "1.0.0",
"type": "docker",
"status": "running",
"restartPolicy": "always",
"settings": {
    "image": "myacr.azurecr.io/iotedgemodule1:0.0.1-amd64",
    "createOptions": "{\"HostConfig\":{\"PortBindings\":{\"5671/tcp\":[{\"HostPort\":\"5671\"}],\"8883/tcp\":[{\"HostPort\":\"8883\"}],\"443/tcp\":[{\"HostPort\":\"443\"}]}}}"
}
Use the IoT Edge Azure CLI set-modules command to deploy the modules to the Azure IoT Hub. For example, to deploy the modules defined in the deployment.debug.amd64.json file to IoT Hub my-iot-hub for the IoT Edge device my-device, use the following command:
az iot edge set-modules --hub-name my-iot-hub --device-id my-device --content ./deployment.debug.template.json --login "HostName=my-iot-hub.azure-devices.net;SharedAccessKeyName=iothubowner;SharedAccessKey=<SharedAccessKey>"
Tip
You can find your IoT Hub connection string in the Azure portal under Azure IoT Hub > Security settings > Shared access policies.
Confirm the deployment to your device
To check that your IoT Edge modules were deployed to Azure, sign in to your device (or virtual machine), for example through SSH or Azure Bastion, and run the IoT Edge list command.
iotedge list
You should see a list of your modules running on your device or virtual machine.
   NAME                        STATUS           DESCRIPTION      CONFIG
   SimulatedTemperatureSensor  running          Up a minute      mcr.microsoft.com/azureiotedge-simulated-temperature-sensor:1.0
   edgeAgent                   running          Up a minute      mcr.microsoft.com/azureiotedge-agent:1.2
   edgeHub                     running          Up a minute      mcr.microsoft.com/azureiotedge-hub:1.2
   IotEdgeModule1              running          Up a minute      myacr.azurecr.io/iotedgemodule1:0.0.1-amd64.debug
   myIotEdgeModule2            running          Up a minute      myacr.azurecr.io/myiotedgemodule2:0.0.1-amd64.debug
Debug using Docker Remote SSH
The Docker and Moby engines support SSH connections to containers allowing you to attach and debug code on a remote device using Visual Studio.
Connecting remotely to Docker requires root-level privileges. Follow the steps in Manage docker as a non-root user to allow connection to the Docker daemon on the remote device. When you're finished debugging, you may want to remove your user from the Docker group.
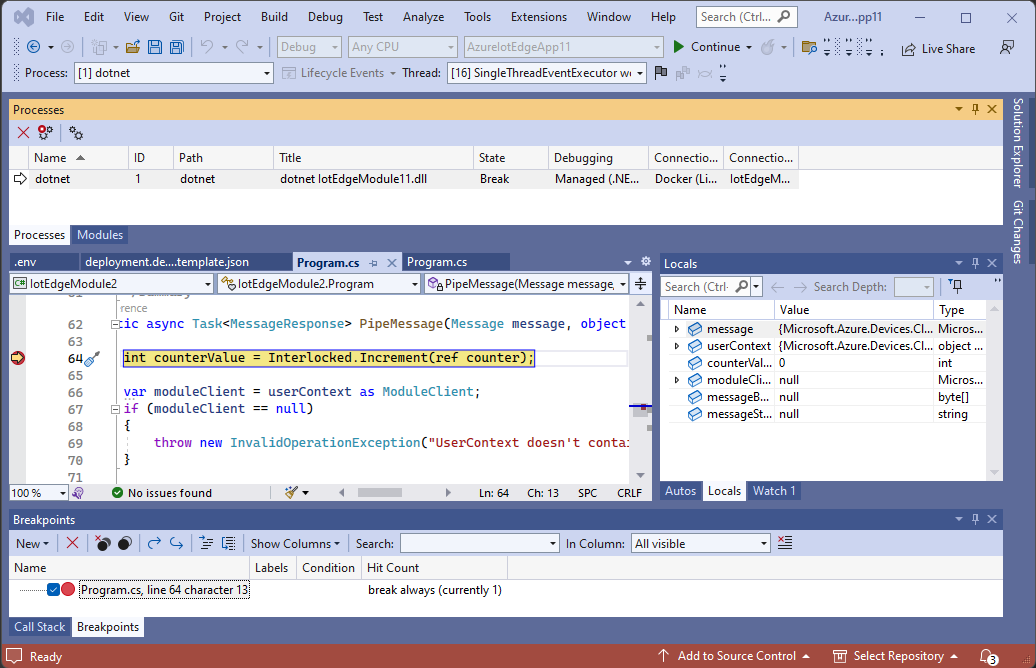
Follow the steps to use Visual Studio to Attach to a process running on a Docker container on your remote device.
In Visual Studio, set breakpoints in your custom module.
When a breakpoint is hit, you can inspect variables, step through code, and debug your module.
Next steps
To develop custom modules for your IoT Edge devices, Understand and use Azure IoT Hub SDKs.
To monitor the device-to-cloud (D2C) messages for a specific IoT Edge device, review the Tutorial: Monitor IoT Edge devices to get started.
