Connect Azure Front Door Premium to an Azure API Management with Private Link
This article guides you through the steps to configure an Azure Front Door Premium to connect privately to your Azure API Management origin using Azure Private Link.
Prerequisites
- An Azure account with an active subscription. Create an account for free.
- Have a functioning Azure Front Door Premium profile and an endpoint. For more information on how to create an Azure Front Door profile, see Create a Front Door.
- Have a functioning Azure API Management instance. For more information on how to create an API Management instance, see Create a new Azure API Management instance
- Private endpoint support for Azure API Management Standard v2 tier is currently in limited preview. If you want to enable an Azure API Management Standard v2 tier instance as a private link enabled origin for Azure Front Door Premium, you must first sign up for the preview via this this form. This step isn't needed if you're using an API Management instance with Developer, Basic, Standard or Premium tier.
Create an origin group and add the API Management instance as an origin
In your Azure Front Door Premium profile, go to Settings and select Origin groups.
Click on Add
Enter a name for the origin group
Select + Add an origin
Use the following table to configure the settings for the origin:
Setting Value Name Enter a name to identify this origin. Origin Type API Management Host name Select the host from the dropdown that you want as an origin. Origin host header Will be autopopulated with the host of the chosen API Management instance HTTP port 80 (default) HTTPS port 443 (default) Priority Assign different priorities to origins for primary, secondary, and backup purposes. Weight 1000 (default). Use weights to distribute traffic among different origins. Region Select the region that matches or is closest to your origin. Target sub resource Choose 'Gateway' Request message Enter a custom message to display while approving the Private Endpoint.

- Select Add to save your origin settings
- Select Add to save the origin group settings.
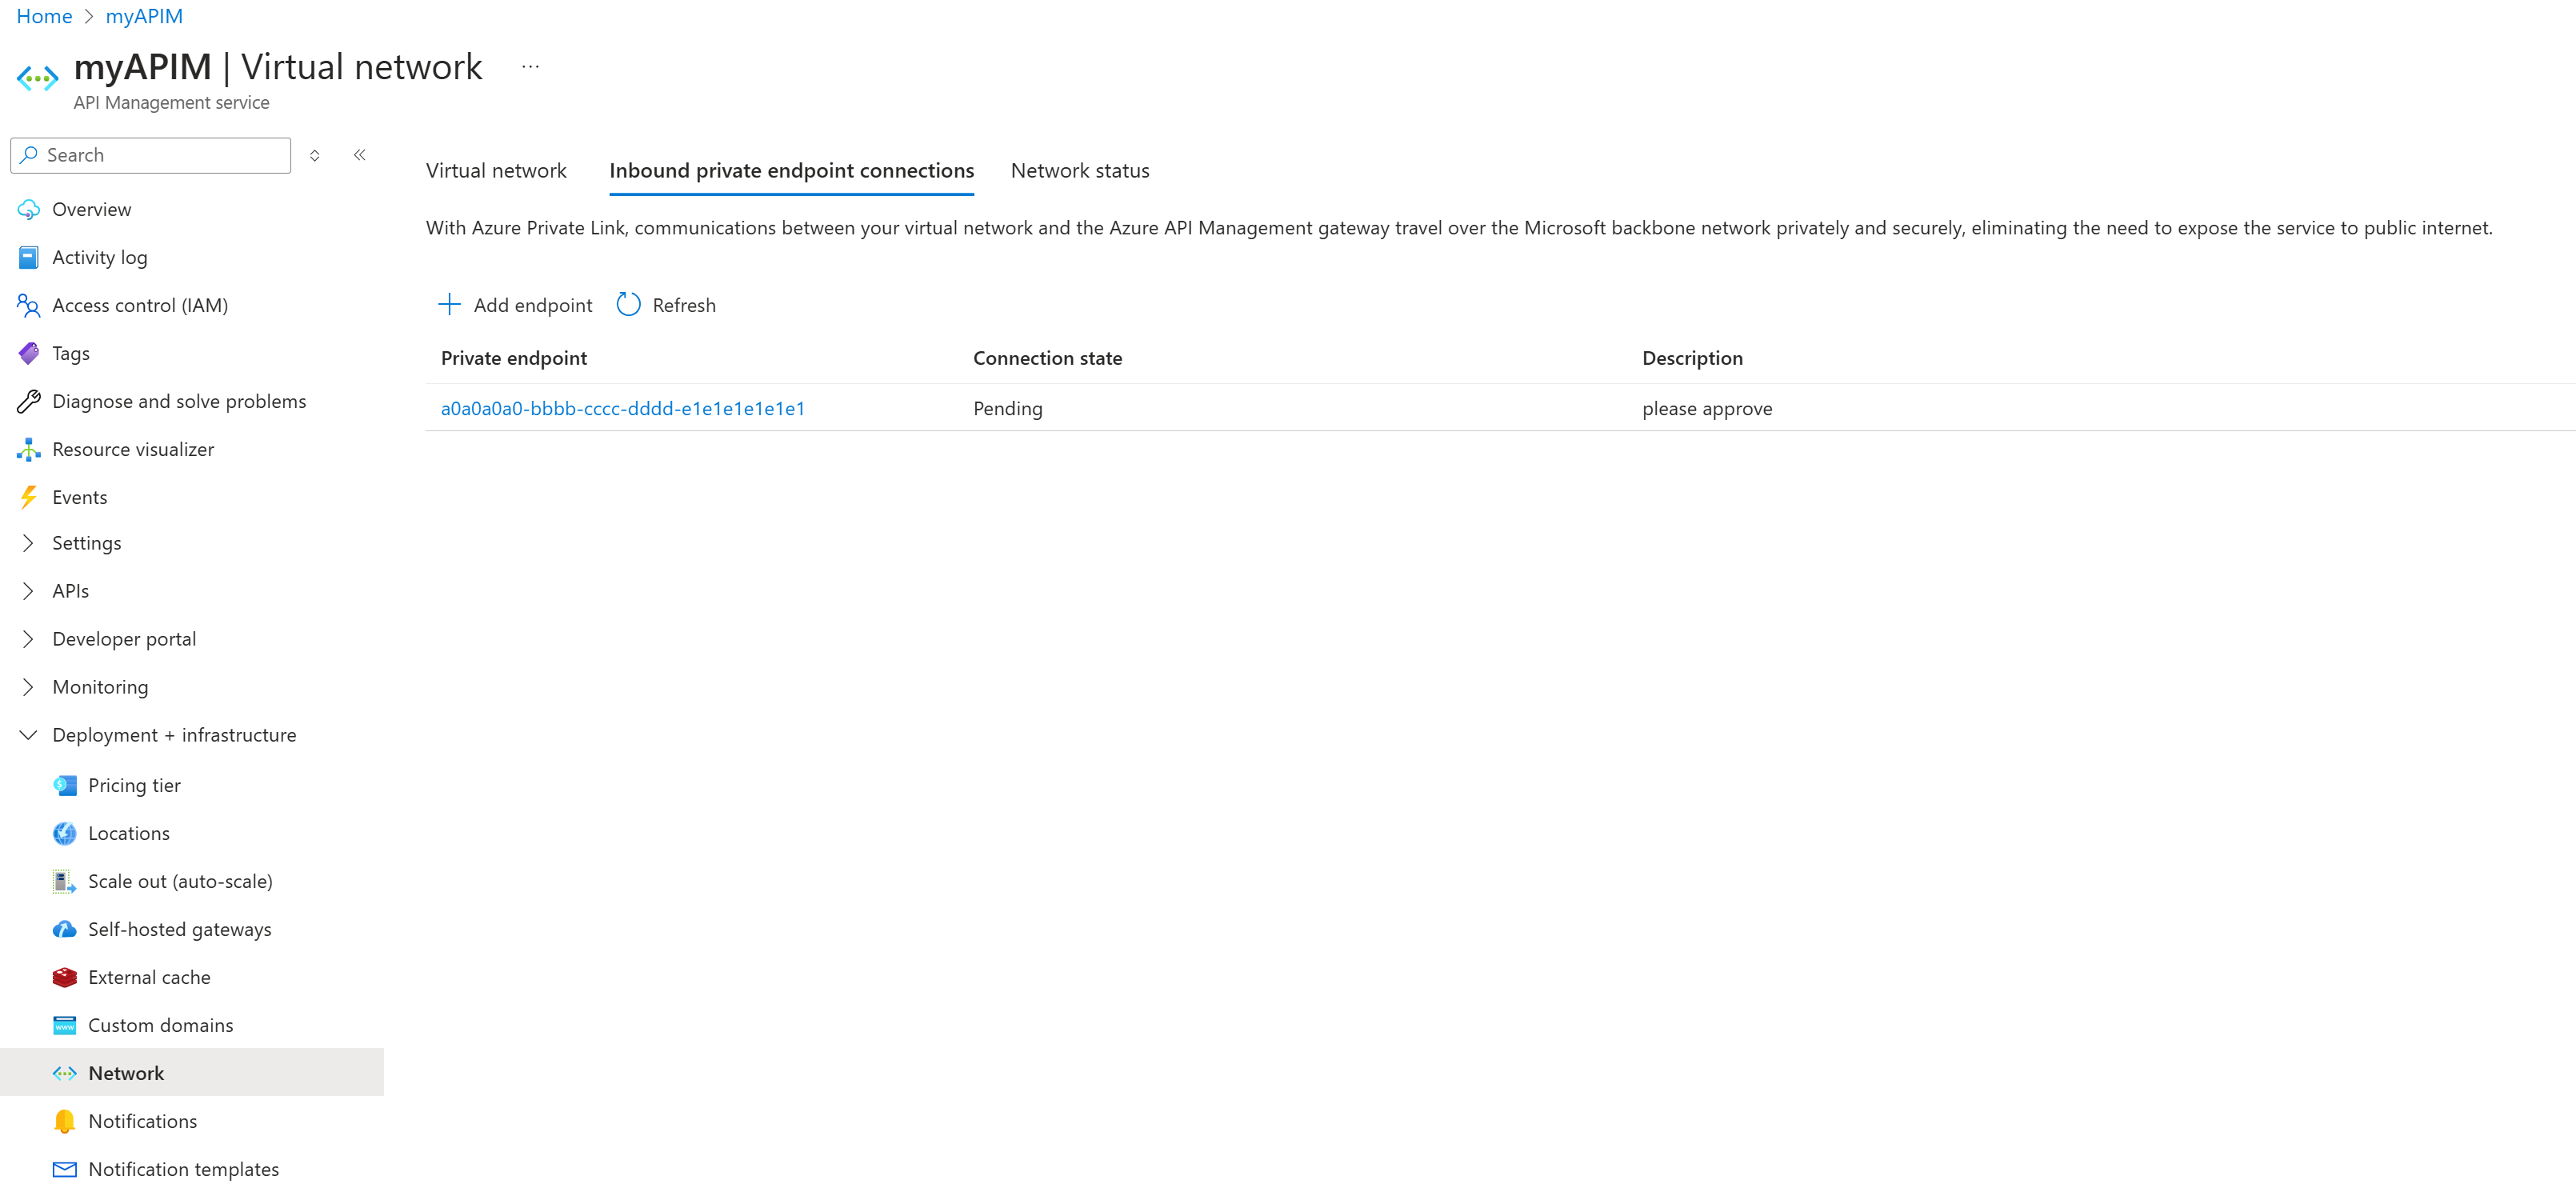
Approve the private endpoint
Navigate to the API Management instance you configured with Private Link in the previous section. Under Deployment + infrastructure, select Network.
Select Inbound private endpoint connections tab.
Find the pending private endpoint request from Azure Front Door Premium and select Approve.
After approval, the connection status will update. It can take a few minutes for the connection to fully establish. Once established, you can access your API Management through Front Door.
Prerequisites
An Azure account with an active subscription. Create an account for free.
Azure PowerShell installed locally or Azure Cloud Shell.
Note
We recommend that you use the Azure Az PowerShell module to interact with Azure. To get started, see Install Azure PowerShell. To learn how to migrate to the Az PowerShell module, see Migrate Azure PowerShell from AzureRM to Az.
Azure Cloud Shell
Azure hosts Azure Cloud Shell, an interactive shell environment that you can use through your browser. You can use either Bash or PowerShell with Cloud Shell to work with Azure services. You can use the Cloud Shell preinstalled commands to run the code in this article, without having to install anything on your local environment.
To start Azure Cloud Shell:
| Option | Example/Link |
|---|---|
| Select Try It in the upper-right corner of a code or command block. Selecting Try It doesn't automatically copy the code or command to Cloud Shell. |  |
| Go to https://shell.azure.com, or select the Launch Cloud Shell button to open Cloud Shell in your browser. |  |
| Select the Cloud Shell button on the menu bar at the upper right in the Azure portal. |  |
To use Azure Cloud Shell:
Start Cloud Shell.
Select the Copy button on a code block (or command block) to copy the code or command.
Paste the code or command into the Cloud Shell session by selecting Ctrl+Shift+V on Windows and Linux, or by selecting Cmd+Shift+V on macOS.
Select Enter to run the code or command.
Have a functioning Azure API Management instance. For more information on how to create an API Management instance, see Create a new Azure API Management instance by using PowerShell
Have a functioning Azure Front Door Premium profile and an endpoint. For more information on how to create an Azure Front Door profile, see Create a Front Door - PowerShell
Private endpoint support for Azure API Management Standard v2 tier is currently in limited preview. If you want to enable an Azure API Management Standard v2 tier instance as a private link enabled origin for Azure Front Door Premium, you must first sign up for the preview via this this form. This step isn't needed if you're using an API Management instance with Developer, Basic, Standard or Premium tier.
Create an origin group and add the API Management instance as an origin
Use New-AzFrontDoorCdnOriginGroupHealthProbeSettingObject to create an in-memory object for storing the health probe settings.
$healthProbeSetting = New-AzFrontDoorCdnOriginGroupHealthProbeSettingObject `
    -ProbeIntervalInSecond 60 `
    -ProbePath "/" `
    -ProbeRequestType GET `
    -ProbeProtocol Http
Use New-AzFrontDoorCdnOriginGroupLoadBalancingSettingObject to create an in-memory object for storing load balancing settings.
$loadBalancingSetting = New-AzFrontDoorCdnOriginGroupLoadBalancingSettingObject `
    -AdditionalLatencyInMillisecond 50 `
    -SampleSize 4 `
    -SuccessfulSamplesRequired 3
Run New-AzFrontDoorCdnOriginGroup to create an origin group that contains your API Management instance.
$origingroup = New-AzFrontDoorCdnOriginGroup `
    -OriginGroupName myOriginGroup `
    -ProfileName myFrontDoorProfile `
    -ResourceGroupName myResourceGroup `
    -HealthProbeSetting $healthProbeSetting `
    -LoadBalancingSetting $loadBalancingSetting
Use the New-AzFrontDoorCdnOrigin command to add your API Management instance to the origin group.
New-AzFrontDoorCdnOrigin `
    -OriginGroupName myOriginGroup `
    -OriginName myAPIMOrigin `
    -ProfileName myFrontDoorProfile `
    -ResourceGroupName myResourceGroup `
    -HostName myapim.azure-api.net `
    -HttpPort 80 `
    -HttpsPort 443 `
    -OriginHostHeader myapim.azure-api.net `
    -Priority 1 `
    -PrivateLinkId /subscriptions/aaaa0a0a-bb1b-cc2c-dd3d-eeeeee4e4e4e/resourceGroups/myResourceGroup/providers/Microsoft.ApiManagement/service/myAPIM `
    -SharedPrivateLinkResourceGroupId Gateway `
    -SharedPrivateLinkResourcePrivateLinkLocation CentralUS `
    -SharedPrivateLinkResourceRequestMessage 'Azure Front Door private connectivity request' `
    -Weight 1000 `
Approve the private endpoint
Run Get-AzPrivateEndpointConnection to retrieve the connection name of the private endpoint connection that needs approval.
$PrivateEndpoint = Get-AzPrivateEndpointConnection -ResourceGroupName myResourceGroup -ServiceName myAPIM -PrivateLinkResourceType Microsoft.ApiManagement/serviceRun Approve-AzPrivateEndpointConnection to approve the private endpoint connection details. Use the Name value from the output in the previous step for approving the connection.
Get-AzPrivateEndpointConnection -Name $PrivateEndpoint.Name -ResourceGroupName myResourceGroup -ServiceName myAPIM -PrivateLinkResourceType Microsoft.ApiManagement/service
Complete Azure Front Door setup
Use the New-AzFrontDoorCdnRoute command to create a route that maps your endpoint to the origin group. This route forwards requests from the endpoint to your origin group.
# Create a route to map the endpoint to the origin group

$Route = New-AzFrontDoorCdnRoute `
    -EndpointName myFrontDoorEndpoint `
    -Name myRoute `
    -ProfileName myFrontDoorProfile `
    -ResourceGroupName myResourceGroup `
    -ForwardingProtocol MatchRequest `
    -HttpsRedirect Enabled `
    -LinkToDefaultDomain Enabled `
    -OriginGroupId $origingroup.Id `
    -SupportedProtocol Http,Https
Your Azure Front Door profile is now fully functional after completing the final step.
Prerequisites
Use the Bash environment in Azure Cloud Shell. For more information, see Get started with Azure Cloud Shell.

If you prefer to run CLI reference commands locally, install the Azure CLI. If you're running on Windows or macOS, consider running Azure CLI in a Docker container. For more information, see How to run the Azure CLI in a Docker container.
If you're using a local installation, sign in to the Azure CLI by using the az login command. To finish the authentication process, follow the steps displayed in your terminal. For other sign-in options, see Authenticate to Azure using Azure CLI.
When you're prompted, install the Azure CLI extension on first use. For more information about extensions, see Use and manage extensions with the Azure CLI.
Run az version to find the version and dependent libraries that are installed. To upgrade to the latest version, run az upgrade.
An Azure account with an active subscription. Create an account for free.
A functioning Azure Front Door Premium profile and endpoint. See Create a Front Door - CLI.
A functioning Azure API Management instance. See Create a new Azure API Management instance by using the Azure CLI
Private endpoint support for Azure API Management Standard v2 tier is currently in limited preview. If you want to enable an Azure API Management Standard v2 tier instance as a private link enabled origin for Azure Front Door Premium, you must first sign up for the preview via this this form. This step isn't needed if you're using an API Management instance with Developer, Basic, Standard or Premium tier.
Create an origin group and add the API Management instance as an origin
Run az afd origin-group create to create an origin group.
az afd origin-group create \
    --resource-group myResourceGroup \
    --origin-group-name myOriginGroup \
    --profile-name myFrontDoorProfile \
    --probe-request-type GET \
    --probe-protocol Http \
    --probe-interval-in-seconds 60 \
    --probe-path / \
    --sample-size 4 \
    --successful-samples-required 3 \
    --additional-latency-in-milliseconds 50
Run az afd origin create to add the API Management instance as an origin to the origin group.
az afd origin create \
    --enabled-state Enabled \
    --resource-group myResourceGroup \
    --origin-group-name myOriginGroup \
    --origin-name myAPIMOrigin \
    --profile-name myFrontDoorProfile \
    --host-name myapim.azure-api.net \
    --origin-host-header myapim.azure-api.net \
    --http-port 80  \
    --https-port 443 \
    --priority 1 \
    --weight 500 \
    --enable-private-link true \
    --private-link-location centralus \
    --private-link-request-message 'Azure Front Door private connectivity request.' \
    --private-link-resource /subscriptions/aaaa0a0a-bb1b-cc2c-dd3d-eeeeee4e4e4e/resourceGroups/myResourceGroup/providers/Microsoft.ApiManagement/service/myAPIM \
    --private-link-sub-resource-type Gateway
Approve the private endpoint connection
Run az network private-endpoint-connection list to get the name of the private endpoint connection that needs approval.
az network private-endpoint-connection list --name myAPIM --resource-group myResourceGroup --type Microsoft.ApiManagement/serviceRun az network private-endpoint-connection approve to approve the private endpoint connection using the name from the previous step.
az network private-endpoint-connection approve --id /subscriptions/aaaa0a0a-bb1b-cc2c-dd3d-eeeeee4e4e4e/resourceGroups/myResourceGroup/providers/Microsoft.ApiManagement/service/myAPIM/privateEndpointConnections/aaaaaaaa-0000-1111-2222-bbbbbbbbbbbb
Complete Azure Front Door setup
Run az afd route create to create a route that maps your endpoint to the origin group. This route forwards requests from the endpoint to your origin group.
az afd route create \
    --resource-group myResourceGroup \
    --profile-name myFrontDoorProfile \
    --endpoint-name myFrontDoorEndpoint \
    --forwarding-protocol MatchRequest \
    --route-name myRoute \
    --https-redirect Enabled \
    --origin-group myOriginGroup \
    --supported-protocols Http Https \
    --link-to-default-domain Enabled
Your Azure Front Door profile is now fully functional after completing the final step.
Next steps
Learn about Private Link service with storage account.